
Popular categories
Looking for a yarn?


Comments / Questions (51)
![]() Monica De Leeuw wrote:
Monica De Leeuw wrote:
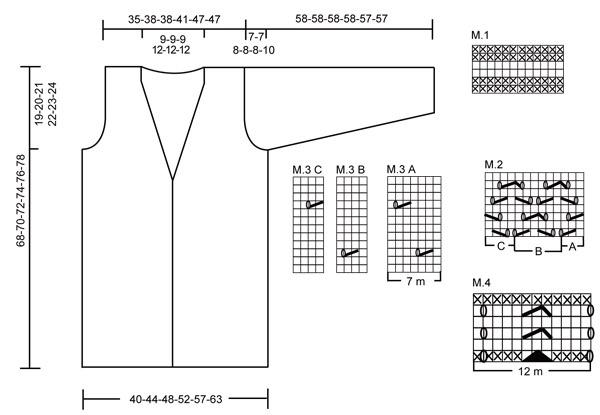
In welke steek wordt de voorbies gebreid?
05.06.2025 - 16:25DROPS Design answered:
Dag Monica,
Wanneer de voorpanden worden gebreid, worden de 3 voorbiessteken in ribbelsteek gebreid. De bies die op het einde wordt gemaakt (nadat steken voor de bies zijn opgenomen langs het voorpand) wordt in telpatroon M.4 gebreid.
08.06.2025 - 20:48
![]() Sylfil wrote:
Sylfil wrote:
Bonjour, selon l'échantillon, pour la taille L, les 145 mailles du dos font 60 cm et non 48 cm comme indiqué sur le schéma. Est-ce exact ? Merci !
17.03.2025 - 16:51DROPS Design answered:
Bonjour Sylfil, notez qu'en taille L, on monte bien 145 mailles pour tricoter les côtes, mais après les côtes, on va diminuer pour qu'il ne reste que 117 mailles pour le point fantaisie (il faut davantage de mailles pour les côtes que pour le point fantaisie , raison pour laquelle on doit ensuite diminuer), et ainsi ces 117 mailles doivent bien mesurer environ 48 cm de large (sans les 2 m lis pour les coutures) sur la base de 24 mailles = 10 cm. Bon tricot!
18.03.2025 - 09:48
![]() Sylfil wrote:
Sylfil wrote:
Bonjour, je souhaiterais tricoter dos et devants ensembles jusqu'aux emmanchures pour éviter la couture des côtés. Qu'en pensez-vous ? Cordialement
04.03.2025 - 10:43DROPS Design answered:
Bonjour, c'est possible. Bon travail!
04.03.2025 - 11:07
![]() Susan Stainsby wrote:
Susan Stainsby wrote:
Can you tell me what uk size, the small is. I am knitting 106-10 and the small seems to be 40cm each side which looks a bit small for me, my uk dress size is 8 - 10. Thank you
26.01.2025 - 18:36DROPS Design answered:
Dear Susan, since the actual measurements for S-M-L-XL-XXL-XXXL sizes can variate from country to country, and they also vary depending on the pattern fit we desire, we use size charts to indicate the final measurements of the garment for each size. You can then compare the measurements to your usual size and check if you need to work a different size than usual. You can check how to read the size chart here. Happy knitting!
26.01.2025 - 19:12
![]() Kari Hofstad wrote:
Kari Hofstad wrote:
Hei, er det mulig å legge til et bilde som viser modellen bakfra også? Lettere å få et inntrykk av det ferdige produktet.
30.01.2024 - 11:16DROPS Design answered:
Hej Kari, det har vi desværre ikke, men det ser samme mønster på bagstykket som på forstykket :)
31.01.2024 - 10:54
![]() Kristin Liabø wrote:
Kristin Liabø wrote:
Hei. etter vrangbord skal man felle til man har 117m (str L), men så skal man pånytt redusere til 117m etter å ha strikket perlestrikk og M1 x2?? men man øker jo ikke antall masker imellom?? så hvordan kan det ha seg at man skal justere to ganger til 117m??
11.08.2023 - 20:02DROPS Design answered:
Hej Kristin, man er nødt til at justere i nogle af størrelserne. Men hvis du ikke behøver det i din størrelse, så fortsætter du bare med de 117 masker :)
16.08.2023 - 11:12
![]() Busata Yvette wrote:
Busata Yvette wrote:
Je ne comprend pas le schéma M2 au 3eme rang il est indiqué (glisser une maille 2 maille ensembles la maille glissée par dessus mais il n'y a que 1jeté ,alors que nous supprimons deux mailles) merci à l'avance Mme busata
24.04.2023 - 15:39DROPS Design answered:
Bonjour Mme Busata, au 3ème rang de M.2 (B) ainsi qu'à l'avant dernier rang des diagrammes M.2 vous encadrez cette diminution par 1 jeté, autrement dit, tricotez: 1 jeté, glissez 1 m à l'end, tricotez les 2 m suivantes ensemble à l'endroit, passez la maille glissée par-dessus les 2 mailles tricotées ensemble, faites 1 jeté. On a ainsi bien 2 diminutions et 2 jetés. Bon tricot!
24.04.2023 - 16:30
![]() Geuens wrote:
Geuens wrote:
Bonjour combien de pelotes faut-il prévoir pour ce modèles svp merci
02.09.2022 - 13:39DROPS Design answered:
Bonjour Mme Geuens, vous trouverez la quantité nécessaire pour chaque taille dans l'en-tête, autrement dit, il faut en taille S par ex. 400 g DROPS Alpaca/50 g la pelote = 8 pelotes en taille S. Bon tricot!
02.09.2022 - 15:21
![]() Cindy wrote:
Cindy wrote:
Hey een vraagje ik ben net gestart en moet.nu gerstekorrel doen tot 12 cm. Is het dan 12 cm enkel gerstekorrel of gemeten van boven boord of volledig gemeten? Vriendelijke groetjes Cindy
15.05.2022 - 15:15DROPS Design answered:
Dag Cindy,
De 12 cm is de totale hoogte, dus gemeten vanaf de opzet.
16.05.2022 - 16:28
![]() Yannick wrote:
Yannick wrote:
Si pour le devant gauche à 12cm je dois faire M2A + M2B + M2C, est-ce que pour le devant droit je dois garder M2A, M2B et M2C ou faire M2C + M2B + M2A. Merci pour votre réponse,
19.04.2022 - 10:03DROPS Design answered:
Bonjour Yannick, tricotez les diagrammes dans le même ordre: M.2A, répétez M.2B et terminez par M.2C. Bon tricot!
19.04.2022 - 11:59
|
||||||||||||||||||||||
DROPS 106-10 |
||||||||||||||||||||||
|
|
||||||||||||||||||||||
DROPS jacket in “Alpaca” with stripes in textured patterns. Size S – XXXL
DROPS 106-10 |
||||||||||||||||||||||
|
Pattern: See Diagram M.1 to M.4. The diagram shows the pattern from the right side. Moss st, (back piece): first row: *K1, P1*, repeat from *-* and finish with K1. Second row: P over K and K over P. Repeat second row. Moss st, (front piece and sleeve): first row: *P1, K1*, repeat from *-*. Second row: K over P and P over K. Repeat second row. Decreasing tip: Dec inside 3 front band sts towards mid front. Make all dec from RS! Even if you cannot fit in a full pattern repeat after a dec, continue in pattern to the 3 front band sts, but be careful not to make more YO than dec on row. Dec as follows before 3 front band sts: K2 tog Dec as follows after 3 front band sts: K2 tog into back of st. Garter st, back and forth on needle): K all rows. Back piece: Worked back and forth on needle. Cast on 121-133-145-157-173-193 sts (includes 1 edge st each side) on needle size 3 mm. K 1 row from RS and P 1 row from WS. Continue in Rib as follows from RS: 1 edge st, *P3, K1*, repeat from *-* and finish with P3 and 1 edge st. Remember the knitting tension! When piece measures 6 cm K 1 row from RS, at the same time dec 22-26-28-30-34-40 sts evenly = 99-107-117-127-139-153 sts. P 1 row from WS and now continue in M.1. After 1 vertical repeat of M.1, K 1 row from RS and P 1 row from WS. Continue in moss st – see above – with 1 edge st each side. When piece measures 12 cm K 1 row from RS, and P 1 row from WS. Continue in M.1. After 1 vertical repeat of M.1, K 1 row from RS, at the same time adjust number of sts to 99-105-117-123-135-153 sts. P 1 row from WS and continue as follows: 1 edge st, M.2A (= 3 sts), M.2B (= 6 sts) repeated on the next 90-96-108-114-126-144 sts, M.2C (= 4 sts) and 1 edge st. Continue like this until piece measures 22 cm (adjust to a full vertical repeat). K 1 row from RS, and P 1 row from WS. Continue in M.1. After 1 vertical repeat of M.1, K 1 row from RS, at the same time adjust number of sts to 97-104-118-125-132-153 sts. P 1 row from WS and continue as follows: 1 edge st, M.3A (= 7 sts) repeated on the next 91-98-112-119-126-147 sts, M.3B (= 4 sts) and 1 edge st. When piece measures 33 cm cm K 1 row from RS, and P 1 row from WS. Continue in M.1. After 1 vertical repeat of M.1, K 1 row from RS, at the same time adjust number of sts to 97-105-117-125-133-153 sts. P 1 row from WS and continue in moss st with 1 edge st each side. When piece measures 42-43-41-42-41-42 cm K 1 row from RS, and P 1 row from WS. Continue in M.1. After 1 vertical repeat of M.1, K 1 row from RS, at the same time adjust number of sts to 99-105-117-123-135-153 sts. P 1 row from WS and continue as follows: 1 edge st, M.2A (= 3 sts), M.2B (= 6 sts) repeated on the next 90-96-108-114-126-144 sts, M.2C (= 4 sts) and 1 edge st. Work 2-2-3-3-4-4 vertical repeats of M.2. Piece now measures approx 49-50-51-52-53-54 cm. K 1 row from RS, at the same time cast off 4 sts at beg of row for armhole, work row and at the same time Size S: dec 1 st mid row Size M + L + XL + XXL + XXXL: inc 6-2-3-1-1 sts evenly = 94-107-115-122-132-150 sts. P 1 row from WS, at the same time cast off 4 sts for armhole at beg of row = 90-103-111-118-128-146 sts. Continue in M.1, at the same time dec to shape the armhole each side on every other row: 2 sts 1-2-4-4-3-8 times and 1 st 1-2-2-2-2-1 times. After 1 vertical repeat of M.1, K 1 row from RS and P 1 row from WS. There are now 84-91-95-102-114-130 sts on row. Now continue in M.3A (= 7 sts) repeated across the row with 0-0-2-2-1-9 stocking sts each side (for size L + XL + XXL + XXXL continue to dec for armhole, i.e number of stocking sts each side dec). When all dec are complete there are 84-91-91-98-112-112 sts on row. When piece measures 65-67-69-71-73-75 cm work garter st on the middle 28-27-27-34-34-34 sts, work remaining sts as before. When piece measures 66-68-70-72-74-76 cm cast off the middle 22-21-21-28-28-28 sts for neck = 31-35-35-35-42-42 sts left on each shoulder. Continue in pattern with 3 garter sts towards neckline until piece measures 68-70-72-74-76-78 cm. Cast off loosely. Left front piece: Cast on 57-65-73-77-85-93 sts (includes 1 edge st at side and 3 front band sts towards mid front) on needle size 3 mm. Work the 3 front band sts in garter st – see above - until finished measurements. K 1 row from RS and P 1 row from WS. Continue in Rib as follows from RS: 1 edge st, *K1, P3*, repeat from *-* and finish with K1 and 3 front band sts. When piece measures 6 cm K 1 row from RS, at the same time dec 11-15-17-17-19-21 sts evenly = 46-50-56-60-66-72 sts. P 1 row from WS and now continue in M.1. After 1 vertical repeat of M.1, K 1 row from RS and P 1 row from WS. Continue in moss st – see above – with 1 edge st at side and 3 front band sts towards mid front. When piece measures 12 cm K 1 row from RS, and P 1 row from WS. Continue in M.1. After 1 vertical repeat of M.1, K 1 row from RS, at the same time adjust number of sts to 47-53-59-59-65-71 sts. P 1 row from WS and continue as follows: 1 edge st, M.2A (= 3 sts), M.2B (= 6 sts) repeated on the next 36-42-48-48-54-60 sts, M.2C (= 4 sts) and 3 front band sts. Continue like this until piece measures approx 22 cm (adjust to a full vertical repeat). K 1 row from RS, and P 1 row from WS. Continue in M.1. After 1 vertical repeat of M.1, K 1 row from RS, at the same time adjust number of sts to 50-50-57-57-64-71 sts. P 1 row from WS and continue as follows: 1 edge st, M.3C (= 4 sts), M.3A (= 7 sts) repeated on the next 42-42-49-49-56-63 sts and 3 front band sts. When piece measures 33 cm cm K 1 row from RS, and P 1 row from WS. Continue in M.1. After 1 vertical repeat of M.1, K 1 row from RS, at the same time adjust number of sts to 44-46-52-54-60-68 sts. P 1 row from WS and continue in moss st with 1 edge st at side and 3 front band sts towards mid front. When piece measures 42-43-41-42-41-42 cm K 1 row from RS, and P 1 row from WS. Continue in M.1. After 1 vertical repeat of M.1, K 1 row from RS, at the same time adjust number of sts to 47-53-59-59-65-71 sts. P 1 row from WS and continue as follows: 1 edge st, M.2A (= 3 sts), M.2B (= 6 sts) repeated on the next 36-42-48-48-54-60 sts, M.2C (= 4 sts) and 3 front band sts. At the same time after 2 rows of M.2 dec to shape the neckline – see Decreasing tip – as follows: 1 st on every 8th row a total of 0-3-3-3-3-4 times and 1 st on every 6th row a total of 9-5-7-7-8-4 times. After 2-2-3-3-4-4 vertical repeats of M.2, K 1 row from RS, at the same time cast off 4 sts at side for armhole. NB! Continue dec for neckline. P 1 row from WS. Continue in M.1, at the same time dec to shape the armhole as described for back piece. After 1 vertical repeat of M.1, K 1 row from RS and P 1 row from WS. Now continue in M.3A (= 7 sts) repeated across the row with 0-0-2-2-1-9 stocking sts at side and 3 front band sts towards mid front. When all dec are complete there are 31-35-35-35-42-42 sts on shoulder. Continue until piece measures 68-70-72-74-76-78 cm. Cast off loosely. Right front piece: Cast on and work like left front piece, but mirrored. Sleeve: Worked back and forth onn needle. Cast on 70-70-74-74-78-82 sts (includes 1 edge st each side) on needle size 3 mm. K 1 row from RS and P 1 row from WS. Continue in Rib as follows from RS: 1 edge st, *K1, P3*, repeat from *-* and finish with 1 edge st. When piece measures 5 cm K 1 row from RS, at the same time dec 14 sts evenly = 56-56-60-60-64-68 sts. P 1 row from WS and now continue in M.1. After 1 vertical repeat of M.1, K 1 row from RS, at the same time inc 2 sts evenly = 58-58-62-62-66-70 sts. P 1 row from WS and continue in moss st – see above – with 1 edge st each side. When piece measures 10 cm K 1 row from RS, at the same time inc 2-2-4-4-4-6 sts evenly = 60-60-66-66-70-76 sts. P 1 row from WS. Continue in M.1. After 1 vertical repeat of M.1, K 1 row from RS, at the same time inc 3-3-3-3-5-5 sts evenly = 63-63-69-69-75-81 sts. P 1 row from WS and continue as follows: 1 edge st, M.2A (= 3 sts), M.2B (= 6 sts) repeated on the next 54-54-60-60-66-72 sts, M.2C (= 4 sts) and 1 edge st. Continue like this until piece measures approx 21 cm (adjust to a full vertical repeat). K 1 row from RS, at the same time inc 2-2-2-5-2-2 sts evenly = 65-65-71-74-77-83 sts. P 1 row from WS. Continue in M.1. After 1 vertical repeat of M.1, K 1 row from RS, at the same time inc 0-0-1-5-2-3 sts evenly = 65-65-72-79-79-86 sts. P 1 row from WS and continue as follows: 1 edge st, M.3A (= 7 sts) repeated across the row and 1 edge st. When piece measures approx 30 cm cm K 1 row from RS, at the same time inc 1-3-4-3-5-4 sts evenly = 66-68-76-82-84-90 sts. P 1 row from WS. Continue in M.1. After 1 vertical repeat of M.1, K 1 row from RS, at the same time inc 2-4-2-2-2-4 sts evenly = 68-72-78-84-86-94 sts. P 1 row from WS and continue in moss st with 1 edge st each side. When piece measures approx 40-40-39-39-38-36 cm K 1 row from RS, at the same time inc 4-4-4-5-6-4 sts evenly = 72-76-82-89-92-98 sts. P 1 row from WS. Continue in M.1. After 1 vertical repeat of M.1, K 1 row from RS, at the same time inc 3-5-5-4-7-7 sts evenly = 75-81-87-93-99-105 sts. P 1 row from WS and continue as follows: 1 edge st, M.2A, M.2B repeated on the next 66-72-78-84-90-96 sts, M.2C and 1 edge st. When piece measures approx 47-47-46-46-45-43 cm K 1 row from RS, at the same time inc 2-2-3-3-4-4 sts evenly = 77-83-90-96-103-109 sts. P 1 row from WS and now continue in M.1. After 1 vertical repeat of M.1, K 1 row from RS, at the same time inc 2-3-3-4-4-5 sts evenly = 79-86-93-100-107-114 sts. P 1 row from WS and continue as follows: 1 edge st, M.3A repeated across the row and 1 edge st. At the same time when piece measures 51-51-50-50-49-47 cm (less for the larger sizes because of longer sleeve cap and wider shoulder) cast off 4 sts each side and dec to shape the sleeve cap each side on every other row: 3 sts 2-3-3-4-4-4 times, 1 st 5-3-5-4-3-6 times and then 3 sts each side until piece measures 57-57-57-57-56-56 cm. Now cast off 4 sts each side and cast off remaining sts on next row. Piece measures approx 58-58-58-58-57-57 cm. Assembly: Sew shoulder seams. Front bands: Pick up 180 to 210 sts on needle size 3 mm on left front piece from mid back towards bottom edge (pick up in the outermost front band st on body piece). K 1 row from WS, at the same time adjust number of sts to 219-231-231-243-243-255 (includes 1 edge st mid back and 2 edge sts at bottom edge). Continue as follows from RS: 1 edge st, M.4 on the next 216-228-228-240-240-252 sts, K1 and 1 garter st. Work 6 vertical repeats of M.4, now work first row in M.4, at the same time cast off loosely. Repeat along right front band, but pick up sts from bottom edge towards mid back. Assembly: Sew front bands tog mid back inside 1 edge st. Set in sleeves. Sew sleeve and side seams inside 1 edge st. Sew buttons on left front piece, just before the 3 front band sts on body piece. Place the top button approx 2 cm from dec for neckline and the bottom one approx 24 cm from casting on row. Place the remaining buttons evenly in between. Use the holes (YO) in M.4 on right front piece as buttonholes. |
||||||||||||||||||||||
Diagram explanations |
||||||||||||||||||||||
|
||||||||||||||||||||||
 |
||||||||||||||||||||||
Have you finished this pattern?Tag your pictures with #dropspattern or submit them to the #dropsfan gallery. Do you need help with this pattern?You'll find 21 tutorial videos, a Comments/Questions area and more by visiting the pattern on garnstudio.com. © 1982-2026 DROPS Design A/S. We reserve all rights. This document, including all its sub-sections, has copyrights. Read more about what you can do with our patterns at the bottom of each pattern on our site. |
||||||||||||||||||||||


With over 40 years in knitting and crochet design, DROPS Design offers one of the most extensive collections of free patterns on the internet - translated to 17 languages. As of today we count 324 catalogues and 12290 patterns translated into English (UK/cm). 12290
We work hard to bring you the best knitting and crochet have to offer, inspiration and advice as well as great quality yarns at incredible prices! Would you like to use our patterns for other than personal use? You can read what you are allowed to do in the Copyright text at the bottom of all our patterns. Happy crafting!
Post a comment to pattern DROPS 106-10
We would love to hear what you have to say about this pattern!
If you want to leave a question, please make sure you select the correct category in the form below, to speed up the answering process. Required fields are marked *.