
Popular categories
Looking for a yarn?


Comments / Questions (11)
![]() Nadia wrote:
Nadia wrote:
Pour ce modèle je ne comprends pas pour l'assemblage, "commencer en bas milieu du dos"
12.02.2015 - 16:19DROPS Design answered:
Bonjour Nadia, on commence à relever les mailles de la bordure à partir du milieu du rang de montage du dos: le long du bas du dos (sur la 1ère moitié), puis le long du devant jusqu'au milieu de l'encolure dos et on tricote la bordure. Quand celle-ci est faite, on relève les mailles de l'autre côté en commençant le long de l'encolure dos, puis le long du devant et on termine par le bas du dos jusqu'au début de la 1ère bordure. Bon tricot!
12.02.2015 - 17:38
![]() Nadia wrote:
Nadia wrote:
Autre question les 3x3 m sont elles sur le même rang. Merci
02.02.2015 - 21:04DROPS Design answered:
À la fin du 1er rang sur l'envers, vous montez 1 fois 3 m, vous tricotez 1 rang sur l'endroit, puis, à la fin du rang suivant sur l'envers, vous montez de nouveau 3 m, et ainsi de suite jusqu'à ce que toutes les augmentations aient été faites côté milieu devant (soit encore 1 fois 3 m puis 4 fois 2 m et 4 fois 1 m). Bon tricot!
03.02.2015 - 09:34
![]() Jacqueline wrote:
Jacqueline wrote:
Il y a quelque chose que je ne comprends pas dans l'explication des manches. Faut-il diminuer 2 fois 3 mailles puis 1 fois 2 mailles et aller jusqu'à 56 cm ou doit-on diminuer 2 mailles tous les 2 rangs jusqu'a 56 cm.Merci de m'aider.
29.06.2014 - 17:14DROPS Design answered:
Bonjour Jacqueline, on rabat pour les manches de chaque côté tous les 2 rangs (= tous les rangs au début de chaque rang, de chaque côté) : 2 x 3 m, puis 2 m au début de chaque rang de chaque côté (= tous les 2 rangs) jusqu'à ce que la manche mesure 55 cm de hauteur totale, puis 1 x3 m de chaque côté et on rabat les mailles restantes. Bon tricot!
30.06.2014 - 09:01
![]() Ulla Møller wrote:
Ulla Møller wrote:
De buede kanter er stadig elegante og fint, der er knapper i og stor varm krave.
14.08.2006 - 22:04Mie wrote:
Har strikket nok af den slags- i 80erne. Den gør intet godt for figuren.
22.07.2006 - 22:23Betty Thomassen wrote:
Ikke heldig. Jeg syntes vi har set rigeligt med de buede kanter.
14.07.2006 - 17:27
![]() Nettan wrote:
Nettan wrote:
Tråkig, "säckig" tröja med dålig passform. Bör inte komma med i katalogen tycker jag!
10.07.2006 - 16:52
![]() Birte-Marie wrote:
Birte-Marie wrote:
Kan undværes.Lidt kedelig.
26.06.2006 - 21:54connie wrote:
kedelig
09.06.2006 - 21:34
![]() Ulla-Karin Olsson wrote:
Ulla-Karin Olsson wrote:
härli varm tröja att "drunkna" i.
04.06.2006 - 15:24
|
|
DROPS 97-10 |
|
|
|
|
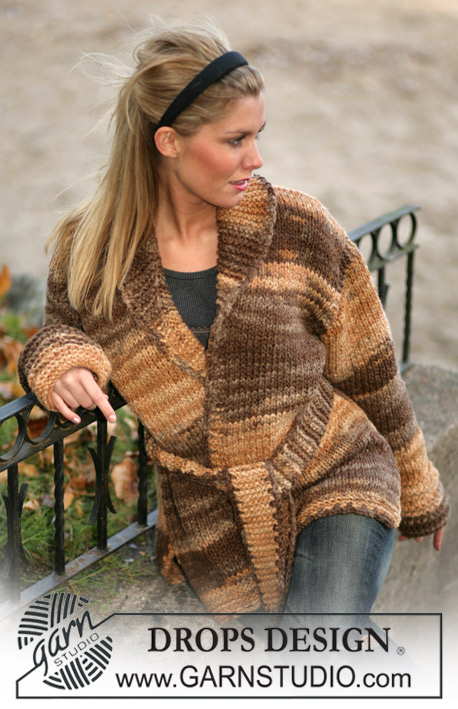
DROPS Loosely knitted cardigan with curved edges in Alaska
DROPS 97-10 |
|
|
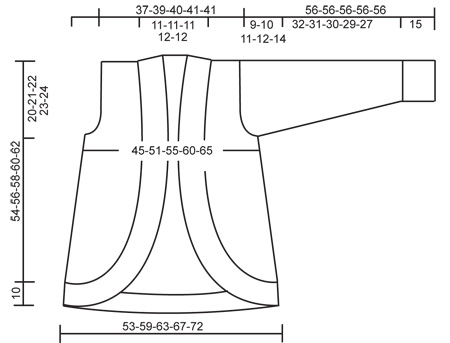
Knitting Tension: 15 sts x 19 rounds on needles size 7 mm in Alaska and moss sts = 10x10 cm. Double moss sts: 1st row: *K1, P1*, repeat from *-* 2nd row: K over K and P over P 3rd row: P over K and K over P 4th row: as 2nd row. Decreasing tips: Inc. inside 1 edge sts which is knitted in garter sts throughout. All dec. are done from the RS. Dec. as follows after 1 edge st: Slip 1 st as if to knit, K1, psso. Dec. as follows before 1 edge st: K2 tog. Knitting tips: All parts are knitted back and forth on circular needle size 7 mm and this needle is used as well for the rib edge around the back and front pieces, but if preferred it is possible to use pointed needles size 7 mm instead, but only for the individual parts, not for the edge. Back piece: Knit the back piece back and forth on circular needle. Cast on 82-90-96-102-110 sts (incl. of 1 edge st each side) on circular needle size 7 mm in Alaska. Knit in moss sts – see explanation above. Please read all of the following section before continuing. Dec. at the sides: When the piece measures 5 cm dec. 1 st each side on every 5.5-5.5-5.5-7-7.5 cm a total of 6-6-6-5-5 times - read decreasing tips = 70-78-84-92-100 sts. When the piece measures 34-35-36-37-38 cm cast off for the armhole each side on every other row: 3 sts 1-1-2-2-2 times, 2 sts 1-2-2-3-4 times and 1 st 2-3-2-3-5 times = 56-58-60-62-62 sts left on row. When the piece measures 52-54-56-58-60 cm cast off the centre 14-14-14-16-16 sts for the neck. On the next row cast off another st each side towards the neck = 22-21-22-22-22 sts left for each shoulder. Cast off remaining sts when the piece measures 54-56-58-60-62 cm Right front: Knit the front piece back and forth on circular needle. Cast on 19-21-22-24-25 sts (incl. of 1 edge st each side) on circular needle size 7 mm in Alaska. Please read all of the following section before continuing! Knit in moss sts – at the same time cast on new sts towards the centre front edge – insert a marking thread where the increases begin and where they end. Cast on every other row: 3 sts 1-2-3-3-4 times, 2 sts 4-4-4-4-6 times and 1 st 6-5-4-4-1 time. Dec. at the sides: At the same time when the piece measures 5 cm dec at the side as done for the back piece. When all inc. and dec. are completed = 30-34-37-40-45 sts on row. When the piece measures 34-35-36-37-38 cm cast off for the armhole as done for the back piece. At the same time when the piece measures 34-36-38-39-41 cm dec. towards the neck at the centre front – read decreasing tips: Dec. 1 st on every 8t-8-8-8-5 cm a total of 3-3-3-3-4 times. When all dec. for armhole and neck are completed = 20-21-22-22-22 sts left for the shoulder. Cast off remaining sts when the piece measures 54-56-58-60-62 cm from the casting on edge. Left front: Knit as right front but reverse. Sleeve: Knit forth and back on circular needle. Cast on 38-44-44-50-50 sts (incl. of 1 edge st each side) on circular needle size 7 mm in Alaska. P 1 row from the WS. Continue in Rib as follows: 1 edge st, *K3, P3*, repeat from *-* and finish with 1 edge st. When the piece measures 15 cm knit 2 rows of garter sts at the same time adjust the number of sts to 38-38-38-44-44. Continue in moss sts until finished. At the same time when the piece measures 18 cm inc. 1 st each side on every 3-2.5-2-2n-2 cm a total of 8-10-12-12-13 times – 54-58-62-68-70 sts. When the piece measures 47-46-45-44-42 cm cast off for the sleeve cap each side on every other row: 3 sts 2 times, continue to cast off 2 sts each side until the piece measures 55 cm. Then cast off 3 sts 1 time each side. Cast off remaining sts when the piece measures approx. 56 cm Assembly: Sew the shoulder seams. Edge around the back and front piece: Pick up approx. 180- 222 sts (divisible with 6) from the RS on circular needle size 7 mm in Alaska. Begin at the bottom edge at the centre back and pick up along the front edge towards the centre back neck = half the cardigan). Knit 2 rows of garter sts beginning from the WS. Insert a new marking thread approx. 25 cm down the front piece from the shoulder (marks the depth of the collar)- keep the marking threads which mark the inc. at the beginning and at the end. Continue in Rib as follows: K1, P3, *K3, P3*, repeat from *-* and finish with K2. When the rib measures 4 cm inc. all P3 to P4 (seen from the RS) in between the 2 marking threads at the bottom of the front piece. When the Rib measures 8 cm inc. all the P4 to P5 in between the same marking threads (This is done to have enough sts to ensure the curve doesn’t become too tight). When the Rib measures 10 cm cast off loosely with K over K and P over P from the bottom edge at the centre back and up towards the marking thread at the neck (make sure the cast off finishes with a P3 seen from the RS). Put the remaining sts on a thread. Make a similar edge at the other side from the centre back neck down the front edge towards the centre back bottom edge. Knit in Rib as follows: K1, P3, *K3, P3*, repeat from *-* and finish with K2. Cast off when the piece measures 10 cm (make sure to begin the cast off before P3 seen from the RS) leave the remaining sts on needle. Collar: When both edges are completed sew them tog. – edge against edge- at the back of the neck. Put the remaining sts around the neck on the needle. Continue over all sts with 2 threads of Alaska – knit back and forth on needle. Knit Rib as before with K over K and P over P, but knit the first 3 sts and the last 3 sts in garter sts. Continue until the Rib (incl. the edge) measures approx. 20-22 cm. Then inc. all p3 to P4 (seen from the RS when the collar is folded). Continue with K over K and P over P for approx. 2 cm and cast off loosely. Assembly: Sew the Rib edge tog. at the bottom of the back and front piece – sew in the outer part of the outermost st to make the seam invisible. Crochet edge: Crochet on hook size 5 in Alaska around the edge from collar to collar as follows: 1 dc in the first st, *2 ch, skip 1 cm, 1 dc in the following st*, repeat from *-* finish with 1 sl st in the last st. Insert the sleeves and sew the sleeve and side seams inside 1 edge st. Sew in the buttons – the top button should be 8 cm down from the collar. Sew the buttons on approx 8 cm inwards from the Rib edge and approx. 8 cm in between. Use the ch loops in the crochet edge as a button hole. |
|
 |
|
Have you finished this pattern?Tag your pictures with #dropspattern or submit them to the #dropsfan gallery. Do you need help with this pattern?You'll find 25 tutorial videos, a Comments/Questions area and more by visiting the pattern on garnstudio.com. © 1982-2026 DROPS Design A/S. We reserve all rights. This document, including all its sub-sections, has copyrights. Read more about what you can do with our patterns at the bottom of each pattern on our site. |


With over 40 years in knitting and crochet design, DROPS Design offers one of the most extensive collections of free patterns on the internet - translated to 17 languages. As of today we count 324 catalogues and 12290 patterns translated into English (UK/cm). 12290
We work hard to bring you the best knitting and crochet have to offer, inspiration and advice as well as great quality yarns at incredible prices! Would you like to use our patterns for other than personal use? You can read what you are allowed to do in the Copyright text at the bottom of all our patterns. Happy crafting!
Post a comment to pattern DROPS 97-10
We would love to hear what you have to say about this pattern!
If you want to leave a question, please make sure you select the correct category in the form below, to speed up the answering process. Required fields are marked *.