
Popular categories
Looking for a yarn?


Comments / Questions (9)
![]() Sharon wrote:
Sharon wrote:
Thanks for the prompt reply but it doesnt help. 1) she lives away from me and 2) doesnt have a similar garment that she can measure. The photo shows the parts marked MB in the pic almost touch at the centre of her back - what adult woman has a 75cm/29.5 inch chest? This implies that the garment needs to stretch in order to fit. The size chart needs to reflect the chest size it will fit to help us decided which size to make!
21.05.2025 - 13:16
![]() Sharon wrote:
Sharon wrote:
How do you know which size to make? I need to make for someone with a 36DD bust but the finished measurements say 22" - 28.5"!
21.05.2025 - 09:40DROPS Design answered:
Dear Sharon, you will find all finished measurements in the chart at the bottom of the page, note that the measurements have been taken from side to side; measure a similar garment she has and likes the shape to find out the matching size. Read more here and convert into inches if needed here. Happy knitting!
21.05.2025 - 13:08
![]() Ribeaudeau wrote:
Ribeaudeau wrote:
Bonjour, Je me pose des questions à propos du top 9431,blanc ajouré. Le patron est un trapeze, soit tour de taille plus grand que le tour de poitrine. Comment la poitrine trouve telle sa place ? Merci de votre réponse.
23.06.2023 - 17:47DROPS Design answered:
Bonjour Mme Ribeaudeau, c'est un dos-nu, autrement dit, il n'y a pas de partie "dos" à ce top, et la mesure indiquée en bas du schéma correspond à la longueur totale du bas du top, dos & devant, cette mesure devrait pouvoir vous aider à trouver votre taille; la largeur indiquée en haut correspond au haut du top (mailles rabattues). Bon tricot!
26.06.2023 - 07:54
![]() Ribeaudeau wrote:
Ribeaudeau wrote:
Bonjour, Je me pose des questions à propos du modèle 9431,top blanc ajouré à la taille. En effet, le patron indique un trapeze, (soit tour de taille plus grand que le tour de poitrine), comment la poitrine a t-elle sa place.? Merci pour la réponse.
23.06.2023 - 17:42
![]() Desiré Brown wrote:
Desiré Brown wrote:
Are decreases worked on the right side?
27.06.2022 - 23:52DROPS Design answered:
Dear Mrs Brown, in size S and M you decrease alternately on every 2nd and on every 3rd row, this means you will decrease both from RS and from WS; in size L, XL and XXL you decrease on every 2nd row = always from RS. Happy knitting!
28.06.2022 - 08:31
![]() Desire wrote:
Desire wrote:
When the pattern for the top part says, decrease 15 times every other/3rd row alternately .. it seems to be much longer than measured ( 40cm). Am I decreasing at every other row or every other 3rd row (3,9,15....)
20.06.2022 - 14:15DROPS Design answered:
Dea Desiree, decrease like this: *work 1 row, decrease on next row, work 2 rows, decrase on next row*, repeat these 5 rows a total of 7 times (= you have then decreased a total of 14 times, now work 1 row without decrease and decrease on next row = you have worked a total of 37 rows and it should measure approximately 17 cm. Happy knitting!
20.06.2022 - 15:16
![]() Chiara wrote:
Chiara wrote:
Ciao, vorrei realizzare questo top per mia figlia ma non vuole la parte traforata all'uncinetto. Mi potete indicare quante diminuzioni devo fare per proseguire il lavoro correttamente? Se non ho sbagliato i calcoli, dovrei diminuire altre 5 v, 2 m per lato. Grazie
26.07.2021 - 17:44DROPS Design answered:
Buonasera Chiara, per un'assistenza così personalizzata può rivolgersi al suo rivenditore DROPS di fiducia. Buon lavoro!
26.07.2021 - 18:05
![]() Viivi wrote:
Viivi wrote:
Tarkoittaako alaosan kavennukset sitä, että s koossa päätetään silmukoita 71 kpl, niin että niitä on lopussa jäljellä enää 24 kpl? En ymmärrä miten se riittää jos yläosa alkaa jo 61 silmukasta.
18.04.2020 - 21:26DROPS Design answered:
Alaosassa kavennetaan kummassakin reunassa ensin 1 silmukka. Tämän jälkeen nämä 1 silmukan kavennukset toistetaan kummassakin reunassa joka 2.kerroksella, kunnes niitä on tehty yhteensä 12 kertaa kummassakin reunassa. Jäljelle jää 71 silmukkaa.
13.05.2020 - 17:50weronica wrote:
Denna top måste komma med i vår/Sommar katalogen..
10.01.2006 - 20:40
|
|
DROPS 94-31 |
|
 |
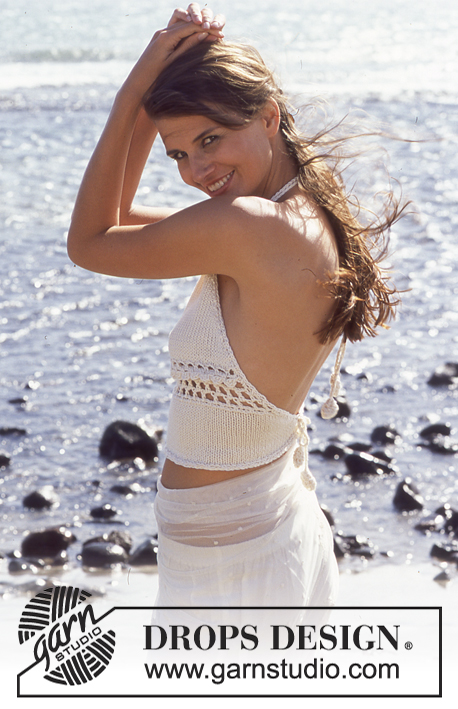 |
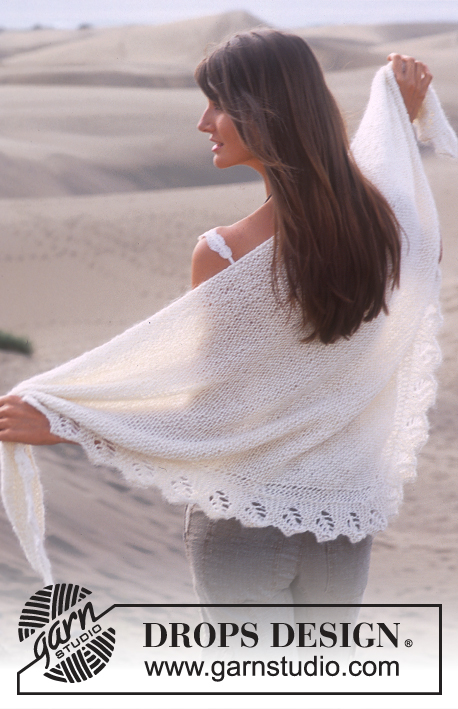
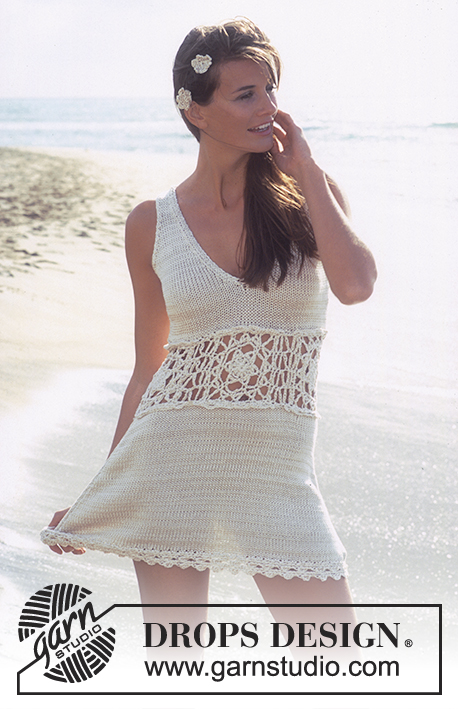
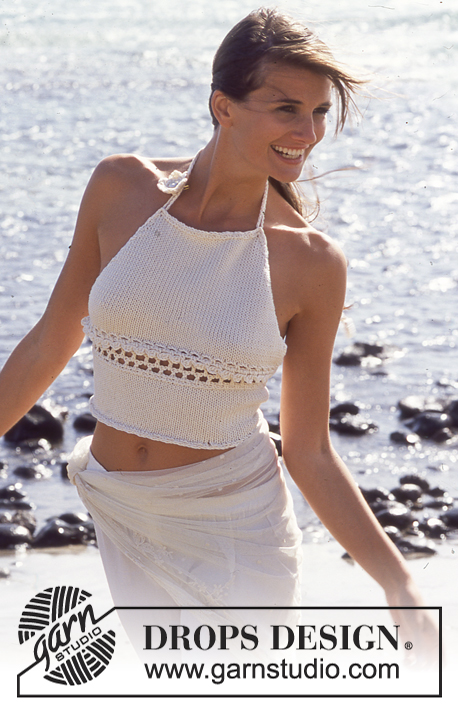
DROPS Top in Paris with tie-strings at back
DROPS 94-31 |
|
|
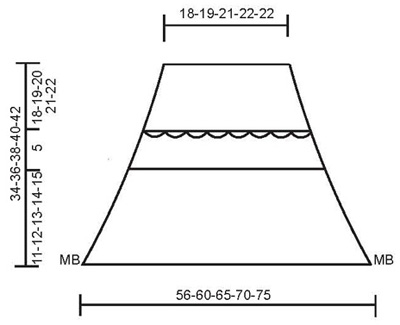
Knitting tension: 17 sts x 22 rows in stocking stitch on needle size 5mm = 10 x 10 cm Top: The top in knitted in two pieces, joined together with a crochet middle piece. Lower piece: Cast on 95-102-111-119-128 sts using Paris and needle size 5. Knit 1 row from the wrong side and continue in stocking stitch, at the same time dec 1 st each side on every other row a total of 12-13-14-15-16 times = 71-76-83-89-96 sts. After the last decrease (piece measures approx 11-12-13-14-15 cm) knit 1 row from the wrong side and cast off. Crochet middle piece: Use crochet hook size 5 and crochet ch-loops along cast-off edge of knitted piece as follows: 1st round: 1 sl st in forst st, 3 ch, *skip 2 sts, 1 dc in next st, 2 ch*, repeat from *-* and finish with 1 dc in last st = 23-25-27-29-31 ch-loops on row. Turn the piece. 2nd round: 4 ch (= 1 tr + 1 ch), 1 tr in first ch-loop, *2 ch, 1 tr in next ch-loop*, repeat from *-* and finish with 1 ch and 1sl st in sl st from beginning of previous round = 22-24-26-28-30 ch-loops with 2 ch in each. Turn the piece. 3rd round: 3 ch (= 1 tr), 1 tr in first ch-loop with 2 ch, *2 ch, 1 tr in next ch-loop*, repeat from *-* and finish with 1 tr in 3rd ch from the beginning of previous round = 21-23-25-27-29 ch-loops. Turn the piece. 4th round: 6 ch (= 1 tr + 3 ch), skip first ch-loop, *1 tr in next ch-loop, 2 ch*, repeat from *-* until there are 2 ch-loops left, 1 tr in next ch-loop, 3 ch, 1 tr in last tr = 20-22-24-26-28 ch-loops. Put the piece aside and knit the top piece. Top piece: Cast on 61-66-73-79-86 sts on needle size 5 with Paris. Knit 1 row from the wrong side and continue in stocking st. At the same time, after 1-0-3-2-0 rows in stocking st dec 1 st each side a total of 15-17-19-21-24 times as follows: size S + M, on every other/3rd row alternately, size L + XL + XXL, on every other row = 31-32-35-37-38 sts. When piece measures 18-19-20-21-22 cm knit 1 row from the wrong side and cast off. Assembly: Now crochet top piece to middle piece as follows: Place the 2 pieces on top of each other, wrong side against wrong side. Crochet 1 dc in the outermost st (crochet through both layers), *2 ch, skip approx 2 st, 1 dc in next st (i.e. crochet through sts on top piece and tr on middle piece)*, repeat from *-*. Turn the piece. Crochet next row as follows: Crochet sl st to the middle of first ch-loop, *3 ch, a tr in the first of the 3 ch just crochet, 1 dc in next ch-loop*, repeat from *-*. Cut the thread. Crochet border: crochet along all edges as follows: 1 dc in first st, *2 ch, skip 2-3 sts, 1 dc in next st*, repeat from *-* along all edges and finish with 1 sl st in first dc from beginning of round (instead of 1 dc in next st). NB! The border should be even and not wavy. Tie-string at back: Crochet a ch-chain approx 40-50 cm long. Now crochet a “knot” each end as follows: 1 dc in ch at one end of chain, 3 ch, 7 tr in the first of the 3 ch just crochet. Turn the piece. Crochet 3 ch, crochet the 7 tr together (don’t make the last pull through on each tr until the last tr is crochet and then pull yarn through all 8 sts on hook). Cut the thread. Repeat other end of chain. Pull string through ch-loop at top corners on back piece and tie at the back. Tie-string at front (round neck): Flower: Crochet 3 ch and form a ring with a sl st. 1st round: 3 ch, 11 tr in ring and finish with 1 sl st in 3rd ch from beginning of round. 2nd round: *3 ch, 1 tr in the first of the 3 ch just crochet, skip 1 tr, 1 dc in next tr*, repeat from *-* a total of 6 times = 6 leaves Sew the button in the middle of flower for decoration. Now crochet a small ch-loop at the back of flower for the tie-string: 1 sl st in a st in the middle of the flower, 3 ch, 1 sl st in next st. Cut the thread. Crochet a ch-chain approx 180 cm long. Pull tie-string through loop at the back of flower. Crochet a “knot” both ends of the string as described for back tie-string. Pull the string through the ch-loops at both corners of top to create a “loop” to go round your neck. Tie the string behind the neck. |
|
 |
|
Have you finished this pattern?Tag your pictures with #dropspattern or submit them to the #dropsfan gallery. Do you need help with this pattern?You'll find 17 tutorial videos, a Comments/Questions area and more by visiting the pattern on garnstudio.com. © 1982-2026 DROPS Design A/S. We reserve all rights. This document, including all its sub-sections, has copyrights. Read more about what you can do with our patterns at the bottom of each pattern on our site. |
|


With over 40 years in knitting and crochet design, DROPS Design offers one of the most extensive collections of free patterns on the internet - translated to 17 languages. As of today we count 324 catalogues and 12290 patterns translated into English (UK/cm). 12290
We work hard to bring you the best knitting and crochet have to offer, inspiration and advice as well as great quality yarns at incredible prices! Would you like to use our patterns for other than personal use? You can read what you are allowed to do in the Copyright text at the bottom of all our patterns. Happy crafting!
Post a comment to pattern DROPS 94-31
We would love to hear what you have to say about this pattern!
If you want to leave a question, please make sure you select the correct category in the form below, to speed up the answering process. Required fields are marked *.