
Popular categories
Looking for a yarn?


Comments / Questions (20)
![]() Isabelle wrote:
Isabelle wrote:
Merci mais je ne comprends pas votre réponse car le dos et le devant sont tricotés ensemble J ai dû monter seulement 148m (soit la taille S) alors que je suis de taille L C est donc que les explications donnent beaucoup trop de mailles à monter pour la taille L.
24.03.2026 - 15:24DROPS Design answered:
Bonjour Isabelle, tout à fait, on tricote les devants et le dos ensemble, et donc en taille L, on doit monter 172 mailles (= 45 pour chaque devant et 82 pour le dos); soit 82 m / 1,4 (14 m pour 10 cm) = 59 cm, c'est bien la largeur indiqué en L dans le schéma. Après les emmanchures, il reste 54 m pour le dos / 1,4 = 39 cm, comme dans le schéma aussi. Bon tricot!
24.03.2026 - 15:54
![]() Isabelle wrote:
Isabelle wrote:
J ai fait l échantillon, j ai les aiguilles préconisées, je tricote les 2 fils comme indiqué et pourtant voulant faire la taille L le nombre de mailles préconisées est beaucoup trop grand ! Je dois donc faire la taille S pour avoir à peu près mes dimensions . Je précise que je tricote normalement ni trop lâche ni trop serré Merci de votre aide
18.03.2026 - 15:04DROPS Design answered:
Bonjour Isabelle, pour le dos, vous devez avoir 82 m pour le dos: les 74 m du dos (erreur dans la description, c'est le dos et non le devant, correction faite) + 4 m rabattues de chaque côté, si vous avez bien 14 mailles = 10 cm, ces 82 m doivent mesurer environ 59 cm soit la largeur indiquée pour le bas du dos pour la taille L dans le schéma. Bon tricot!
18.03.2026 - 16:33
![]() Evie wrote:
Evie wrote:
Twee vragen: 1. klopt het dat er geen specifieke onderrand (bijv. ribbelsteek of boordsteek) wordt gemaakt maar er meteen met tricotsteek wordt gebreid? 2. op de foto zie ik een zakje op het vest maar dat zie ik in het patroon niet terug. Klopt dat? Kan dat nog worden toegevoegd?
26.02.2026 - 08:54DROPS Design answered:
Dag Evie,
Ja, dat klopt. Er zit geen speciale onderrand in boordsteek o.i.d. Je begint direct in tricotsteek. Er wordt niet echt een zak op het voorpand gemaakt, maar dit is een decoratieve rand in tube vorm. In de allerlaatste alinea wordt dit beschreven.
01.03.2026 - 11:44
![]() Sanaa wrote:
Sanaa wrote:
Buonasera Non riesco capire come si fa i-cord po' fare un video Grazie mille e buon natale
25.12.2025 - 01:38DROPS Design answered:
Buongiorno Sanaa, sotto il titolo può trovare tutti i video relativi a questo modello, anche quello per lavorare l'I-cord. Buon lavoro!
27.12.2025 - 13:46
![]() Rezvan wrote:
Rezvan wrote:
I completed the "S" size, and it fits perfectly. Though for a loose fit like the model's, I would recommend the "M" size instead. I thank you for the nice pattern, which is designed beautifully and is easy to follow.
11.11.2025 - 12:18
![]() Adela wrote:
Adela wrote:
There is a mistake when shaping the front pieces. The instructions call for binding off on both side of the piece instead of only on the side of the sleeve.
02.11.2025 - 14:49DROPS Design answered:
Dobrý den, Adélo, děkujeme za upozornění. Návod jsme opravili.
06.11.2025 - 23:37
![]() Petra wrote:
Petra wrote:
Hallo, mir ist S zu groß. Wie kann ich die Anleitung in Größe XS umrechnen? LG
21.10.2025 - 07:17DROPS Design answered:
Liebe Petra, leider können wir Ihnen hier keine weitere Größenangabe bieten. Die Jacke ist so angelegt, dass sie sehr leger und weit geschnitten ist. Vielleicht suchen Sie nach einem anderen Modell, das von vornherein enger geschnitten ist und Ihnen dann besser passt. Viel Spaß beim Stöbern!
23.10.2025 - 10:10
![]() Lefrère wrote:
Lefrère wrote:
Bonjour, je ne comprends pas pour les têtes de manches: « Rabattre les mailles restantes, EN MÊME TEMPS, tricoter toutes les mailles ensemble 2 par 2 à l’endroit« Merci pour votre explication….
14.08.2025 - 14:24DROPS Design answered:
Bonjour Mme Lefrère, pour obtenir les bonnes mesures à la fin de la tête de manche, on va procéder ainsi: on tricote 2 m ens à l'endroit, *on tricote les 2 m suivantes ensemble à l'endroit et on passe la 1ère maille par-dessus la 2ème = on a rabattu 1 maille*, on répète de *-* jusqu'à ce que toutes les mailles ont été rabattues. Bon tricot!
14.08.2025 - 15:35
![]() Anne wrote:
Anne wrote:
What size is the model wearing? How many cm positive ease would you recommend to achieve the same loose fit that the model showcases in the picture? If I follow my size which is Medium with the given measurements the cardigan would be way tighter then what is displayed in your example.
13.08.2025 - 19:20DROPS Design answered:
Dear Anne, most of the time our models wear either a S or a M; to find your size and the desired ease, measure a similar garment you have and like the shape and then compare these measurements to the ones in the chart. Read more here. Happy knitting!
14.08.2025 - 08:50
![]() Alejandra wrote:
Alejandra wrote:
Hola queridos DROPS, No entiendo bien que hacer con los 9 puntos que se dejan en un hilo al terminar los frentes delanteros. No sé si disminuir los puntos desde el hilo o los que tengo en el palillo. Si disminuyo 2 ptos 1 vez y 1pto 3 veves me quedan 25 en total con los 9 que he reservado. Pueden aclararme como hacerlo? Muchas gracias!!!
04.07.2025 - 21:05DROPS Design answered:
Hola Alejandra, los 9 pts en el gancho auxiliar se usarán para la sección cuello con I-cord, que puedes encontrar casi al final del patrón. Estos puntos no se usan ya para trabajar el delantero y no se tienen en cuenta al contar los puntos restantes en los hombros. Por eso, después de pasar 9 pts, te quedan 21 pts; después rematas 5 pts y te quedan 16 pts para el hombro.
06.07.2025 - 19:29
|
|
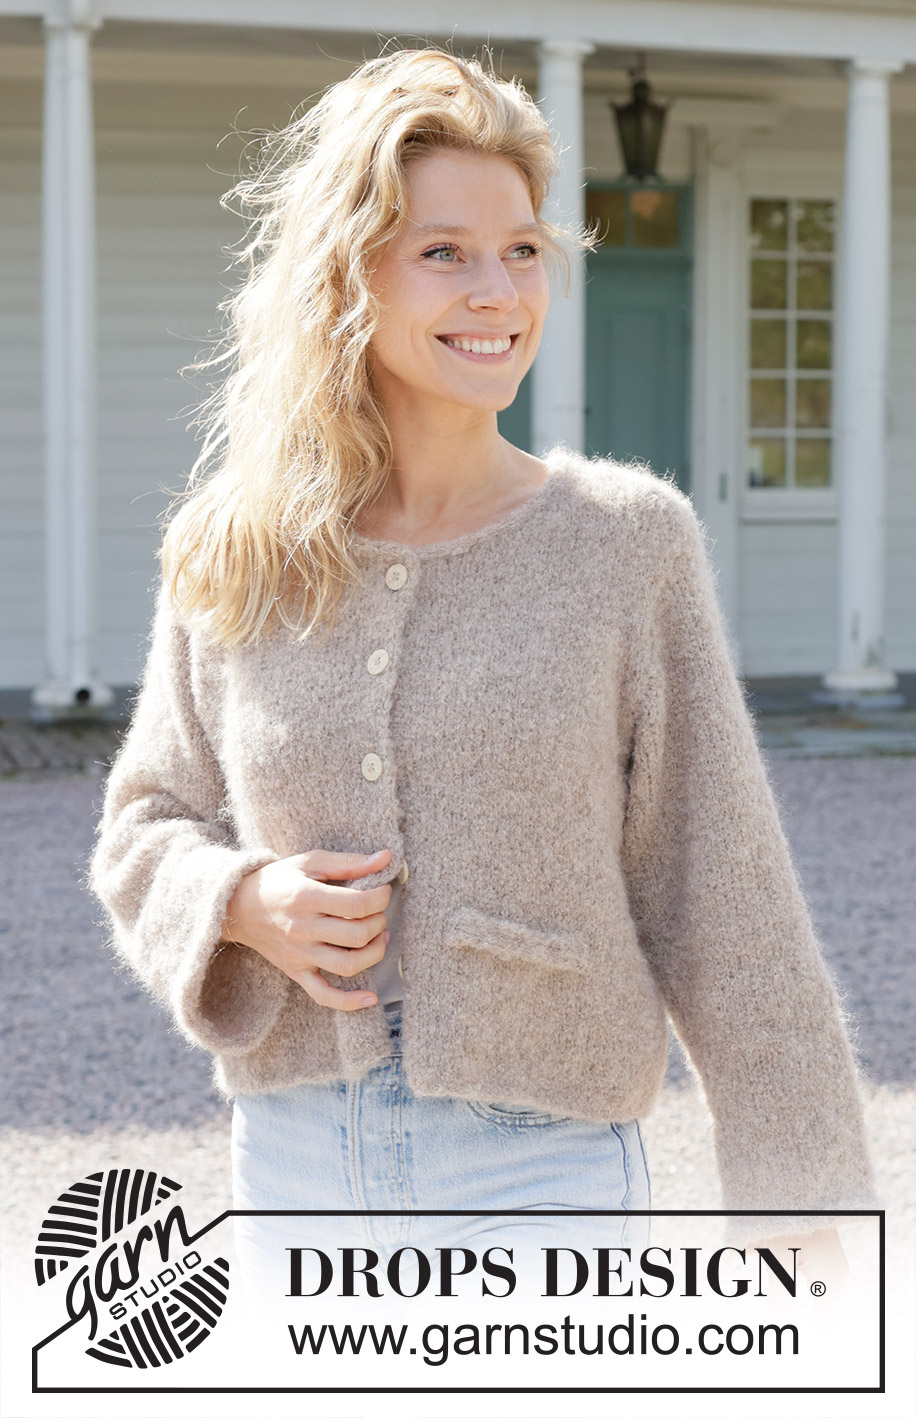
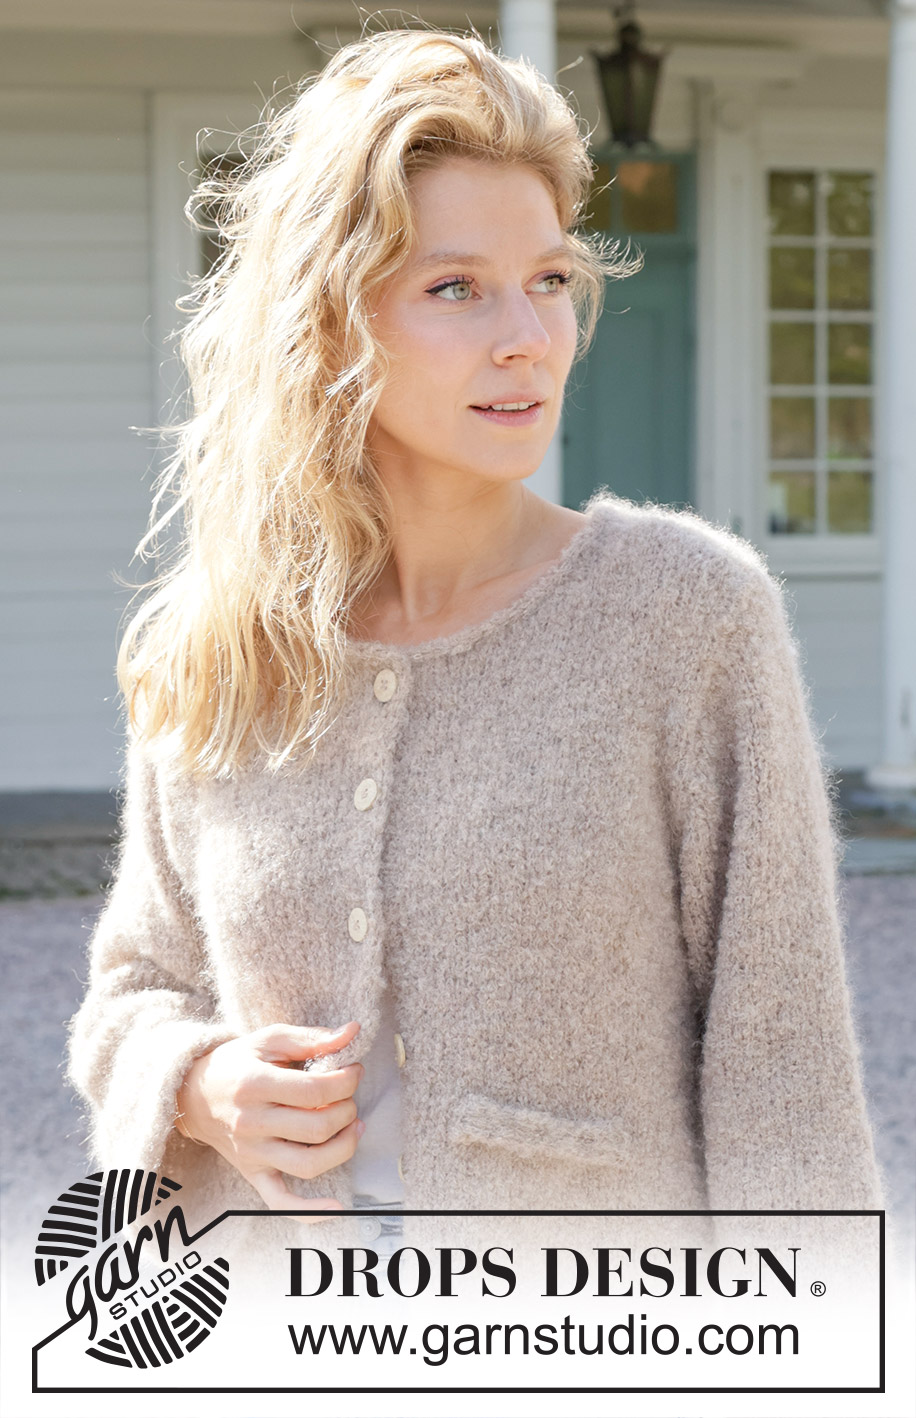
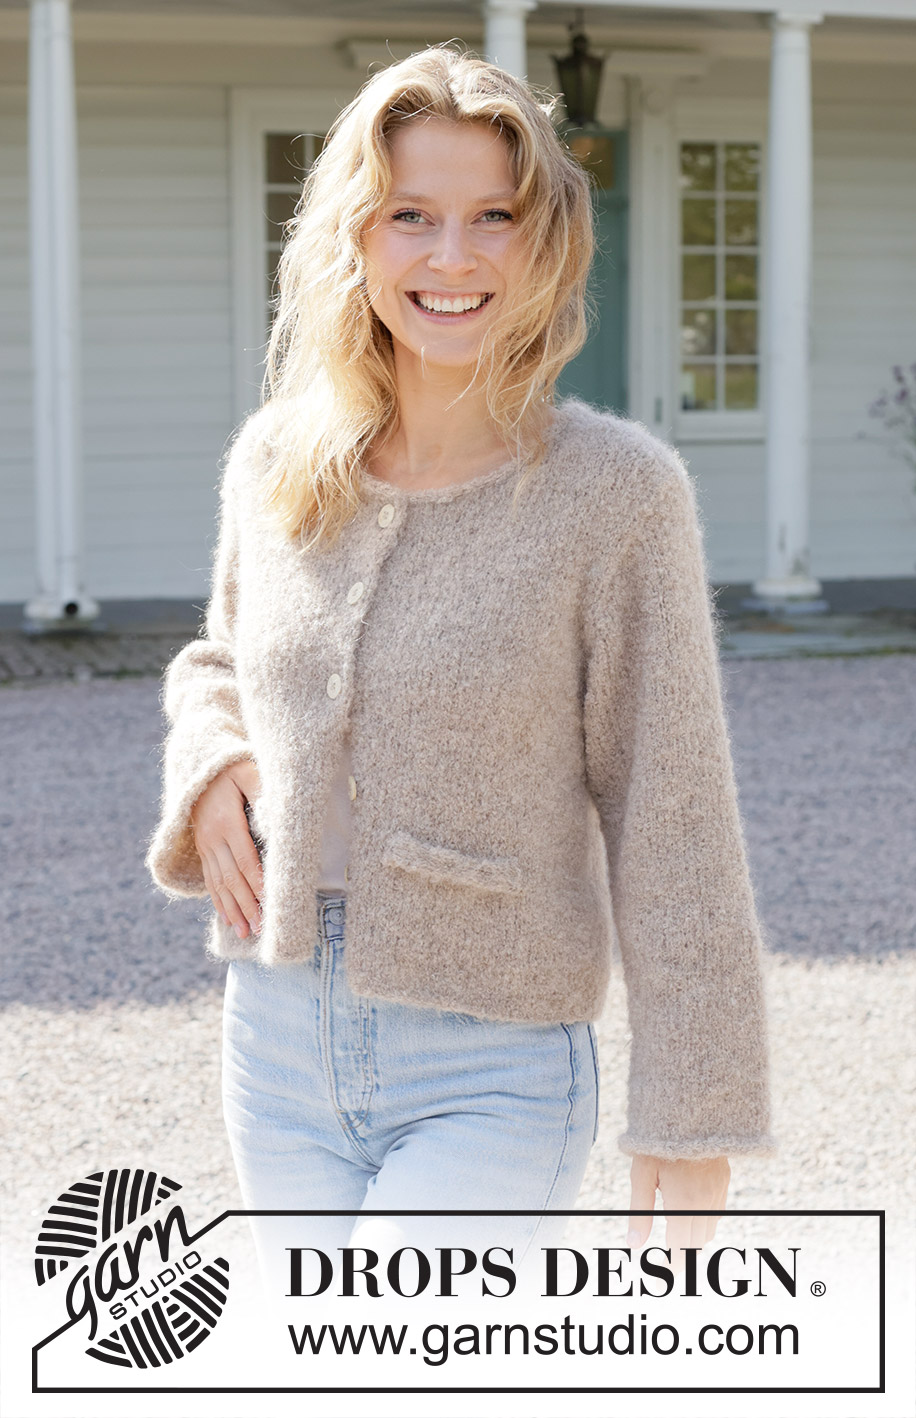
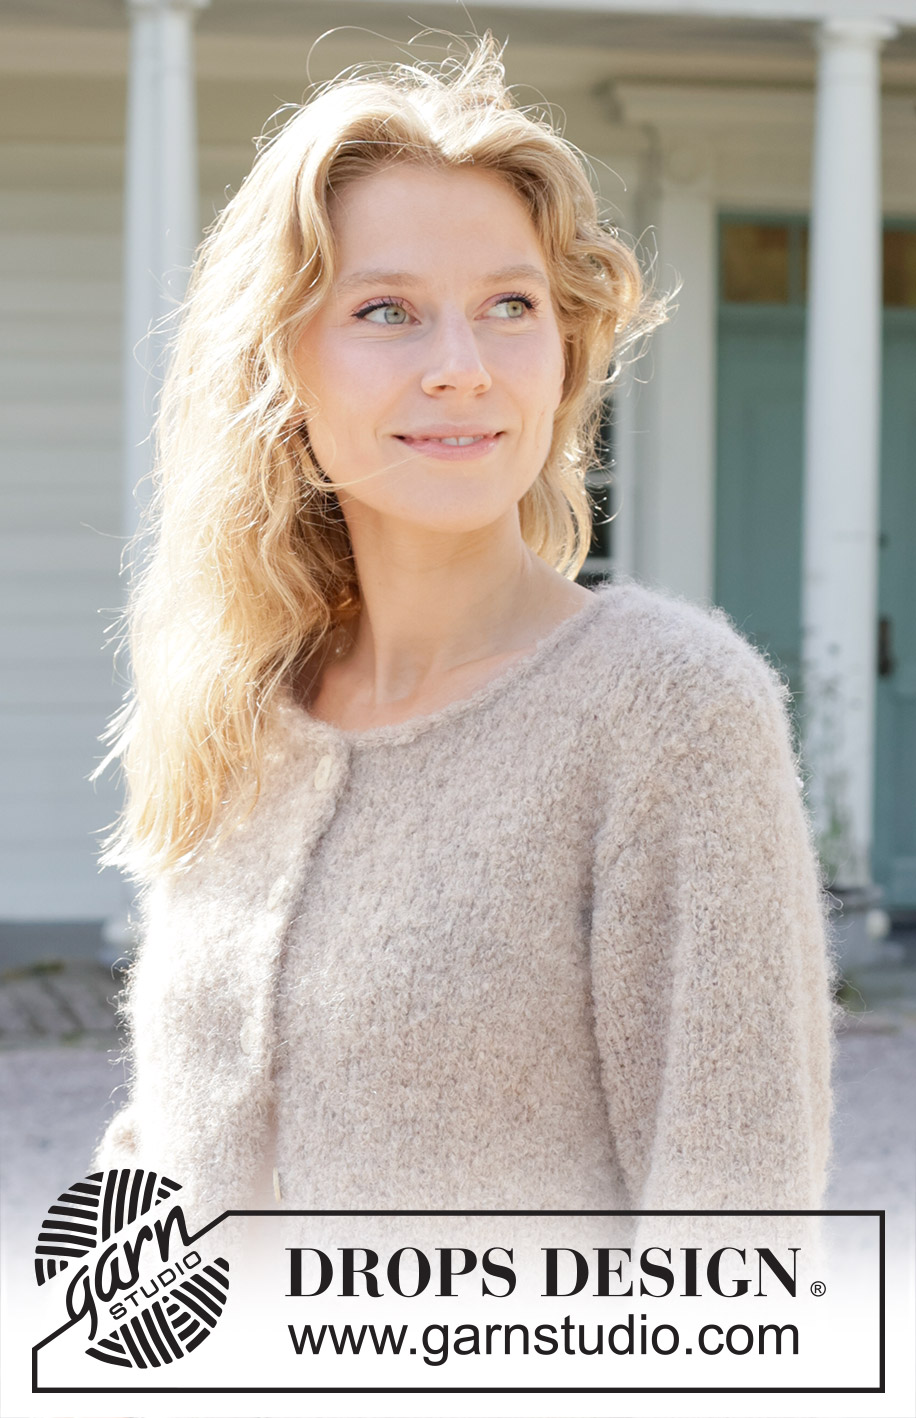
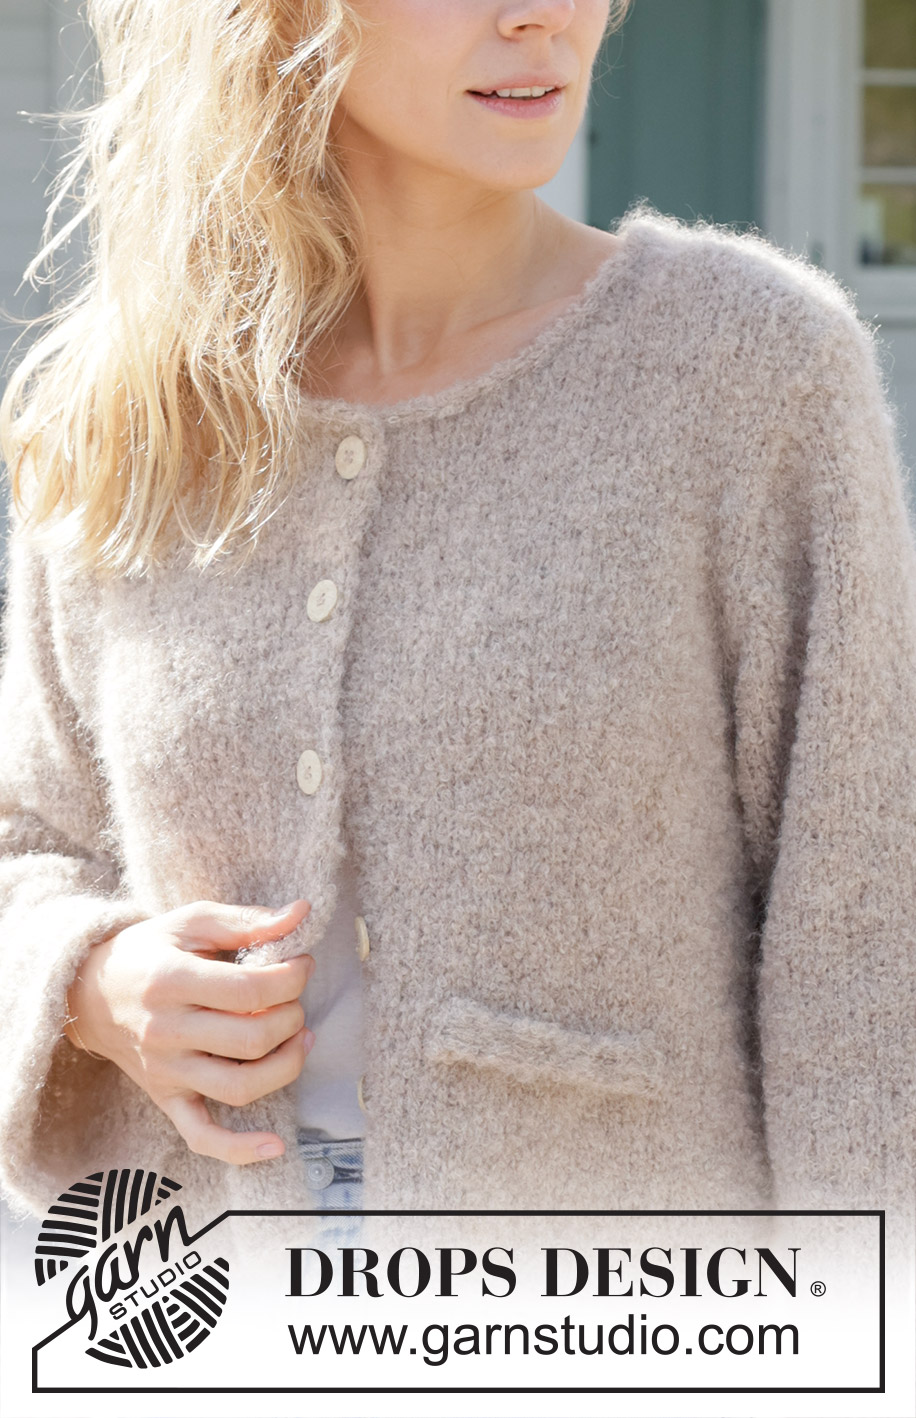
Almond Butter Cardigan#almondbuttercardigan |
|
 |
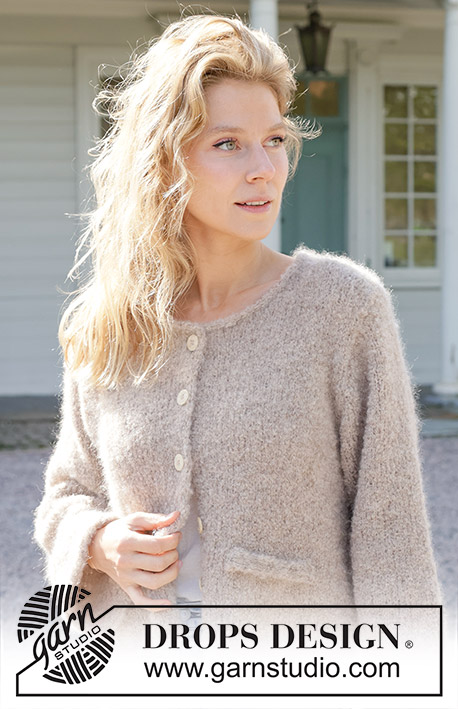 |
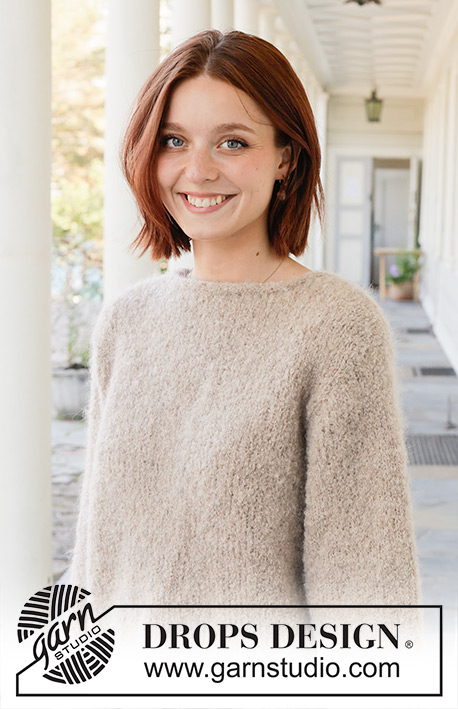
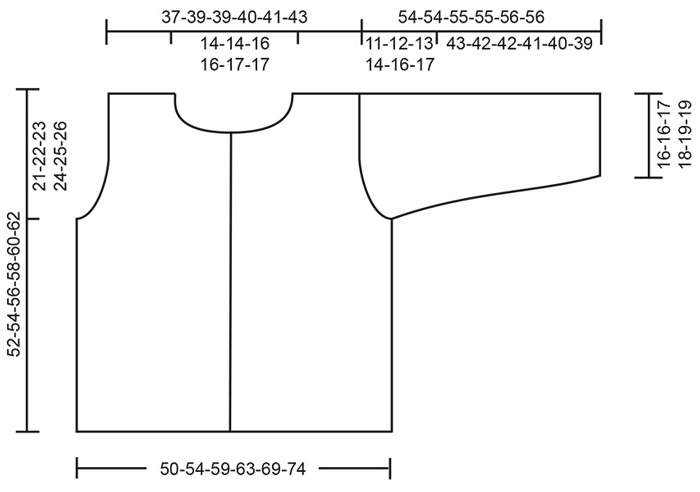
Knitted jacket in DROPS Alpaca Bouclé and DROPS Kid-Silk. The piece is worked bottom up, with stocking stitch and I-cord. Sizes S - XXXL.
DROPS 257-3 |
|
|
------------------------------------------------------- EXPLANATIONS FOR THE PATTERN: ------------------------------------------------------- BANDS WITH I-CORD: BEGINNING OF ROW: Work the band as follows: Slip 1 stitch purl-wise with yarn in front, knit 1, purl1 from right side/knit 1 from wrong side, knit 1 from right side/purl 1 from wrong side. END OF ROW: Work until there are 4 stitches left on the row, knit 1 from right side/purl 1 from wrong side, purl 1 from right side/knit 1 from wrong side, slip 1 stitch purl-wise with yarn in front, knit 1. Work like this from both the right and wrong side. BUTTONHOLES: Work the buttonholes on the right band from the right side (band = 4 stitches). ROW 1 (right side): Knit together the 4th and 5th stitch from the edge, make 1 yarn over, work remaining stitches as before. ROW 2 (wrong side): Work the band as before, purling the yarn over to leave a hole. The first buttonhole is worked when the piece measures 8-10-11-9-10-11 cm, then the other buttonholes as follows: S: 16, 24, 32 and 40 cm M: 18, 26, 34 and 42 cm L: 19, 27, 35 and 43 cm XL: 16, 23, 30, 37 and 44 cm XXL: 17, 24, 31, 38, and 45 cm XXXL: 18, 25, 32, 39 and 46 cm (Last buttonhole 2 cm below neckline). DECREASE TIP: All decreases are worked from the right side! AFTER 3 STITCHES: Slip 1 stitch knit-wise, knit 1, pass the slipped stitch over the knitted stitch (1 stitch decreased). BEFORE 3 STITCHES: Work until there are 5 stitches left on the row, knit 2 together (1 stitch decreased). INCREASE TIP: Increase 1 stitch on each side of the marker-thread as follows: Work until there is 1 left stitch before the marker-thread, make 1 yarn over, knit 2 (marker-thread sits between these 2 stitches), 1 yarn over (2 increased stitches). On the next round knit the yarn overs twisted to avoid holes. Then work the new stitches in stocking stitch. I-CORD CAST-OFF: Cast on 2 stitches onto the right needle. Slip these 2 stitches onto the left needle so the working strand is 2 stitches in on the left needle (tighten the strand while working to form a small tube). ROW 1 (right side): Knit 1, knit 2 twisted together. ROW 2 (right side): Slip the 2 stitches on the right needle back onto the left needle, knit 1, knit 2 twisted together. Repeat ROW 2 until there are 2 stitches left on the right needle. Slip these 2 stitches back onto the left needle. Cast off. I-CORD TUBE: Work a tube of 6 stitches, using double pointed needles as follows: Knit 1 row, then on the next row: * Push all stitches to the right-hand end of the needle without turning, tighten the strand, knit all stitches *, work from *-* to desired length. Cast off. ------------------------------------------------------- START THE PIECE HERE: ------------------------------------------------------- JACKET – SHORT OVERVIEW OF THE PIECE: The pattern uses both long and short needles; start with the length which fits the number of stitches and change when necessary. The piece is worked back and forth, bottom up as far as the armholes, then divided for the front and back pieces, which are finished separately. The sleeves are worked in the round, bottom up as far as the sleeve cap which is finished back and forth. The sections are sewn together. Stitches are knitted up along the neck and around the cuffs, which are then cast off with I-cord. If there is a «0» in your chosen size, skip the information and go straight to the next instruction. BODY: Cast on 148-160-172-184-200-216 stitches with circular needle size 6 mm, 1 strand DROPS Alpaca Bouclé and 1 strand DROPS Kid-Silk (2 strands). Work stocking stitch back and forth, with 4 stitches on each side worked according to BANDS WITH I-CORD – read description above. When the piece measures 8-10-11-9-10-11 cm, work the first BUTTONHOLE on the right band – read description above. Remember to maintain the knitting tension. Continue working until the piece measures 31-32-33-34-35-36 cm. Now divide for the armholes. DIVIDE FOR ARMHOLES: Work 36-39-41-43-47-50 stitches (band + front piece), cast off the next 6-6-8-10-10-12 stitches, work 64-70-74-78-86-92 stitches (back piece), cast off the next 6-6-8-10-10-12 stitches, work the last 36-39-41-43-47-50 stitches (front piece + band). The front and back pieces are now finished separately. BACK PIECE: = 64-70-74-78-86-92 stitches. Continue stocking stitch, back and forth (first row from the wrong side), casting off every 2nd row for the armholes as follows: 3 stitches 0-0-1-1-1-2 times on each side, 2 stitches 1-1-1-1-2-2 times on each side. Then decrease every 2nd row, 1 stitch inside 3 stitches 4-6-5-6-7-6 times on each side – read DECREASE TIP = 52-54-54-56-58-60 stitches. When the piece measures 50-52-54-56-58-60 cm, cast off the middle 18-18-20-20-22-22 stitches for the neckline and finish each shoulder separately. SHOULDERS: Cast off 1 stitch on the next row from the neckline = 16-17-16-17-17-18 shoulder stitches. Cast off when the piece measures 52-54-56-58-60-62 cm. LEFT FRONT PIECE: = 36-39-41-43-47-50 stitches. Continue with stocking stitch and the band back and forth, with the first row from the wrong side. Cast off for the armhole every 2nd row as follows: 3 stitches 0-0-1-1-1-2 times, 2 stitches 1-1-1-1-2-2 times. Then decrease 1 stitch inside 3 stitches every 2nd row 4-6-5-6-7-6 times – remember DECREASE TIP = 30-31-31-32-33-34 stitches. When the piece measures 42-44-45-46-47-48 cm, place the outermost 9-9-10-10-11-11 stitches mid-front on a thread for the neckline (including the band stitches). Cast off as follows on each row from the neckline: 2 stitches 1 time, 1 stitch 3 times = 16-17-16-17-17-18 shoulder stitches. Cast off when the piece measures 52-54-56-58-60-62 cm. RIGHT FRONT PIECE: Work in the same way as the left front piece but remember to continue working the buttonholes. SLEEVES: The sleeves are worked in the round as far as the sleeve cap, then finished back and forth. Cast on 44-46-48-50-52-54 stitches with double pointed needles size 6 mm. Insert 1 marker-thread at the beginning of the round (mid-under sleeve); used when increasing under the sleeve. Work stocking stitch in the round for 11-8-7-6-6-6 cm. Now increase 2 stitches mid-under the sleeve – read INCREASE TIP. Increase like this every 10-8-6½-5½-4½-4½ cm a total of 4-5-6-7-8-8 times = 52-56-60-64-68-70 stitches. Continue with stocking stitch until the sleeve measures 43-42-42-41-40-39 cm. Now work the sleeve cap. SLEEVE CAP: On the next round, you cast off 6-6-8-10-10-12 stitches under the sleeve but, to avoid cutting the strand, start the round 3-3-4-5-5-6 stitches before the marker-thread, then cast off and work to end of round. Continue stocking stitch back and forth, casting off for the sleeve cap every 2nd row as follows: 3 stitches 1 time on each side, 2 stitches 2 times on each side, 1 stitch 5-6-7-8-10-10 times on each side = 22-24-24-24-24-24 stitches. Then cast off 3 stitches on each side until the sleeve measures 54-54-55-55-56-56 cm. Cast off the remaining stitches, AT THE SAME TIME as knitting all stitches together 2 and 2. ASSEMBLY: Sew the shoulder seams. Sew the sleeves into the armholes. Sew the buttons onto the left band. NECK WITH I-CORD: Use circular needle size 6 mm and 1 strand of each quality (2 strands). Start from the right side, mid-front and knit up 62-62-68-70-74-76 stitches along the neckline – including the stitches on the thread. Start from the right side with a new strand and work I-CORD CAST-OFF – read description above. Sew the opening mid-front with small stitches so there is an even transition from body to band. CUFFS WITH I-CORD: Use circular needle size 6 mm and 1 strand of each quality (2 strands). Knit up 1 stitch in each stitch from the cast-on edge around the sleeves (= 44-46-48-50-52-54 stitches). Work I-cord cast-off in the round. Sew the ends together so the transition is neat. DECORATIVE BAND WITH I-CORD: Use circular needle size 6 mm and 1 strand of each quality (2 strands). Cast on 6 stitches. Work I-CORD TUBE – read description above, for 12-12-13-13-14-14 cm. Work 1 more 1 tube. Sew 1 cord to each front piece, 10-10-11-11-12-12 cm above the bottom edge. |
|
 |
|
Have you finished this pattern?Tag your pictures with #dropspattern #almondbuttercardigan or submit them to the #dropsfan gallery. Do you need help with this pattern?You'll find 29 tutorial videos, a Comments/Questions area and more by visiting the pattern on garnstudio.com. © 1982-2026 DROPS Design A/S. We reserve all rights. This document, including all its sub-sections, has copyrights. Read more about what you can do with our patterns at the bottom of each pattern on our site. |
|


With over 40 years in knitting and crochet design, DROPS Design offers one of the most extensive collections of free patterns on the internet - translated to 17 languages. As of today we count 324 catalogues and 12290 patterns translated into English (UK/cm). 12290
We work hard to bring you the best knitting and crochet have to offer, inspiration and advice as well as great quality yarns at incredible prices! Would you like to use our patterns for other than personal use? You can read what you are allowed to do in the Copyright text at the bottom of all our patterns. Happy crafting!
Post a comment to pattern DROPS 257-3
We would love to hear what you have to say about this pattern!
If you want to leave a question, please make sure you select the correct category in the form below, to speed up the answering process. Required fields are marked *.