
Popular categories
Looking for a yarn?


Comments / Questions (9)
![]() Wingyi wrote:
Wingyi wrote:
May I know is it possible to crochet with single yarn? May I know how much yarn is required for S/M size sweater? Lots of thanks.
02.02.2026 - 08:12DROPS Design answered:
Hi Wingyi, If you choose a yarn from our yarn group C, you can use a single strand (click on Yarns & Needles at the top of the page, then Yarn Groups on the right-hand side). You will then need the same amount of yarn as specified for the 2 yarns together, i.e., 375 g for size S (250 g + 125 g). Regards Drops Team.
03.02.2026 - 07:44
![]() Nathalie wrote:
Nathalie wrote:
I am starting with the sleeves and red the whole sleeve instruction. De sleeves look flared in the picture but in the pattern for the sleeves I only see decreases and no increases. Can u explain please what I should do.
13.01.2026 - 20:14DROPS Design answered:
Dear Nathalie, that's right there are no increases for sleeve, they are just a bit larger than usual at the bottom, towards wrist, so you will decrease to avoid too big sleeves, then it should measure approx. 32/42 cm circumference at the bottom to get the same effect as on the picture. Happy crocheting!
15.01.2026 - 08:25
![]() Naomi wrote:
Naomi wrote:
Hello! Is this worked in turned rounds or with the right side facing throughout? Thank you in advance!
27.09.2025 - 20:25DROPS Design answered:
Hi Naomi, it is worked with the right side facing throughout. Happy crocheting!
27.09.2025 - 20:57
![]() Severine wrote:
Severine wrote:
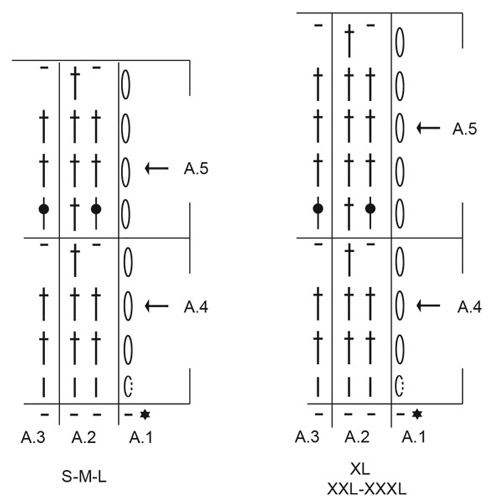
Bonjour, Je ne comprend pas le diagramme A1, puis A2, puis A3. Cela consiste à refaire un tour de maille en l'air? Qui ne sont reliées à la 1ere chaînette que par la maille coulée de jointure? Comment est-ce qu'on termine ce tour? Par une maille coulée ? On as donc crer 2 chaînettes?
21.05.2025 - 21:32DROPS Design answered:
Bonjour, on ne crochète pas chacun des diagrammes tout le tour, on commence le tour par A.1 (3 mailles en l'air pour remplacer la 1ère bride) , puis on répète les 2 mailles de A.2 tout le tour jusqu'à ce qu'il reste 1 maille, on crochète alors A.3 (soit 1 bride soit 1 maile en l'air pour que le motif continue jusqu'à la fin du tour) et on termine par 1 maille coulée dans la 3ème maille en l'air du début du tour (A.1). Bon crochet!
22.05.2025 - 09:03
![]() Simone Fröhlich wrote:
Simone Fröhlich wrote:
Bei Größe M soll ich bei 96 Maschen 42 Maschen zunehmen. Gleichmäßig verteilt, sodass ich auf 138 Maschen komme. Egal, wie ich zunehme, komme ich leider nie auf die gewünschte Anzahl der Maschen. 96 : 42= 2,28 Verdoppel ich jede zweite Masche, werden es zu viele. Mache ich es abwechselnd jede zweite und dritte, werden es zu wenige Maschen :)
14.04.2025 - 18:57DROPS Design answered:
Liebe Simone, rechnerisch ergibt sich in etwa ein Rhythmus von "jede 2., jede 2., jede 2., jede 3. Masche verdoppeln", also 3x nacheinander jede 2. Masche, dann 1x die nächste 3. Masche verdoppeln. Am besten markieren Sie sich die Mitte der Maschen und nehmen in jeder Hälfte 21 Maschen zu, dann behalten Sie leichter den Überblick. Viel Spaß beim Weiterhäkeln!
17.04.2025 - 23:02
![]() Abi Allanson wrote:
Abi Allanson wrote:
Thank you! That’s much clearer now. I didn’t understand how to follow the pattern. I’ve made a good start now - it’s lovely yarn.
18.02.2025 - 08:04
![]() Abi Allanson wrote:
Abi Allanson wrote:
I’m struggling to read the A1 pattern. After I’ve formed a ring to begin, it looks as if I’m trying to create chains in each of the original stitches of the ring. I’ve never seen this before - why is it not just trebles? I’ve tried looking at your videos and pattern notes but I can’t make sense of it.
17.02.2025 - 10:08DROPS Design answered:
Dear Mrs Allanson, diagram A.1 just shorws how to start the round, this means after you have worked the slip stitch creating a large ring of chain, jsut crochet 2 chains (on first round) then 3 chains from next round (see 3rd and 5th symbol), then continue repeating A.2 in the round until 1 stitch remain then end with 1 slip stitch in the2nd/3rd chain from beg of round. Happy crocheting!
17.02.2025 - 14:26
![]() Bliblimama wrote:
Bliblimama wrote:
And you can even print it highlighted, thank you.
09.02.2025 - 12:11
![]() JMFS wrote:
JMFS wrote:
The highlight size is such a Magnificent addition to the patterns. Thank you! That's going to be helpful in making DROPs patterns. Less time for us to spend highlighting means more time crocheting!
07.02.2025 - 20:06
|
||||||||||||||||||||||
Seafoam Whisper#seafoamwhispersweater |
||||||||||||||||||||||
 |
 |
|||||||||||||||||||||
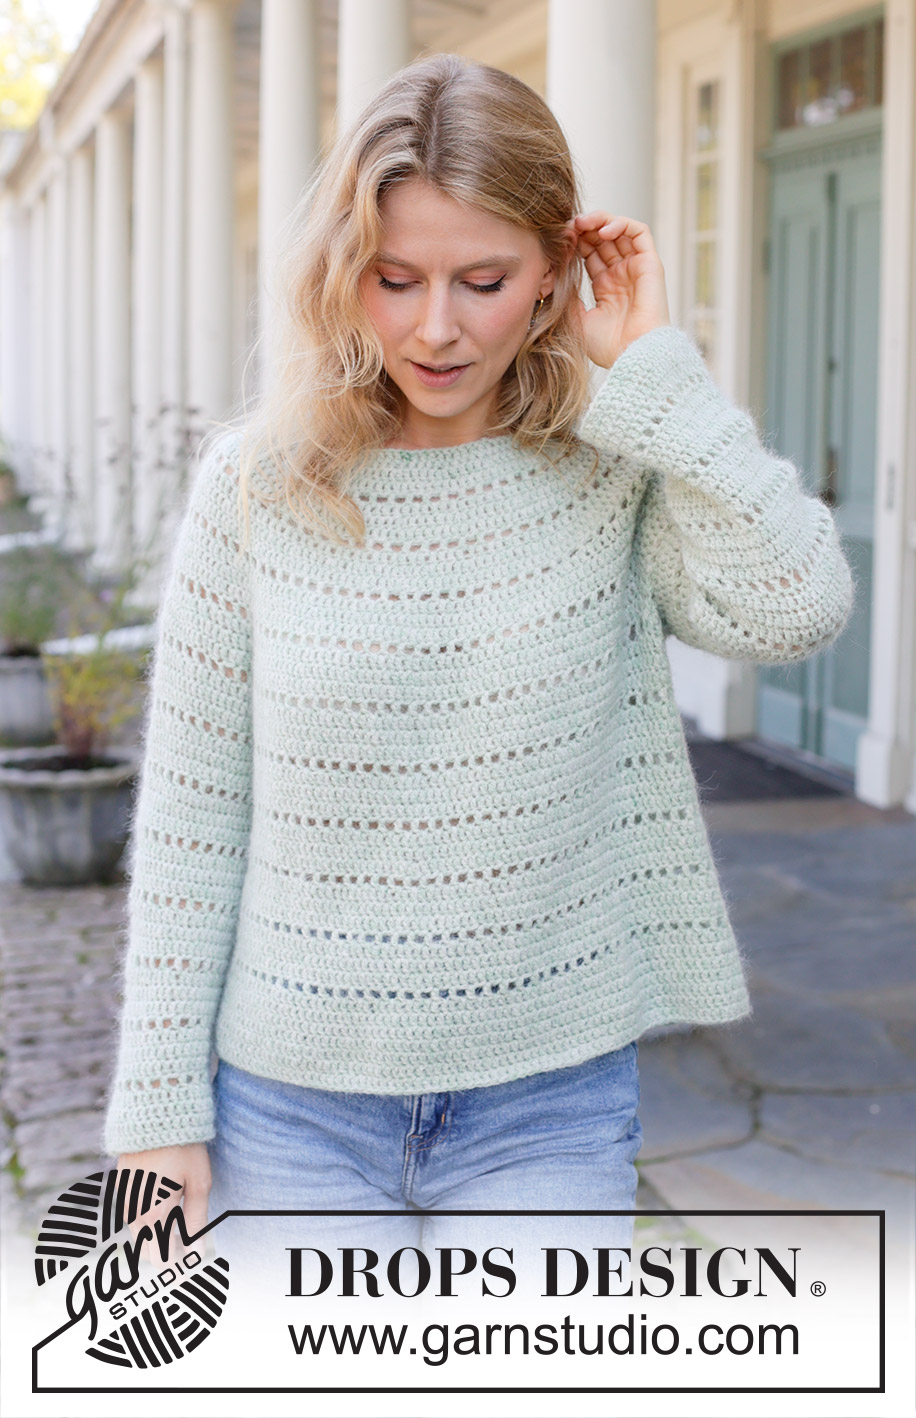
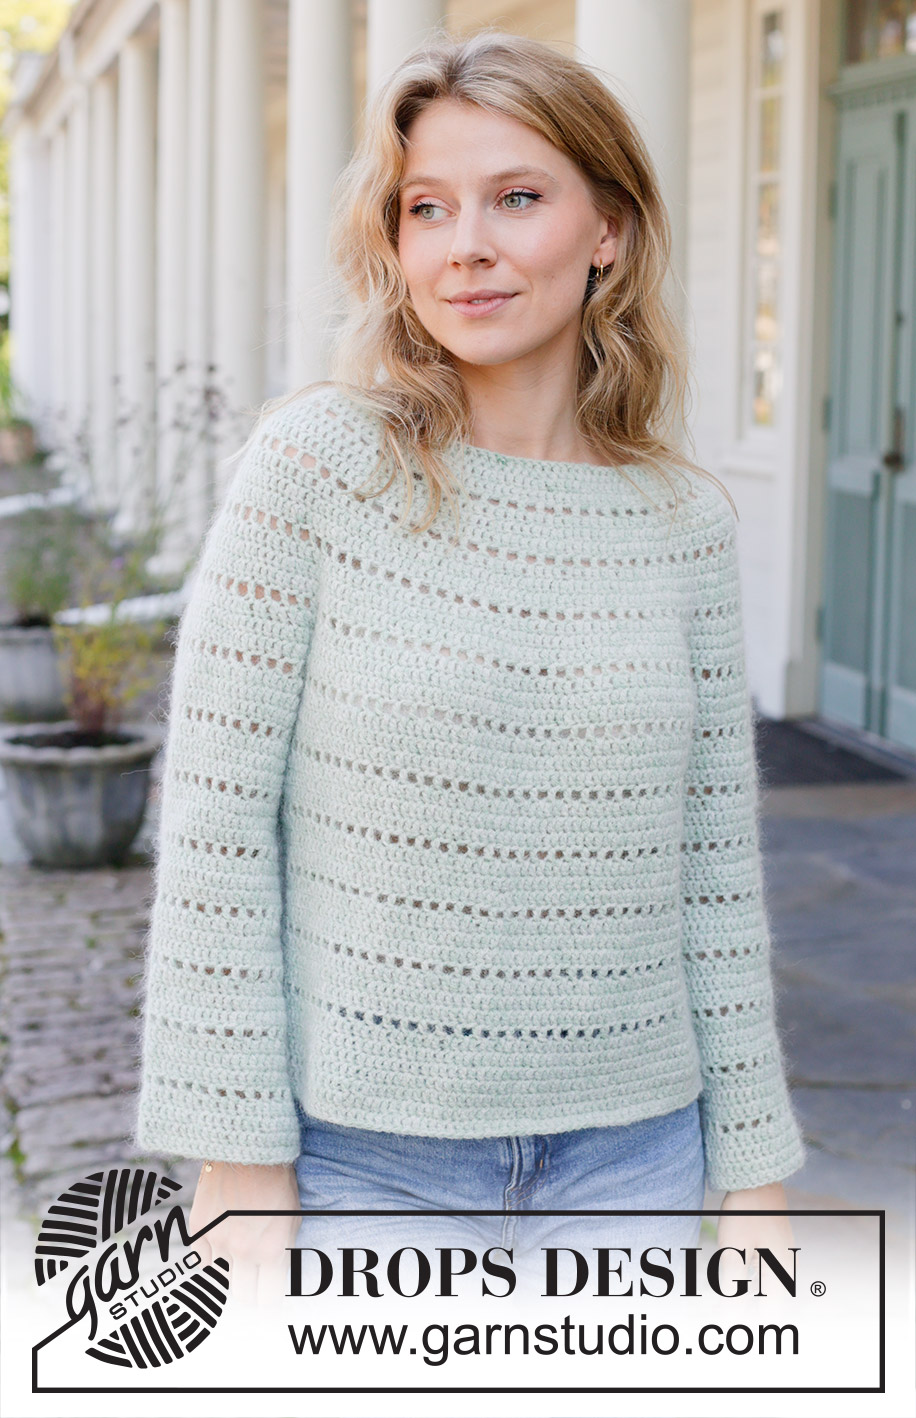
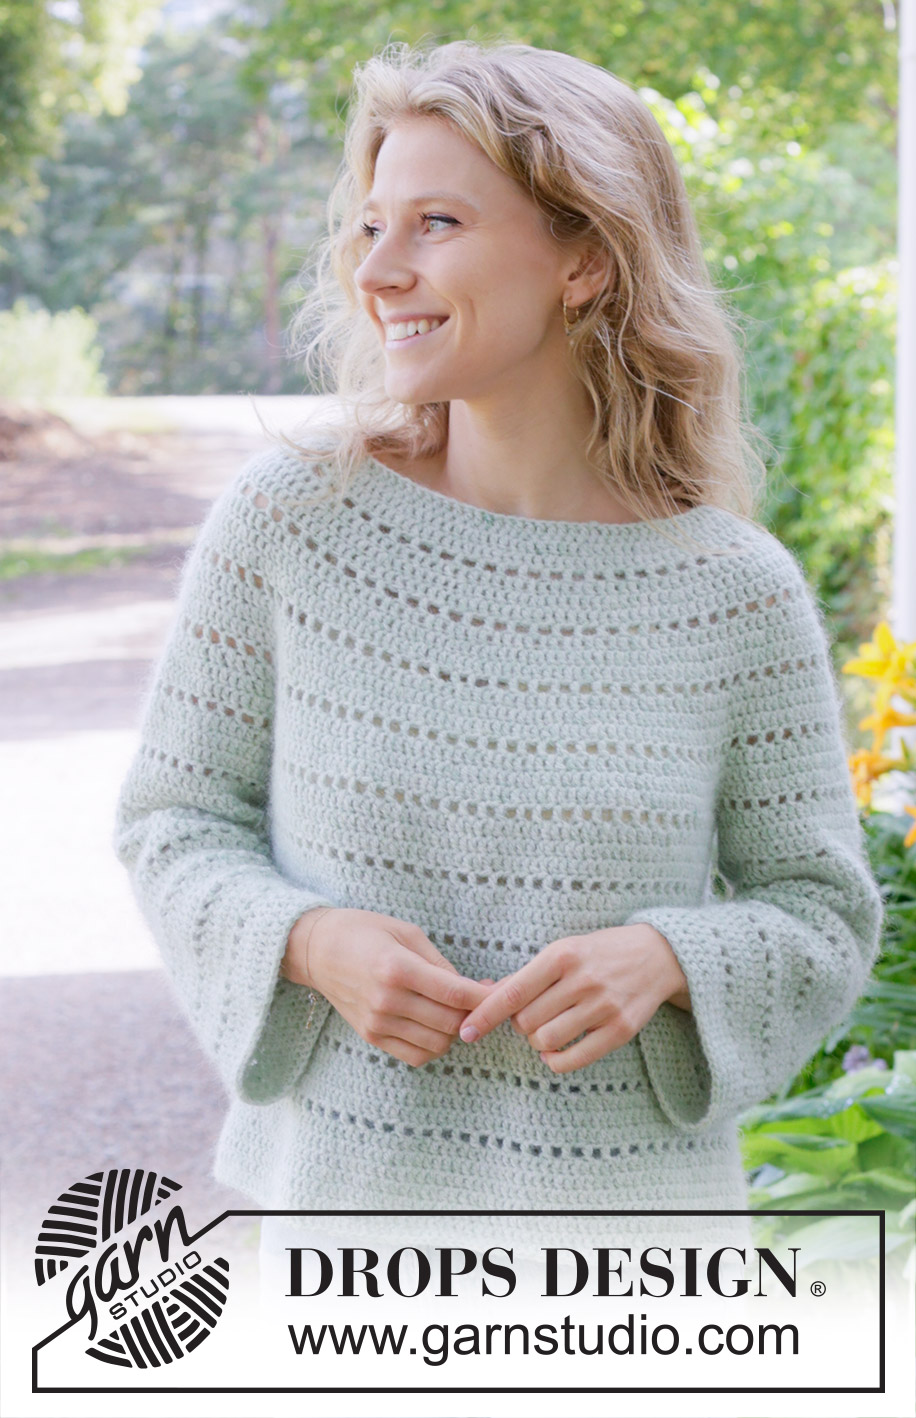
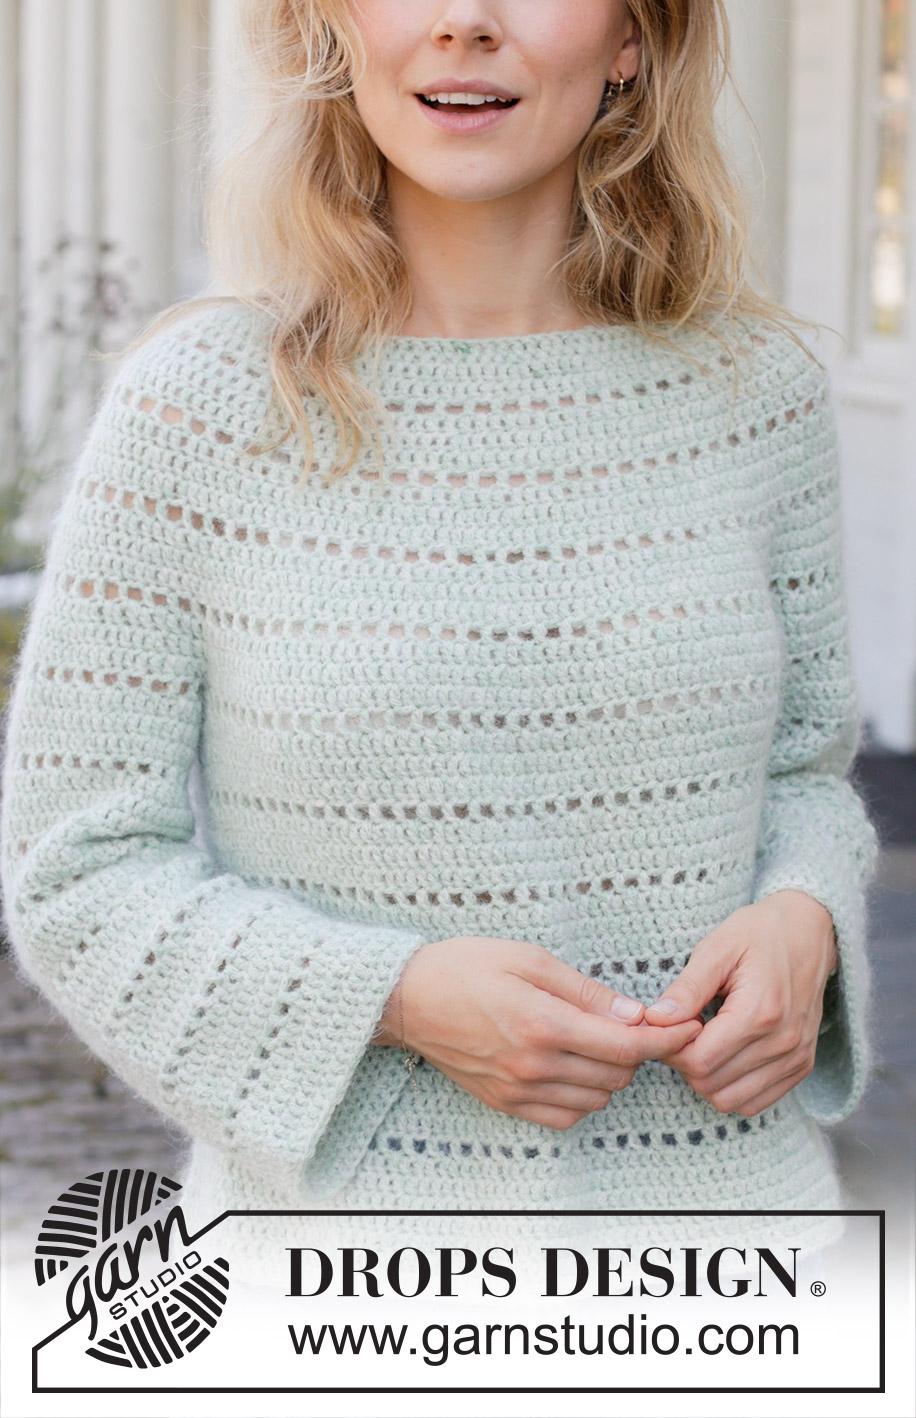
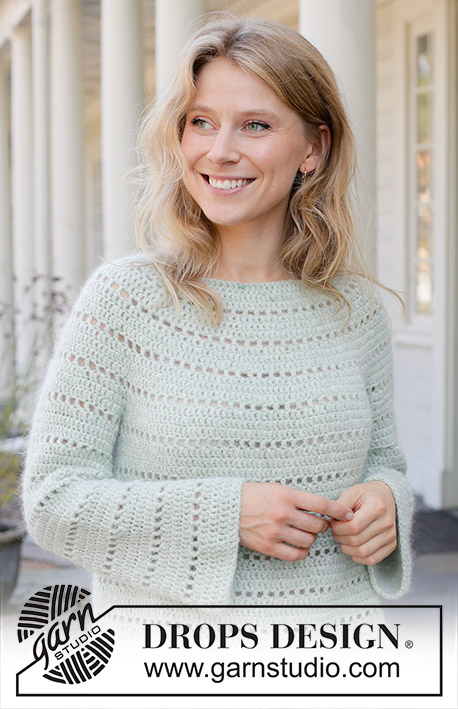
Crocheted jumper in DROPS Sky and DROPS Kid-Silk. Piece is crocheted top down with round yoke and lace pattern. Size: S - XXXL.
DROPS 258-10 |
||||||||||||||||||||||
|
---------------------------------------------------------- EXPLANATION FOR THE PATTERN: ---------------------------------------------------------- CHAIN STITCH: If you work at the back of the crochet hook the chain stitch will often be too tight. 1 chain stitch should be just as long as 1 half treble crochet/treble crochet is wide PATTERN: See diagrams A.1 to A.5. Choose diagram for correct size. INCREASE TIP (evenly): To calculate how to increase evenly, use the total number of stitches on round (e.g. 92 stitches) and divide stitches by number of increases to be done (e.g. 38) = 2.4. In this example increase by working 2 treble crochets in 1 treble crochet alternately approx. every 2nd and 3rd stitch. CROCHET TIP: If the crochet tension vertically does not match the pattern can be repeated vertically until correct measurements but to make the division easier it is best to divide for body and sleeves as follows in the different sizes: SIZE S, M and L: Divide after 1st or 2nd round in A.5. SIZE XL, XXL and XXXL: Divide after 1st, 2nd or 3rd round in A.5. DECREASE TIP: Decrease at beginning and end of round as follows: Work the first treble crochet as before (i.e. 3 chain stitches replace first treble crochet), work the next 2 treble crochets together as follows: * Make 1 yarn over, insert hook in next stitch and get the yarn, make 1 yarn over and pull yarn through the 2 loops on hook *, repeat from *-* 2 times in total, there are 3 loops on hook. Make 1 yarn over and pull yarn over through all 3 loops on hook (= 1 stitch decreased). Work as before until 3 treble crochets remain at the end of round, decrease 1 treble crochet more the same way and work 1 treble crochet in last treble crochet on round. 2 stitches have been decreased on round. ---------------------------------------------------------- START THE PIECE HERE: ---------------------------------------------------------- JUMPER - SHORT OVERVIEW OF THE PIECE: Yoke is worked in the round from left shoulder at the back, and worked top down. When yoke is done, divide piece for body and sleeves. Work body downwards in the round while putting the sleeves aside. Then work sleeves downwards in the round. Work 1 round around the neck at the end. YOKE: Use hook size 4.5 mm and 1 strand DROPS Sky and 1 strand DROPS Kid-Silk (2 strands). Work 92-96-100-104-108-112 CHAIN STITCHES - read explanation above, and form a ring with 1 slip stitch in first chain stitch. Now work PATTERN as follows: Work A.1, work A.2 until 1 chain stitch remain, work A.3. Work as shown in A.4 - on round marked with arrow increase 38-42-46-52-54-58 stitches evenly - read INCREASE TIP in explanation above = 130-138-146-156-162-170 stitches. Remember to follow the crochet tension! When A.4 has been worked, work A.5 the same way and repeat vertically - on round marked with arrow increase stitches as explained below. 1st time: Work A.5 and increase 38-42-46-52-54-58 stitches evenly on round marked with arrow = 168-180-192-208-216-228 stitches. 2nd time: Work A.5 and increase 36-40-42-46-50-52 stitches evenly on round marked with arrow = 204-220-234-254-266-280 stitches. 3rd time: Work A.5 and increase 36-40-42-46-50-52 stitches evenly on round marked with arrow = 240-260-276-300-316-332 stitches. Continue A.5 without increases until 17-18-18-20-21-22 rounds in total have been worked and piece measures 19-20-20-22-23-24 cm from cast-on edge – read CROCHET TIP. Now divide yoke for body and sleeves. DIVIDING FOR BODY AND SLEEVES: AT THE SAME TIME as next round in A.5 is worked divide for body and sleeves as follows: Work 74-80-84-92-98-106 stitches (= back piece), skip 46-50-54-58-60-60 stitches (= sleeve), work 6-6-8-10-12-14 chain stitches (= in the side under sleeve), work 74-80-84-92-98-106 stitches (= front piece), skip 46-50-54-58-60-60 stitches (= sleeve), work 6-6-8-10-12-14 chain stitches (= in the side under sleeve) and finish round with 1 slip stitch as before. Finish body and sleeves separately. BODY: = 160-172-184-204-220-240 stitches. Work A.5 in the round as before. When piece measures 19-20-22-22-22-23 cm from division, finish A.5. Work 1 treble crochet in every treble crochet the entire round until piece measures 27-28-30-29-30-31 cm from division. Cut and fasten the yarn. Jumper measures approx. 52-54-56-58-60-62 cm from the top of shoulder. SLEEVES: Begin round in the 4th-4th-5th-6th-7th-8th chain stitch in the side under sleeve. Work 3 chain stitches (replace first treble crochet), work 1 treble crochet in each of the next 1-1-2-3-4-5 chain stitches, work 1 treble crochet in the last chain stitch, but wait with last yarn over and pull through, work 1 treble crochet around the side of treble crochet that belongs to body, but pull last yarn over through all 3 loops on hook (to close hole), work diagram A.5 as before over the next 46-50-54-58-60-60 treble crochets, work 1 treble crochet around the side of treble crochet that belongs to body, but wait with last yarn over and pull through, work 1 treble crochet in first chain stitch in the side under sleeve but pull last yarn over through all 3 loops on hook (to close hole), work 1 treble crochet in each of the last 2-2-3-4-5-6 chain stitches under sleeve and finish with 1 slip stitch as before = 52-56-62-68-72-74 treble crochets. Insert a marker thread in the middle of the 6-6-8-10-12-14 stitches under sleeve - move the marker thread upwards when working - use marker thread later when decreasing mid under sleeve. Continue to work A.5 in the round but in the 6-6-8-10-12-14 treble crochets mid under sleeve work treble crochet, AT THE SAME TIME when sleeve measures 3 cm from division decrease 2 stitches under sleeve – read DECREASE TIP in explanation above, and decrease approx. every 4-4-5-6-9-9 cm 1-1-2-3-4-4 times in total = 50-54-58-62-64-66 stitches. When sleeve measures 38-37-38-36-36-36 cm, continue with treble crochets. Work until sleeve measures 42-41-42-41-40-40 cm from division. Cut and fasten the yarn. NECK EDGE: Begin mid back, fasten strand with 1 slip stitch, work 2 chain stitches (replace first half treble crochet), work 1 half treble crochet between every half treble crochet from first round on yoke, finish round with 1 slip stitch in 2nd chain stitch. Cut and fasten the yarn. |
||||||||||||||||||||||
Diagram explanations |
||||||||||||||||||||||
|
||||||||||||||||||||||
 |
||||||||||||||||||||||
 |
||||||||||||||||||||||
Have you finished this pattern?Tag your pictures with #dropspattern #seafoamwhispersweater or submit them to the #dropsfan gallery. Do you need help with this pattern?You'll find 9 tutorial videos, a Comments/Questions area and more by visiting the pattern on garnstudio.com. © 1982-2026 DROPS Design A/S. We reserve all rights. This document, including all its sub-sections, has copyrights. Read more about what you can do with our patterns at the bottom of each pattern on our site. |
||||||||||||||||||||||


With over 40 years in knitting and crochet design, DROPS Design offers one of the most extensive collections of free patterns on the internet - translated to 17 languages. As of today we count 324 catalogues and 12290 patterns translated into English (UK/cm). 12290
We work hard to bring you the best knitting and crochet have to offer, inspiration and advice as well as great quality yarns at incredible prices! Would you like to use our patterns for other than personal use? You can read what you are allowed to do in the Copyright text at the bottom of all our patterns. Happy crafting!
Post a comment to pattern DROPS 258-10
We would love to hear what you have to say about this pattern!
If you want to leave a question, please make sure you select the correct category in the form below, to speed up the answering process. Required fields are marked *.