
Popular categories
Looking for a yarn?


Comments / Questions (205)
![]() Luhaib wrote:
Luhaib wrote:
After finishing the neck rib and increasing to 144 (size M) it is said: Insert 1 marker after the first 52 stitches is this going to be the beginning of the round? (there should be a marker in mid back when we started the rib of the neck and finishing A1 then we count the first 52 sts).. the pattern of yoke doesn’t say how to work those first 52 sts. Not clear explanation of how we jump from end of neck and beginning of yoke so we count 52 sts. Please clarify.
06.11.2025 - 18:23DROPS Design answered:
Hi Luhaib, the beginning of round is at the same place as before, This particular marker (approx. mid-front) is only for measurements. It should sit at the same place all the time - you should put it there without working stitches. Happy knitting!
24.11.2025 - 12:05
![]() Patoua wrote:
Patoua wrote:
Merci pour les dernières explications, mais je ne comprends toujours pas comment tricoter les 13 mailles sous la manches . J’ai 1m envers 1 m endroit du raglan pour le dos, puis les 13 mailles et 1m endroit et 1 m envers (2nd raglan ) et A2. Comment tricoter les 13 mailles? A3? Je ne comprends pas pourquoi j’ai 3 M envers de chaque côté de la manche ?
06.11.2025 - 18:12DROPS Design answered:
Bonjour Patoua, vous allez intégrer ces 13 m au motif, autrement dit, en partant des de la fin du dos/devant (A.4 se termine par les 5 dernières mailles de A.3), vous tricotez: ces 5 m + les 2 m des raglans + 1 des 13 m (= 8 m pour un nouveau motif de A.3), puis encore 1 fois A.3 sur les 8 m suivantes et vous tricotez encore 1 fois A.3 sur les 4 dernières des 13 m + les 2 m des raglans et les 2 m premières m de A.2 (= 4+2+2=8 m pour 1 A.3). Bon tricot!
07.11.2025 - 08:19
![]() Patoua wrote:
Patoua wrote:
Bonjour J’en suis à la séparation corps/manches. En taille XL, on a les 3 m du raglan, on laisse les 2 premières pour le dos, mais ça fait 3 mailles envers alors qu’à aucun moment on a ça sur le motif. On met 97 m sur un fil, on arrive sur le 2nd raglan sur une M endroit puis encore 3 m envers. Comment retrouver le motif? Je ne vois pas. Merci beaucoup
03.11.2025 - 14:28DROPS Design answered:
Bonjour Patoua, les 3 mailles des raglans se tricotent (1 m env, 1 m end, 1 m env), lorsque l'on divise l'empiècement, on tricotez les 2 premières mailles (1 m env, 1 m end) pour le dos effectivement; vous avez ensuite pour la manche (10 m de A.2, 72 m de A.3, 3 m de A.3 et 10 m de A.4 = 95 m pour chacune des manches + 1 m de chaque côté = 97 m pour les manches), vous tricotez après la 1ère manche (début du devant : 1 m end; 1 m env (2 dernières m du raglan). Lorsque vous tricotez ensuite après les manches, vous tricotez A.3 tout le tour. Bon tricot!
03.11.2025 - 16:49
![]() Agnieszka wrote:
Agnieszka wrote:
Dzień dobry, przerobiłam pierwszą wysokość karczku - mam aktualnie 216 oczek na drutach dla rozmiaru S (144+ 8 narzutów + 64ilość dodanych oczek na wysokość) i nie wiem co zrobić dalej. Z tego co rozumiem powinnam przerobić kolejne 2 wysokości schematów A2 i A4, ale nie rozumiem jak przejść z ostatniej wysokości schematu z powrotem do pierwszej. Jak zacząć pierwszy rząd po skończeniu pierwszej wysokości karczka? Lewe - prawe - lewe - A3 (1. rząd) - A2 itd?
29.10.2025 - 21:37DROPS Design answered:
Witaj Agnieszko, schematy A.2 i A.4 przerabiasz dalej od dołu, wykonujesz narzut i 2 oczka lewe, dalej przerabiasz schemat A.3 (za każdym razem gdy schematy A.2 i A.4 zostaną przerobione na wysokość, jest wystarczająca liczba oczek, aby przerobić o 2 motywy A.3 więcej, na szerokość) i schemat A.4 czyli 2 oczka lewe i 1 narzut. Dalej przerabiać ścieg fantazyjny i dodawać oczka, aż schematy A.2, A.3 i A.4 zostaną przerobione w sumie 3 razy na wysokość. Pozdrawiamy!
30.10.2025 - 08:20
![]() Melina wrote:
Melina wrote:
Hallo, nach der Reihe mit 144 Maschen soll man ja auf 160 Maschen zunehmen, also insgesamt 16. Mit den Raglan Zunahmen und den Umschlägen aus A2 und A4 kommt man zwar auf 160 Maschen aber bei A3 nimmt man ja eine Masche ab indem man eine abhebt, zwei strickt und dann die abgehobene überzieht. Deshalb fehlen mir am Ende der ersten Raglan Reihe Maschen. Was mache ich falsch?
28.10.2025 - 10:39DROPS Design answered:
Liebe Melina, die Masche, die Sie in A.3 abnehmen, nehmen Sie zwei Runden später wieder zu, damit ist das wieder ausgeglichen. Die Maschenzahl, die in der Anleitung genannt ist, bezieht sich stets auf die Maschen in A.3, die vor der Abnahme vorhanden sind - Sie berechnen A.3 (wie es unter MUSTER stet) stets mit 8 Maschen, auch wenn es in dieser ersten Reihe 1 Masche pro A.3 weniger ist. Viel Spaß beim Weiterstricken!
28.10.2025 - 22:29
![]() Mar wrote:
Mar wrote:
Czy jest może nagrany tutorial jak wydziergać ten sweterek? Jest piękny, ale niestety gubię się we wzorze :(
27.10.2025 - 10:47DROPS Design answered:
Witaj, niestety nie mamy jeszcze takiego tutorialu. Radzę zacząć i w razie jakichkolwiek problemów pisać, z zaznaczeniem przerabianego rozmiaru. Postaramy się pomóc. Pozdrawiam!
27.10.2025 - 15:40
![]() Anne wrote:
Anne wrote:
In the second round of the yoke should I yet again : pick up 1 stitch from the previous round, k1, pick up 1 stitch from the previous round? Or start by working A.2 once then 3 times A.3 etc without doing the picking up, k1, picking up? Please explain . I just finished round 1 with the yo, the pattern says pick up, k, pick up but it doesn’t make sense ???
22.10.2025 - 18:30
![]() Emilia wrote:
Emilia wrote:
Okrutnie nie jasny i brzydko napisany wzór, włóczki kupione i nie da się po dekolcie kontynuować karczku.
22.10.2025 - 03:42DROPS Design answered:
Witaj Emilio, na początek spójrz do sekcji komentarze, właśnie odpowiadałam pytanie dotyczące początku swetra. Pamiętaj, że na każdym etapie możesz zadać pytanie, a my postaramy się pomóc. Pozdrawiamy!
22.10.2025 - 08:50
![]() Gosia wrote:
Gosia wrote:
Proszę mi jeszcze pomóc w odczytaniu reglanu w drugim rzędzie.karczku. Nie widzę w którym schemacie jest uwzględniony. Czy dodajemy oczka w każdym rzędzie, czy co drugi rząd?
20.10.2025 - 15:18DROPS Design answered:
Witaj Gosiu, oczka na reglan są dodawane wg schematów A.2 i A.4, to oznacza, że dodajesz oczka na reglan co 2 okrążenia. Czyli w drugim okrążeniu karczku nie dodajesz oczek na reglan. Ponownie robisz to w okrążeniu 3. Pozdrawiamy!
21.10.2025 - 11:35
![]() Gosia wrote:
Gosia wrote:
Dzień dobry, doszłam w robótce do pierwszego rzędu karczku i nie pasuje mi liczba oczek. Po zakończeniu dekoltu miałam 144 oczka. Po pierwszym rzędzie dodałam na reglan 4x po 2 oczka czyli 8. 144+8=152. Dlaczego powinnam mieć 160? Gdzie znajdę te pozostałe 8 ?
20.10.2025 - 11:49DROPS Design answered:
Witaj Gosiu, na reglan dodajesz oczka zgodnie ze schematami A.2 i A.4 > dodanych 8 oczek w okrążeniu. W tym samy okrążeniu dodajesz jeszcze 8 o. z nitki poprzecznej między 2 oczkami. Tak więc masz 144+8+8=160. Musisz przerabiać dokładnie jak jest opisane w części KARCZEK, krok po kroku. Pozdrawiamy!
21.10.2025 - 11:31
|
|||||||||||||||||||
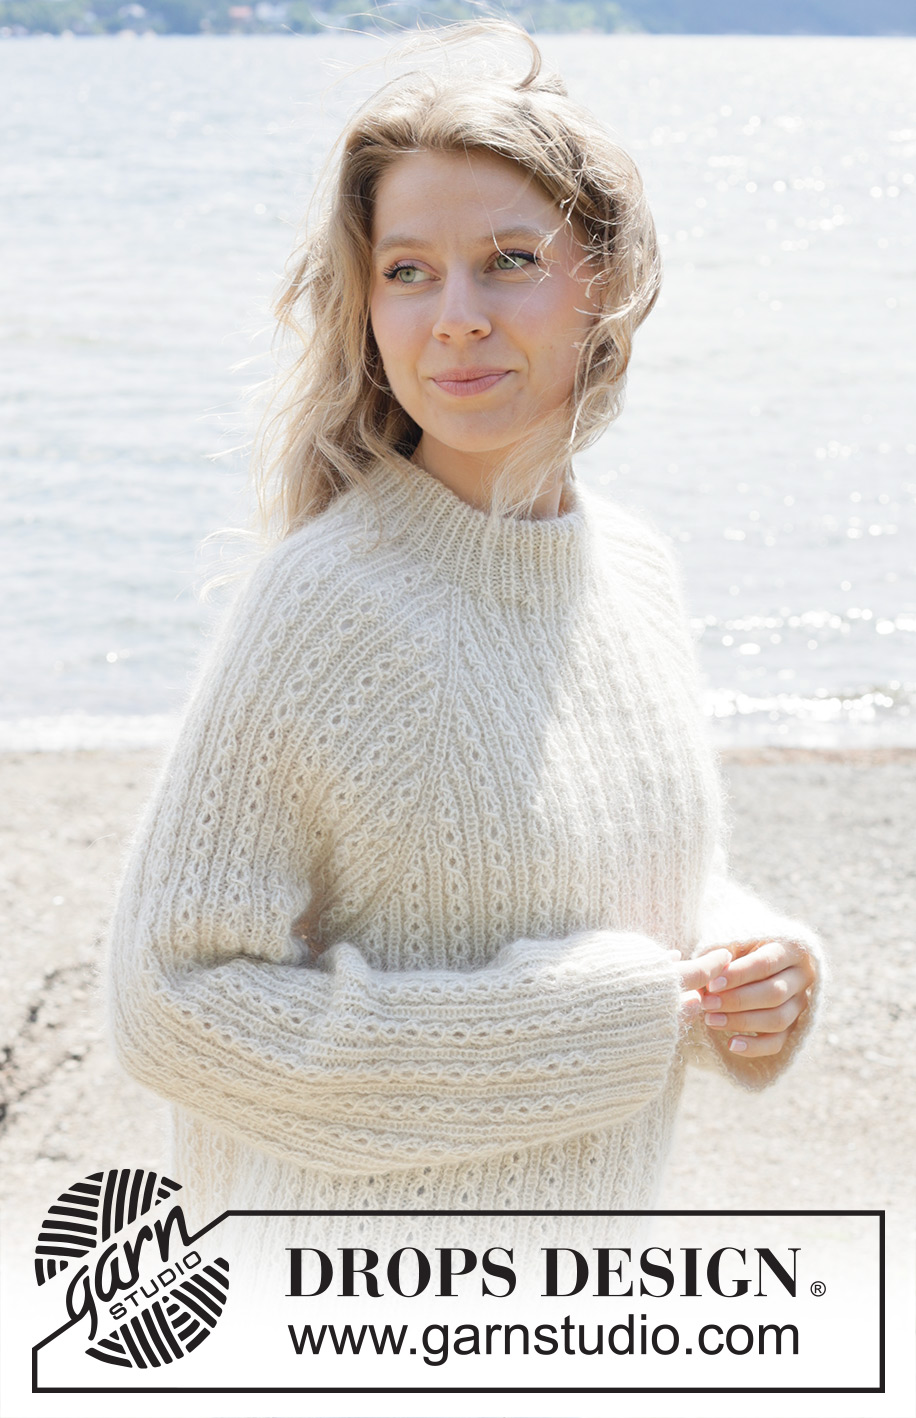
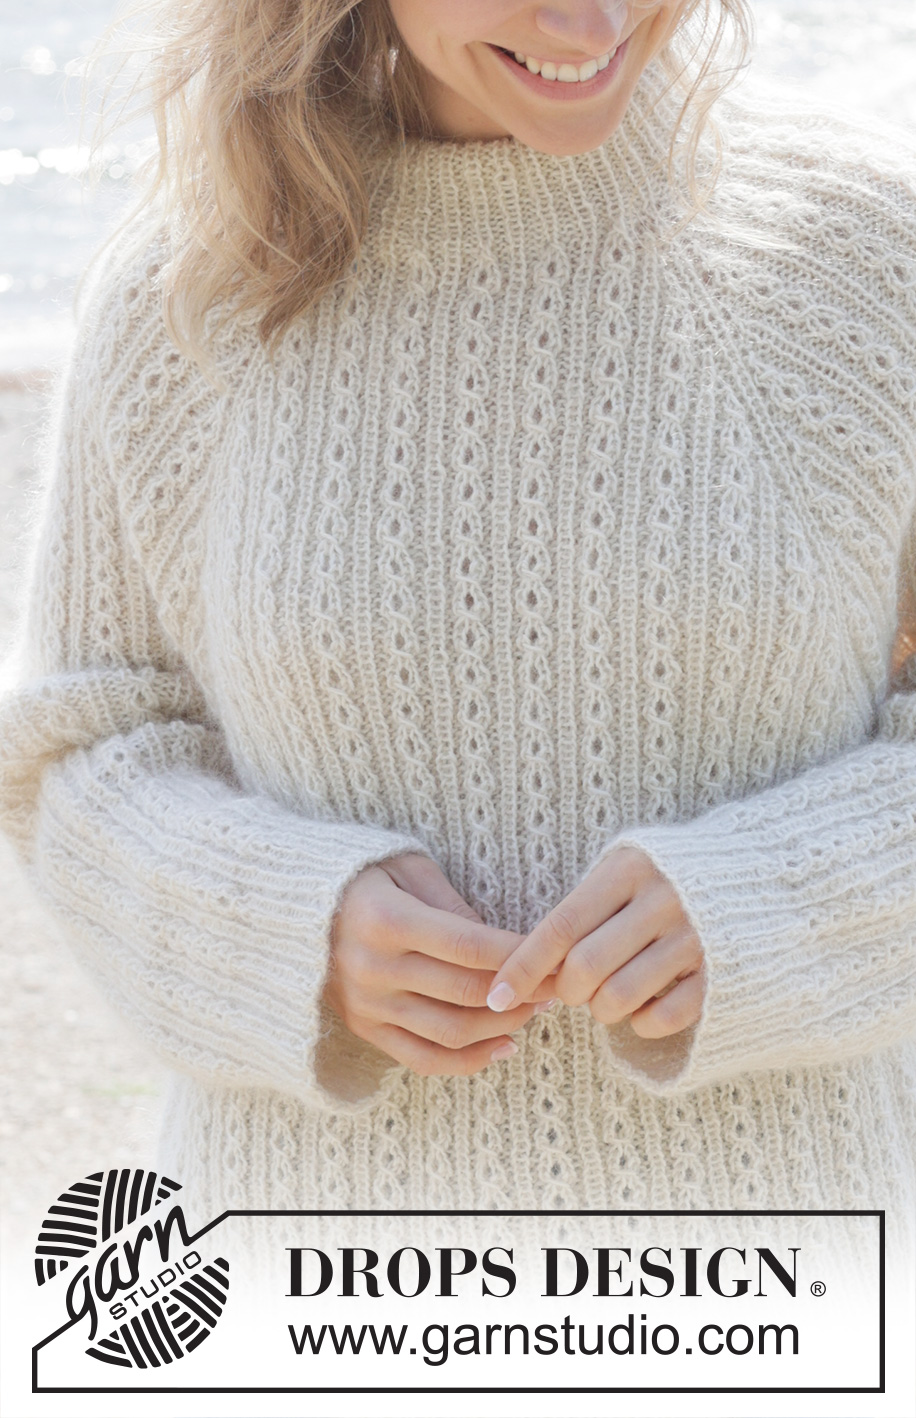
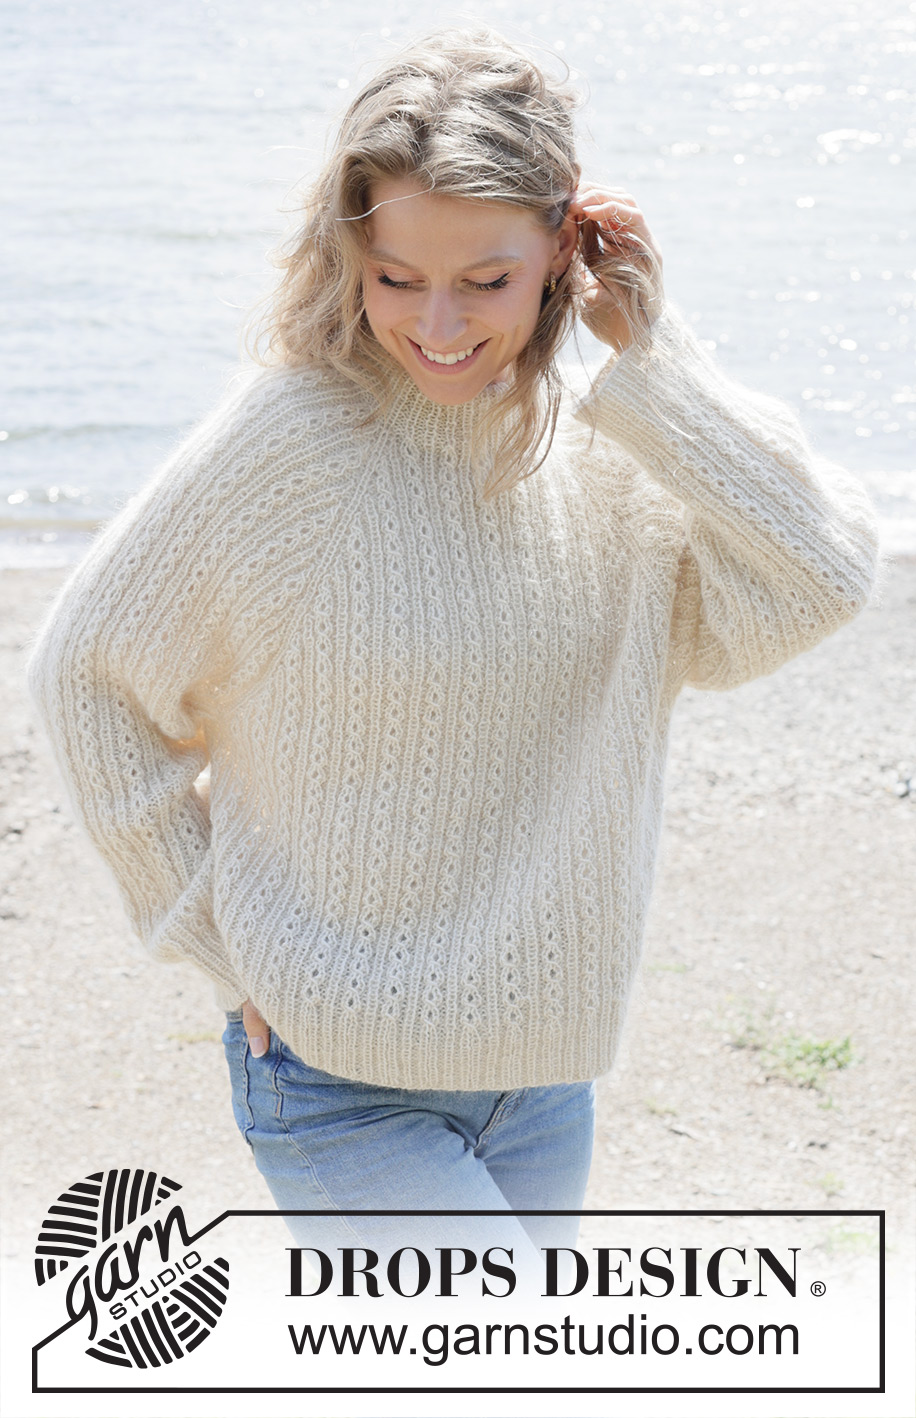
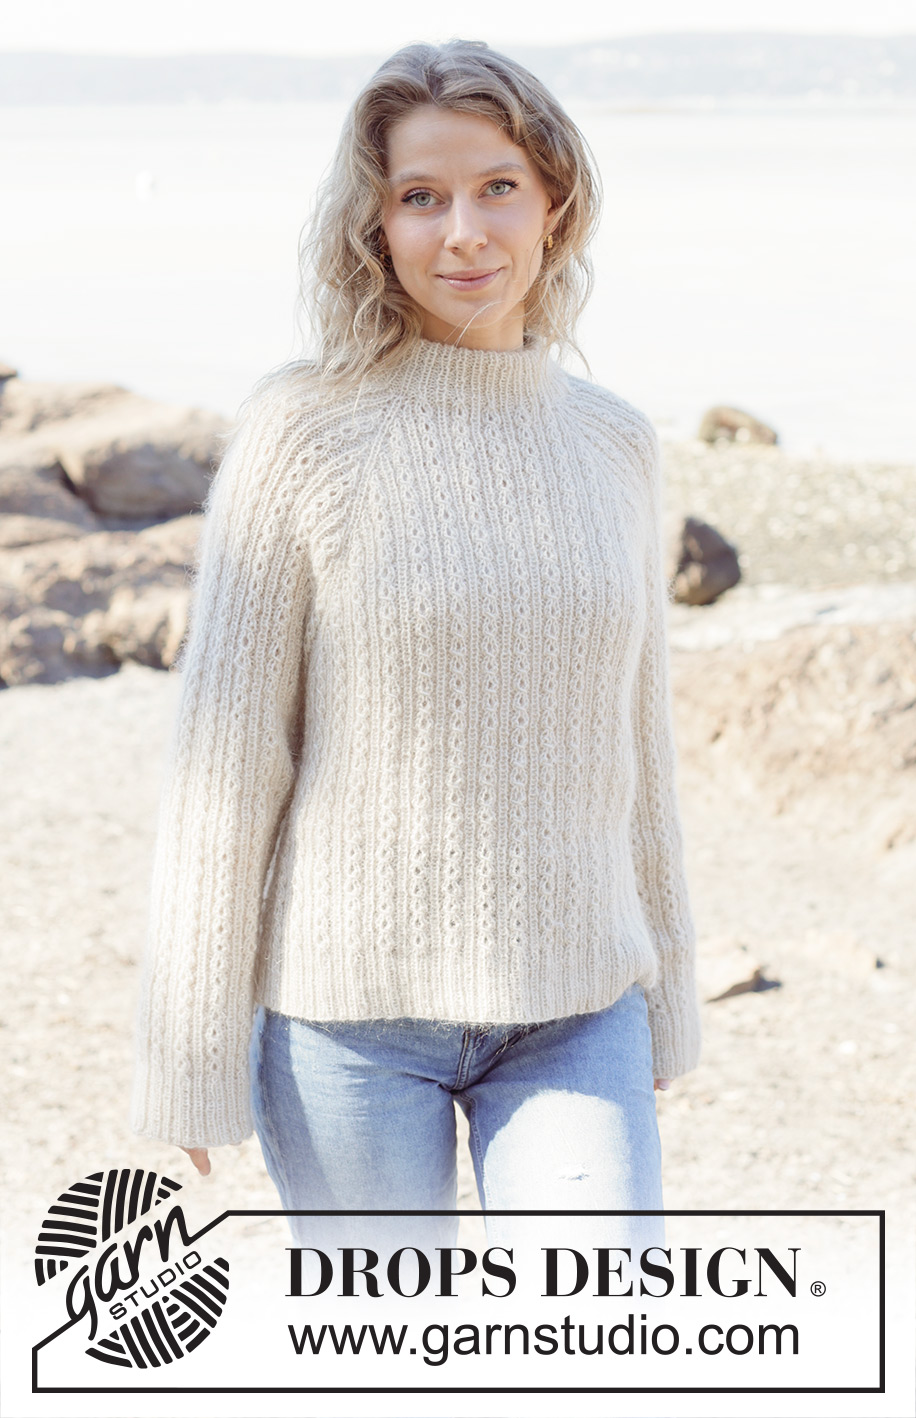
Winter Pearl Sweater#winterpearlsweater |
|||||||||||||||||||
 |
 |
||||||||||||||||||
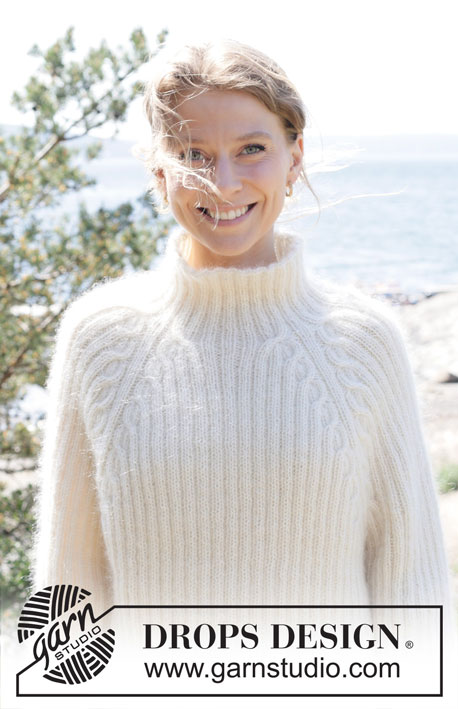
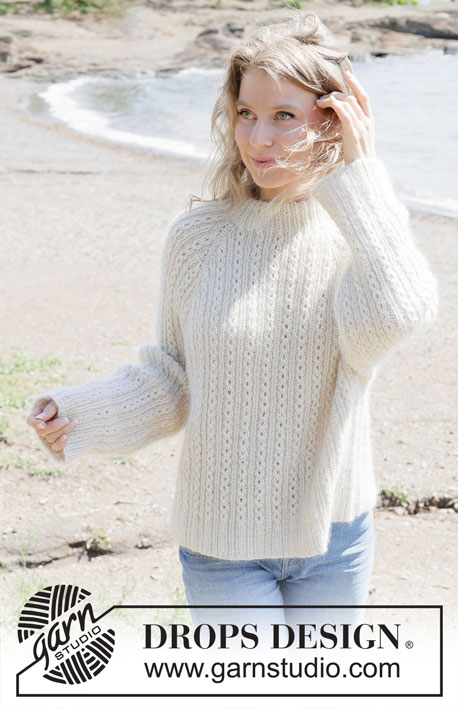
Knitted jumper in DROPS Alpaca and DROPS Kid-Silk. The piece is worked top down with double neck, raglan and cables. Sizes S - XXXL.
DROPS 255-1 |
|||||||||||||||||||
|
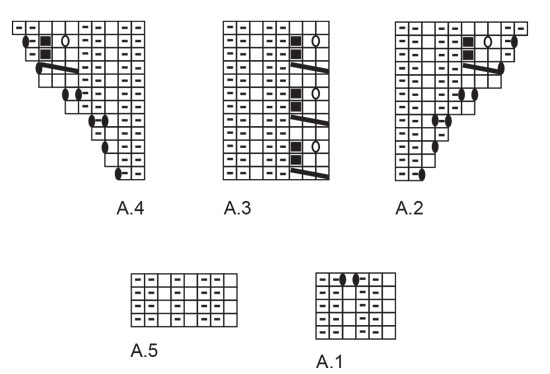
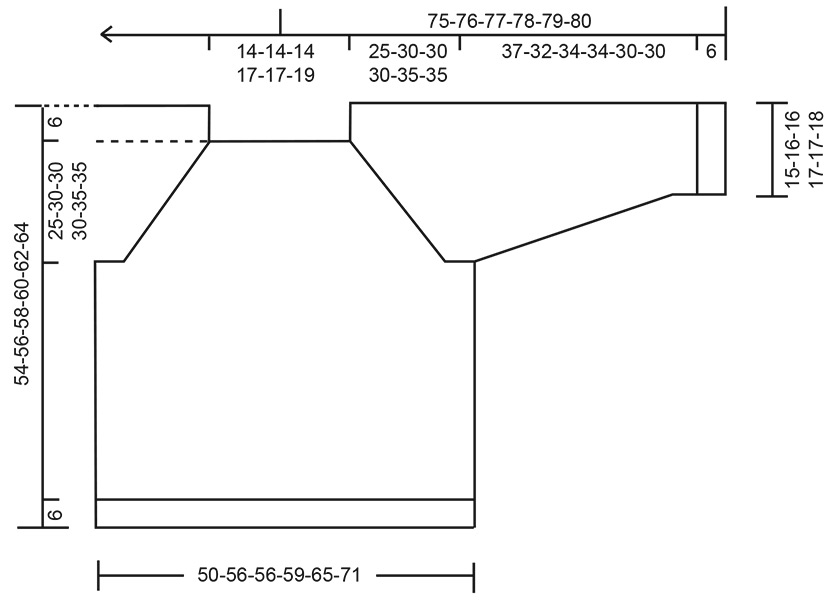
------------------------------------------------------- EXPLANATIONS FOR THE PATTERN: ------------------------------------------------------- PATTERN: See diagrams A.1 to A.5. A.3 is always counted as 8 stitches. RAGLAN: Increase for raglan before/after 1 purled + 1 knitted + 1 purled stitch (= raglan-line). The increased stitches are worked into the pattern. The increases are marked in the diagrams. DECREASE TIP (for sleeves): Decrease by purling 2 together on each side of 1 knitted stitch (= 2 decreased stitches). The stitches which do not fit into a complete cable are knitted. ----------------------------------------------------- START THE PIECE HERE: ------------------------------------------------------- JUMPER – SHORT OVERVIEW OF THE PIECE: The pattern uses both long and short needles; start with the length which fits the number of stitches and change when necessary. The neck and yoke are worked in the round with circular needle, top down and from the right back shoulder. When the yoke is finished, it is divided for the body and sleeves and the body continued in the round, while the sleeves wait. The sleeves are worked top down, in the round. The neck is folded double and fastened to the inside. DOUBLE NECK: Cast on 108-108-108-120-120-132 stitches with circular needle size 3 mm and 1 strand of each quality (= 2 strands). Work rib according to A.1 in the round. Repeat the first 4 rounds of A.1 until the rib measures 9-9-9-11-11-11 cm; the neck is later folded double. Change to circular needle size 4.5 mm and work the last round in A.1 (yarn overs knitted twisted on the next round) = 144-144-144-160-160-176 stitches. Insert 1 marker after the first 52-52-52-57-57-61 stitches (approx. mid-front); the piece is measured from here. YOKE: Continue in the round as follows: Pick up 1 stitch from the previous round (all picked-up stitches are purled twisted), knit 1 ( = raglan-line), pick up 1 stitch from the previous round, work A.2, A.3 across the next 24 stitches, work the first 3 stitches in A.3, A.4 (= sleeve), pick up 1 stitch from the previous round, knit 1 (= raglan-line), pick up 1 stitch from the previous round, work A.2, A.3 across the next 32-32-32-40-40-48 stitches, work the first 3 stitches in A.3, A.4 (= front piece), pick up 1 stitch from the previous round, knit 1 (= raglan-line), pick up 1 stitch from the previous round, work A.2, A.3 across the next 24 stitches, work the first 3 stitches in A.3, work A.4 (= sleeve) pick up 1 stitch from the previous round, knit 1 (= raglan-line), pick up 1 stitch from the previous round, work A.2, A.3 across the next 32-32-32-40-40-48 stitches, work the first 3 stitches in A.3, A.4 (= back piece). NOTE! Make sure the pattern matches the rib. The increases for raglan are marked in the diagrams, you have picked up 8 extra stitches = 160-160-160-176-176-192 stitches. RAGLAN: Increase as shown in the diagrams, increasing on each side of 1 purled + 1 knitted + 1 purled stitch in each raglan-line. Each time A.2 and A.4 are finished in height, there is room for 2 more repeats of A.3 in width. Continue with pattern and increases until A.2, A.3 and A.4 have been worked a total of 3-4-4-4-5-5 times in height. There are 344-408-408-424-488-504 stitches. Now increase only on the front and back pieces; the increases on the sleeves are finished. Work 2 more repeats in height with increases as shown in A.2 and A.4 on the front and back pieces, continuing the pattern on the sleeves without further increases. There are 408-472-472-488-552-568 stitches. Continue working without further increases until the yoke measures 25-30-30-30-35-35 cm from the marker mid-front. DIVIDE FOR BODY AND SLEEVES: Work the next round as follows: Work the first 2 stitches (belong to back piece), place the next 81-97-97-97-113-113 stitches on a thread for the sleeve, cast on 13-13-13-13-13-21 stitches (in side under sleeve), work 123-139-139-147-163-171 stitches (front piece), place the next 81-97-97-97-113-113 stitches on a thread for the sleeve, cast on 13-13-13-13-13-21 stitches (in side under sleeve), work the remaining 121-137-137-145-161-169 stitches (back piece). BODY: = 272-304-304-320-352-384 stitches. Continue the pattern in the round until the piece measures 42-44-46-48-50-52 cm from the marker mid-front. Change to circular needle size 3 mm and work rib according to A.5 for 6 cm, make sure you have knit 1, purl 1, knit 1 across the cables and knit over knit and purl over purl otherwise. Cast off. The jumper measures approx. 48-50-52-54-56-58 cm from the marker and 54-56-58-60-62-64 cm from the shoulder. SLEEVES: Place the 81-97-97-97-113-113 sleeve-stitches from the thread on one side of the piece on circular needle size 4.5 mm and knit up 1 stitch in each of the 13-13-13-13-13-21 stitches cast on under the sleeve + 1 extra stitch on each side = 96-112-112-112-128-136 stitches. Insert a marker-thread mid-under sleeve. Continue the pattern from the yoke, in the round. When the sleeve measures 4 cm, decrease 2 stitches under the sleeve – read DECREASE TIP. Decrease like this every 4-2-2-2½-1-1 cm a total of 8-14-13-11-18-20 times = 80-84-86-90-92-96 stitches. Continue working until the sleeve measures 37-32-34-34-30-30 cm. Change to double pointed needles size 3 mm. Work rib as shown in A.5 for 6 cm, make sure you have knit 1, purl 1, knit 1 across the cables and knit over knit and purl over purl otherwise. Cast off. The sleeve measures approx. 43-38-40-40-36-36 cm from the division. ASSEMBLY: Fold the neck double to the inside and sew down. Make sure the seam is elastic to avoid the neck being tight. |
|||||||||||||||||||
Diagram explanations |
|||||||||||||||||||
|
|||||||||||||||||||
 |
|||||||||||||||||||
 |
|||||||||||||||||||
Have you finished this pattern?Tag your pictures with #dropspattern #winterpearlsweater or submit them to the #dropsfan gallery. Do you need help with this pattern?You'll find 23 tutorial videos, a Comments/Questions area and more by visiting the pattern on garnstudio.com. © 1982-2026 DROPS Design A/S. We reserve all rights. This document, including all its sub-sections, has copyrights. Read more about what you can do with our patterns at the bottom of each pattern on our site. |
|||||||||||||||||||


With over 40 years in knitting and crochet design, DROPS Design offers one of the most extensive collections of free patterns on the internet - translated to 17 languages. As of today we count 324 catalogues and 12239 patterns translated into English (UK/cm). 12239
We work hard to bring you the best knitting and crochet have to offer, inspiration and advice as well as great quality yarns at incredible prices! Would you like to use our patterns for other than personal use? You can read what you are allowed to do in the Copyright text at the bottom of all our patterns. Happy crafting!
Post a comment to pattern DROPS 255-1
We would love to hear what you have to say about this pattern!
If you want to leave a question, please make sure you select the correct category in the form below, to speed up the answering process. Required fields are marked *.