
Popular categories
Looking for a yarn?


Comments / Questions (99)
![]() Silva Kuivanen wrote:
Silva Kuivanen wrote:
Tere! Arvan,et varrukate ja esiosa/tagaosa silmad valesti Teil arvutatud juhises.Kui jagab ära ennem raglaanikasvatamisi,siis 14 silma jääb üle,teisisönu:20 kahele esitûkil=40, selg 41, 2×9 =18 kuhu need asetatakse,2,×7=14 ripskude,kraele loodi 141 silma,14 jääb üle???Palju siis varruka osale silmi jääb,tänan!
15.02.2025 - 22:38
![]() Wenche Søgaard wrote:
Wenche Søgaard wrote:
Jeg strikker DROPS 232-15 og har begynt å felle undrer ermet. Når vrange masker inngår i fellingen er det vel ikke til å unngå at det blir flere rette masker ved siden av hverandre? Det ser ikke så fint ut, men jeg ser ingen måte å unngå det på.
14.01.2025 - 14:01DROPS Design answered:
Hej Wenche, det stemmer, det kan du ikke undgå - men det bliver ret fint når du har gjort det nogle gange :)
16.01.2025 - 14:15
![]() Zofia wrote:
Zofia wrote:
Dziękuję bardzo.
10.01.2025 - 18:00
![]() Zofia wrote:
Zofia wrote:
Proszę o informację czy dobrze podzieliłam początkowe oczka karczku w rozmiarze M t.j.: 7 o. obszycia przodu ściegiem francuskim, schemat A1ponad 22 następnymi o. , A2, A.3 ponad 15 następnymi o. , A.2, A.3 ponad 45 ponad następnymi o., A.2,A.3 ponad 15 następnymi o. , A.2,A.3 ponad 22 następnymi o.i 7 o. przodu ściegiem francuskim.
07.01.2025 - 13:30DROPS Design answered:
Witaj Zofio, dla rozmiaru M odczytujesz 2-gą cyfrę w każdym ciągu cyfr. W rozmiarze M powinno być następująco: 7 o. obszycia przodu ściegiem francuskim, schemat A1ponad 18 następnymi o. , A2, A.3 ponad 9 następnymi o. , A.2, A.3 ponad 37 następnymi o., A.2, A.3 ponad 9 następnymi o. , A.2, A.3 ponad 18 następnymi o. i 7 o. przodu ściegiem francuskim. Pozdrawiamy!
08.01.2025 - 08:41
![]() Wenche Søgaard wrote:
Wenche Søgaard wrote:
Hei Jeg har bare strikket perlestrikk en gang tidligere med rett over vrang og motsatt, aldri etter diagram. Mitt spørsmål vil derfor sikkert virke dumt for andre. Jeg strikker størrelse L og er ferdig med halskanten. Skal det være en maske rettstrikk hele veien mot stolpene og en omgang glattstrikk mellom perleradene?
09.12.2024 - 09:53DROPS Design answered:
Hei Wenche. Enkelt fortalt strikkes det på 1 .pinne (fra retten) kun med rett masker. 2. pinne (fra vrangen) strikkes det rett masker og vrang masker annenhver gang. 3. pinne (fra retten) strikkes det bare rett masker igjen og på 4. pinne (fra vrangen) strikkes det rett masker og vrang masker annenhver gang igjen. Ta en titt på videoen: Hvordan strikke et enkelt og flott strukturmønster. Den viser 2 masker rett strikk og 2 masker strukturstrikk, men man får en vis forståelse for perleribb strukturen. mvh DROPS Design
10.12.2024 - 14:18
![]() Jacobs Patricia wrote:
Jacobs Patricia wrote:
Bonjour Je ne comprend pas pour le dos et devant cette phrase du tricoter en suivant « « A.1 en allers et retours avec 7 mailles de bordure devant au point mousse de chaque côté. » Normalement il faut faire en jersey le reste du gilet Avec mon amie qui travaille beaucoup avec vous ….ont ne vois pas où il faut faire le « A1 » sur le gilet à cette parti du gilet Bon Wkend
06.12.2024 - 18:46DROPS Design answered:
Bonjour Mme Jacobs, lorsque vous avez mis les mailles des manches en attente, vous continuez le point fantaisie comme avant, autrement dit, vous continuez à tricoter le diagramme A.1 avec les 7 mailles au point mousse de chaque côté pour la bordure des devants. Bon tricot!
09.12.2024 - 09:42
![]() Marit Tvervåg wrote:
Marit Tvervåg wrote:
Hei! Når jeg starter på diagrammene, er da første omg en hel omg med vrang fra vrangen? ( eller rett fra retten?) 😊
09.11.2024 - 19:41DROPS Design answered:
Hei Marit. Når du skal strikke 1. pinne av diagrammet er det fra retten. Så da strikker du alle maskene rett (også de 7 stoplemaskene i riller i hver side). mvh DROPS Design
11.11.2024 - 13:29
![]() Jacobs Patricia wrote:
Jacobs Patricia wrote:
Je disais es que le 2ème rang ont fait tout à envers ou 1 envers 1 endroit Ou c’est autrement merci je comprend pas désolé
29.10.2024 - 20:20
![]() Jacobs Patricia wrote:
Jacobs Patricia wrote:
Bonjour Merci essuie le 2eme rang on le tricote tout a envers comme sur le point fantaisie À1 ? Ou 1 envers 1 endroit Et le 3 Eme rang ont reprend A1 ? Car je comprend pas trop Merci pour tout bonne soirée 👍
29.10.2024 - 20:16DROPS Design answered:
Bonjour Mme Jacobs, sur l'envers, suivez la légende des symboles en lisant les diagrammes de gauche à droite, soit pour A.1 : 1 m endroit, 1 maille envers et pour A.2: 1 m envers, 1 m endroit, 1 m envers, 1 m endroit, 1 m envers, 1 m endroit, 1 m envers. Essayez de vous entrainer sur A.2 (7 m) sur un échantillon si besoin, vous pourrez ainsi mieux saisir comment tricoter les diagrammes. Bon tricot!
30.10.2024 - 08:16
![]() Jacobs Patricia wrote:
Jacobs Patricia wrote:
Bonjour madame je commence le cardigan, et je voudrais savoir le point Fantaisie le premier rang ont le commence comment tout à l’endroit et ensuite ensuite on fait le A1 ? Car, je comprends pas les trois points fantaisie? Quelle différence y a-t-il entre les 3 Je voudrais juste savoir comment c’est le premier rang. C’est la première fois que j’utilise vos modèles. Merci pour votre réponse.
29.10.2024 - 05:33DROPS Design answered:
Bonjour Mme Jacobs, les diagrammes représentent le même point fantaisie mais tricotés différemment en fonction de leur emplacement; A.2 correspond aux mailles des raglans; et vous tricotez soit A.1 soit A.3 sur les devants, les manches et le dos. En commençant sur l'endroit, tricotez A.1 à A.3 tout à l'endroit au 1er rang. Sur l'envers, tricotez A.1 ainsi (1 m end, 1 m env), A.2 (= 1 m env, 1 m end, 1 m env, 1 m end, 1 m env, 1 m end, 1 m env) et A.3 (= 1 m env, 1 m end), vous avez ainsi des côtes (1 m jersey endroit (1ère m de A.1 et A.2 par ex ou 2ème m de A.3/dernière m de A.2) et 1 m point mousse (2ème m de A.1 et de A.2, 1ère m de A.3)). Bon tricot!
29.10.2024 - 09:46
|
|||||||
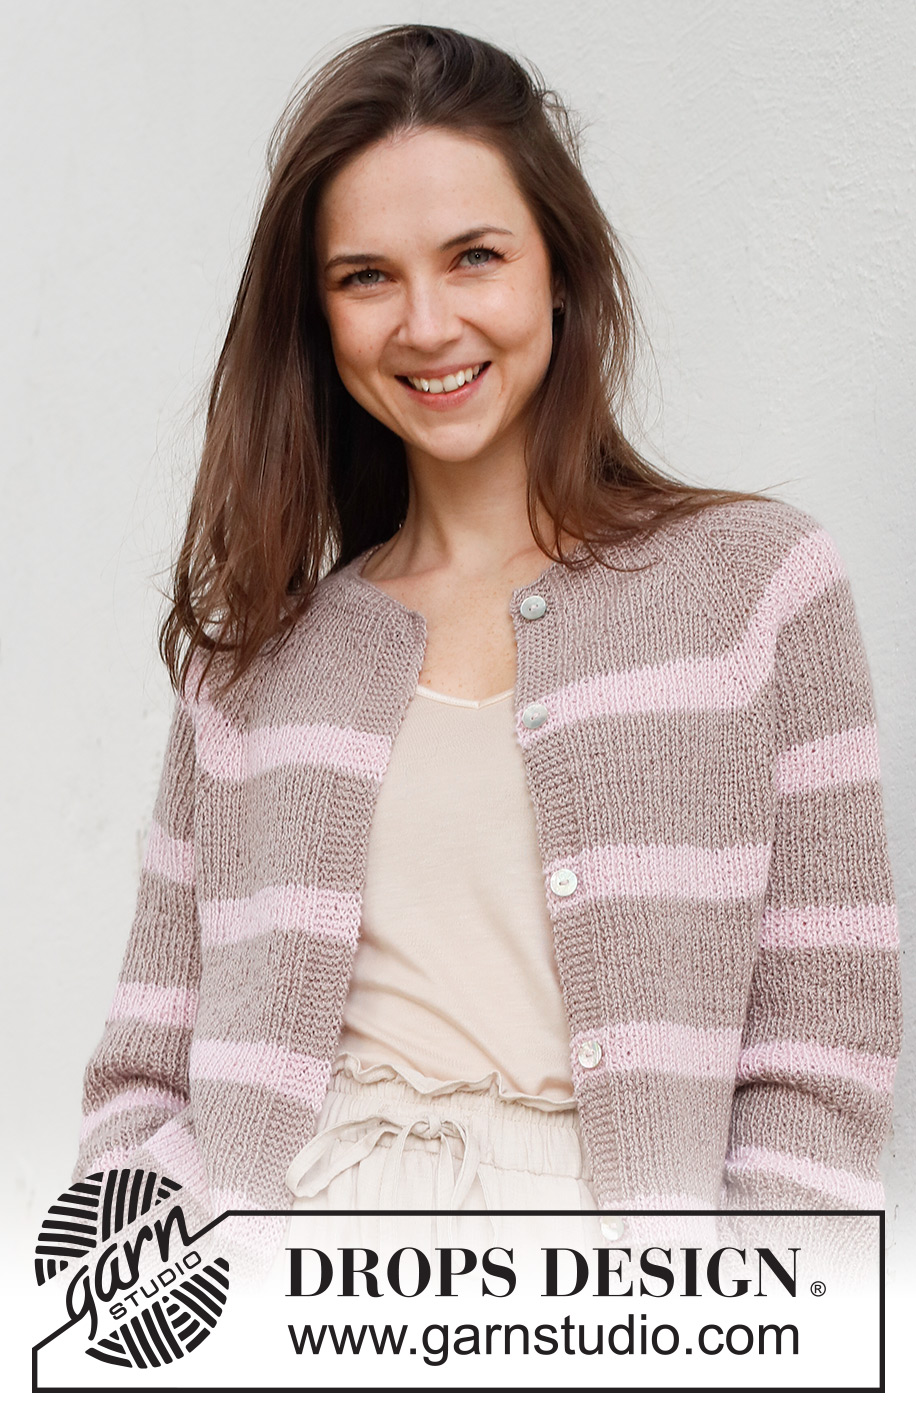
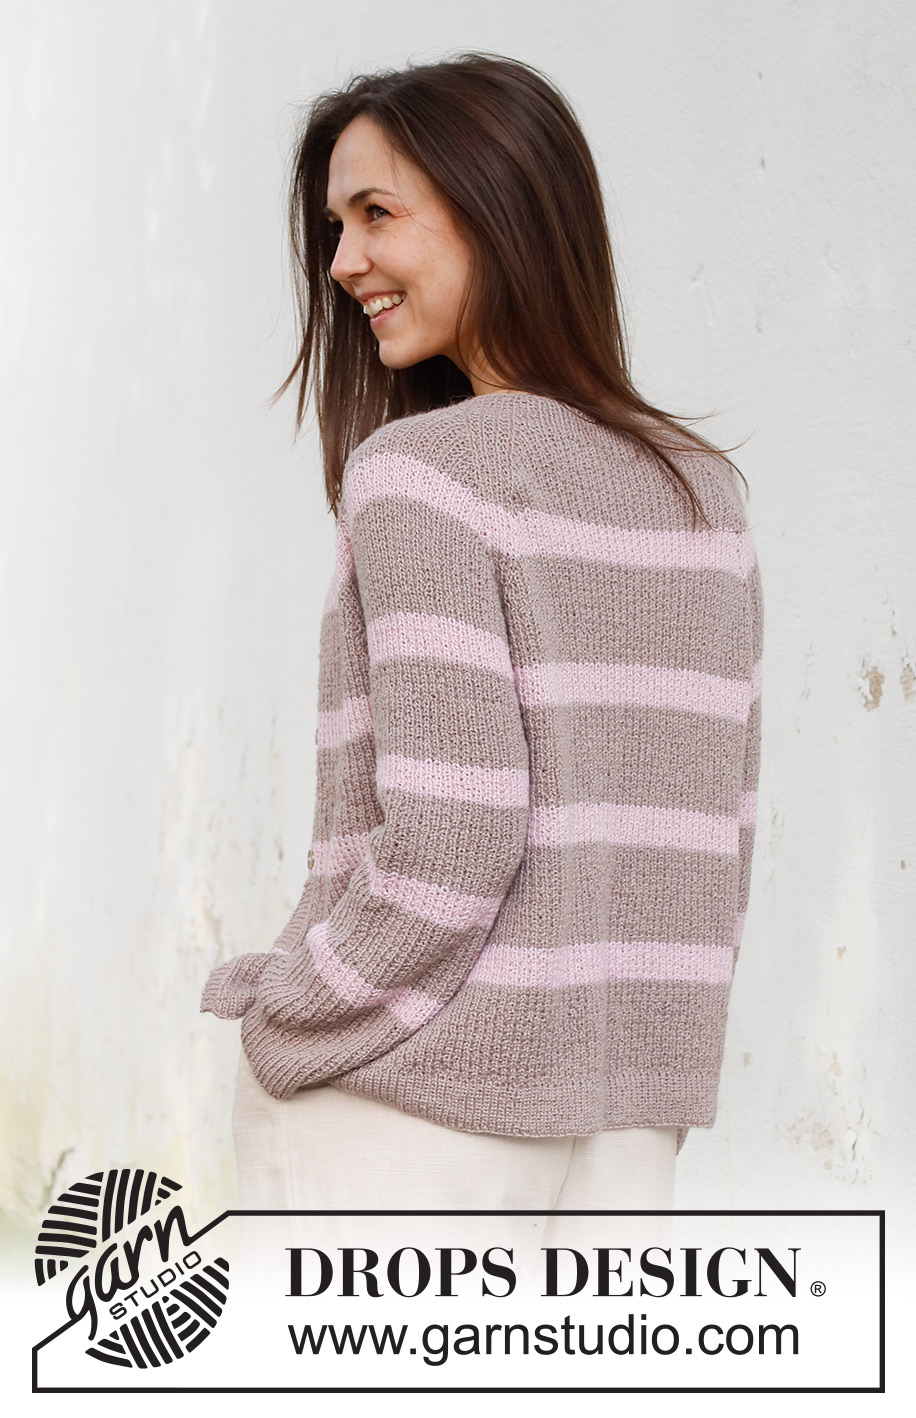
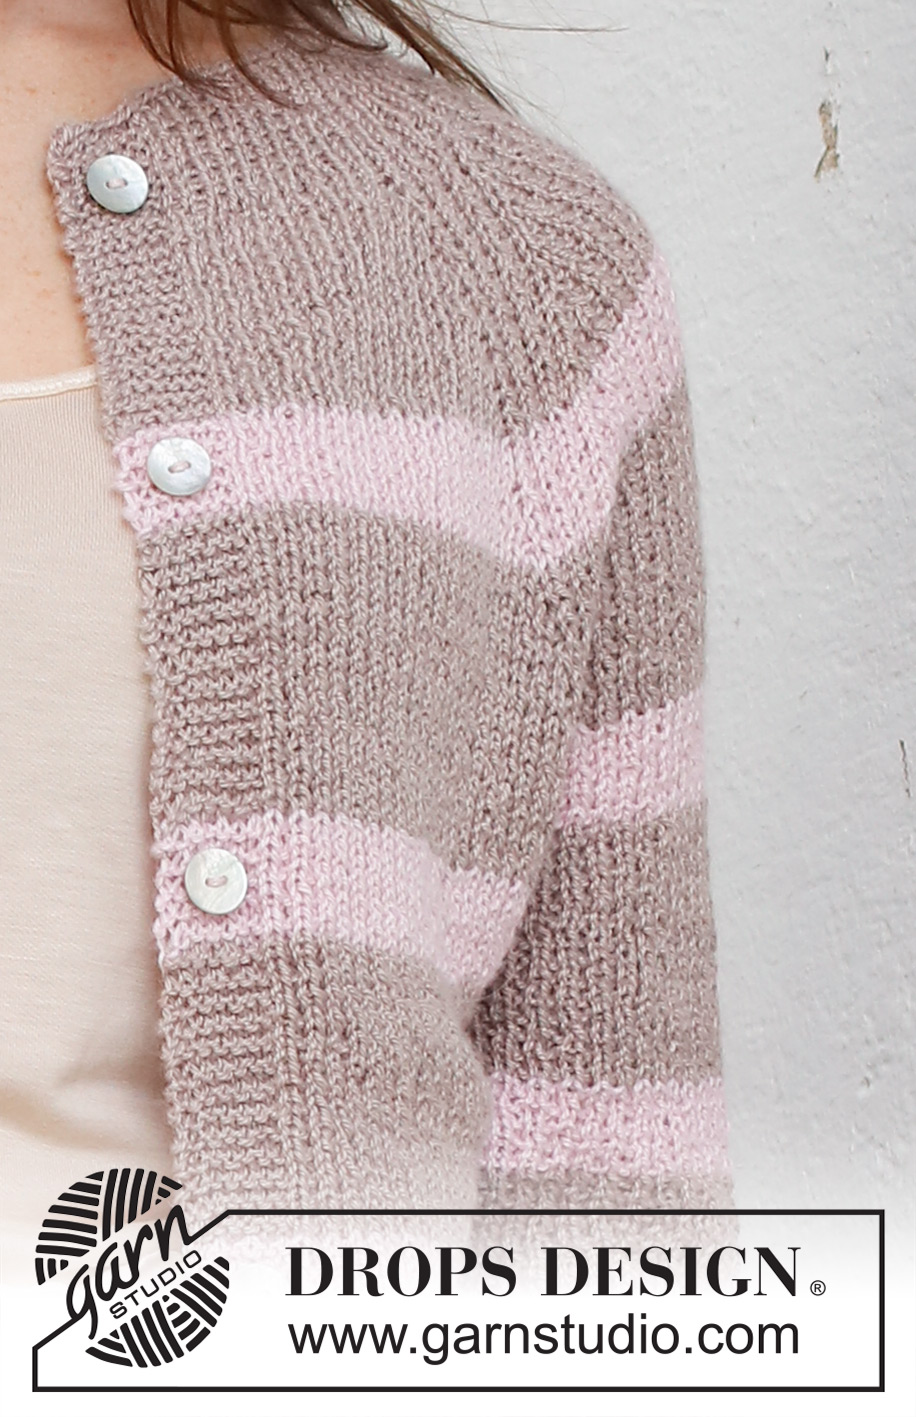
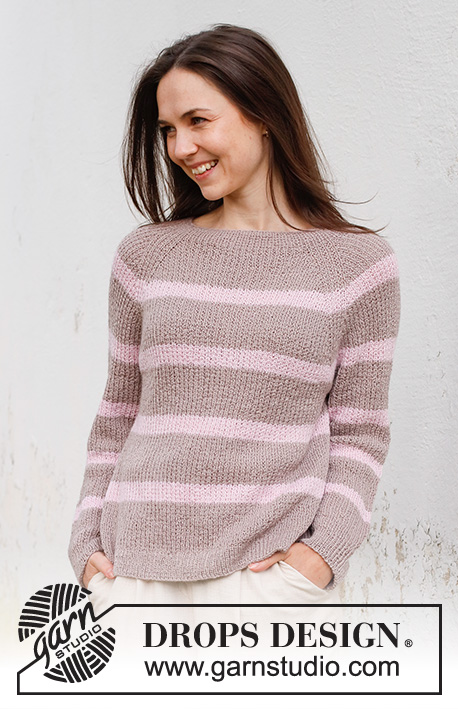
Desert Mirage Cardigan#desertmiragecardigan |
|||||||
 |
 |
||||||
Knitted jacket in DROPS Nord. Piece is knitted top down with raglan, broken rib and stripes. Size: S - XXXL
DROPS 232-15 |
|||||||
|
---------------------------------------------------------- EXPLANATION FOR THE PATTERN: ---------------------------------------------------------- PATTERN: See diagrams A.1, A.2 and A.3. Diagrams show all rows in pattern seen from the right side. GARTER STITCH (back and forth): Knit all rows. 1 ridge vertically = knit 2 rows. STRIPES: * Work 7-7-7-8-8-8 cm with colour light beige, work 3 cm with colour powder pink *, work from *-*. BUTTONHOLES: Decrease for buttonholes on right band (when garment is worn). Decrease from right side when 4 stitches remain on row as follows: Make 1 yarn over, knit the next 2 stitches together, knit the last 2 stitches. On next row knit yarn over to make holes. Decrease first buttonhole when rib in the neck measures 3 cm. Then decrease the next 4-4-4-5-5-5 approx. 10-10-10-9½-9½-10 cm between each buttonhole. RAGLAN: Increase 1 stitch in each side of 7 stitches (= A.2) in every transition between body and sleeves (= 8 stitches increased on round). Increase 1 stitch by making 1 yarn over. On next row work yarn overs twisted to avoid holes. Then work the new stitches in pattern A.3/A.1. DECREASE TIP (applies to sleeves): Decrease 1 stitch on each side of marker thread as follows: Work until 3 stitches remain before marker thread and knit 2 together, knit 2 (marker thread is between these 2 stitches), slip 1 stitch knitwise, knit 1, pass slipped stitch over stitch worked. ---------------------------------------------------------- START THE PIECE HERE: ---------------------------------------------------------- JACKET - SHORT OVERVIEW OF THE PIECE: Work neck edge and yoke back and forth on circular needle from mid front, work top down. Now divide yoke for body and sleeves. Work body back and forth on circular needle. Work sleeves in the round on double pointed needles/a short circular needle. NECK EDGE: Cast on 133-133-141-141-149-149 stitches on circular needle size 2.5 mm with colour light beige in DROPS Nord. Purl 1 row from wrong side. Work next row as follows - from right side and mid front as follows: Work 7 band stitches in garter stitch, * knit 1, purl 1 *, work from *-* until 8 stitches remain, knit 1 and finish with 7 band stitches in garter stitch. Work like this until rib measures 4 cm. Insert 1 marker after band, at the beginning of row mid front. Measure yoke from this marker. Work STRIPES - see explanation above. The 4 cm in the neck edge are not counted with the stripes (i.e. work 11-11-11-12-12-12 cm in total with colour light beige before first stripe with colour powder pink). YOKE: Switch to circular needle size 3 mm and work as follows - from right side: 7 band stitches in garter stitch, A.1 over the next 18-18-20-20-22-22 stitches, A.2, A.3 over the next 9 stitches, A.2, A.3 over the next 37-37-41-41-45-45 stitches, A.2, A.3 over the next 9 stitches, A.2, A.3 over the next 18-18-20-20-22-22 stitches, and finish with 7 band stitches in garter stitch. Continue this pattern, on next row from right side begin increase for RAGLAN – read explanation above (= 8 stitches increased). Increase like this on every other row (= every row from right side) 26-32-34-40-44-50 times in total = 341-389-413-461-501-549 stitches. REMEMBER THE KNITTING TENSION! Work without increase until piece measures 21-23-25-27-29-31 cm from marker thread. Now divide yoke for body and sleeves: Work the first 55-61-65-71-77-83 stitches as before (left front piece), slip the next 67-79-83-95-103-115 stitches on a thread for sleeve, cast on 9-9-11-11-13-13 new stitches on row (in the side under sleeve), work the next 97-109-117-129-141-153 stitches as before (back piece), slip the next 67-79-83-95-103-115 stitches on a thread for sleeve, cast on 9-9-11-11-13-13 new stitches on row (in the side under sleeve) and work the remaining 55-61-65-71-77-83 stitches as before (right front piece). BODY: = 225-249-269-293-321-345 stitches. Work in A.1 and back and forth with 7 band stitches in garter stitch in each side towards mid front. Continue with stripes but when 4 stripes have been worked in total with colour powder pink, finish the piece with colour light beige. Work until piece measures 24 cm from division - finish with a row from wrong side. 4 cm remain until finished measurements. Try the jacket and work to desired length. Knit 1 row from right side while increasing 46-50-54-58-64-70 stitches evenly, do not increase over band stitches = 271-299-323-351-385-415 stitches. Switch to circular needle size 2.5 mm. Work next row as follows from wrong side: 7 band stitches in garter stitch, * purl 1, knit 1 *, repeat from *-* until 8 stitches remain on needle, purl 1, and finish with 7 band stitches in garter stitch. Continue rib like this for 4 cm. Cast off. Jacket measures approx. 52-54-56-58-60-62 cm from shoulder and down. SLEEVE: Slip the 67-79-83-95-103-115 stitches from thread in one side of piece back on a short circular needle/double pointed needles size 3 mm, and pick in addition up 1 stitch in each of the 9-9-11-11-13-13 stitches cast on under sleeve = 76-88-94-106-116-128 stitches. Insert a marker thread in the middle of the new stitches. Work pattern as before and continue with stripes. When 5 stripes have been worked in total with colour powder pink, finish the piece with colour light beige. AT THE SAME TIME when piece measures 3-3-3-2-2-3 cm, decrease 2 stitches under sleeve - READ DECREASE TIP. Decrease like this approx. every 6-3-2½-2-1½-1 cm 6-10-10-14-18-22 times in total = 64-68-74-78-80-84 stitches. Continue until piece measures 35-34-31-31-29-28 cm from division. Switch to double pointed needles size 2.5 mm. Work rib (knit 1/purl 1) for 4 cm. Cast off. Sleeve measures approx. 39-38-35-35-33-32 cm from division. Work the other sleeve the same way. ASSEMBLY: Sew the buttons on to left band. |
|||||||
Diagram explanations |
|||||||
|
|||||||
 |
|||||||
Have you finished this pattern?Tag your pictures with #dropspattern #desertmiragecardigan or submit them to the #dropsfan gallery. Do you need help with this pattern?You'll find 28 tutorial videos, a Comments/Questions area and more by visiting the pattern on garnstudio.com. © 1982-2026 DROPS Design A/S. We reserve all rights. This document, including all its sub-sections, has copyrights. Read more about what you can do with our patterns at the bottom of each pattern on our site. |
|||||||


With over 40 years in knitting and crochet design, DROPS Design offers one of the most extensive collections of free patterns on the internet - translated to 17 languages. As of today we count 324 catalogues and 12290 patterns translated into English (UK/cm). 12290
We work hard to bring you the best knitting and crochet have to offer, inspiration and advice as well as great quality yarns at incredible prices! Would you like to use our patterns for other than personal use? You can read what you are allowed to do in the Copyright text at the bottom of all our patterns. Happy crafting!
Post a comment to pattern DROPS 232-15
We would love to hear what you have to say about this pattern!
If you want to leave a question, please make sure you select the correct category in the form below, to speed up the answering process. Required fields are marked *.