
Popular categories
Looking for a yarn?


Comments / Questions (42)
![]() Judy wrote:
Judy wrote:
Starting yoke. Made 1st round increases. Says works 2 inches.But next 2 sentences say read knitting tip and work A1 over complete round. At SAME TIME marked A1 to do increases. Do I work 2 inches after knit 1 round of increases before moving on to to the next group of increases and chart A1
20.04.2026 - 19:14DROPS Design answered:
Hi Judy, Yes, you finish the 2 inches before going on to A.1 and the increases. Regards, Drops Team.
21.04.2026 - 06:19
![]() Pete wrote:
Pete wrote:
For the sleeves I'm finding I get sizable gaps between the picked up stitches and those already on the thread. Does anyone have any advice on how to avoid this?
20.03.2026 - 10:02DROPS Design answered:
Dear Pete, you can close these holes by picking up the strand between two stitches - work this strand twisted together with the first stitch between body and sleeve to close the hole. Happy knitting!
20.03.2026 - 15:29
![]() Kirstin wrote:
Kirstin wrote:
Thank you for the great instruction! I just learned how to knit 2 months ago and now have just knitted this as my first sweater for my 15 year old son who had asked for it. With the instruction and videos it was quite doable and the yarn is great to work with!
15.03.2026 - 17:53
![]() Pete wrote:
Pete wrote:
Do you have a video or other info on how to cast on the stitches that will be under the sleeve? I'm used to using the long tailed cast on but I'm sure I'll need a different method to cast on new stitches with working yarn in the round.
05.03.2026 - 20:02DROPS Design answered:
Hi Pete, Here is a link to casting on using the Continental method: https://www.garnstudio.com/video.php?id=2&lang=en and a second video for casting on at the edge of a piece: https://www.garnstudio.com/video.php?id=94&lang=en Regards, Drops Team.
06.03.2026 - 06:51
![]() Emma wrote:
Emma wrote:
Hejsa, Kan jeg erstatte garnet Drops Alaska med Drops Snow i denne opskrift? Venlig Hilsen Emma
07.01.2026 - 11:12DROPS Design answered:
Hej Emma. Nej det kan du dessvärre inte. Du kan bara ersätta garnet med ett annat garn i samma garngrupp, dvs garngrupp C (DROPS Snow tillhör garngrupp E). Mvh DROPS Design
07.01.2026 - 13:13
![]() Agneta Ståhle wrote:
Agneta Ståhle wrote:
Ska det verkligen bara vara 32 cm från delningen av arbetet, dvs att arbetet bara blir 37 cm från delningen klart? Borde det inte var 42 cm?
10.12.2025 - 15:38DROPS Design answered:
Hej Agneta. Ja det stämmer. Om du ser på måttskissen så är tröjan 32+5 cm efter delning. Vill du ha den längre så kan du självklart sticka några cm till om du önskar det. Mvh DROPS Design
12.12.2025 - 12:15
![]() Schneerberger Annie wrote:
Schneerberger Annie wrote:
Bonjour Peut-on faire des rangs raccourcis avant de commencer la grille A1. Pour une taille XL Bien cordialement
30.11.2025 - 20:15DROPS Design answered:
Bonjour Mme Schneerberger, tout à fait, retrouvez quelques indications dans cette vidéo. Bon tricot!
01.12.2025 - 10:27
![]() Egle wrote:
Egle wrote:
Am I right there are no German Short Rows used in this pattern? How would be best to add them?
29.11.2025 - 12:14DROPS Design answered:
Dear Mrs Egle, that's right there is no elevation worked here for neck on back piece. If you like to add some, this video might help you (in this video we use another technique for short rows, but still helpful for the elevation). Happy knitting!
01.12.2025 - 08:21
![]() Egle wrote:
Egle wrote:
Am I right there are no German Short Rows used in this pattern? How would be best to add them?
23.11.2025 - 19:29
![]() Christina wrote:
Christina wrote:
Vilka kroppsmått motsvarar herr large?
07.11.2025 - 12:21DROPS Design answered:
Hei Christina. Du finner målene på målskissen helt nederst på oppskriften, i alle str. mvh DROPS Design
17.11.2025 - 09:46
|
|||||||||||||
Nordic Nights#nordicnightssweater |
|||||||||||||
 |
 |
||||||||||||
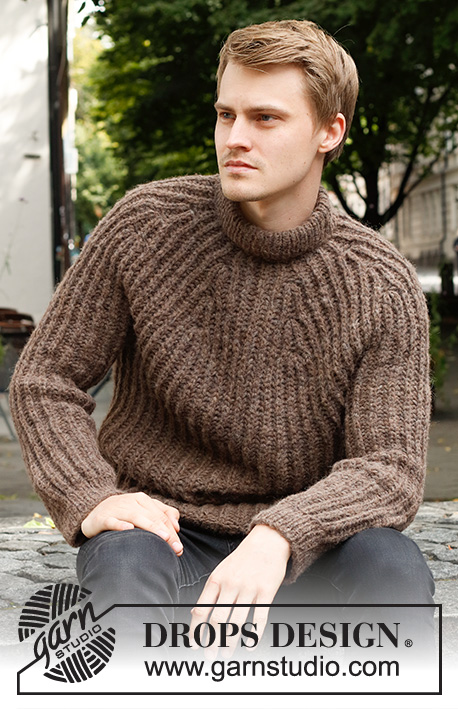
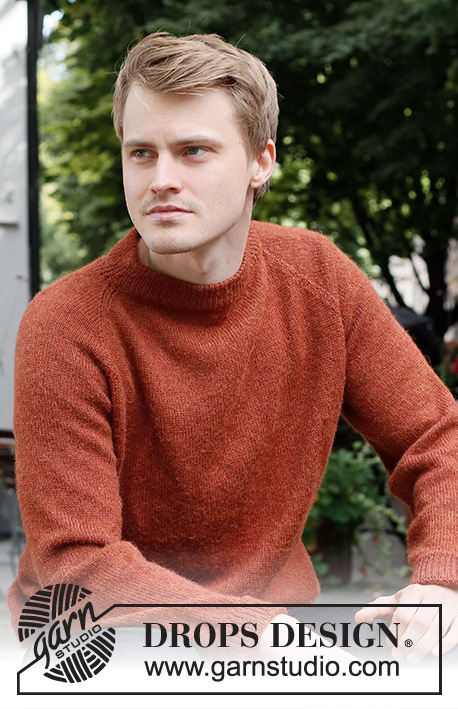
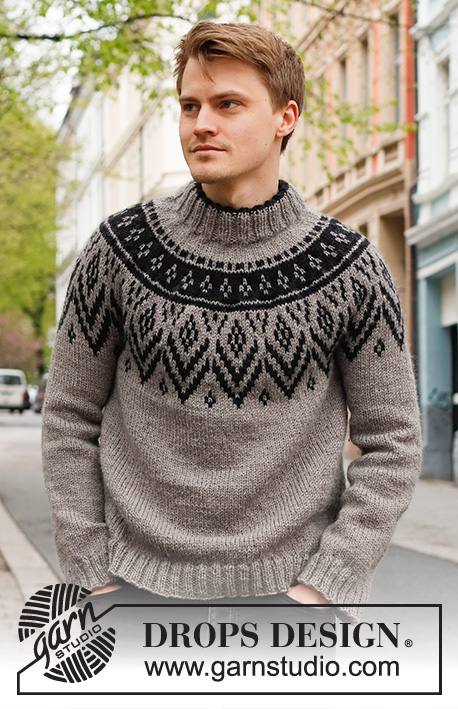
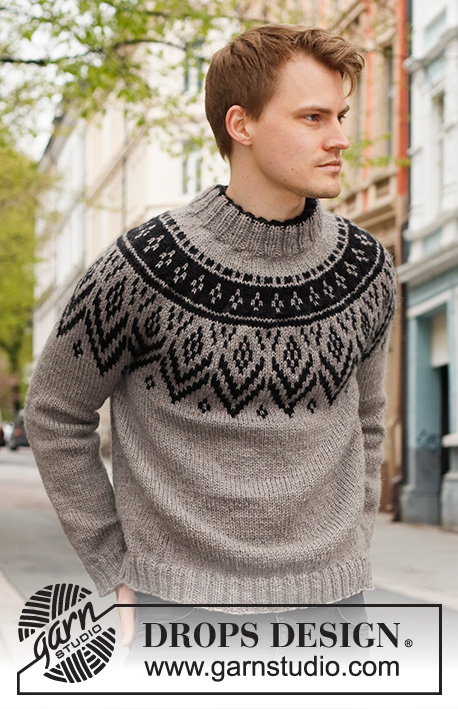
Knitted jumper for men in DROPS Alaska. The piece is worked top down, with double neck, round yoke and Nordic pattern on the yoke. Sizes S - XXXL.
DROPS 224-14 |
|||||||||||||
|
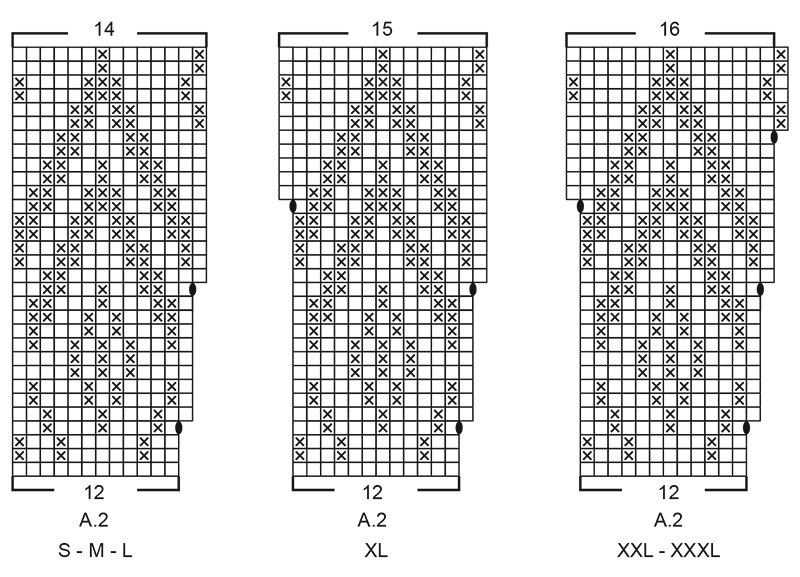
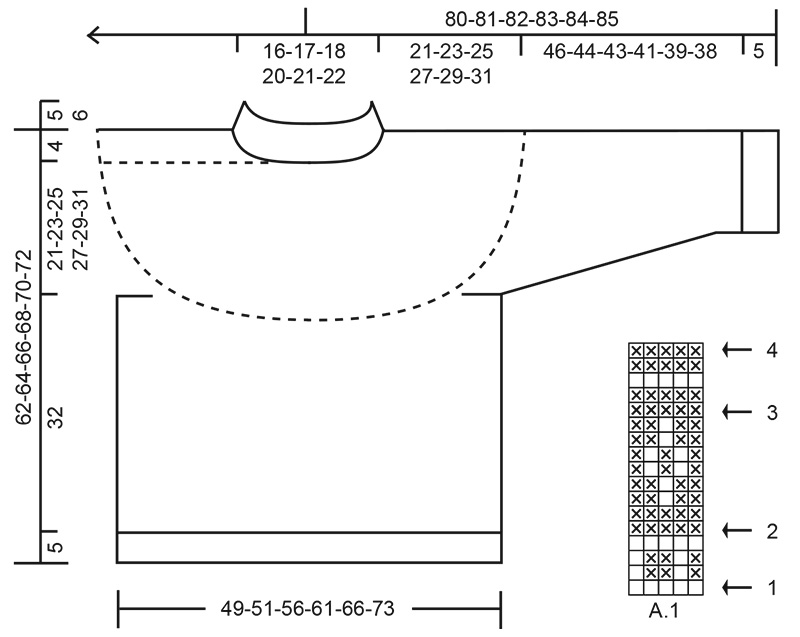
------------------------------------------------------- EXPLANATIONS FOR THE PATTERN: ------------------------------------------------------- PATTERN: See diagrams A.1 and A.2. Choose diagram for your size (applies to A.2). The pattern is worked in stocking stitch. KNITTING TIP: To avoid the knitting tension losing its elasticity when working pattern it is important that the strands at the back are not tight. Use a size larger needle when working pattern if the tension becomes tight. INCREASE TIP (evenly spaced): To work out how to increase evenly, count the total number of stitches on the needle (e.g. 76 stitches) and divide by the number of increases to be made (e.g. 24) = 3.2. In this example, increase by making 1 yarn over after approx. each 3rd stitch. On the next round knit the yarn overs twisted to avoid holes. DECREASE TIP (for sleeves): Decrease 1 stitch on either side of the marker thread as follows: Work until there are 3 stitches left before the marker thread, slip 1 stitch as if to knit, knit 1 and pass the slipped stitch over the knitted stitch, knit 2 (marker thread sits between these 2 stitches), knit 2 together (2 stitches decreased). CASTING-OFF TIP: To avoid the cast-off edge being tight you can cast off with a larger size needle. If the edge is still tight, make 1 yarn over after approx. each 6th stitch at the same time as casting off; the yarn overs are cast off as normal stitches. ------------------------------------------------------- START THE PIECE HERE: ------------------------------------------------------- JUMPER – SHORT OVERVIEW OF THE PIECE: The neck and yoke are worked in the round with circular needle, from the transition between back piece and right sleeve and top down. The yoke is divided for body and sleeves and the body is continued in the round with circular needle. The sleeves are worked in the round with double pointed needles/short circular needle. DOUBLE NECK: Cast on 76-80-84-88-92-96 stitches with short circular needle size 5.5 mm and black DROPS Alaska. Knit 1 round. Change to short circular needle size 4 mm. Work rib in the round (knit 2, purl 2) for 6-6-6-7-7-7 cm. Change to light brown DROPS Alaska and continue rib for 5-5-5-6-6-6 cm (= 11-11-11-13-13-13 cm in total). Knit 1 round where you increase 24-25-26-27-28-29 stitches evenly spaced – read INCREASE TIP = 100-105-110-115-120-125 stitches. Insert 1 marker at the beginning of the round; the yoke is measured from this marker! YOKE: Change to short circular needle size 5.5 mm. Work stocking stitch with light brown for 3-3-4-4-5-5 cm. Read KNITTING TIP and work A.1 over the complete round. AT THE SAME TIME, on each round marked with an arrow in A.1, increase stitches as follows – remember INCREASE TIP: Arrow-1: Increase 25-25-30-30-35-35 stitches evenly spaced = 125-130-140-145-155-160 stitches (there is now room for 25-26-28-29-31-32 repeats of 5 stitches). Arrow-2: Increase 20-25-25-25-25-30 stitches evenly spaced = 145-155-165-170-180-190 stitches (there is now room for 29-31-33-34-36-38 repeats of 5 stitches). Arrow-3: Increase 35-39-41-42-42-44 stitches evenly spaced = 180-194-206-212-222-234 stitches. Arrow-4: Increase 24-22-34-28-18-18 stitches evenly spaced = 204-216-240-240-240-252 stitches. When A.1 has been completed, work A.2 (= 17-18-20-20-20-21 repeats of 12 stitches). Increase as shown in A.2. After the last increase in A.2 there are 238-252-280-300-320-336 stitches. Continue the pattern. NOTE: If your knitting tension is correct, there will be 6-4-3-1-0-0 cm of A.2 left when you divide for the body and sleeves – A.2 is finished on the body and sleeves. Work until the yoke measures 21-23-25-27-29-31 cm from the marker. Divide for the body and sleeves as follows: Place the first 47-50-58-60-62-64 stitches on a thread for the sleeve, cast on 6-6-8-8-8-12 stitches (= in side under sleeve), continue A.2 over the next 72-76-82-90-98-104 stitches (= front piece), place the next 47-50-58-60-62-64 stitches on a thread for the sleeve, cast on 6-6-8-8-8-12 stitches (= in side under sleeve), continue A.2 over the last 72-76-82-90-98-104 stitches (= back piece). Cut the strand. The body and sleeves are finished separately. THE PIECE IS NOW MEASURED FROM HERE! BODY: = 156-164-180-196-212-232 stitches. Insert a marker in the middle of the 6-6-8-8-8-12 stitches cast on under each sleeve. Start at one of the markers and continue A.2 in the round – NOTE: The pattern will not fit under the sleeves – continue the pattern from the yoke as far as possible out towards the sides. When A.2 has been completed, continue with stocking stitch and light brown until the piece measures 32 cm from the division. Try the jumper on and work to desired length; there is approx 5 cm left to finished length. To avoid the following rib being tight, knit 1 round where you increase 36-40-44-48-52-56 stitches evenly spaced = 192-204-224-244-264-288 stitches. Change to circular needle size 4 mm and work rib (knit 2, purl 2) for 5 cm. Cast off with knit over knit and purl over purl – read CASTING-OFF TIP. The jumper measures approx. 62-64-66-68-70-72 cm from the shoulder down. SLEEVES: Place the 47-50-58-60-62-64 stitches from the thread on the one side of the piece on double pointed needles/short circular needle size 5.5 mm and knit up 1 stitch in each of the 6-6-8-8-8-12 stitches cast on under the sleeve, using light brown = 53-56-66-68-70-76 stitches. Insert a marker thread in the middle of the new stitches under the sleeve. Start at the marker thread and continue A.2 in the round. NOTE: The pattern will not fit under the sleeve. When A.2 has been completed, continue with stocking stitch and light brown. AT THE SAME TIME, when the sleeve measures 3 cm from the division, decrease 2 stitches under the sleeve – read DECREASE TIP (in the sizes where A.2 continues, decrease under the sleeve in the pattern). Decrease every 7-6½-3½-3-3-2½ cm a total of 7-7-11-12-12-14 times = 39-42-44-44-46-48 stitches. Continue working until the sleeve measures 46-44-43-41-39-38 cm from the division (shorter measurements in larger sizes due to wider neck and longer yoke). Try the jumper on and work to desired length; there is approx 5 cm left to finished length). Knit 1 round where you increase 9-6-8-8-10-8 stitches evenly spaced = 48-48-52-52-56-56 stitches. Change to double pointed needles size 4 mm and work rib (knit 2, purl 2) for 5 cm. The sleeve measures approx. 51-49-48-46-44-43 cm. Cast off with knit over knit and purl over purl – remember CASTING-OFF TIP! Work the other sleeve in the same way. ASSEMBLY: Fold the neck double to the inside and sew down. To avoid the neck being tight and rolling outwards, it is important that the seam is elastic. |
|||||||||||||
Diagram explanations |
|||||||||||||
|
|||||||||||||
 |
|||||||||||||
 |
|||||||||||||
Have you finished this pattern?Tag your pictures with #dropspattern #nordicnightssweater or submit them to the #dropsfan gallery. Do you need help with this pattern?You'll find 29 tutorial videos, a Comments/Questions area and more by visiting the pattern on garnstudio.com. © 1982-2026 DROPS Design A/S. We reserve all rights. This document, including all its sub-sections, has copyrights. Read more about what you can do with our patterns at the bottom of each pattern on our site. |
|||||||||||||


With over 40 years in knitting and crochet design, DROPS Design offers one of the most extensive collections of free patterns on the internet - translated to 17 languages. As of today we count 324 catalogues and 12290 patterns translated into English (UK/cm). 12290
We work hard to bring you the best knitting and crochet have to offer, inspiration and advice as well as great quality yarns at incredible prices! Would you like to use our patterns for other than personal use? You can read what you are allowed to do in the Copyright text at the bottom of all our patterns. Happy crafting!
Post a comment to pattern DROPS 224-14
We would love to hear what you have to say about this pattern!
If you want to leave a question, please make sure you select the correct category in the form below, to speed up the answering process. Required fields are marked *.