
Popular categories
Looking for a yarn?


Comments / Questions (57)
![]() Brigitte wrote:
Brigitte wrote:
Merci pour votre réponse ...et votre réactivité !
20.04.2026 - 11:29
![]() Brigitte wrote:
Brigitte wrote:
Bonjour! Pouvez-vous m\'expliquer comment tricoter les 5 mailles montées sous la manche, (taille M) puisque ce sont des mailles simples et non des mailles de côtes anglaises ! Comment les intégrer aux côtes anglaises ? Comment les \"transformer\" en côtes ? Merci beaucoup pour votre réponse !
19.04.2026 - 16:31DROPS Design answered:
Bonjour Brigitte, tricotez les au 1er tour soit à l'endroit soit à l'envers (pour continuer les côtes) au lieu de les tricoter ensemble à l'endroit / à l'envers avec leur jeté, et glissez 1 m sur 2 à l'envers comme pour les côtes anglaises normales. Bon tricot!
20.04.2026 - 10:39
![]() Christel wrote:
Christel wrote:
Juste pour dire que j’ai compris pour les augmentations (questions précédente). Le problème vient du mot « suivantes » tout est décalé, je pense que ce serait mieux d’écrire « au dessus des 18 mailles ». Merci
15.02.2026 - 20:21
![]() Christel wrote:
Christel wrote:
Rebonjour.Autre chose que je ne comprends pas puisque je bloque . Je suis au dernier tour du diagramme A1 où il faut faire les augmentations. Je tricote la taille M. Pour le côté pull c’est noté « tricoter le jeté torse, 1 mailles env, 1 endroit » répéter sur les 30 mailles suivantes. Sauf qu’il n’y a plus de jetés dans les réductions… aussi pour les 30 mailles suivantes, faut-il compter les jetés à part? Quand je compte je n’ai pas 15 mailles augmentés. Merci
15.02.2026 - 19:51
![]() Christel wrote:
Christel wrote:
Bonjour , Pour les manches, je pense que pour les tailles XS, S, M et L, il n’est pas nécessaire de commencer le tour par la première des 5 mailles montées sous la manche. Mais si c’est le cas, que doit-je faire exactement puisque je termine en montant ces 5 mailles, avant de recommencer les mailles anglaises. Dois-je faire un simple tour endroit pour arriver à la première des mailles montées? Ou quelle autre solution ? Merci pour votre future réponse.
14.02.2026 - 10:02DROPS Design answered:
Bonjour Christel, calculez simplement comment ces mailles doivent se tricoter d'après les autres mailles du tour, placez un marqueur dans la 1ère des 5 mailles et tricotez ces mailles de sorte que les côtes anglaises tombent juste. Bon tricot!
16.02.2026 - 16:20
![]() Kay wrote:
Kay wrote:
I dont understand the raglan marking? i am following the m size and the total stitch count for placing the markers is 72 when the last count on the neck section is 76? 13+9+27+9+14 is 72
29.01.2026 - 03:09DROPS Design answered:
Hi Kay, The missing 4 stitches are the raglan-stitches. Each marker is inserted in a stitch (the raglan-stitch), rather than between stitches: 13 + 1 + 9 + 1 + 27 + 1, etc.. Regards, Drops Team.
29.01.2026 - 06:16
![]() Inger Pettersen wrote:
Inger Pettersen wrote:
Full moon Festival genser Jeg får det ikke å stemme med antall masker på sidene på bolen, sett av 30 masker = ok, men får ikke 45 masker, som jeg tolker at det sksl bli. (Får 40) Hva er feil, oppskriften eller meg?
28.04.2025 - 18:01DROPS Design answered:
Hei Inger. Vi skal hjelpe deg så godt vi kan, men fint om du kan opplyse hvilken str. du strikker og hvor mange masker har du på pinnen når du skal starter på bol. mvh DROPS Design
05.05.2025 - 13:01
![]() Mimi wrote:
Mimi wrote:
Eine Frage an Theresa oder an Drops in Deutschland. Theresa hatte das gleiche Problem wie ich und gefragt ob man für den Raglan in der 14. Masche zunehmen soll. Ich muss sagen, für mich war die Antwort nicht klar. Denn die 14. Masche ist eine Masche mit Umschlag, nicht die 15. Masche. Vielen Dank für eine Antwort in deutsch oder französisch, wie auch immer. J\'ai hâte de mettre ce pull
17.03.2025 - 14:38
![]() Mimi wrote:
Mimi wrote:
Bonjour, Avec la vidéo, j'ai bien compris comment je dois faire les augmentations. Mon problème est que la 15ème maille dans laquelle je dois faire cette augmentation, n'est pas une maille avec jeté mais une maille que je dois glisser. Le tour 3 commence par un jeté et une maille glissé, donc la 15ème maille est la même que la première. Qu'est-ce que je n'ai pas fait comme il faut???
11.03.2025 - 21:12
![]() Marion wrote:
Marion wrote:
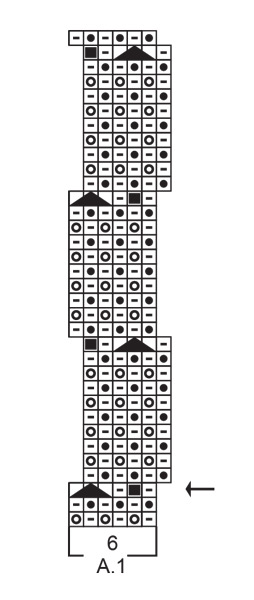
Bonjour ,je ne comprends pas la fin du diagramme est-ce qu'il faut faire le dernier tour du diagramme puis faire les augmentations ? Car si on fait le dernier tour avec les augmentations j'ai un soucis avec les augmentations du diagramme faite juste avant le dernier tour et je ne comprends pas d'où viennent les jetés torse. Merci de m'éclairer. Cordialement
08.03.2025 - 17:36DROPS Design answered:
Bonjour Marion, le nombre de mailles de chaque A.1 doit toujours être de 6 mailles: vous augmentez 2 mailles (cf 5ème symbole = 2ème maille au rang 3) et vous diminuez 2 mailles (cf 4ème symbole, fin du 3ème rang). Au tour suivant, les jetés des augmentations vont se tricoter en côtes anglaises, mais se tricotent à l'envers (pas à l'endroit, correction faite). Retrouvez sous l'onglet "Vidéos" en haut de page comment augmenter en tricotant plusieurs fois la même maille (tricotez-la bien 3 fois comme dans ce modèle). Bon Tricot!
10.03.2025 - 08:19
|
|||||||||||||||||||
Full Moon Festival#fullmoonfestivalsweater |
|||||||||||||||||||
 |
 |
||||||||||||||||||
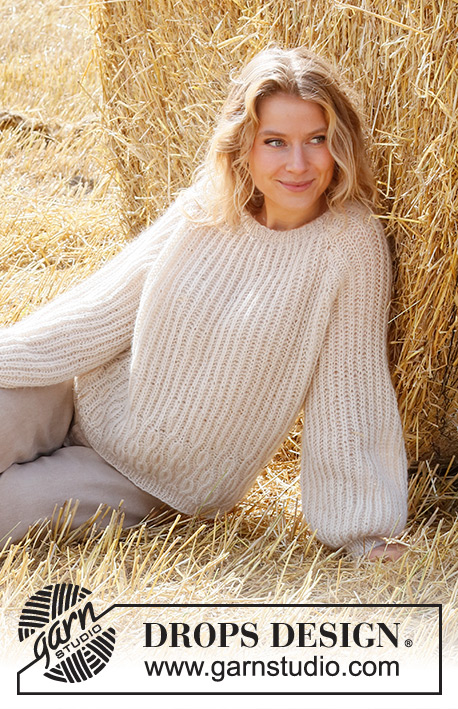
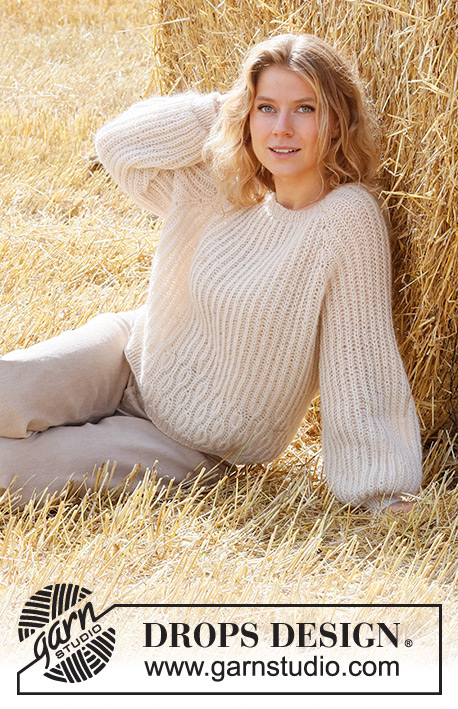
Knitted jumper in DROPS Air. The piece is worked top down, with raglan and English rib. Sizes XS - XXL.
DROPS 223-15 |
|||||||||||||||||||
|
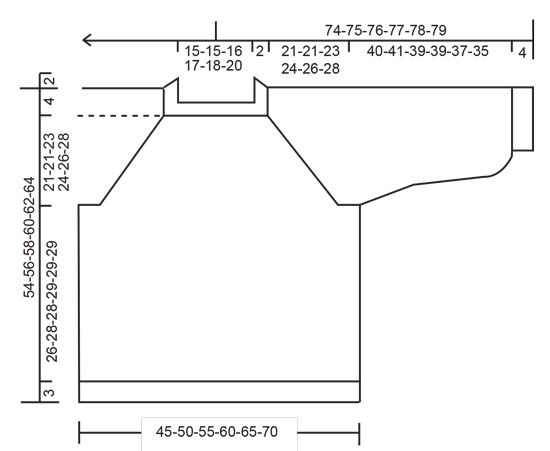
------------------------------------------------------- EXPLANATIONS FOR THE PATTERN: ------------------------------------------------------- PATTERN: See diagram A.1. INCREASE/DECREASE TIP (evenly spaced): To work out how to increase/decrease evenly, count the number of stitches to be increased/decreased over (e.g. 13 stitches), and divide by the number of increases/decreases to be made (e.g. 2) = 6.5. In this example, increase by making 1 yarn over after alternately each 6th and 7th stitch. On the next round work the yarn overs twisted to avoid holes. When decreasing, knit together alternately each 5th and 6th and each 6th and 7th stitch. ENGLISH RIB: ROUND 1: * Make 1 yarn over, slip 1 stitch as if to purl, knit 1 *, repeat from *-* to end of round. ROUND 2: * Purl together the yarn over and slipped stitch, make 1 yarn over, slip 1 stitch as if to purl *, repeat from *-* to end of round. ROUND 3: * Make 1 yarn over, slip 1 stitch as if to purl, knit together the yarn over and slipped stitch *, repeat from *-* to end of round. Repeat rounds 2 and 3 onwards. ENGLISH RIB STITCH: When counting the stitches the yarn overs are not included. RAGLAN: Increase 4 stitches in each marker-stitch (= 16 stitches increased on the round). All increases are worked on a round where the yarn overs and knitted stitches are knitted together (i.e. round 3 in the English rib). Increase as follows in the knitted stitch: Knit together the yarn over and knitted stitch, but do not slip the stitch from the left needle, make 1 yarn over the right needle, knit the yarn over and knitted stitch together again, move the marker to this stitch (= mid-stitch), make 1 yarn over the right needle, knit the yarn over and knitted stitch together again (= 3 stitches and 2 yarn overs), slip the stitch and yarn over off the left needle. On the next round work the new stitches in English rib, but note that on this first round after the increases, the purled stitches in the increases are purled without yarn overs because the yarn overs have not been made. The marker sits in the middle of the increased stitches (a knitted stitch). DECREASE TIP (for sleeves): Decrease 2 stitches on round 3 in the English rib as follows: Work until there are 2 stitches left before the marker-stitch (yarn overs not counted), slip the next stitch + yarn over as if to knit together, knit the next 2 stitches + yarn over together and pass the slipped stitch + yarn-over over these knitted together stitches (= 2 stitches decreased), move the marker to the next knitted stitch. CASTING-OFF TIP: To avoid the cast-off edge being tight you can cast off with a larger size needle. If the edge is still tight, make 1 yarn over after approx. each 4th stitch at the same time as casting off; the yarn overs are cast off as normal stitches. ------------------------------------------------------- START THE PIECE HERE: ------------------------------------------------------- JUMPER – SHORT OVERVIEW OF THE PIECE: The neck and yoke are worked in the round with circular needle, top down from mid back. The yoke is divided for body and sleeves and the body continued in the round with circular needle. The sleeves are worked in the round with short circular needle/double pointed needles, top down. NECK: Cast on 76-76-80-84-88-92 stitches with short circular needle size 4 mm and Air. Knit 1 round. Then work rib (purl 1, knit 1) in the round for 2 cm. The next round is worked as follows: Work rib as before over the first 12-14-14-16-16-16 stitches, knit 13-11-11-11-13-13 and decrease 4-2-2-2-4-4 stitches evenly over these stitches – read DECREASE TIP, work rib as before over the next 25-27-29-31-31-33 stitches, knit 13-11-11-11-13-13 and decrease 4-2-2-2-4-4 stitches evenly over these stitches – read DECREASE TIP, work rib as before over the last 13-13-15-15-15-17 stitches = 68-72-76-80-80-84 stitches. Change to circular needle size 6 mm. Insert 1 marker at the beginning of the round; the yoke is measured from this marker! YOKE: Now work ENGLISH RIB – read description above, the whole round. When round 3 has been completed, insert 1 marker in an ENGLISH RIB STITCH – read description above, in each transition between body and sleeves (= 4 markers) as follows: Marker 1: Skip 11-13-13-15-15-15 stitches, insert marker in the next stitch (= half back piece). Marker 2: Skip the next 9 stitches, insert marker in the next stitch (= sleeve). Marker 3: Skip the next 23-25-27-29-29-31 stitches, insert marker in the next stitch (= front piece). Marker 4: Skip the next 9 stitches, insert marker in the next stitch. There are 12-12-14-14-14-16 stitches left on the round. Continue in the round with English rib. AT THE SAME TIME, the next time you work round 3, begin to increase for RAGLAN – read description above. Increase like this every 8th round a total of 6-7-8-9-10-11 times = 164-184-204-224-240-260 stitches. REMEMBER THE KNITTING TENSION! Continue with English rib until the piece measures 21-21-23-24-26-28 cm from the marker on the neck – adjust so the next round is round 2 in the English rib. Now divide the piece for the body and sleeves on the next round as follows: Work the first 24-28-30-34-36-38 stitches (= ½ back piece), place the next 33-37-41-45-49-53 stitches on a thread for the sleeve, cast on 5-5-5-5-7-7 new stitches (= in side under sleeve), work the next 49-55-61-67-71-77 stitches (= front piece), place the next 33-37-41-45-49-53 stitches on a thread for the sleeve, cast on 5-5-5-5-7-7 new stitches (= in side under sleeve), work the last 25-27-31-33-35-39 stitches. Body and sleeves are finished separately. THE PIECE IS NOW MEASURED FROM HERE! BODY: = 108-120-132-144-156-168 stitches. Continue in the round with English rib as before. When the piece measures 17-19-19-20-20-20 cm from the division – adjust so the next round is round 3 in the English rib; there is 12 cm to finished length, try the jumper on and work to desired length. Work A.1 on the whole round. When there is 1 round left in the diagram, the piece measures approx. 26-28-28-29-29-29 cm from the division. On the next round (the last round in the diagram = round 2 in the English rib) increase stitches in the sides and insert 4 markers (which will be used when working rib) as follows: Half back piece: * Purl together the yarn over and slipped stitch, knit 1 *, work from *-* over the next 14-14-18-18-20-22 stitches. Insert a marker here. Side of body: * Purl the yarn over twisted (= 1 stitch increased), purl 1, knit 1 *, work from *-* over the next 26-28-30-34-36-40 stitches (= 13-14-15-17-18-20 stitches increased), insert a marker here. Front piece: * Purl together the yarn over and slipped stitch, knit 1 *, work from *-* over the next 28-32-36-38-42-44 stitches. Insert a marker here. Side of body: * Purl the yarn over twisted (= 1 stitch increased), purl 1, knit 1 *, work from *-* over the next 26-28-30-34-36-40 stitches (= 13-14-15-17-18-20 stitches increased), insert a marker here. Half back piece: * Purl together the yarn over and slipped stitch, knit 1 *, work from *-* over the next 14-18-18-20-22-22 stitches. There are 134-148-162-178-192-208 stitches on the needle. Change to circular needle size 4 mm and work rib as follows: (purl 1, knit 1) as far as the first marker, (purl 2, knit 1) as far as the next marker, (purl 1, knit 1) as far as the next marker, (purl 2, knit 1) as far as the next marker, (purl 1, knit 1) to end of round. Continue this rib for 3 cm. Cast off with knit over knit and purl over purl – read CASTING-OFF TIP. The jumper measures approx. 54-56-58-60-62-64 cm from the shoulder down. SLEEVES: Place the 33-37-41-45-49-53 stitches from the thread on the one side of the piece on short circular needle/double pointed needles size 6 mm and cast on 5-5-5-5-7-7 new stitches on the needle (= mid under sleeve) = 38-42-46-50-56-60 stitches. Continue in the round with the English rib as before – make sure you begin on the correct round in the pattern, round now starts with the 1st of the 5-5-5-5-7-7 new stitches that were cast on mid under sleeve. Sizes XS, S, M and L: go to ALL SIZES below. Sizes XL and XXL work as follows: Insert a marker in the middle stitch under the sleeve (= 1 knitted stitch in the English rib). Allow the marker to follow your work onwards; it is used when decreasing under the sleeve. When the sleeve measures 4 cm from the division – adjust so the next round is round 3 in the English rib, decrease under the sleeve – read DECREASE TIP (= 2 stitches decreased). Decrease like this every 8th round a total of 2-2 times = 52-56 stitches. ALL SIZES: Continue working until the sleeve measures 40-41-39-39-37-35 cm from the division (shorter measurements in larger sizes due to longer yoke). There is 4 cm to finished length, try the jumper on and work to desired length. The next round is worked as follows: * Knit together the yarn over and slipped stitch, purl 1 *, work from *-* to the end of the round. Change to double pointed needles size 4 mm and knit 1 round where you decrease 0-2-4-8-8-10 stitches evenly spaced = 38-40-42-42-44-46 stitches. Work rib (knit 1, purl 1) for 4 cm. Cast off with knit over knit and purl over purl – remember CASTING-OFF TIP. The sleeve measures approx. 44-45-43-43-41-39 cm from the division. Work the other sleeve in the same way. ASSEMBLY: Sew the openings under the sleeves. |
|||||||||||||||||||
Diagram explanations |
|||||||||||||||||||
|
|||||||||||||||||||
 |
|||||||||||||||||||
 |
|||||||||||||||||||
Have you finished this pattern?Tag your pictures with #dropspattern #fullmoonfestivalsweater or submit them to the #dropsfan gallery. Do you need help with this pattern?You'll find 25 tutorial videos, a Comments/Questions area and more by visiting the pattern on garnstudio.com. © 1982-2026 DROPS Design A/S. We reserve all rights. This document, including all its sub-sections, has copyrights. Read more about what you can do with our patterns at the bottom of each pattern on our site. |
|||||||||||||||||||


With over 40 years in knitting and crochet design, DROPS Design offers one of the most extensive collections of free patterns on the internet - translated to 17 languages. As of today we count 324 catalogues and 12290 patterns translated into English (UK/cm). 12290
We work hard to bring you the best knitting and crochet have to offer, inspiration and advice as well as great quality yarns at incredible prices! Would you like to use our patterns for other than personal use? You can read what you are allowed to do in the Copyright text at the bottom of all our patterns. Happy crafting!
Post a comment to pattern DROPS 223-15
We would love to hear what you have to say about this pattern!
If you want to leave a question, please make sure you select the correct category in the form below, to speed up the answering process. Required fields are marked *.