
Popular categories
Looking for a yarn?


Comments / Questions (7)
![]() Adele wrote:
Adele wrote:
Blir väldigt förbannad stickat en bra bit och ser nu att mönstret/diagrammet överensstämmer ju inte med mössan på bilden! 😡 Där hålmönstret börjar det ska vara tre likadana sen utökas det! GÖR OM GÖR RÄTT
18.02.2026 - 17:52DROPS Design answered:
Hej Adele, Tak for trevlig info! Vi beklager og skal få lavet en opdatering så hurtigt som muligt. Rigtig god dag!
26.02.2026 - 11:58
![]() Lorraine Nel wrote:
Lorraine Nel wrote:
Would love some hat / beanie patterns. Thank you
23.05.2024 - 07:18
![]() Andrea wrote:
Andrea wrote:
Bei der Trennung in Vorder- und Rückenteil ist ein Fehler in der Anleitung. Ich bitte dringend um Korrektur, da die Strickerin aus Norwegen das bereits vor 1 Jahr angegeben hat. Ich möchte den Kragen nächsten Mittwoch verschenken 😳
20.11.2022 - 18:42DROPS Design answered:
Liebe Andrea, was für ein Fehler haben Sie bei der Verteilung? Können Sie uns bitte mehr sagen, ich habe die Maschenanzahl bei beiden Größen richtig. Danke im voraus.
21.11.2022 - 10:16
![]() Else wrote:
Else wrote:
Hej Hvor meget garn skal jeg købe når jeg kun vil lave halsedissen og ikke huen? tak for svar
17.09.2021 - 17:01DROPS Design answered:
Hej Else. Då ska du ha 150 g DROPS Karisma. Mvh DROPS Design
22.09.2021 - 09:35
![]() Ronja Joensuu wrote:
Ronja Joensuu wrote:
Hej! Jag har upptäckt att det finns ett fel i mönstret, strax innan man ska klippa av garnet och lägga bakstycket på en tråd så saknas det att man även ska sticka resår stickning dem sista 6-6 maskorna. Tack för ett övrigt fint och toppenbra mönster!
11.02.2021 - 21:33
![]() Jy Min wrote:
Jy Min wrote:
So useful project it is. I've been searching for this kind of warmer . Thank you so much.
07.01.2021 - 08:37
![]() Lise Kilganon wrote:
Lise Kilganon wrote:
Je suis incapable d imprimer la photo du modèle choisie , très important pour suivre les instructions, pouvez vous m aider, merci,,,,
08.10.2020 - 15:52DROPS Design answered:
Bonjour Mme Kilganon, vérifiez bien les paramètres de votre imprimante, nous avons pu lancer l'impression des photos sans soucis. Bon tricot!
08.10.2020 - 16:20
|
||||||||||||||||||||||||||||||||||
Blushing Birches#blushingbirchesset |
||||||||||||||||||||||||||||||||||
 |
 |
|||||||||||||||||||||||||||||||||
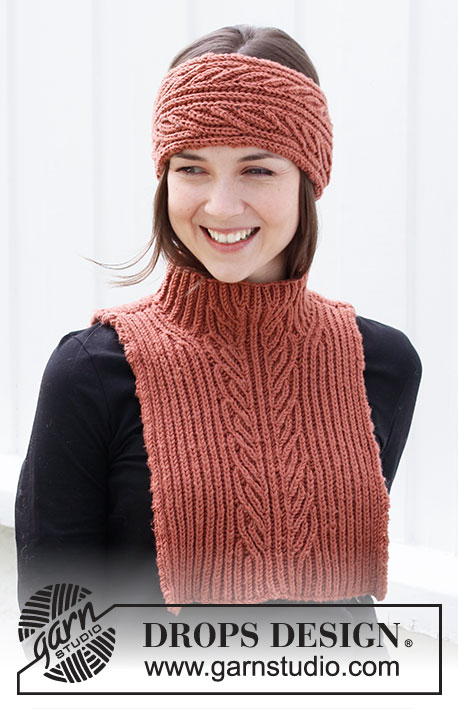
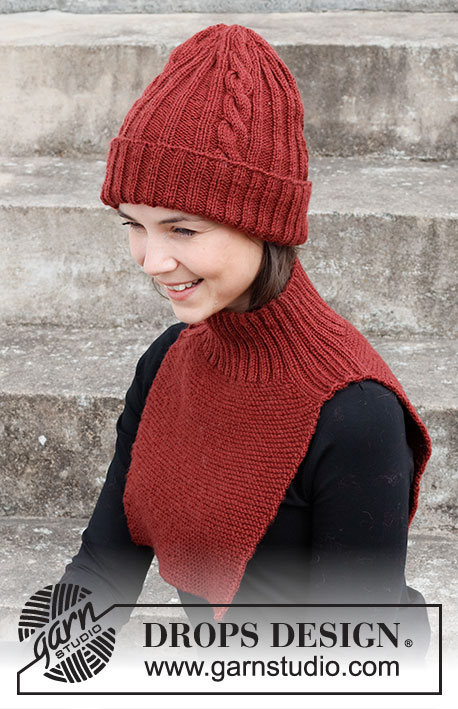
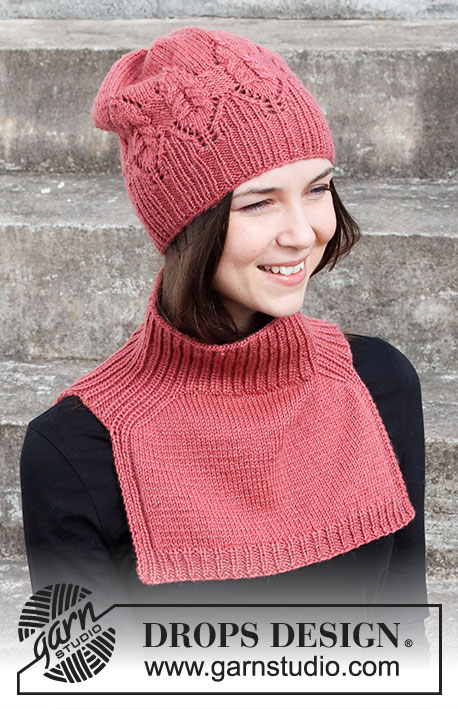
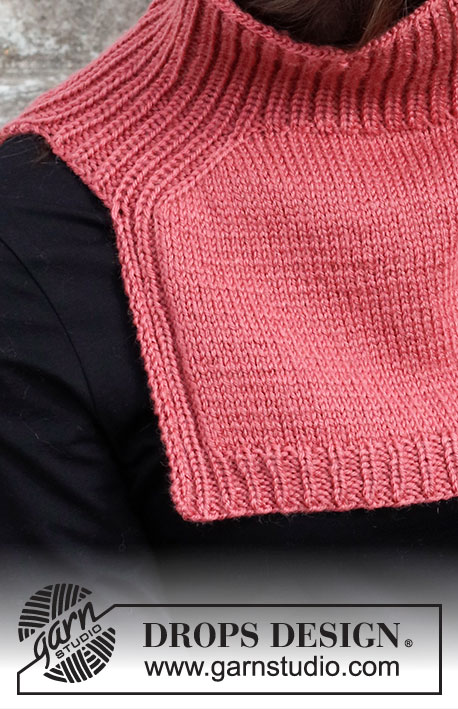
Knitted hat and neck warmer with saddle shoulder in DROPS Karisma. The set is worked with lace pattern, cables and rib.
DROPS 214-11 |
||||||||||||||||||||||||||||||||||
|
------------------------------------------------------- EXPLANATIONS FOR THE PATTERN: ------------------------------------------------------- RIDGE/GARTER STITCH (worked back and forth): Knit all rows. 1 ridge in height = Knit 2 rows. PATTERN (for hat): See diagrams A.1 and A.2. DECREASE TIP-1 (for top of hat): Decrease 1 stitch before each marker thread as follows: Work until there are 2 stitches left before the marker thread and knit 2 together. DECREASE TIP-2 (evenly spaced): To work out how to decrease evenly, count the total number of stitches on needle (e.g. 44 stitches) and divide by number of decreases to be made (e.g. 12) = 3.7. In this example decrease by knitting together alternately each 2nd and 3rd stitch and each 3rd and 4th stitch. INCREASE TIP (for increases for saddle shoulders on neck warmer): BEFORE MARKER: The new stitch will be twisted, leaning towards the right. Use left needle to pick up strand between 2 stitches from the round below, pick up strand from behind and knit stitch in front loop. AFTER MARKER: The new stitch will be twisted, leaning towards the left. Use left needle to pick up strand between 2 stitches from the round below, pick up strand from the front and knit stitch in back loop. CASTING-OFF TIP: To avoid the cast-off edge being tight you can cast off with a larger size needle. If the edge is still tight, make 1 yarn over after approx. each 4th stitch at the same time as casting off; the yarn overs are cast off as normal stitches. ------------------------------------------------------- START THE PIECE HERE: ------------------------------------------------------- HAT – SHORT OVERVIEW OF THE PIECE: The piece is worked in the round with short circular needle, bottom up. Change to double pointed needles when necessary. HAT: Cast on 108-120 stitches with circular needle size 3.5 mm and Karisma. Change to circular needle size 3 mm. Knit 1 round then work A.1 in the round (= 9-10 repeats of 12 stitches). When the piece measures 5-5 cm from the cast-on edge, change back to circular needle size 3.5 mm. Continue with A.2 (= 9-10 repeats of 12 stitches). Continue this pattern. REMEMBER THE KNITTING TENSION! When A.2 has been completed, work stocking stitch to finished length. AT THE SAME TIME when the piece measures 20-21 cm, insert 9-10 marker threads in the piece as follows: Count 6 stitches, * insert 1 marker thread before the next stitch, count 12 stitches *, repeat from *-* a total of 8-9 times, insert 1 marker thread before the next stitch. There are 6 stitches left on the round after the last marker thread. On the next round decrease 1 stitch before each marker thread – read DECREASE TIP-1 (= 9-10 stitches decreased). Decrease like this every 2nd round a total of 5-8 times and then every round a total of 5-2 times = 18-20 stitches left. On the next round knit all stitches together 2 and 2 = 9-10 stitches. Cut the strand, pull it through the remaining stitches, tighten and fasten well. The hat measures approx. 25-27 cm from the top down. ------------------------------------------------------- NECK WARMER - SHORT OVERVIEW OF THE PIECE: The piece is worked in the round with circular needle, top down. When the increases for the saddle shoulders are finished, stitches are cast off on each shoulder. The front and back pieces are then finished separately, back and forth on the needle. NECK WARMER: Cast on 138-156 stitches with short circular needle size 3.5 mm and Karisma. Change to short circular needle size 3 mm. Knit 1 round then work rib in the round (= knit 1, purl 2) – beginning of the round is the back right shoulder, when the neck warmer is worn. When the piece measures 7-8 cm from the cast-on edge, change to circular needle size 3.5 mm. Insert 4 markers in the piece as described below. Each marker is inserted in a knitted stitch and without working the stitches: Insert the first marker in the first knitted stitch on the round, skip 23-29 stitches (= shoulder), insert 2nd marker in the next knitted stitch, skip 44-47 stitches (= front piece), insert 3rd marker in the next knitted stitch, skip 23-29 stitches (= shoulder) and insert 4th marker in the next knitted stitch. There are 44-47 stitches left after the 4th marker. The next round is worked as follows: Knit the stitch with the marker, work rib over the next 23-29 stitches, knit the stitch with the marker, work stocking stitch over the next 44-47 stitches and decrease 12-13 stitches evenly over these stitches– read DECREASE TIP-2, knit the stitch with the marker, work rib over the next 23-29 stitches, knit the stitch with the marker, work stocking stitch over the last 44-47 stitches and decrease 12-13 stitches evenly over these stitches = 114-130 stitches. Now increase for the shoulders as described below. SADDLE SHOULDER INCREASE: Work rib as before over the 23-29 stitches on each shoulder, and stocking stitch over the other stitches on the front and back pieces (including the stitches with markers). REMEMBER THE KNITTING TENSION! AT THE SAME TIME increase 4 stitches on every round for saddle shoulders as follows: Increase BEFORE markers 1 and 3 and AFTER markers 2 and 4 – read INCREASE TIP (= 4 stitches increased – the increased stitches become part of the front and back pieces and are worked in stocking stitch; the number of stitches on each shoulder + the 4 stitches with markers remains the same). Increase like this EVERY round a total of 12-14 times = 162-186 stitches. On the next round cast off stitches in the middle of each shoulder section as follows: Knit the stitch with the marker, work rib over the next 6-6 stitches, work 1 stitch in GARTER STITCH – read description above, cast off the next 9-15 stitches (= middle of shoulder – cast off with knit and make sure the cast-off stitches are not tight), work 1 stitch in garter stitch, work rib over the next 6-6 stitches, stocking stitch over the next 58-64 stitches (= front piece including stitches with 2nd and 3rd markers), work rib over the next 6-6 stitches, 1 stitch in garter stitch, cast off the next 9-15 stitches (= middle of shoulder), 1 stitch in garter stitch, rib over the next 6-6 stitches and stocking stitch over the last 57-63 stitches (= back piece including stitch with 4th marker). Cut the strand. Place the 72-78 stitches for the back piece on 1 thread or extra needle and work the front piece. FRONT PIECE: = 72-78 stitches. Work back and forth with circular needle size 3.5 mm as follows: 1 edge stitch in garter stitch, rib over the next 6-6 stitches (= knit 1, purl 2, knit 1, purl 2), work stocking stitch until there are 7 stitches left on the row, rib over the next 6 stitches (= purl 2, knit 1, purl 2, knit 1) and finish with 1 edge stitch in garter stitch. Continue this pattern until the piece measures 22-24 cm from the cast-on edge mid-front. There is approx. 3 cm left to finished length; try the neck warmer on and work to desired length. Change to circular needle size 3 mm and work the next row as follows from the right side: 1 edge stitch in garter stitch, * knit 1, purl 2 *, work from *-* until there are 2 stitches left on the row, knit 1 and finish with 1 edge stitch in garter stitch. Work a total of 8 rows of this rib. Cast off with knit over knit and purl over purl – read CASTING-OFF TIP. Cut and fasten the strand. The front piece measures approx. 25-27 cm from the cast-on edge mid-front. BACK PIECE: Place the 72-78 stitches from the thread/extra needle back onto circular needle size 3.5 mm and work in the same way as the front piece, until the piece measures 24-26 cm from the cast-on edge mid-back (i.e. 2 cm longer than the front piece). Change to circular needle size 3 mm and work rib in the same way as the front piece. The back piece measures approx. 27-29 cm from the cast-on edge mid-back. |
||||||||||||||||||||||||||||||||||
Diagram explanations |
||||||||||||||||||||||||||||||||||
|
||||||||||||||||||||||||||||||||||
 |
||||||||||||||||||||||||||||||||||
Have you finished this pattern?Tag your pictures with #dropspattern #blushingbirchesset or submit them to the #dropsfan gallery. Do you need help with this pattern?You'll find 25 tutorial videos, a Comments/Questions area and more by visiting the pattern on garnstudio.com. © 1982-2026 DROPS Design A/S. We reserve all rights. This document, including all its sub-sections, has copyrights. Read more about what you can do with our patterns at the bottom of each pattern on our site. |
||||||||||||||||||||||||||||||||||


With over 40 years in knitting and crochet design, DROPS Design offers one of the most extensive collections of free patterns on the internet - translated to 17 languages. As of today we count 324 catalogues and 12290 patterns translated into English (UK/cm). 12290
We work hard to bring you the best knitting and crochet have to offer, inspiration and advice as well as great quality yarns at incredible prices! Would you like to use our patterns for other than personal use? You can read what you are allowed to do in the Copyright text at the bottom of all our patterns. Happy crafting!
Post a comment to pattern DROPS 214-11
We would love to hear what you have to say about this pattern!
If you want to leave a question, please make sure you select the correct category in the form below, to speed up the answering process. Required fields are marked *.