
Popular categories
Looking for a yarn?


Comments / Questions (27)
![]() Ida wrote:
Ida wrote:
Vad menas med ”När A.1 är färdigstickat på höjden, stickas A.2 över A.1 och resår som förut över de 26-30-34 maskorna på varje axel.” Specifikt att A2 stickas över A1, betyder det att man går över från att sticka A1 till att sticka A2?
12.01.2022 - 22:14DROPS Design answered:
Hej Ida. Ja det stämmer. Mvh DROPS Design
14.01.2022 - 14:21
![]() Caroline wrote:
Caroline wrote:
Could you please clarify how the last 8 rounds of increased stitches of the saddle shoulder increase should be worked? Should the M1 increase in each round be purled or should the M1 increase be knit and the pattern (p2, k2, p2, k2) start on the next stitch?
28.12.2021 - 22:26DROPS Design answered:
Dear Caroline, the next 8 increases should be worked in pattern: P2, K2, P2, K2. This means the first and the second (= and the 5th + 6th) of these 8 increases will be purled, the 3rd and the 4th (and the 7th + 8th) will be knitted. Happy knitting!
03.01.2022 - 09:31
![]() Mina Vaghei wrote:
Mina Vaghei wrote:
Har dere en video om denne? Særlig halsen, jeg har vanskelighet med å forstå. Er det strikket opp fra jalsen og nedover eller omvendt
10.11.2021 - 01:19DROPS Design answered:
Hej Mina. Du börjar längst upp på halsen och stickar nedover. Vi har dessvärre inte en video på just detta mönster, men vi har en på hur du ökar till sadelskulder efter halsen. Mvh DROPS Design
10.11.2021 - 08:46
![]() Giovanna wrote:
Giovanna wrote:
Per favore. Istruzioni per i ferri diritti e non circolari grazie
23.06.2021 - 19:28DROPS Design answered:
Buonasera Giovanna, può lavorare il modello in parti separate con 1 maglia di vivagno a ogni lato per la cucitura. Buon lavoro!
23.06.2021 - 23:47
![]() Cecilia Ankarstrand wrote:
Cecilia Ankarstrand wrote:
Är det möjligt att någon vill göra ett mönster för denna som en väst? Älskar denna, har gjort 2st nu o vinter. Perfekt under jackor, men skulle önska få till ärmhålet då det kan bli en slipover/ väst. Underbar tack!
27.02.2021 - 10:44
![]() Yvonne Schüler-Mudra wrote:
Yvonne Schüler-Mudra wrote:
Auweia, hab ich dann die Anleitung in diesem Abschnitt komplett falsch verstanden? Ich hab wie gesagt die ersten 10 Runden die Zunahmen glatt re gestrickt (also 40 MA gl re) und hab somit bis dahin insgesamt 164 Ma auf der Nadel. Hätte ich schon gleichzeitig mit den Zunahmen mit A. 2 beginnen müssen? Sorry, ich stricke das erst mal so komplex und nach so einer Anleitung und erst recht von oben nach unten..
16.02.2021 - 10:39DROPS Design answered:
Liebe Frau Schüler-Mudra, Verzeihung für die späte Antwort, Ihre Frage wurde leiger übersehen. Also ja, wenn Sie die 2 Reihen in A.1 gestrickt haben, dann stricken Sie A.2 über die Maschen von A.1, und gleichzeitig stricken Sie die Zunahmen für die Sattelschulter weiter. Viel Spaß beim stricken!
20.05.2021 - 08:57
![]() Yvonne wrote:
Yvonne wrote:
Hallo, ich stricke seit 2 Tagen an diesem Overshirt und bin jetzt bei dem Absatz mit den Sattelschultern. Die ersten 10 Teihen der Zunahmen habe ich, wie in der Anleitung beschrieben, glatt rechts gestrickt und somit ergeben sich gleichmäßig verteilt, 4 glatt rechts gestrickte Dreiecke. Bei den nächsten 8 Reihen der Zunahmen soll dann darunter das Rippmuster gestrickt werden. Habe ich das richtig verstanden? Ist auf den Bildern so aber nicht zu erkennen.
16.02.2021 - 09:45DROPS Design answered:
Liebe Yvonne, die ersten 10 Zunahmen werden glatt rechts gestrickt aber die letzten 8 werden im Bündchen gestrickt, damit diese Maschen dann die "Rand-Maschen" für Vorder- bzw Rückenteil sind - schauen Sie das letzte Foto, vielleicht kann es Ihnen helfen?
16.02.2021 - 09:50
![]() Lydia Vedder wrote:
Lydia Vedder wrote:
When you say back and forth does this mean you are doing every other row backwards? I can seam to grasp how this back and forth works. Thank you in advance.
25.01.2021 - 20:34DROPS Design answered:
Dear Mrs Vedder, working back and forth means working flat, alternately from right side and from wrong side - just as shown in this video. Happy knitting!
26.01.2021 - 08:45
![]() Birgitta Eriksson wrote:
Birgitta Eriksson wrote:
Jag ska sticka denna väst i färg Nord nr19 vilken färg ska jag ha på Kid Silk då?
26.12.2020 - 17:32DROPS Design answered:
Hej Birgitta. Då tycker jag att nummer 19 mörk grön passar bäst. Mvh DROPS Design
05.01.2021 - 12:19
![]() Tula Strand wrote:
Tula Strand wrote:
Kan jeg bruker garngruppe C? Isåfall kan air brukes og hvor mange gram?
27.11.2020 - 10:41DROPS Design answered:
Hej Tula. Ja du kan använda ett garn ut garngrupp C till detta mönster (som t.ex. DROPS Air). Här kan du läsa mer om hur du gör för att beräkna garnforbruk. Mvh DROPS Design
27.11.2020 - 13:32
|
|||||||||||||||||||
Leaf Diversion#leafdiversionset |
|||||||||||||||||||
 |
 |
||||||||||||||||||
Knitted vest and head band in DROPS Nord and DROPS Kid-Silk. Piece is knitted top down with increase for saddle shoulder and lace pattern. Size: S - XXXL
DROPS 218-23 |
|||||||||||||||||||
|
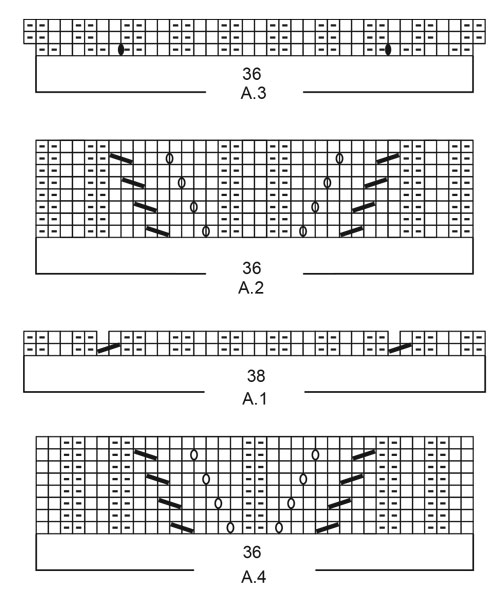
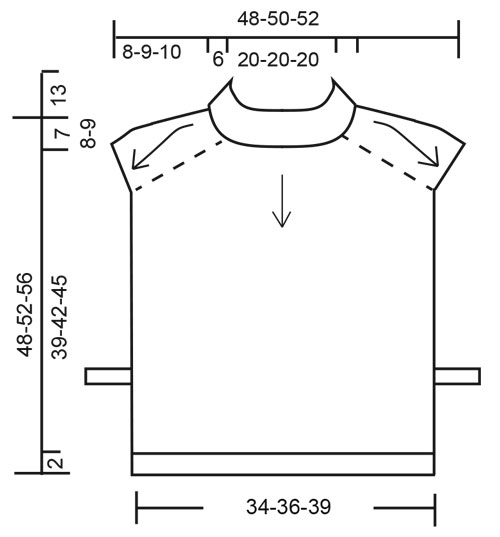
------------------------------------------------------- EXPLANATION FOR THE PATTERN: ------------------------------------------------------- GARTER STITCH (back and forth): Knit all rows. 1 ridge vertically = knit 2 rows. PATTERN: Vest: See diagrams A.1 to A.3. Head band: See diagram A.4. Diagrams show all rows in pattern seen from the right side. INCREASE TIP-1 (applies to saddle shoulder increase): BEFORE MARKER: The new stitch will be twisted, leaning towards the right. Use left needle to pick up strand between 2 stitches from the round below, pick up strand from behind and knit stitch in front loop. AFTER MARKER: The new stitch will be twisted, leaning towards the left. Use left needle to pick up strand between 2 stitches from the round below, pick up strand from the front and knit stitch in back loop. INCREASE TIP-2 (evenly): To calculate how to increase evenly, count the stitches to be increased (e.g. 10 stitches) and divide this number by stitches of increases to be done (e.g. 4) = 2.5. In this example increase by making 1 yarn over after alternately every other and 3rd stitch. On next row work yarn overs twisted to avoid holes. ------------------------------------------------------- START THE PIECE HERE: ------------------------------------------------------- VEST - SHORT OVERVIEW OF THE PIECE: Piece is worked top down, and worked in the round until shoulder increases are done. Then work front and back piece back and forth separately. VEST: Cast on 128-136-144 stitches on circular needle size 4 mm with 1 strand Nord and 1 strand Kid-Silk (= 2 strands). Knit 1 round. Then work rib (= knit 2/purl 2) in the round for 13 cm. Switch to circular needle size 5 mm. Now work as follows: Insert 1st marker at beginning of round (= before 2 knit stitches), work rib as before over the first 26-30-34 stitches, insert 2nd marker here, work A.1 over the next 38-38-38 stitches (= 2 stitches decreased), insert 3rd marker here, work rib as before over the next 26-30-34 stitches, insert 4th marker here, work A.1 over the last 38-38-38 stitches (= 2 stitches decreased) = 124-132-140 stitches. REMEMBER THE KNITTING TENSION! SADDLE SHOULDER INCREASE: Now work last round in A.1 and work rib as before over the 26-30-34 stitches on each shoulder. AT THE SAME TIME on first round increase 4 stitches on round: Increase BEFORE 1st and 3rd marker, and AFTER 2nd and 4th marker – read INCREASE TIP-1. Increases are only on front piece and back piece and number of shoulder stitches remains the same. Increase like this every round 18-20-22 times in total. Work the increased stitches from the first 10-12-14 rounds in stocking stitch, then work the increased stitches from the next 8 rounds in pattern as follows: Purl 2, knit 2, purl 2, knit 2. When A.1 is finished vertically, work A.2 over A.1 and rib as before over the 26-30-34 stitches on each shoulder. When all increases are done, there are 196-212-228 stitches on round, continue with pattern as before. The next time the 1st, 3rd, 5th or 7th round in A.2 is worked; work as follows: Cast off with knit over knit and purl over purl over the first 26-30-34 stitches, work pattern as before over the next 72-76-80 stitches before slipping them on 1 stitch holder (= front piece), cast off with knit over knit and purl over purl over the next 26-30-34 stitches, work pattern as before over the last 72-76-80 stitches (= back piece). BACK PIECE: Continue back and forth with pattern as before over the 72-76-80 stitches. I.e. Work A.2 over the middle 36-36-36 stitches and work knit over knit and purl over purl over the remaining stitches. When piece measures 39-42-45 cm from transition between A.1 in the neck and A.2 – adjust to finish after a whole repetition vertically, work next row from right side as follows: Work as before over the first 8-8-8 stitches, knit the next 10-12-14 stitches while increasing 4-2-4 stitches evenly – read INCREASE TIP-2, work A.3 over A.2 (= 2 stitches increased), knit the next 10-12-14 stitches while increasing 4-2-4 stitches evenly, work the last 8-8-8 stitches as before = 82-82-90 stitches. Work 1 row in pattern (work yarn overs twisted to avoid holes). Switch to circular needle size 4 mm. Now work rib from right side as follows: Work (knit 2/purl 2) over the first 20-20-24 stitches, knit 2, continue with knit over knit and purl over purl over the next 38-38-38 stitches, work (knit 2/purl 2) over the next 20-20-24 stitches, knit 2. Continue back and forth like this until rib has been worked for 2 cm. Cast off stitches with knit over knit and purl over purl. FRONT PIECE: Work as on back piece. ASSEMBLY: Knit a band with buttonhole in each side as follows: Cast on 7 stitches on circular needle size 4 mm with 1 strand Nord and 1 strand Kid-Silk (= 2 strands). Work in garter stitch back and forth. When 4 ridges have been worked, decrease for buttonhole follows: Knit 2, knit 2 together (= 1 stitch decreased), make 1 yarn over, knit 3. On next row knit yarn over. continue back and forth in garter stitch until band measures approx. 16 to 28 cm – or desired length (ribbon can be worked longer after button is attached, to make it easier to work until correct length). Fasten button on right side of back piece, approx. 14 cm up from bottom edge and between 5th and 6th stitch from edge. Then try the vest on and adjust length of band by working to desired length. Fasten the other end of band on on the inside of front piece approx. 14 cm (i.e. in a row) with button. Repeat in the other side. ------------------------------------------------------- HEAD BAND: Work head band back and forth on circular needle. HEAD BAND: Cast on 36 stitches on circular needle size 4.5 mm with 1 strand Nord + 1 strand Kid-Silk (= 2 strands). Work pattern A.4 back and forth. Tighten the yarn a little at the beginning of every row to avoid a loose edge stitch. REMEMBER THE KNITTING TENSION! Work like this until piece measures 49 cm or desired length - adjust to finish after a whole repetition vertically. Cast off stitches with knit over knit and purl over purl. Cut the yarn but leave some yarn for assembly. Sew seam with grafting/kitchener stitches inside cast-on and cast-off edge. |
|||||||||||||||||||
Diagram explanations |
|||||||||||||||||||
|
|||||||||||||||||||
 |
|||||||||||||||||||
 |
|||||||||||||||||||
Have you finished this pattern?Tag your pictures with #dropspattern #leafdiversionset or submit them to the #dropsfan gallery. Do you need help with this pattern?You'll find 23 tutorial videos, a Comments/Questions area and more by visiting the pattern on garnstudio.com. © 1982-2026 DROPS Design A/S. We reserve all rights. This document, including all its sub-sections, has copyrights. Read more about what you can do with our patterns at the bottom of each pattern on our site. |
|||||||||||||||||||


With over 40 years in knitting and crochet design, DROPS Design offers one of the most extensive collections of free patterns on the internet - translated to 17 languages. As of today we count 324 catalogues and 12290 patterns translated into English (UK/cm). 12290
We work hard to bring you the best knitting and crochet have to offer, inspiration and advice as well as great quality yarns at incredible prices! Would you like to use our patterns for other than personal use? You can read what you are allowed to do in the Copyright text at the bottom of all our patterns. Happy crafting!
Post a comment to pattern DROPS 218-23
We would love to hear what you have to say about this pattern!
If you want to leave a question, please make sure you select the correct category in the form below, to speed up the answering process. Required fields are marked *.