
Popular categories
Looking for a yarn?


Comments / Questions (11)
![]() Ulrika wrote:
Ulrika wrote:
Hej! Finns DROPS ALPACA färg 6347, söt lavendel kvar? Vilken färgnyans rekommenderar ni annars för att matcha DROPS KID-SILK färg 11, lila? Jag funderar på om 6790 funkar.
13.02.2022 - 17:31
![]() Wilhelmiina Koskela wrote:
Wilhelmiina Koskela wrote:
Hei olen tekemässä neuleen takaosaa, mutta aloittelijana en ymmärrä takakappaleen kvennusohjetta miten se tulisi tehdä ?
17.12.2020 - 10:28DROPS Design answered:
Silmukoita kavennetaan tasavälein. Lue ohjeen yläreunassa oleva KAVENNUSVINKKI. Esim. koossa S kavennetaan neulomalla vuorotellen joka 3. ja joka 4. ja joka 4. ja joka 5. silmukka oikein yhteen.
22.03.2021 - 16:49
![]() Mila wrote:
Mila wrote:
Lieber Drops- Team, Danke für die schnelle Antwort! Wenn ich meine Frage präzisieren darf: was passiert beim zweiten Mal? Bleiben die mittleren 9 Maschen immer 9, oder bei der 2. Verschiebung sind sie schon 11; bei der 3. Mal - 13, etc. Ich habe es als konstant 9 Maschen verstanden und gemacht; es sieht aber anders aus, als die Bilder oben 🤔🤔🤔
25.06.2020 - 10:10DROPS Design answered:
Liebe Mila, es sind immer 9 Maschen, aber am Anfang der Reihe, die 1. von den 9 Maschen ist die mit der Abnahme ( re Ma), und die Zunahme wird nach der 9. Masche gestrickt (nach der re M)- für die 2. Verschiebung nehmen Sie vor der 1. von den 9 Maschen (=re. Masche) und nach den 9. Masche (nach der letzten re M von den 9 M). Hoffentlich ist es etwas deutlicher.... Gerne können Sie auch Ihr Strickstück Ihr DROPS Laden zeigen, (auch per Mail), es wird sicher einfacher für sie Ihnen weiterzuhelfen. Viel Spaß beim stricken!
25.06.2020 - 17:13
![]() Mila wrote:
Mila wrote:
Könnten Sie bitte, die Verschiebung als ein Schema veröffentlichen? Für mich ist die Beschreibung ziemlich schwer zu verstehen, ich weiß nicht warum. Aber, ich finde, mit einem Schema wäre es viel einfacher. Danke im voraus!
23.06.2020 - 19:28DROPS Design answered:
Liebe Mila, das haben wir leider nicht. Die Verschiebungn stricken Sie so: 2 Maschen 11 Maschen vor der 1. Markierung abnehmen, die nächsten 8 Maschen wie zuvor stricken, 2 Maschen zunehmen - ( = 1. Verschiebung) jetzt stricken Sie bis 1 Masche vor der nächsten Markierung, 2 Maschen zunehmen, die nächsten 8 M wie zuvor stricken, 2 M abnehmen: Sie haben 1 Masche vor dem ersten 8-Maschen Set + 1 Maschen nach dem 2. 8-Maschen-Set abgenommen, und 1 Masche nach den 8-Maschen + 1 Masche vor den 8-Maschen zugenmomen. Versuchen Sie mal mit einer kleineren Maschenanzahl. Viel Spaß beim stricken!
24.06.2020 - 07:32
![]() Binky Durran wrote:
Binky Durran wrote:
What thickness is A. -2 or 4 ply
04.03.2020 - 17:29DROPS Design answered:
Dear Binky, A yarngroup has several yarns with slightly different thickns, but generally most of them falls into the sport/ fingering weight, between 150-200 meters for each 50 gramm skein or ball. Happy Crafting!
05.03.2020 - 01:57
![]() Uta wrote:
Uta wrote:
Wann kann man diesen tollen pulli endlich stricken ich wuerde ihn soooo gerne arbeiten habe schon wolle dafür schaue jeden Tag nach wie lange noch wird mir die Nase lang gemacht
10.11.2019 - 08:18
![]() Jette Storm wrote:
Jette Storm wrote:
Lækker model.Hvornår er opskriften klar? Skal bruges til julegave
05.11.2019 - 13:47
![]() Lavendel wrote:
Lavendel wrote:
Den tröja är min favorit i höst/vinterkollektionen. Jag kommer att sticka den i denna vackra färg.
24.08.2019 - 22:32
![]() Anne Marie Wuyts wrote:
Anne Marie Wuyts wrote:
Graag had ik de uitleg gekend Hoe je die schuiningen moet maken. Ik vind nergens een nederlandstalige uitleg. 'Anne Marie
12.08.2019 - 15:09
![]() Ellis wrote:
Ellis wrote:
Here is bm060 but longer, nice to
09.06.2019 - 22:00
|
|
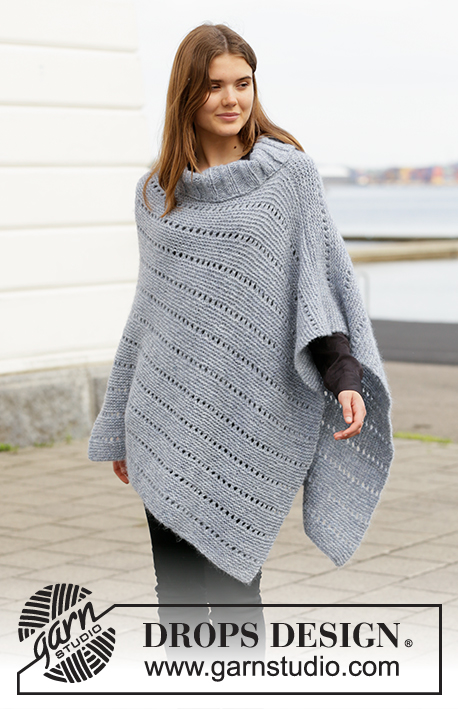
Tender Memories#tendermemoriessweater |
|
 |
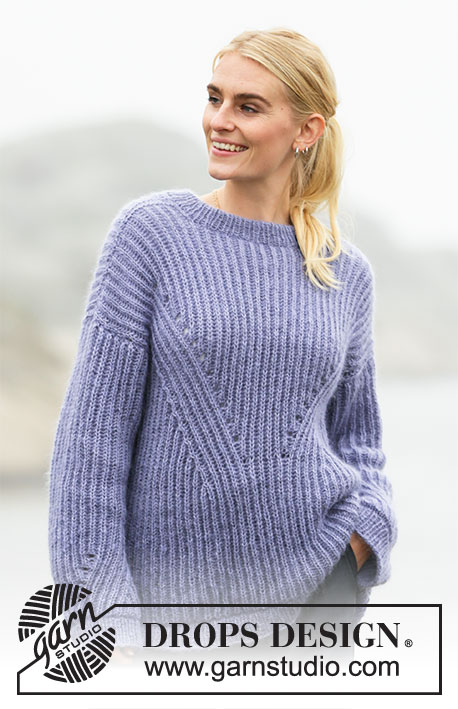 |
Knitted jumper with English rib in DROPS Alpaca and DROPS Kid-Silk. The piece is worked with displacements and a double neck. Sizes S - XXXL.
DROPS 205-34 |
|
|
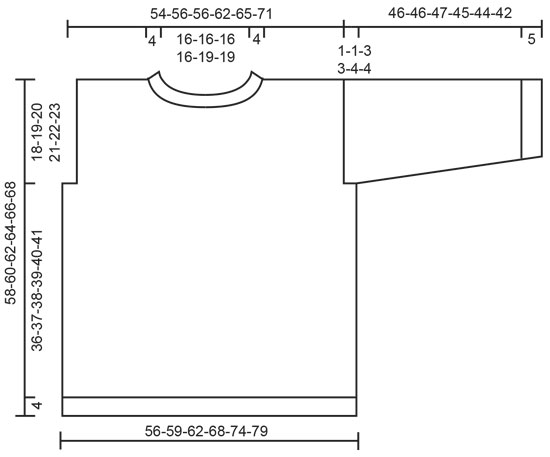
------------------------------------------------------- EXPLANATIONS FOR THE PATTERN: ------------------------------------------------------- RIDGE/GARTER STITCH (worked back and forth): Knit all rows. 1 ridge in height = Knit 2 rows. ENGLISH RIB (back and forth): ROW 1 (right side): 1 stitch in garter stitch, * knit 1, 1 yarn over, slip 1 stitch as if to purl *, work from *-* until there are 2 stitches left, knit 1, 1 stitch in garter stitch. ROW 2 (wrong side): 1 stitch in garter stitch, * 1 yarn over, slip 1 stitch as if to purl, knit the yarn over and slipped stitch together *, work from *-* until there are 2 stitches left and finish with 1 yarn over, slip 1 stitch as if to purl, 1 stitch in garter stitch. ROW 3 (right side): 1 stitch in garter stitch, * knit the yarn over and slipped stitch together, 1 yarn over, slip 1 stitch as if to purl *, work from *-* until there is 1 yarn over and 2 stitches left, knit the yarn over and slipped stitch together, 1 stitch in garter stitch. Repeat rows 2 and 3 onwards. DECREASE TIP (evenly spaced): To work out how to decrease evenly, count the total number of stitches on needle (e.g. 103 stitches) minus the edge stitches (= 2 stitches) and divide the remaining stitches by the number of decreases to be made (e.g. 22) = 4.6. In this example decrease by knitting together alternately each 3rd and 4th stitch and each 4th and 5th stitch. INCREASE TIP (for sleeves): All increases are worked from the right side! Increase in the knitted stitch inside the 1 edge stitch on each side of the sleeve as follows: Work 1 edge stitch in garter stitch, knit 1, 1 yarn over, knit 1 in the same stitch (= 2 stitches increased), work until there are 2 stitches left on the row, knit 1, 1 yarn over, knit 1 in the same stitch (= 2 stitches increased),1 edge stitch in garter stitch. A total of 4 stitches increased on the row. Work the increased stitches into the English rib but on the first row (wrong side) there are no yarn overs between the increased stitches. The stitch which should be worked together with a yarn over is therefore worked without one. DISPLACEMENTS: Work until there are 11 stitches left before the first marker thread, knit 3 (+ yarn overs) together (= 2 stitches decreased), work the next 8 stitches as before, (marker here), work 3 stitches in the next stitch (= purled stitch) as follows: Knit 1, 1 yarn over, knit 1 in the same stitch (= 3 stitches, i.e. 2 stitches increased), work until there is 1 stitch left before the next marker thread, work 3 stitches in the next stitch (= purled stitch) as follows: Knit 1, 1 yarn over, knit 1 in the same stitch (= 3 stitches, i.e. 2 stitches increased), marker here, work the next 8 stitches, slip the yarn over and next stitch as if to knit, knit the next 2 stitches (+ yarn over) together, pass the slipped stitch (+ yarn over) over (= 2 stitches decreased), work to end of row. You have decreased 2 stitches towards each side of the piece and increased 4 stitches between the marker threads mid front. The increased stitches are worked into the English rib, but on the first row (wrong side) there are no yarn overs between the increased stitches. The stitch which should be worked together with a yarn over is therefore worked without one. ------------------------------------------------------- START THE PIECE HERE: ------------------------------------------------------- JUMPER – SHORT OVERVIEW OF THE PIECE: The piece is worked back and forth with circular needle, in sections which are then sewn together. Stitches are displaced on the front piece and on the sleeves. A double neck is worked in the round with circular needle. BACK PIECE: Cast on 103-109-115-125-137-145 stitches (including 1 edge stitch on each side) with circular needle size 4 mm and 1 strand Alpaca and 1 strand Kid-Silk (= 2 strands). Purl 1 row (= wrong side). Then work rib from the right side as follows: 1 edge stitch in GARTER STITCH – read description above, * knit 1, purl 1 *, work from *-* until there are 2 stitches left on the row, knit 1 and work 1 edge stitch in garter stitch. When the rib measures 4 cm purl 1 row from the wrong side where you decrease 22-24-26-28-32-32 stitches evenly spaced – read DECREASE TIP = 81-85-89-97-105-113 stitches. Change to circular needle size 5 mm. Now work ENGLISH RIB – read description above. REMEMBER THE KNITTING TENSION! When the piece measures 40-41-42-43-44-45 cm, cast off 2-2-4-4-6-6 stitches at the beginning of the next 2 rows for the armholes = 77-81-81-89-93-101 stitches. Continue with English rib and 1 edge stitch in garter stitch on each side. When the piece measures 55-57-59-61-63-65 cm, cast off the middle 19-19-19-19-23-23 stitches for the neck and each shoulder is finished separately. On the next row from the neck cast off 2 stitches = 27-29-29-33-33-37 stitches on shoulder. When the piece measures 57-59-61-63-65-67 cm (17-18-19-20-21-22 cm from where you cast off for the armholes), knit 1 row over all stitches (yarn overs knitted together with their respective stitches) and increase at the same time 6-6-6-7-7-8 stitches evenly spaced = 33-35-35-40-40-45 stitches. Knit 1 row back from the wrong side so there is a ridge on the shoulder. Cast off with knit from the right side; make sure the cast-off edge is not tight. Work the other shoulder in the same way. The back piece measures approx. 58-60-62-64-66-68 cm from the shoulder down. FRONT PIECE: Cast on 103-109-115-125-137-145 stitches (including 1 edge stitch on each side) with circular needle size 4 mm and 1 strand Alpaca and 1 strand Kid-Silk (= 2 strands). Purl 1 row (= wrong side). Then work rib from the right side as follows: 1 edge stitch in GARTER STITCH – read description above, * knit 1, purl 1 *, work from *-* until there are 2 stitches left on the row, knit 1 and work 1 edge stitch in garter stitch. When the rib measures 4 cm, purl 1 row from the wrong side where you decrease 22-24-26-28-32-32 stitches evenly spaced – remember DECREASE TIP = 81-85-89-97-105-113 stitches. Change to circular needle size 5 mm. Now work English rib in the same way as on the back piece until the piece measures 23 cm in all sizes – adjust so the next row is from the right side. Insert 2 marker threads on each side of the 9 middle stitches on the row (= 36-38-40-44-48-52 stitches the outside of each marker threads). You should have 1 purled stitch in English rib after the first marker thread and 1 purled stitch in English rib before the second marker thread. Allow the threads to follow your work onwards. Now work a DISPLACEMENTS – read description above. Displace stitches towards the side every 8th row (= 4 English rib stitches in height) 10-11-11-14-15-19 times, then every 12th row (= 6 English rib stitches in height) 2 times. At the same time when the piece measures 40-41-42-43-44-45 cm, cast off 2-2-4-4-6-6 stitches at the beginning of the next 2 rows for the armholes = 77-81-81-89-93-101 stitches. Continue with English rib, displacements and 1 edge stitch in garter stitch on each side. When the piece measures 51-53-54-56-57-59 cm place the middle 15-15-15-15-19-19 stitches on a thread for the neck and each shoulder is finished separately. Then cast off stitches on each row from the neck as follows: 2 stitches 1 time and 1 stitch 2 times = 27-29-29-33-33-37 stitches on shoulder. When the piece measures 57-59-61-63-65-67 cm (17-18-19-20-21-22 cm from where stitches were cast off for the armholes) – adjust so the next row is from the right side, knit 1 row over all stitches (yarn overs knitted together with their respective stitches) and increase at the same time 6-6-6-7-7-8 stitches evenly spaced = 33-35-35-40-40-45 stitches. Knit 1 row back from the wrong side so there is a ridge on the shoulder. Cast off with knit from the right side; make sure the cast-off edge is not tight. Work the other shoulder in the same way. SLEEVES: Cast on 43-43-47-47-51-51 stitches (including 1 edge stitch on each side) with circular needle size 4 mm and 1 strand Alpaca and 1 strand Kid-Silk (= 2 strands). Purl 1 row (= wrong side). Then work rib from the right side as follows: 1 edge stitch in garter stitch, * knit 1, purl 1 *, work from *-* until there are 2 stitches left on the row, knit 1 and 1 edge stitch in garter stitch. When the rib measures 5 cm, purl 1 row from the wrong side where you decrease 2 stitches evenly spaced = 41-41-45-45-49-49 stitches. Change to circular needle size 5 mm. Now work English rib in the same way as on the front and back pieces. Read the whole of the next section before continuing: When the piece measures 7 cm from the cast-on edge start to increase on each side of the piece – read INCREASE TIP. Increase like this every 14-9-13-8-11-7 cm a total of 3-4-3-4-3-4 times = 53-57-57-61-61-65 stitches. AT THE SAME TIME when the piece measures 8 cm – adjust so the next row is from the right side, insert 2 marker threads on each side of the 5 middle stitches on the row. You should have 1 purled stitch in English rib after the first marker thread and 1 purled stitch in English rib before the second marker thread. Allow the threads to follow your work onwards. Now work DISPLACEMENTS – read description above. Displace stitches towards the side every 8th row (= 4 English rib stitches in height) 4 times in all sizes. When the displacements are finished continue with English rib to finished length. When the sleeve measures 45-45-44-42-40-38 cm, insert a marker thread on each side of the piece; these will be used when assembling the garment. Continue working until the sleeve measures 46-46-47-45-44-42 cm. Cast off; to avoid the cast-off edge being tight cast off the yarn overs as normal stitches. Work the other sleeve in the same way. ASSEMBLY: Sew the shoulder seams with grafting stitches inside the cast-off edge. Sew the sleeves to the body inside the 1 edge stitch on the body and the cast-off edge on the sleeves. The marker threads on either side of the sleeves should meet the edge stitch under the armhole on the body. Sew the sleeve and side seams in one go. NECK: Start from the right side with circular needle size 4 mm and 1 strand of each quality (= 2 strands). Knit up 80 to 96 stitches around the neck (including the stitches from the thread on the front piece). Work rib (knit 1, purl 1) for 8 cm. Cast off with knit over knit and purl over purl. Fold the neck edge double and sew it with small stitches. Cut and fasten the strands. |
|
 |
|
Have you finished this pattern?Tag your pictures with #dropspattern #tendermemoriessweater or submit them to the #dropsfan gallery. Do you need help with this pattern?You'll find 18 tutorial videos, a Comments/Questions area and more by visiting the pattern on garnstudio.com. © 1982-2026 DROPS Design A/S. We reserve all rights. This document, including all its sub-sections, has copyrights. Read more about what you can do with our patterns at the bottom of each pattern on our site. |
|


With over 40 years in knitting and crochet design, DROPS Design offers one of the most extensive collections of free patterns on the internet - translated to 17 languages. As of today we count 324 catalogues and 12290 patterns translated into English (UK/cm). 12290
We work hard to bring you the best knitting and crochet have to offer, inspiration and advice as well as great quality yarns at incredible prices! Would you like to use our patterns for other than personal use? You can read what you are allowed to do in the Copyright text at the bottom of all our patterns. Happy crafting!
Post a comment to pattern DROPS 205-34
We would love to hear what you have to say about this pattern!
If you want to leave a question, please make sure you select the correct category in the form below, to speed up the answering process. Required fields are marked *.