
Popular categories
Looking for a yarn?


Comments / Questions (15)
![]() Mette Stephens wrote:
Mette Stephens wrote:
Hej Kan man lave sjalet mindre end 192cm bredt? Med venlig hilsen Mette
09.02.2024 - 12:03
![]() Malena Palm wrote:
Malena Palm wrote:
Hej, Jag vill gärna sticka denna med de färger som är rekommenderade men det verkar som att 7120 ljus grågrön har utgått i Drops alpacka. Då det är svårt att se på små färgkartor på en dator undrar jag vilken färg ni rekommenderar som ersättningsfärg som ligger närmast 7120.
14.03.2023 - 07:26DROPS Design answered:
Hej Malena, de DROPS Alpaca 7139 og 7120 var næsten ens, så enten bruger du også 7139 i den anden rand eller så kan du bruge 7323 som også passer til de andre farver i sjalet :)
15.03.2023 - 14:33
![]() Kristin wrote:
Kristin wrote:
Tre av disse garnene heter noe annet i fargelisten. Regner med numrene er rett?
29.10.2021 - 12:23
![]() Djuni Hansen wrote:
Djuni Hansen wrote:
Mangler opskrift - ønskes sendt via mail På forhånd tak 😄
21.09.2020 - 13:22
![]() Celine wrote:
Celine wrote:
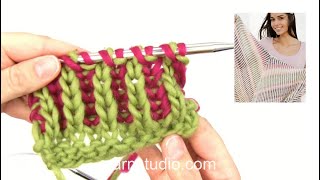
Bonjour, je rejoins Martine sur la question du rang 2 des cotes anglaises où dans la video on les vois tricoter a l envers et dans les explications c indiqué de le faire a l endroit , je pense qu il y a une erreur sur les explications. Bonne journée
12.12.2019 - 10:58DROPS Design answered:
Bonjour Céline, le rang 2 se tricote bien dans la vidéo<:a> comme il est décrit dans les explications (= sur l'endroit), avec *1 jeté, glisser 1 m à l'env, tricoter ens à l'env la m suivante et son jeté* - cf time code 08:15 (début du rang 2). Bon tricot!
12.12.2019 - 14:29
![]() EB wrote:
EB wrote:
Creo que la hilera 2 no está bien explicada, me parece que cuando hay que tejer el punto junto con la lazada es del revés, no del derecho como explica. De hecho, en el vídeo explicativo los teje del revés.
20.11.2019 - 14:00DROPS Design answered:
Hola EB. Si, es correcto. Tienes que trabajar la lazada y el punto juntos de revés. Ha sido una errata de la traducción. Gracias por el aviso.
24.11.2019 - 23:32
![]() Martine wrote:
Martine wrote:
Bonsoir Pour les explications du point brioche, au rang 2 sur l'endroit, ne convient il pas de tricoter â l'envers (et non à l'endroit ) la maille et son jeté ? Merci de votre réponse
29.09.2019 - 22:49DROPS Design answered:
Bonjour Martine, quand on tricote en côtes anglaises bicolores, on tricote alternativement 2 rangs sur l'endroit avec une couleur différente et 2 rangs sur l'envers avec une couleur différente - cf vidéo. Bon tricot!
30.09.2019 - 11:43
![]() Claire wrote:
Claire wrote:
Y a-t-il moyen d'avoir le patron de ce châle même s'il n'est pas sélectionné?
02.09.2019 - 07:37
![]() Claire wrote:
Claire wrote:
J'adore!!!
01.09.2019 - 09:44
![]() Catmat31 wrote:
Catmat31 wrote:
Un peu de brioche?
26.08.2019 - 15:04
|
|
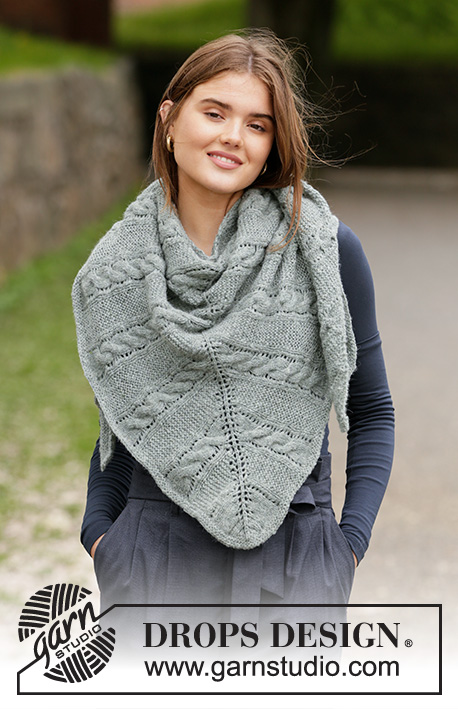
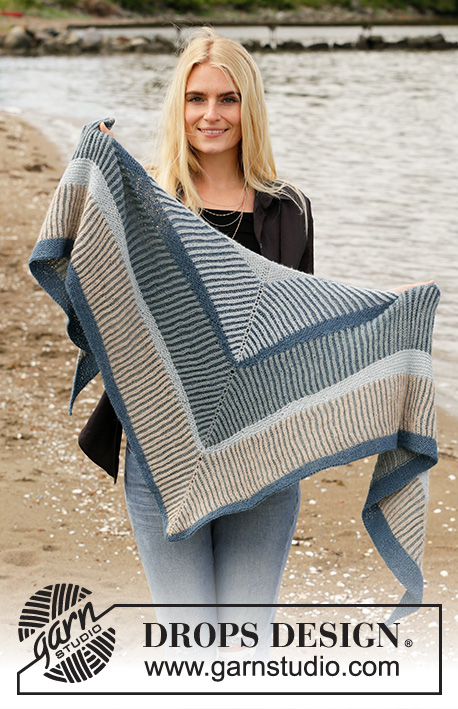
Sandstone Wrap#sandstonewrap |
|
 |
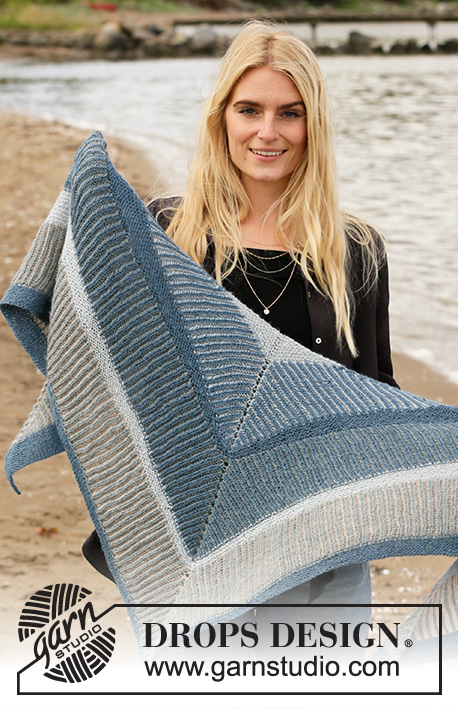 |
Knitted shawl in DROPS Alpaca. The piece is worked top down with stripes and 2-coloured English rib.
DROPS 203-16 |
|
|
------------------------------------------------------- EXPLANATIONS FOR THE PATTERN: ------------------------------------------------------- RIDGE/GARTER STITCH (worked back and forth): Knit all rows. 1 ridge in height = Knit 2 rows. STRIPE 1: Row 1 = light greyish green. Row 2 = medium petrol. Row 3 = light greyish green. Row 4 = medium petrol. Row 5 = light greyish green. Then repeat rows 2-5 onwards. STRIPE 2: Row 1 = dark grey green. Row 2 = medium petrol. Row 3 = dark grey green. Row 4 = medium petrol. Row 5 = dark grey green. Then repeat rows 2-5 onwards. STRIPE 3: Row 1 = light camel. Row 2 = dark grey green. Row 3 = light camel. Row 4 = dark grey green. Row 5 = light camel. Then repeat rows 2-5 onwards. INCREASE 2 STITCHES: The increase is worked from the right side in a knitted stitch and yarn over as follows: Knit yarn over and stitch together, but do not slip off the left needle. Make 1 yarn over, knit yarn over and stitch together again. Now slip the stitch from the left needle. On the next row from the right side work these stitches as follows: Make 1 yarn over and slip the first stitch as if to purl. Purl the yarn over. Make 1 yarn over and slip the next stitch as if to purl. 1 knitted stitch has now become 2 knitted stitches, each with a yarn over and 1 purled stitch between them = 2 stitches increased. INCREASE 4 STITCHES: The increase is worked from the right side in a knitted stitch and yarn over as follows: Knit yarn over and stitch together, but do not slip off the left needle. * Make 1 yarn over, knit yarn over and stitch together again *, work from *-* a total of 2 times and then slip the stitch and yarn over off the left needle. On the next row from the right side work these stitches as follows: Make 1 yarn over and slip the first stitch as if to purl. * Purl the yarn over. Make 1 yarn over and slip the next stitch as if to purl *, work from *-* a total of 2 times. Now 1 stitch has become 3 knitted stitches each with a yarn over and a purled stitch between them = 4 stitches increased. KNITTING TIP-1: If you are in doubt about which colour to use on the next row, you can see which colour the previous row was worked with, by looking at the edge stitch. KNITTING TIP-2: All stitch-numbers given when working English rib are without the yarn overs; the yarn overs belong to the knitted stitches and are counted together as 1 stitch (unless stated otherwise). ------------------------------------------------------- START THE PIECE HERE: ------------------------------------------------------- SHAWL – SHORT OVERVIEW OF THE PIECE: The piece is worked back and forth with circular needle so there is room for all the stitches. The piece consists of sections with GARTER STITCH– read description above – and stripes with 2-coloured English rib. SHAWL: Cast on 5 stitches with circular needle size 4 mm and light greyish green. Knit 1 row. Knit 2, 1 yarn over, knit 1, 1 yarn over and knit to end of row = 7 stitches. Knit 1 row; the yarn overs are knitted twisted to avoid holes. Knit 1, 1 yarn over, knit 2, 1 yarn over, knit 1, 1 yarn over, knit 2, 1 yarn over and knit 1 = 11 stitches. Knit 1 row; the yarn overs are knitted twisted. Insert 1 marker in the middle stitch and allow the marker to follow your work onwards. Continue increasing 4 stitches every other row like this (inside the 1 edge stitch and on each side of the middle stitch) until there are 35 stitches on the needle – yarn overs from previous increase always knitted twisted. REMEMBER THE KNITTING TENSION! Now continue with 2-coloured English rib in light greyish green and medium petrol – READ STRIPE 1 in explanations above, and work as follows: ROW 1 (= right side): Knit the 1 edge stitch, * knit 1, 1 yarn over, slip the next stitch as if to purl *, work from *-* until there are 2 stitches left, knit 1 and knit the 1 edge stitch. Do not turn the piece but push all the stitches back so the next row is worked from the right side again. Read KNITTING TIPS 1 and 2 in explanations above. ROW 2 (= right side): Knit 1 edge stitch, * 1 yarn over, slip the next stitch as if to purl, purl the next stitch and yarn over together *, work from *-* until there are 2 stitches left, 1 yarn over, slip the next stitch as if to purl and knit the edge stitch. Turn the piece so the next row is worked from the wrong side. ROW 3 (= wrong side): Knit the edge stitch, * purl the next stitch and yarn over together, 1 yarn over, slip the next stitch as if to purl *, work from *-* until there are 2 stitches left, purl the next stitch and yarn over together and knit the edge stitch. Do not turn the piece but push all the stitches back so the next row is worked from the wrong side again. ROW 4 (= wrong side): Knit the edge stitch, * 1 yarn over, slip the next stitch as if to purl, knit the next stitch and yarn over together *, work from *-* until there are 2 stitches left, 1 yarn over, slip the next stitch as if to purl and knit the edge stitch. Turn the piece so the next row is from the right side. For the next set of increases, insert markers in the following 3 stitches on the right side of the piece as follows: Insert 1 marker in the 2nd stitch, 1 marker in the middle stitch (the same stitch as had a marker at the beginning of the piece) and 1 marker in the next-to-last stitch. Increase and work from the right side as follows: ROW 5 (= right side): Knit the1 edge stitch, INCREASE 2 STITCHES in the next stitch – read description above. * Make 1 yarn over and slip the next stitch as if to purl, knit the next stitch and yarn over together *, work from *-* as far as the middle stitch with marker (= knitted stitch with yarn over). INCREASE 4 STITCHES In the next stitch – read description above, work from *-* until there are 2 stitches left, INCREASE 2 STITCHES in the next stitch and knit the 1 edge stitch. Do not turn the piece but push all the stitches back so the next row is worked from the right side again. ROWS 2-5 are repeated but make sure the INCREASE 2 STITCHES is always worked in the outermost knitted stitch in each side of the piece and the INCREASE 4 STITCHES is always worked in the middle stitch. Work like this until the English rib section measures approx. 10 cm; adjust so the last row is the same as ROW 4 and the next row is from the right side. Cut the light greyish green strand – medium petrol is used onwards. Work MIDDLE SECTION as described below. MIDDLE SECTION: Work as follows from the right side: Knit the edge stitch, * knit 1 in the yarn over belonging to the knitted stitch, knit 1 in the knitted stitch, knit 1 in the purled stitch *, work from *-* a total of 10 times (you have increased 10 stitches over the outermost 21 stitches). Knit until there are 21 stitches left, ** knit 1 in purled stitch, knit 1 in yarn over belonging to the knitted stitch and knit 1 in the knitted stitch **, work from **-** a total of 10 times and knit the edge stitch (you have increased 10 stitches over the outermost 21 stitches). Now work short rows. These need to be counted out as the number of stitches has not been given. Count the number of stitches as far as the middle stitch (do not count the middle stitch itself). Divide this number by 9. The number you get is approx. the number of stitches between each time you turn the short rows. This number is called TURNING STITCH NUMBER in the text. Work as follows from the wrong side: ROW 1 (= wrong side): Work as far as the middle stitch (do not work the middle stitch), turn the piece. ROW 2 (= right side): Knit until there is 1 stitch left, knit 2 stitches in the last stitch (knit in both front and back loops) and turn the piece (first short row completed). ROW 3 (= wrong side): Knit until you have the TURNING STITCH NUMBER left before the previous turn, turn the piece. ROW 4 (= right side): Knit until there is 1 stitch left, knit 2 stitches in the last stitch (knit in both front and back loops) and turn the piece (second short row completed). Continue working rows 3 and 4 until you have worked a total of 10 short rows (= 10 ridges and 10 stitches increased outermost towards the side). On the next row increase 2 stitches by working 2 stitches in each of the outermost stitches on the piece, then knit the remaining stitches on needle from wrong side. Work as follows starting from the right side: ROW 1 (= right side): Knit as far as the middle stitch (do not work the middle stitch), turn the piece. ROW 2 (= wrong side): Knit until there is 1 stitch left, knit 2 stitches in the last stitch (work in both front and back loops) and turn the piece (first short row completed). ROW 3 (= right side): Knit until the you have the TURNING STITCH NUMBER left before the previous turn, turn the piece. ROW 4 (= wrong side): Knit until there is 1 stitch left, knit 2 stitches in the last stitch (work in both front and back loops) and turn the piece (second short row completed). Continue working rows 3 and 4 until you have worked 10 short rows (=10 ridges and 10 stitches increased outermost towards the side). On the next row increase 2 stitches by working 2 stitches in each of the outermost stitches on the piece, then knit a row from the right side. Knit 1 row from the wrong side. Now continue with 2-coloured English rib in medium petrol and dark grey green – READ STRIPE 2, and work ROWS 1-5 as described above. Then repeat ROWS 2-5 but make sure the INCREASE 2 STITCHES is always worked in the outermost knitted stitch on each side of the piece and the INCREASE 4 STITCHES is always worked in the middle stitch. Work like this until the English rib section measures approx. 10 cm; adjust so the last row worked is the same as ROW 4 and the next row is worked from the right side. Cut the strands. Change to light greyish green and work MIDDLE SECTION. Now continue with 2-coloured English rib in light camel and dark grey green – READ STRIPE 3 and work ROWS 1-5 as described above. Then repeat ROWS 2-5, but make sure the INCREASE 2 STITCHES is always worked in the outermost stitch on each side of the piece and the INCREASE 4 STITCHES always worked in the middle stitch. Continue like this until the English rib section measures approx. 10 cm; adjust so the last row worked is the same as ROW 4 and the next row is worked from the right side. Cut the strand. Change to medium petrol and work MIDDLE SECTION. Loosely cast off with knit from the right side. |
|
Have you finished this pattern?Tag your pictures with #dropspattern #sandstonewrap or submit them to the #dropsfan gallery. Do you need help with this pattern?You'll find 20 tutorial videos, a Comments/Questions area and more by visiting the pattern on garnstudio.com. © 1982-2026 DROPS Design A/S. We reserve all rights. This document, including all its sub-sections, has copyrights. Read more about what you can do with our patterns at the bottom of each pattern on our site. |
|


With over 40 years in knitting and crochet design, DROPS Design offers one of the most extensive collections of free patterns on the internet - translated to 17 languages. As of today we count 324 catalogues and 12290 patterns translated into English (UK/cm). 12290
We work hard to bring you the best knitting and crochet have to offer, inspiration and advice as well as great quality yarns at incredible prices! Would you like to use our patterns for other than personal use? You can read what you are allowed to do in the Copyright text at the bottom of all our patterns. Happy crafting!
Post a comment to pattern DROPS 203-16
We would love to hear what you have to say about this pattern!
If you want to leave a question, please make sure you select the correct category in the form below, to speed up the answering process. Required fields are marked *.