
Popular categories
Looking for a yarn?


Comments / Questions (33)
![]() Mona Bjørheim wrote:
Mona Bjørheim wrote:
Hei. Jeg holder på med armene og lurer på om jeg forstår mønsteret riktig? Skal jeg felle så ofte som hver 11/2 cm og så strikke et ganske langt stykke hvor jeg ikke feller? Mvh Mona
08.04.2021 - 16:43DROPS Design answered:
Hei Mona. Når du har felt på hver 1,5 cm 16 eller 19 ganger (spørs hvilken str. du strikker), måler arbeidet/ermen 4+24 cm eller 4+28,5 cm, Altså 28 eller 32,5 cm, så fortsetter du uten å felle i 8 eller 2,5 cm til ermet måler 36 eller 35 cm. 8 eller 2,5 cm er ikke et langt stykke uten å felle. mvh DROPS design
26.04.2021 - 10:23
![]() Patricia wrote:
Patricia wrote:
Bonjour je souhaite réaliser ce modèle en baby alpaca silk. Est ce que les explications sont les mêmes ? et la taille des aiguilles est t'elle identique ? sachant que le fil de remplacement est suggéré dans les explications . merci de votre réponse
04.01.2021 - 13:53DROPS Design answered:
Bonjour Patricia, n'hésitez pas à nous dire si la réponse précédente a pu vous aider ou bien si vous avez besoin de précisions complémentaires. Bon tricot!
05.01.2021 - 10:32
![]() Patricia wrote:
Patricia wrote:
Bonjour, la possibilité de réaliser ce modèle dans un autre groupe de fil est donnée. J'ai choisi Babay alpaca silk pour le faire par contre je me pose la question de savoir si les explications à suivre sont identiques que pour le fil Flora donné ici ? idem pour les aiguilles sont elles les mêmes ? Merci pour votre réponse. Cordialement
03.01.2021 - 16:12DROPS Design answered:
Bonjour Patricia, vous pouvez tout à fait remplacer DROPS Flora par DROPS Baby Alpaca Silk, vérifiez bien la quantité nécessaire via notre convertisseur, comme c'est une laine du même groupe, vous devriez avoir la même tension - la règle de l'échantillon s'applique ici comme toujours. Bon tricot!
04.01.2021 - 16:17
![]() Diana Blockx wrote:
Diana Blockx wrote:
Geachte, na het beindigen van de pas en men de steken gaat verdelen voor de mouwen wordt er gevraagd om een aantal steken bij te zetten. Is het eerst de steken voor de mouw op een hulpdraad zetten en dan de extra steken er achter bijzetten of is het de helft van de mouw, dan de bijkomende steken en dan de rest; Vriendelijke groeten D Blockx
12.11.2020 - 22:09DROPS Design answered:
Dag Diana,
De steken worden opgezet onder de oksel, dus in de zijnaad tussen het voorpand en het achterpand (en later als je de mouw breit aan de onderkant van de mouw), dus niet halverwege de mouw.
14.11.2020 - 10:08
![]() Isabela Anaguano wrote:
Isabela Anaguano wrote:
Hello dear Team, I don't understand why we need to decrease stitches after knitting the neck, just to increase it again in the next row? Can I omit the decrease and increase only the number of stitches I need to continue in my size?
15.10.2020 - 17:32DROPS Design answered:
Dear Mrs Anaguano, this way there is a nice transition between neck edge and yoke, the one you can see also on the photo. Happy knitting!
16.10.2020 - 08:32
![]() Tina wrote:
Tina wrote:
Hej! Min mamma och jag använde er omvandlare för att vi ville ha ett annat garn till denna tröja. Omvandlaren hade med DROPS Lace som alternativ, men hur vi än försöker så blir det inte rätt. Det känns som om garnet är på tok för tunt. Då undrar man ju till att börja med varför det dyker upp som ett alternativ i omvandlaren. Kan du tipsa om ett annat mönster som vi kan använda DROPS Lace till istället? Helst tröja, slipover eller annan top.
14.07.2020 - 13:46DROPS Design answered:
Hej Tina, DROPS Lace er super flot men meget tyndere som du helt sikkert kan se i farvekortet. Her ser du hvordan DROPS Lace ser ud når den er strikket på samme strikkefasthed som DROPS Flora. "Falling in Lace" God fornøjelse!
28.07.2020 - 13:54
![]() Lene wrote:
Lene wrote:
Jeg har samme problem som flere andre: patentstykket drejer - selvom jeg har fulgt opskriften nøjagtigt. Finder en anden opskrift...
02.03.2020 - 19:49DROPS Design answered:
Hej Lene, Mærkeligt... vores bærestykke trækker ikke skævt. Hvilket garn strikker du denne opskrift i?
03.03.2020 - 15:34
![]() Katje wrote:
Katje wrote:
Jeg savner at der er bryst mål for de forskellige størrelser.
27.02.2020 - 20:17DROPS Design answered:
Hej Katje, nederst i opskriften finder du måleskitsen på blusen. Lidt længere nede kan du også se en skridt-for-skridt lektion, hvordan man læser måleskitsen. God fornøjelse!
28.02.2020 - 11:02
![]() Anne wrote:
Anne wrote:
Ein schöner Pullover! was ich nicht verstehe: ich stricke die Halsblende mit 126 Maschen 3cm lang. Dann stricke ich 1 Runde rechts und nehme dabei 16 Maschen ab, dann habe ich noch 110 Maschen. Dann stricke ich wieder eine Runde rechts und nehme dabei 50 Maschen zu, habe dann 160 Machen warum stricke ich nicht nach der Halsblende 1 Runde rechts und nehme in der nächsten Runde dafür nur noch 34 Maschen zu, hätte dann 126 + 34, also auch 160 Maschen? vielen Dank
27.02.2020 - 19:16DROPS Design answered:
Liebe Anne, es wird zuerst abgenommen und danach zugenommen um den Halsblende zu markieren. Viel Spaß beim stricken!
28.02.2020 - 08:00
![]() Pia Wiingreen wrote:
Pia Wiingreen wrote:
Patentstykket bliver skævt/skråt i forhold til selve trøjen. Det vil sige at det ser helt skævt ud når jeg har trøjen på. Har delt maskerne med de masker som skal tages ud så mener ikke at det kan være derfor. Har set at der er en mere som har skrevet om samme problematik. Der ligger ingen vidio eller tips om dette problem. Jeg har strikket patent helt efter mønster og har set videoen om det.
25.02.2020 - 18:21DROPS Design answered:
Hej Pia, jeg kan faktisk ikke regne ud hvorfor dit patentstykke drejer... Strikker du i DROPS Flora? Kan det have noget med den løse maske at gøre... eller vrangmasken. Prøv at lave en prøve hvor du løfter tråden om foran på venstre pind før du strikker vrangmasken. :)
26.02.2020 - 10:42
|
|
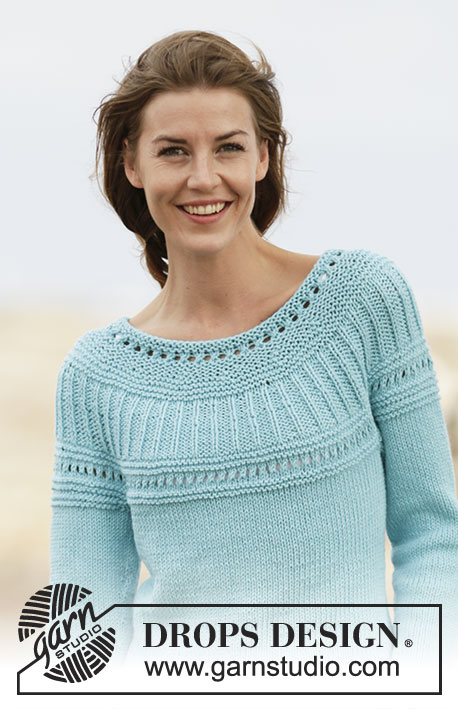
Winter Bride#winterbridesweater |
|
 |
 |
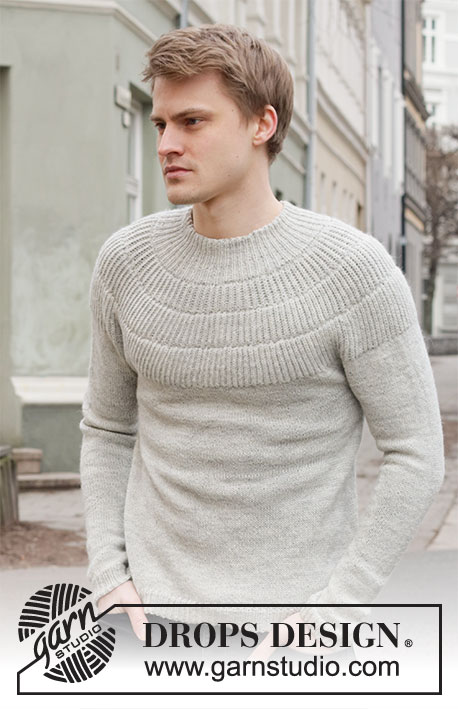
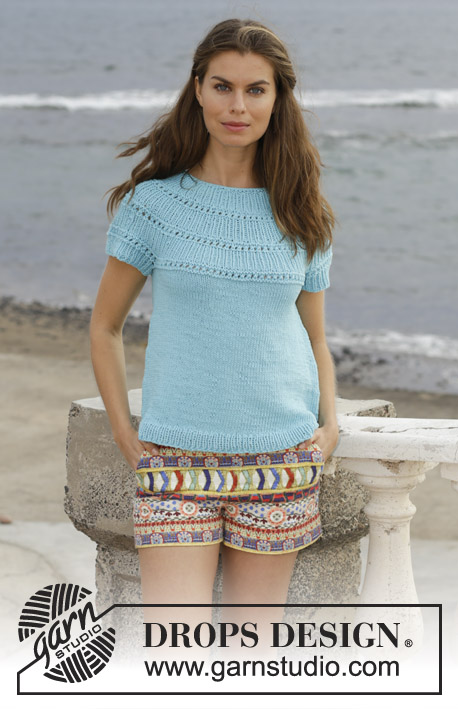
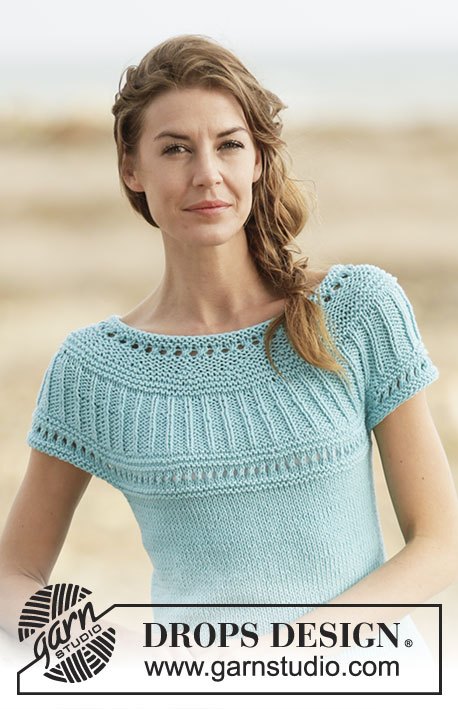
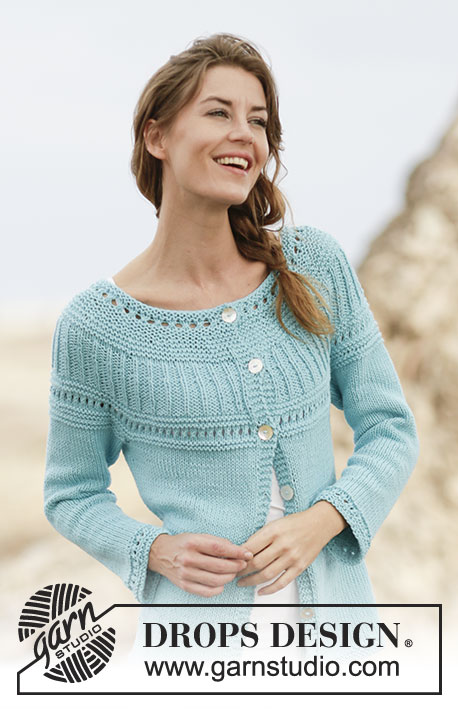
Knitted jumper with round yoke in DROPS Flora. The piece is worked top down with English rib on the yoke. Sizes S - XXXL.
DROPS 207-3 |
|
|
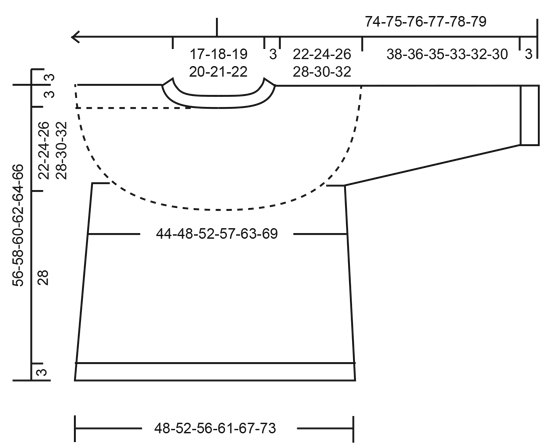
------------------------------------------------------- EXPLANATIONS FOR THE PATTERN: ------------------------------------------------------- DECREASE/INCREASE TIP (evenly spaced): To work out how to decrease/increase evenly, count the total number of stitches on needle (e.g. 126 stitches) and divide by the number of decreases/increases to be made (e.g. 16) = 7.8. In this example decrease by knitting together approx. each 7th and 8th stitch When increasing pick up the strand between 2 stitches after approx. each 8th stitch (the strand is knitted twisted to avoid holes). ENGLISH RIB: ROUND 1: * Make 1 yarn over, slip 1 stitch as if to purl, knit 1 *, repeat from *-* to end of round. ROUND 2: * Purl the yarn over and slipped stitch together, make 1 yarn over, slip 1 stitch as if to purl *, repeat from *-* to end of round. ROUND 3: * Make 1 yarn over, slip 1 stitch as if to purl, knit the yarn over and slipped stitch together *, repeat from *-* to end of round. Repeat rounds 2 and 3 onwards. INCREASE TIP (for sides of body): Work until there are 2 stitches left before the marker thread, make 1 yarn over, knit 4 (marker thread sits between these 4 stitches) make 1 yarn over. Repeat at the other marker thread (4 stitches increased on round). On the next round knit the yarn overs twisted to avoid holes. Then work the new stitches in stocking stitch. DECREASE TIP (for mid under sleeve): Decrease 1 stitch on each side of the marker thread as follows: Work until there are 3 stitches left before the marker thread, knit 2 together, knit 2 (marker thread sits between these 2 stitches), slip 1 stitch as if to knit, knit 1 and pass the slipped stitch over the knitted stitch. ------------------------------------------------------- START THE PIECE HERE: ------------------------------------------------------- JUMPER – SHORT OVERVIEW OF THE PIECE: The piece is worked in the round with circular needle, top down. The sleeves are worked in the round with short circular needle/double pointed needles. NECK: Cast on 126-132-138-144-150-156 stitches with circular needle size 2.5 mm and Flora. Knit 1 round. Then work rib (= knit 1 / purl 2) for 3 cm. Knit 1 round where you decrease 16-17-18-19-20-22 stitches evenly spaced – read DECREASE/INCREASE TIP = 110-115-120-125-130-134 stitches. Insert a marker thread here. THE PIECE IS NOW MEASURED FROM HERE! YOKE: Change to circular needle size 3 mm. Knit 1 round where you increase 50-51-54-55-56-62 stitches evenly spaced – remember DECREASE/INCREASE TIP = 160-166-174-180-186-196 stitches. Knit 1 round. Now work ENGLISH RIB – read description above, for 4-4-4-5-5-5 cm. REMEMBER THE KNITTING TENSION! Knit 1 round where the yarn overs are knitted together with their respective stitches and increase at the same time 68-72-80-88-96-104 stitches evenly spaced = 228-238-254-268-282-300 stitches. Knit 1 round. Now work English rib for 5-5-5-6-6-6 cm. Knit 1 round where the yarn overs are knitted together with their respective stitches and increase at the same time 68-72-80-88-96-104 stitches evenly spaced = 296-310-334-356-378-404 stitches. Knit 1 round. Now work English rib for 6-6-6-7-7-7 cm. Knit 1 round where the yarn overs are knitted together with their respective stitches and increase at the same time 16-29-32-38-42-49 stitches = 312-339-366-394-420-453 stitches. Continue with stocking stitch. When the piece measures 20-21-22-24-25-26 cm increase 16-29-32-38-42-49 stitches evenly spaced = 328-368-398-432-462-502 stitches. When the piece measures 22-24-26-28-30-32 cm from the marker thread the yoke is finished. The next round is worked as follows: Work the first 47-52-56-62-68-76 stitches (= half back piece), place the next 69-79-86-91-94-99 stitches on a thread for sleeve and cast on 10-10-12-12-14-14 new stitches on the needle (= in side under sleeve), work the next 95-105-113-125-137-152 stitches (= front piece), place the next 69-79-86-91-94-99 stitches on a thread for sleeve and cast on 10-10-12-12-14-14 new stitches on the needle (= in side under sleeve), finally work the remaining 48-53-57-63-69-76 stitches (= half back piece). BODY: There are 210-230-250-274-302-332 stitches on the body. Insert a marker thread on both sides of the body in the middle of the 10-10-12-12-14-14 stitches cast on under both sleeves (= 5-5-6-6-7-7 new stitches on each side of the threads). Work stocking stitch in the round. When the piece measures 4 cm increase 1 stitch on each side of both marker threads – read INCREASE TIP. Increase like this every 5 cm a total of 5 times = 230-250-270-294-322-352 stitches. When the piece measures 28 cm increase 46-50-54-57-62-68 stitches evenly spaced = 276-300-324-351-384-420 stitches. Change to circular needle size 2.5 mm and work rib (= knit 1 / purl 2) for 3 cm. Cast off with knit over knit and purl over purl. The jumper measures approx. 56-58-60-62-64-66 cm from the shoulder down. SLEEVE: Place the 69-79-86-91-94-99 stitches from the one side of the piece onto short circular needle/double pointed needles size 3 mm and knit up 1 stitch in each of the 10-10-12-12-14-14 stitches cast on under the sleeve = 79-89-98-103-108-113 stitches. Insert a marker thread in the middle of the new stitches (= 5-5-6-6-7-7 new stitches on each side of the thread). Work stocking stitch in the round. When the sleeve measures 4 cm decrease 1 stitch on each side of the marker thread under the sleeve – read DECREASE TIP. Decrease like this every 2½-1½-1½-1-1-1 cm a total of 12-16-19-21-22-23 times = 55-57-60-61-64-67 stitches. Continue with stocking stitch until the sleeve measures 38-36-35-33-32-30 cm. Now increase 11-12-12-14-14-14 stitches evenly spaced = 66-69-72-75-78-81 stitches. Change to circular needle size 2.5 mm and work rib (= knit 1 / purl 2) for 3 cm. Cast off with knit over knit and purl over purl. The sleeve measures approx. 41-39-38-36-35-33 cm from the division. Work the other sleeve in the same way. |
|
 |
|
Have you finished this pattern?Tag your pictures with #dropspattern #winterbridesweater or submit them to the #dropsfan gallery. Do you need help with this pattern?You'll find 24 tutorial videos, a Comments/Questions area and more by visiting the pattern on garnstudio.com. © 1982-2026 DROPS Design A/S. We reserve all rights. This document, including all its sub-sections, has copyrights. Read more about what you can do with our patterns at the bottom of each pattern on our site. |
|


With over 40 years in knitting and crochet design, DROPS Design offers one of the most extensive collections of free patterns on the internet - translated to 17 languages. As of today we count 324 catalogues and 12290 patterns translated into English (UK/cm). 12290
We work hard to bring you the best knitting and crochet have to offer, inspiration and advice as well as great quality yarns at incredible prices! Would you like to use our patterns for other than personal use? You can read what you are allowed to do in the Copyright text at the bottom of all our patterns. Happy crafting!
Post a comment to pattern DROPS 207-3
We would love to hear what you have to say about this pattern!
If you want to leave a question, please make sure you select the correct category in the form below, to speed up the answering process. Required fields are marked *.