
Popular categories
Looking for a yarn?


Comments / Questions (30)
![]() Christine wrote:
Christine wrote:
Bonjour Je tricote avec le fil tenu par la main droite et dans ce cas le résultat des côtes anglaises avec le jeté est non concluant et je n'y arrive pas en le mettant à gauche. Je vais tenter de faire mes côtes anglaises avec la technique de la maille double, quelqu'un a-t-il essayé?
17.02.2025 - 22:30DROPS Design answered:
Bonjour Christine, votre échantillon pourrait être différent, pensez à vérifier auparavant. Pour tricoter des côtes anglaises avec le fil dans la main droite, procédez de la même façon que dans la vidéo en suivant bien le fil du regard au niveau de l'aiguille pour voir son emplacement, autrement dit, pour glisser 1 maille à l'envers en faisant 1 jeté, passez le fil entre vos 2 aiguilles devant l'ouvrage, glissez la maille suivante comme pour la tricoter à l'envers et tricotez la maille suivante à l'endroit (ou ensemble à l'endroit avec son jeté), le fil va automatiquement se placer au-dessus de la maille glissée. Bon tricot!
18.02.2025 - 09:55
![]() Maggie wrote:
Maggie wrote:
Hi, I have had difficulty with the lace section of patter summerbee and have decided to switch to this pattern. I have 300gm of wool. i was doing a small in the other pattern. I am a size 10 (36 bust) and wanted to know if I would need to do this in the medium and hope i can get another ball? many Thanks Maggie
14.02.2025 - 17:46DROPS Design answered:
Dear Maggie, the Summerbee pattern has a straight shape, so the chest wasn't too tight and therefore, you could work an S size in that case. However, this pattern has an A-shape (the top is narrower than the bottom edge). So the chest is more fitted and you can't work the S size anymore. In this case you will need to work the M size and use 1 more ball of yarn. Happy knitting!
17.02.2025 - 00:12
![]() Jackie wrote:
Jackie wrote:
When knitting the English rib, having finished row 3 and starting row 2 again. End of row 3 finishes with knitting the y o and slip stitch. Row 2 starts with purl the y o and slip stitch together. I am finding that my row 2 starts with 2 ‘single ‘ stitches in front of the y o and slipped stitches. Have tried several times. Can you advise what I’m doing wrong please?
13.08.2023 - 17:17DROPS Design answered:
Dear Jackie, round 3 starts with (YO, slip 1 as if to P) so that the first stitch on next round will be (Purl together YO and slipped stitch). We show in this video how to work English rib in the round, it might then help. Happy knitting!
14.08.2023 - 10:08
![]() Claude wrote:
Claude wrote:
Bonjour, le point de ce modèle est le point brioche et non le point côtes anglaises et il faut beaucoup de concentration pour parvenir à suivre la vidéo quand on tient le fil de la main droite... Pourquoi diminuer de 16 mailles (taille s) pour augmenter de 50 mailles le rang suivant entre le col et l'empiècement ? Ne peut-on pas simplement augmenter de 34 mailles ? Cordialement, Claude
03.11.2022 - 10:52DROPS Design answered:
Bonjour Claude, ces diminutions après le col + les augmentations au début de l'empiècement permettent de marquer joliment le col. Bon tricot!
03.11.2022 - 14:03
![]() Emilita wrote:
Emilita wrote:
Quisiera saber si este patrón o parecido está para bebés y niños. Gracias. saludos
24.02.2022 - 18:30DROPS Design answered:
Hola Emilita, puedes probar con los siguientes patrones, que son similares: https://www.garnstudio.com/pattern.php?id=10511&cid=23 https://www.garnstudio.com/pattern.php?id=10319&cid=23
28.02.2022 - 16:56
![]() Anett wrote:
Anett wrote:
Am Ende des Rumpfteiles sollen für meine Größe 50 Maschen zugenommen werden.Jedoch mißt der untere Umfang des Rumpfes nur 4 cm mehr als der obere.Selbst wenn ich dann mit Nadel 2,5 weiter stricke, habe ich dann viel mehr Weite als angegeben!Da stimmt doch was nicht!
30.01.2022 - 23:11DROPS Design answered:
Liebe Anett, nach alle Zunahmen (vor Bündchen) haben Sie 250 Maschen (= ca 104 cm Umfang/52 cm flach, wie in der Maßskizze), dann nehmen Sie 50 Maschen regelmäßig zu und jetzt stricken Sie Bündchen mit den kleineren Nadeln: man braucht mehr Maschen im Bündchen für den selben Umfang als glatt rechts, deshalb wird es so zugenommen.Viel Spaß beims tricken!
31.01.2022 - 10:13
![]() Van Der Sijpt Chris wrote:
Van Der Sijpt Chris wrote:
Zou deze trui graag breien met gewone naalden(geen rondbreinld)van onder naar boven.hoe bereken ik mijn steken aub?met dank
08.11.2021 - 18:30DROPS Design answered:
Dag Chris,
Omdat de pas helemaal in de rondte gebreid wordt met structuurpatroon, is dit patroon niet zo geschikt om met rechte naalden te breien. Voor sommige andere patronen is dit wel mogelijk.
Om een patroon aan te passen om op rechte naalden te breien hebben we een instructie gemaakt. Deze vind je hier.
10.11.2021 - 16:28
![]() Mona Bjørheim wrote:
Mona Bjørheim wrote:
Hei. Jeg holder på med armene og lurer på om jeg forstår mønsteret riktig? Skal jeg felle så ofte som hver 11/2 cm og så strikke et ganske langt stykke hvor jeg ikke feller? Mvh Mona
08.04.2021 - 16:43DROPS Design answered:
Hei Mona. Når du har felt på hver 1,5 cm 16 eller 19 ganger (spørs hvilken str. du strikker), måler arbeidet/ermen 4+24 cm eller 4+28,5 cm, Altså 28 eller 32,5 cm, så fortsetter du uten å felle i 8 eller 2,5 cm til ermet måler 36 eller 35 cm. 8 eller 2,5 cm er ikke et langt stykke uten å felle. mvh DROPS design
26.04.2021 - 10:23
![]() Patricia wrote:
Patricia wrote:
Bonjour je souhaite réaliser ce modèle en baby alpaca silk. Est ce que les explications sont les mêmes ? et la taille des aiguilles est t'elle identique ? sachant que le fil de remplacement est suggéré dans les explications . merci de votre réponse
04.01.2021 - 13:53DROPS Design answered:
Bonjour Patricia, n'hésitez pas à nous dire si la réponse précédente a pu vous aider ou bien si vous avez besoin de précisions complémentaires. Bon tricot!
05.01.2021 - 10:32
![]() Patricia wrote:
Patricia wrote:
Bonjour, la possibilité de réaliser ce modèle dans un autre groupe de fil est donnée. J'ai choisi Babay alpaca silk pour le faire par contre je me pose la question de savoir si les explications à suivre sont identiques que pour le fil Flora donné ici ? idem pour les aiguilles sont elles les mêmes ? Merci pour votre réponse. Cordialement
03.01.2021 - 16:12DROPS Design answered:
Bonjour Patricia, vous pouvez tout à fait remplacer DROPS Flora par DROPS Baby Alpaca Silk, vérifiez bien la quantité nécessaire via notre convertisseur, comme c'est une laine du même groupe, vous devriez avoir la même tension - la règle de l'échantillon s'applique ici comme toujours. Bon tricot!
04.01.2021 - 16:17
|
|
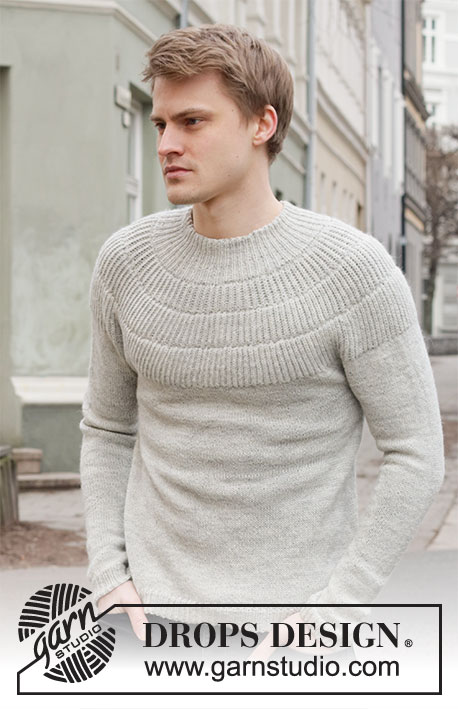
Winter Bride#winterbridesweater |
|
 |
 |
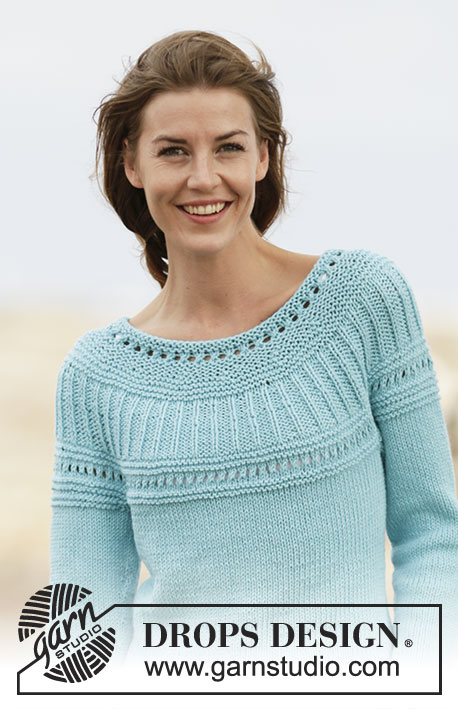
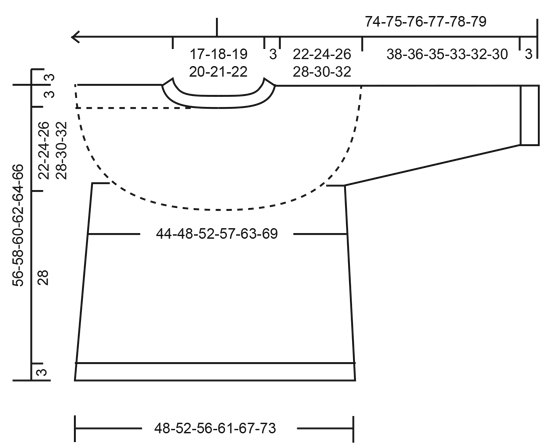
Knitted jumper with round yoke in DROPS Flora. The piece is worked top down with English rib on the yoke. Sizes S - XXXL.
DROPS 207-3 |
|
|
------------------------------------------------------- EXPLANATIONS FOR THE PATTERN: ------------------------------------------------------- DECREASE/INCREASE TIP (evenly spaced): To work out how to decrease/increase evenly, count the total number of stitches on needle (e.g. 126 stitches) and divide by the number of decreases/increases to be made (e.g. 16) = 7.8. In this example decrease by knitting together approx. each 7th and 8th stitch When increasing pick up the strand between 2 stitches after approx. each 8th stitch (the strand is knitted twisted to avoid holes). ENGLISH RIB: ROUND 1: * Make 1 yarn over, slip 1 stitch as if to purl, knit 1 *, repeat from *-* to end of round. ROUND 2: * Purl the yarn over and slipped stitch together, make 1 yarn over, slip 1 stitch as if to purl *, repeat from *-* to end of round. ROUND 3: * Make 1 yarn over, slip 1 stitch as if to purl, knit the yarn over and slipped stitch together *, repeat from *-* to end of round. Repeat rounds 2 and 3 onwards. INCREASE TIP (for sides of body): Work until there are 2 stitches left before the marker thread, make 1 yarn over, knit 4 (marker thread sits between these 4 stitches) make 1 yarn over. Repeat at the other marker thread (4 stitches increased on round). On the next round knit the yarn overs twisted to avoid holes. Then work the new stitches in stocking stitch. DECREASE TIP (for mid under sleeve): Decrease 1 stitch on each side of the marker thread as follows: Work until there are 3 stitches left before the marker thread, knit 2 together, knit 2 (marker thread sits between these 2 stitches), slip 1 stitch as if to knit, knit 1 and pass the slipped stitch over the knitted stitch. ------------------------------------------------------- START THE PIECE HERE: ------------------------------------------------------- JUMPER – SHORT OVERVIEW OF THE PIECE: The piece is worked in the round with circular needle, top down. The sleeves are worked in the round with short circular needle/double pointed needles. NECK: Cast on 126-132-138-144-150-156 stitches with circular needle size 2.5 mm and Flora. Knit 1 round. Then work rib (= knit 1 / purl 2) for 3 cm. Knit 1 round where you decrease 16-17-18-19-20-22 stitches evenly spaced – read DECREASE/INCREASE TIP = 110-115-120-125-130-134 stitches. Insert a marker thread here. THE PIECE IS NOW MEASURED FROM HERE! YOKE: Change to circular needle size 3 mm. Knit 1 round where you increase 50-51-54-55-56-62 stitches evenly spaced – remember DECREASE/INCREASE TIP = 160-166-174-180-186-196 stitches. Knit 1 round. Now work ENGLISH RIB – read description above, for 4-4-4-5-5-5 cm. REMEMBER THE KNITTING TENSION! Knit 1 round where the yarn overs are knitted together with their respective stitches and increase at the same time 68-72-80-88-96-104 stitches evenly spaced = 228-238-254-268-282-300 stitches. Knit 1 round. Now work English rib for 5-5-5-6-6-6 cm. Knit 1 round where the yarn overs are knitted together with their respective stitches and increase at the same time 68-72-80-88-96-104 stitches evenly spaced = 296-310-334-356-378-404 stitches. Knit 1 round. Now work English rib for 6-6-6-7-7-7 cm. Knit 1 round where the yarn overs are knitted together with their respective stitches and increase at the same time 16-29-32-38-42-49 stitches = 312-339-366-394-420-453 stitches. Continue with stocking stitch. When the piece measures 20-21-22-24-25-26 cm increase 16-29-32-38-42-49 stitches evenly spaced = 328-368-398-432-462-502 stitches. When the piece measures 22-24-26-28-30-32 cm from the marker thread the yoke is finished. The next round is worked as follows: Work the first 47-52-56-62-68-76 stitches (= half back piece), place the next 69-79-86-91-94-99 stitches on a thread for sleeve and cast on 10-10-12-12-14-14 new stitches on the needle (= in side under sleeve), work the next 95-105-113-125-137-152 stitches (= front piece), place the next 69-79-86-91-94-99 stitches on a thread for sleeve and cast on 10-10-12-12-14-14 new stitches on the needle (= in side under sleeve), finally work the remaining 48-53-57-63-69-76 stitches (= half back piece). BODY: There are 210-230-250-274-302-332 stitches on the body. Insert a marker thread on both sides of the body in the middle of the 10-10-12-12-14-14 stitches cast on under both sleeves (= 5-5-6-6-7-7 new stitches on each side of the threads). Work stocking stitch in the round. When the piece measures 4 cm increase 1 stitch on each side of both marker threads – read INCREASE TIP. Increase like this every 5 cm a total of 5 times = 230-250-270-294-322-352 stitches. When the piece measures 28 cm increase 46-50-54-57-62-68 stitches evenly spaced = 276-300-324-351-384-420 stitches. Change to circular needle size 2.5 mm and work rib (= knit 1 / purl 2) for 3 cm. Cast off with knit over knit and purl over purl. The jumper measures approx. 56-58-60-62-64-66 cm from the shoulder down. SLEEVE: Place the 69-79-86-91-94-99 stitches from the one side of the piece onto short circular needle/double pointed needles size 3 mm and knit up 1 stitch in each of the 10-10-12-12-14-14 stitches cast on under the sleeve = 79-89-98-103-108-113 stitches. Insert a marker thread in the middle of the new stitches (= 5-5-6-6-7-7 new stitches on each side of the thread). Work stocking stitch in the round. When the sleeve measures 4 cm decrease 1 stitch on each side of the marker thread under the sleeve – read DECREASE TIP. Decrease like this every 2½-1½-1½-1-1-1 cm a total of 12-16-19-21-22-23 times = 55-57-60-61-64-67 stitches. Continue with stocking stitch until the sleeve measures 38-36-35-33-32-30 cm. Now increase 11-12-12-14-14-14 stitches evenly spaced = 66-69-72-75-78-81 stitches. Change to circular needle size 2.5 mm and work rib (= knit 1 / purl 2) for 3 cm. Cast off with knit over knit and purl over purl. The sleeve measures approx. 41-39-38-36-35-33 cm from the division. Work the other sleeve in the same way. |
|
|
|
Have you finished this pattern?Tag your pictures with #dropspattern #winterbridesweater or submit them to the #dropsfan gallery. Do you need help with this pattern?You'll find 24 tutorial videos, a Comments/Questions area and more by visiting the pattern on garnstudio.com. © 1982-2025 DROPS Design A/S. We reserve all rights. This document, including all its sub-sections, has copyrights. Read more about what you can do with our patterns at the bottom of each pattern on our site. |
|


With over 40 years in knitting and crochet design, DROPS Design offers one of the most extensive collections of free patterns on the internet - translated to 17 languages. As of today we count 314 catalogues and 11822 patterns translated into English (UK/cm).
We work hard to bring you the best knitting and crochet have to offer, inspiration and advice as well as great quality yarns at incredible prices! Would you like to use our patterns for other than personal use? You can read what you are allowed to do in the Copyright text at the bottom of all our patterns. Happy crafting!
Post a comment to pattern DROPS 207-3
We would love to hear what you have to say about this pattern!
If you want to leave a question, please make sure you select the correct category in the form below, to speed up the answering process. Required fields are marked *.