
Popular categories
Looking for a yarn?


Comments / Questions (53)
![]() Lisa wrote:
Lisa wrote:
Hej. Forstykke. For hver gang A2-A4 er strikket i højden Hvad menes der med: Strikkes der 1 rapport mere a A2b og A4 i bredden,m
12.11.2025 - 16:24DROPS Design answered:
Hej Lisa, for hver udtagning får du flere masker og dem strikker du ifølge A2b og A4 som jo er samme mønster som du har strikket over hele blusen :)
19.11.2025 - 12:22
![]() Eva wrote:
Eva wrote:
Hei. Ser at flere andre strikkedesignere opererer med anbefalt positiv ease/ bevegelsesvidde på sine oppskrifter. Det synes jeg er veldig bra. Hva tenker dere bør være bevegelsesvidde på denne genseren?
22.07.2025 - 09:19DROPS Design answered:
Hei Eva. En bevegelsevidde for en person kan være en helt annen begelsevidde for en annen person. Er du usikker på hvilken størrelse som vil passe deg best anbefaler jeg deg å ta mål av en genser du allerede har og sammenligner med målene i målskissen til Freedom Found for å finne beste passform / bevelgelsevidden for deg. mvh DROPS Design
04.08.2025 - 11:03
![]() Michaela Haubrich wrote:
Michaela Haubrich wrote:
Ich möchte den Pullover in der Größe L mit dem Garn Drops Melody, Garngruppe D stricken. Wieviel Garn muss ich bestellen?
16.11.2024 - 13:35DROPS Design answered:
Liebe Frau Haubrich, in diese Lektion wird erklärt, wie man die neue passende Garnmenge kalkuliert. Viel Spaß beim Stricken!
18.11.2024 - 07:29
![]() Chochoy Micheline wrote:
Chochoy Micheline wrote:
Bonjour J'ai acheter le fils adéquate mais je n'arrive pas a comprendre ce qu'il faut faire après les rangs racourcis quand j'ai rejoins les 2 epaules je ne comprends ce qu'il faut faire merci de m'aider svp bien cordialement
18.04.2024 - 17:28DROPS Design answered:
Bonjour Mme Chochoy, pour réunir les 2 épaules, commencez par monter 4 ou 6 mailles (cf taille), puis tricotez sur l'endroit les mailles de l'épaule droite en suivant le diagramme A.1b, montez 5 mailles (bas de l'encolure) et tricotez les mailles de l'épaule gauche en suivant A.1b, puis terminez par 1 m point mousse et montez 4 ou 6 mailles pour l'emmanchure. Tricotez le rangs envers puis tricotez toutes les mailles avec A.2 et A.4 et 1 maille lisière au point mousse de chaque côté. Bon tricot!
19.04.2024 - 08:04
![]() Danielle Chester wrote:
Danielle Chester wrote:
I am almost to the point where I need to put the right front shoulder piece onto the needle with the left front shoulder piece and I am uncertain how to do this. Can you further explain the assembly please?
26.10.2023 - 03:54DROPS Design answered:
Dear Mrs Chester, slip the stitches on both shoulder together next to each other (first right, then left, seen from RS). With a new yarn cast on 4 or 6 sts for armhole (see size), then work the stitches on right shoulder with A.1b ending with 1 stitch in garter stitch, cast on 5 new stitches, work now the sts on left shoulder in A.1b ending with 1 st in garter stitch, then cast on 4 or 6 sts (see size) for armhole. Work next row from WS in pattern, then work A.2 / A.4 with 1 edge st in each side. Happy knitting!
26.10.2023 - 07:09
![]() Mieke Stomps wrote:
Mieke Stomps wrote:
Ik snap bij het voorpand de instructies niet. Ik heb de schouders met de extra opgezette steken met elkaar verbonden in een rechter pen. Nu zegt de instructies dat ik daarna een averechtse pen moet breien en daarna met het diagram moet beginnen met een rechtse naald. Maar mijns inziens loopt het patroon dan niet door. HELP. En hoeveel steken krijg je uiteindelijk in het totaal er extra bij door het diagram?
17.06.2022 - 23:42DROPS Design answered:
Dag Mieke,
Bij het verbinden van de rechter en de linker schouder brei je ook gewoon door in patroon. Dus je zet eerst steken op voor het armsgat, dan brei je de rechter schouder in patroon, dan ze je steken op voor het midden, daarna brei je de linker schouder in patroon en tot slot zet je steken op voor het armsgat.
19.06.2022 - 16:34
![]() Nina wrote:
Nina wrote:
Ich habe leider Probleme mit dem Ende der Ärmel - ich soll in Runden Stricken, dann teilen und über alles hin und her Stricken? Ohne zu oder ab zu nehmen ? Dann verstehe ich leider nicht wie ich es zusammennähen soll, es ergibt für mich leider nicht so viel Sinn. Vielleicht könnt ihr mir helfen, das würde mich sehr freuen! Vielen Dank !
15.04.2022 - 18:38DROPS Design answered:
Liebe Nina, dieses Video kann Ihnen damit helfen: hier wird gezeigt, wie man die Ärmel weiter in Hin- und Rückreihen strickt (Video zeigt glatt rechts, stricken Sie aber Muster wie zuvor weiter), und wie die Ärmel dann eingenäht werden. Viel Spaß beim stricken!
19.04.2022 - 09:22
![]() Andrea wrote:
Andrea wrote:
Vielen Dank für die schnelle Nachricht! Wenn ich mit einer Hinreihe ( im Rapport dann nur rechte Maschen und zu und Abnahmen ) die Schultern zusammenstricke, habe ich zwei Reihen ohne Muster hintereinander. Das kann doch nicht stimmen. Die Schultern endeten mit Rückreihen (also eine Reihe linke Maschen). Und jetzt soll ich eine Reihe rechte Maschen ohne Muster stricken. Hilfe, da stimmt doch was nicht!
07.02.2022 - 11:46DROPS Design answered:
Liebe Andrea, sorry ich habe miserklärt.. die 1. Reihe mit beiden Schultern zusammen ist gestrickt wenn man mit den neuen Maschen anfängt, also zuerst die neuen Maschen anschlagen, dann die beiden Schulter dann neuen Maschen anschlagen = Hin-Reihe und so weiterstricken mit nächsten Reihe als Rück-Reihe. Viel Spaß beim stricken!
07.02.2022 - 15:40
![]() Andrea wrote:
Andrea wrote:
Hallo! Ich verstehe die Anleitung nicht so ganz. Nachdem die rechte und linke Schulter nach einer Rückreihe fertiggestellt sind und zusammen auf einer Nadel befinden, geht es laut Rapport erneut mit einer Rückreihe weiter, in der auch zu- und abgenommen wird. In der Anleitung steht, das die zwei Teile mit einer Hinreihe verbunden werden. Dann würde die erste Reihe des Rapport fehlen. Ich bin ratlos. Liebe Grüße Andrea
07.02.2022 - 10:24DROPS Design answered:
Liebe Andrea, beide Schulter enden mit einer Rück-Reihe - so wird die nächste Reihe mit 2 Schulter zusammen eine Hin-Reihe. Legen Sie alle Maschen auf der Nadel = 66-70-78-86-90-98 Maschen. und jetzt stricken Sie die 1. Hinreihe (mit neuen Machen anschlagen/anfangen). Viel Spaß beim stricken!
07.02.2022 - 11:05
![]() Conny wrote:
Conny wrote:
Hallo! Ich habe die Vorderteile verbunden und das Diagramm bereits einmal gestrickt. Wiederhole ich das Diagramm nun sooft, bis ich die Länge erreicht habe? Mein Vorderteil ist bereits jetzt zu breit! Ich habich aber akribisch an die Zu- und Abnahmen gehalten. Liebe Grüße
02.01.2022 - 00:01DROPS Design answered:
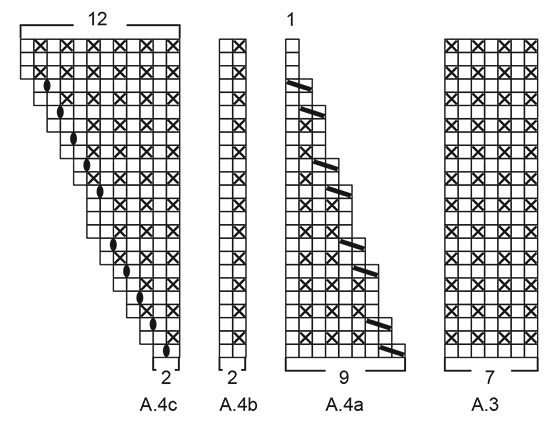
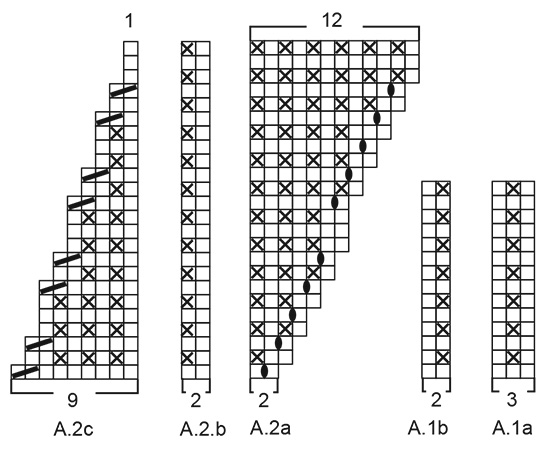
Liebe Conny, die Diagramme müssen Sie bis zur Ende in der Höhe wiederholen, es wird jeweils 4 Maschen zugenommen (nach den 24 Reihen haben Sie 10 Maschen in A.2a und 10 Maschen in A.4c zugenommen und 8 Maschen in A.2c und 8 Maschen in A.4a abgenommen). Die Arbeit messen Sie in der Breite wenn die Arbeit flach liegt (wie man den Pullover trägt und nicht die Maschen einer selben Reihe). Viel Spaß beim stricken!
03.01.2022 - 12:05
|
||||||||||||||||
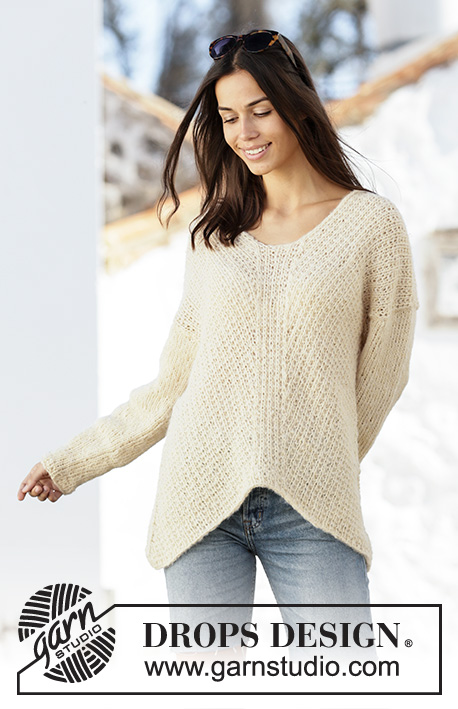
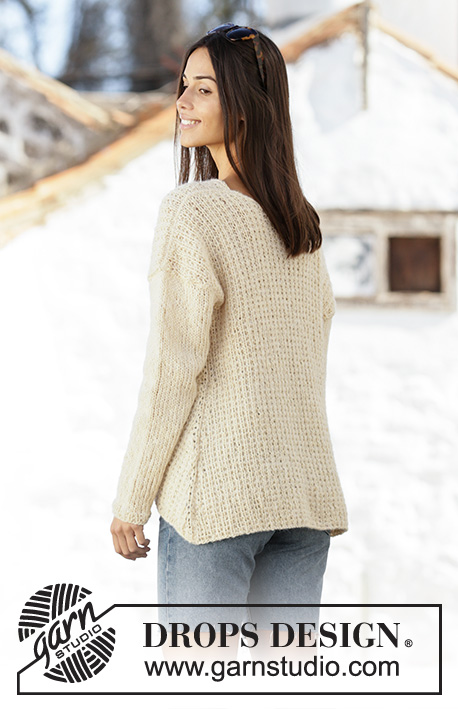
Freedom Found#freedomfoundsweater |
||||||||||||||||
 |
 |
|||||||||||||||
Knitted jumper in DROPS Alpaca and DROPS Brushed Alpaca Silk. Piece is knitted with texture at an angle with V-neck, top down. Size: S - XXXL
DROPS 201-23 |
||||||||||||||||
|
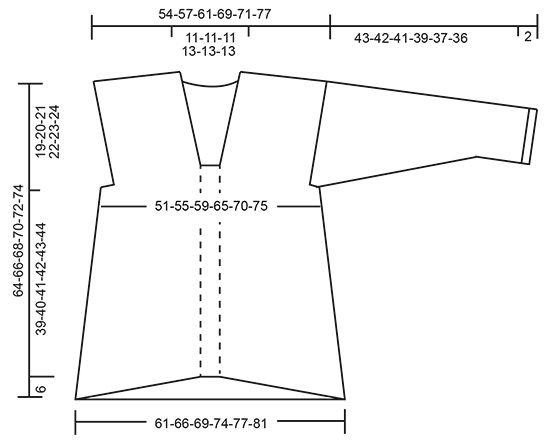
---------------------------------------------------------- EXPLANATION FOR THE PATTERN: ---------------------------------------------------------- GARTER STITCH (back and forth): Knit all rows. 1 ridge vertically = knit 2 rows. PATTERN: See diagrams A.1 to A.4. DECREASE TIP (applies to back piece): All decreases are done from the right side! Work 1 stitch in garter stitch, slip 1 stitch knitwise, knit 1, pass slipped stitch over stitch worked, work until 3 stitches remain, knit 2 together, 1 stitch in garter stitch. INCREASE TIP (applies to sides on back piece): All increases are done from the right side. Work 1 stitch in garter stitch, knit 1, 1 yarn over, work until 2 stitches remain on row, 1 yarn over, knit 1 and 1 stitch in garter stitch. On next row work yarn overs twisted to avoid holes. Then work the new stitches in pattern. INCREASE TIP (applies to sleeves): Work until 2 stitches remain before marker thread, 1 yarn over, knit 4 (marker thread is in the middle of these stitches), 1 yarn over. On next round knit yarn overs twisted to avoid holes. Then work the new stitches in stocking stitch. ---------------------------------------------------------- START THE PIECE HERE: ---------------------------------------------------------- JUMPER - SHORT OVERVIEW OF THE PIECE: Worked back and forth in several pieces and sewn together when finished. Work sleeves in the round on double pointed needles/a short circular needle. FRONT PIECE: RIGHT SHOULDER: Cast on 33-35-39-43-45-49 stitches (including 1 edge stitch in each side) on circular needle size 5.5 mm with 1 strand Alpaca and 1 strand Brushed Alpaca Silk (= 2 strands). Purl 1 row from wrong side. Work next row as follows from right side: Work 1 stitch in garter stitch, A.1a (= 3 stitches), repeat A.1b until 1 stitch remains (= 14-15-17-19-20-22 repetitions of 2 stitches), and finish with 1 stitch in garter stitch. When 2 rows have been worked, continue this pattern AT THE SAME TIME on next row work short rows as follows, begin from right side: Work over the first 25-27-31-31-35-37 stitches, turn, tighten yarn and work back from wrong side. Work over the first 17-19-21-21-23-25 stitches, turn, tighten yarn and work back from wrong side. Work over the first 9-9-11-11-11-13 stitches, turn, tighten yarn and work back from wrong side. Then work over all the 33-35-39-43-45-49 stitches - REMEMBER THE KNITTING TENSION! When piece measures 17-18-19-20-21-22 cm along the shortest side, i.e. towards the neck (= approx. 19-20-21-22-23-24 cm towards armhole), finish after row from wrong side. Cut the yarn. Put piece aside and work the left shoulder. LEFT SHOULDER: Cast on 33-35-39-43-45-49 stitches (including 1 edge stitch in each side) on circular needle size 5.5 mm with 1 strand Alpaca and 1 strand Brushed Alpaca Silk (= 2 strands). Purl 1 row from wrong side. Work next row as follows from right side: Work 1 stitch in garter stitch, A.1a (= 3 stitches), work A.1b until 1 stitch remains (= 14-15-17-19-20-22 repetitions of 2 stitches), and finish with 1 stitch in garter stitch. When 3 rows have been worked, continue this pattern AT THE SAME TIME on next row work short rows as follows, begin from wrong side: Work over the first 25-27-31-31-35-37 stitches, turn, tighten yarn and work back from right side. Work over the first 17-19-21-21-23-25 stitches, turn, tighten yarn and work back from right side. Work over the first 9-9-11-11-11-13 stitches, turn, tighten yarn and work back from right side. Then work over all the 33-35-39-43-45-49 stitches. When piece measures 17-18-19-20-21-22 cm along the shortest side, i.e. towards the neck (= approx. 19-20-21-22-23-24 cm towards armhole) - adjust according to right shoulder, finish after row from wrong side. Cut the yarn. FRONT PIECE: Slip right shoulder on to same circular needle size 5.5 mm as left shoulder – make sure that the short rows are in each side of piece and that the shortest sides are against the neck = 66-70-78-86-90-98 stitches. Now work right shoulder together with left shoulder as follows - from right side: Cast on 4-4-4-4-6-6 new stitches on needle for armhole, work A.1b over the next 32-34-38-42-44-48 stitches (= 16-17-19-21-22-24 repetitions of 2 stitches), work 1 stitch in garter stitch, (= right shoulder), cast on 5 new stitches on needle (= middle piece), continue over left shoulder as follows: Work A.1b over the first 32-34-38-42-44-48 stitches (= 16-17-19-21-22-24 repetitions of 2 stitches), work 1 stitch in garter stitch and finish by casting on 4-4-4-4-6-6 new stitches on needle for armhole (= left shoulder) = 79-83-91-99-107-115 stitches. Work row back from wrong side. Then work as follows from right side: Work 1 stitch in garter stitch, work A.2a over the next 2 stitches, work A.2b over the next 24-26-30-34-38-42 stitches (= 12-13-15-17-19-21 repetitions of 2 stitches), work A.2c over the next 9 stitches, work A.3 over the next 7 stitches (= middle piece) work A.4a over the next 9 stitches, work A.4b over the next 24-26-30-34-38-42 stitches (= 12-13-15-17-19-21 repetitions of 2 stitches), work A.4c over the next 2 stitches and finish with 1 stitch in garter stitch. When A.2 and A.4 have been worked vertically, 4 stitches have been increased in total = 83-87-95-103-111-119 stitches on needle. Repeat this pattern, every time A.2 to A.4 have been worked 1 time vertically, work 1 repetition more of A.2b and A.4b in width. Work until piece measures 39-40-41-42-43-44 cm straight up from middle piece, loosely cast off with knit over knit and purl over purl from right side. BACK PIECE: RIGHT SHOULDER: Cast on 33-35-39-43-45-49 stitches (including 1 edge stitch in each side) on circular needle size 5.5 mm with 1 strand Alpaca and 1 strand Brushed Alpaca Silk (= 2 strands). Purl 1 row from wrong side. Work next row as follows from right side: Work 1 stitch in garter stitch, work A.1b over the remaining stitches (= 16-17-19-21-22-24 repetitions of 2 stitches). When 3 rows have been worked, continue this pattern AT THE SAME TIME on next row work short rows as follows, begin from wrong side: Work over the first 25-27-31-31-35-37 stitches, turn, tighten yarn and work back from right side. Work over the first 17-19-21-21-23-25 stitches, turn, tighten yarn and work back from right side. Work over the first 9-9-11-11-11-13 stitches, turn, tighten yarn and work back from right side. Work over all the 33-35-39-43-45-49 stitches, turn and work back from right side. Cut the yarn. Put piece aside and work the left shoulder. LEFT SHOULDER: Cast on 33-35-39-43-45-49 stitches (including 1 edge stitch in each side) on circular needle size 5.5 mm with 1 strand Alpaca and 1 strand Brushed Alpaca Silk (= 2 strands). Purl 1 row from wrong side. Work next row as follows - from right side: Work A.1b until 1 stitch remains (= 16-17-19-21-22-24 repetitions of 2 stitches) and finish with 1 stitch in garter stitch. When 2 rows have been worked, continue this pattern AT THE SAME TIME on next row work short rows as follows, begin from right side: Work over the first 25-27-31-31-35-37 stitches, turn, tighten yarn and work back from wrong side. Work over the first 17-19-21-21-23-25 stitches, turn, tighten yarn and work back from wrong side. Work over the first 9-9-11-11-11-13 stitches, turn, tighten yarn and work back from wrong side. Work over all the 33-35-39-43-45-49 stitches, turn and work back from wrong side. Do not cut the yarns! BACK PIECE: Slip right shoulder on to same circular needle size 5.5 mm as left shoulder – make sure that the short rows in each side of piece and that the shortest sides are against the neck = 66-70-78-86-90-98 stitches. Now work left shoulder together with right shoulder as follows - from right side: Work A.1b until 1 stitch remains on left shoulder (= 16-17-19-21-22-24 repetitions of 2 stitches), work 1 stitch in garter stitch, cast on 17-17-17-19-19-19 new stitch on needle (= neck), work A.1b until 1 stitch remains on right shoulder (= 16-17-19-21-22-24 repetitions of 2 stitches) and finish with 1 stitch in garter stitch. On next row work the new stitches in pattern. Continue this pattern, at the same time decrease 1 stitch in each side on next row from right side - read DECREASE TIP. Decrease like this every 6th row 1-1-2-2-4-4 times in total, then every 4th row 5-4-4-5-3-3 times in total = 71-77-83-91-95-103 stitches on needle. When piece measures 19-20-21-22-23-24 cm along one armhole, cast on 4-4-4-4-6-6 new stitches at the end of the next 2 rows for armholes = 79-85-91-99-107-115 stitches. Continue pattern as before over all stitches. When piece measures 3 cm, increase 1 stitch in each side - read INCREASE TIP. Increase like this every 6-5½-6-6-9-12 cm 7-8-7-7-5-4 times in total = 93-101-105-113-117-123 stitches. Work until piece measures 62-64-66-68-70-72 cm from shoulder (towards the neck) and down. Cast off stitches with knit over knit and purl over purl. SLEEVE: Cast on 32-34-36-36-38-40 stitches on double pointed needles size 5.5 mm with 1 strand Alpaca + 1 strand Brushed Alpaca Silk (= 2 strands). Work A.1b (= 2 stitches) the entire round. Work 4 rounds in total. Insert 1 marker at beginning of round = mid under sleeve. Then work in stocking stitch in the round - REMEMBER THE KNITTING TENSION! When piece measures 8-9-8-8-8-9 cm, increase 2 stitches mid under sleeve - READ INCREASE TIP above. Increase like this every 3-2½-2½-2-2-1½ cm 12-13-13-15-15-16 times in total = 56-60-62-66-68-72 stitches. Continue with stocking stitch without increases until piece measures 42-41-40-37-36-34 cm (shorter measurements in the larger sizes because of wider shoulders and longer sleeve cap). The piece is now split at the marker mid under sleeve and worked back and forth until finished measurements. Insert 1 marker in each side, markers mark where sleeve should be sewn into armhole. Work back and forth until piece measures 45-44-43-41-39-38 cm. Then loosely cast off stitches with knit over knit and purl over purl. Work the other sleeve the same way. ASSEMBLY: Sew shoulder seams inside cast-on edge. Sew side seams inside 1 edge stitch. Sew in sleeves inside 1 edge stitch in each side on front and back piece. Marks on sleeves should fit bottom of armhole. |
||||||||||||||||
Diagram explanations |
||||||||||||||||
|
||||||||||||||||
 |
||||||||||||||||
 |
||||||||||||||||
 |
||||||||||||||||
Have you finished this pattern?Tag your pictures with #dropspattern #freedomfoundsweater or submit them to the #dropsfan gallery. Do you need help with this pattern?You'll find 26 tutorial videos, a Comments/Questions area and more by visiting the pattern on garnstudio.com. © 1982-2026 DROPS Design A/S. We reserve all rights. This document, including all its sub-sections, has copyrights. Read more about what you can do with our patterns at the bottom of each pattern on our site. |
||||||||||||||||


With over 40 years in knitting and crochet design, DROPS Design offers one of the most extensive collections of free patterns on the internet - translated to 17 languages. As of today we count 324 catalogues and 12290 patterns translated into English (UK/cm). 12290
We work hard to bring you the best knitting and crochet have to offer, inspiration and advice as well as great quality yarns at incredible prices! Would you like to use our patterns for other than personal use? You can read what you are allowed to do in the Copyright text at the bottom of all our patterns. Happy crafting!
Post a comment to pattern DROPS 201-23
We would love to hear what you have to say about this pattern!
If you want to leave a question, please make sure you select the correct category in the form below, to speed up the answering process. Required fields are marked *.