
Popular categories
Looking for a yarn?


Comments / Questions (32)
![]() Zuber wrote:
Zuber wrote:
Guten Abend, 2 Krausrippen habe ich gestrickt! Aber dann hab ich einen Denkfehler! 6M Blende, 12M ( M1) dann 103M dann 16M ( M2 ) und 4 M Kraus Dann sind mehr als 125 M die ich angeschlagen habe?!? Wo ist mein Fehler?
06.03.2018 - 19:07DROPS Design answered:
Liebe Frau Zuber, Sie stricken: 6 Blendemaschen, M.1 (= 12 M), M.2 über die nächsten 103 M und 4 M kraus rechts = 6 + 12 + 103 + 4 = 125 M. Viel Spaß beim stricken!
07.03.2018 - 08:29
![]() Dylvie wrote:
Dylvie wrote:
Et si je veux le faire sur des aiguilles normales y a t il des explications qq part Il est très joli Bonne journee
20.02.2018 - 06:46DROPS Design answered:
Bonjour Dylvie, le dos et les devants se tricotent en allers et retours sur aiguille circulaires pour avoir suffisamment de place pour y loger toutes les mailles, les manches se tricotent en rond. Vous trouverez ici quelques informations sur l'adaptation d'un ouvrage sur aiguilles droites. Bon tricot!
20.02.2018 - 08:52
![]() Plonia Pieterse wrote:
Plonia Pieterse wrote:
Ik brei dit vest op gewone naalden. Het achterpand is inmiddels af, maar ik begrijp niet goed hoe de afkanting voor de hals is bij de voorpanden. Klopt het dat de bies van 6 steken ribbelsteek geminderd wordt tot 2 steken ribbelsteek langs de halsafkanting? En hoe wordt die schulp rand gemaakt, wordt die er later langs gehaakt?
25.07.2017 - 20:44DROPS Design answered:
Hoi Plonia, Dat klopt inderdaad; de 6 steken worden geminderd tot 2 ribbelsteken. Er is verder geen schulprand. (Misschien lijkt dat een beetje zo op de foto door de ribbelsteek aan de rand...)
30.07.2017 - 21:58
![]() DROPS Design wrote:
DROPS Design wrote:
Marilyn, US version is now saying the same as the Norwegian original, thank you for letting us know!
14.04.2011 - 17:40
![]() Marilyn wrote:
Marilyn wrote:
I think the instructions for the left side piece need to be reversed. As they stand, they are the same as the instructions for the right side piece.
14.04.2011 - 15:00
![]() Drops Design wrote:
Drops Design wrote:
Cindy, pattern 1 and 2 are right above the measure chart and are named on top M1 and M2, which stands for Pattern 1 and Pattern 2. The translations for the Diagrams for all Garnstudio patterns are included within the text of the Pattern itself. If you look you will find lines starting with an = sign. These are the translations, and they are given in the same vertical order as the chart symbols within the diagram.
27.12.2009 - 09:40
![]() Cindy wrote:
Cindy wrote:
I am reading through the pattern to understand. I see reference to Pattern 1 and Pattern 2 - but I do not see where Pattern 1 nor Pattern 2 are defined any where. The chart for the cardigan is in a different language and i cannot read it. Any help?
26.12.2009 - 07:08
![]() Scandinavian Knitting Design wrote:
Scandinavian Knitting Design wrote:
It is the edge within the centre front piece the edge in the middle where you cast off for the neckshaping and maybe have the button holes. Best Wishes Birgitte
23.08.2006 - 23:59
![]() zaheya wrote:
zaheya wrote:
its me again. the center front edge is where? within pattern one. but this would alter pattern one. or is it within the center of the front piece? thanks one more time.
23.08.2006 - 05:25
![]() Scandinavian Knitting Design wrote:
Scandinavian Knitting Design wrote:
Zaheya... It means you decrease at the centre front edge in American terminology. Best Wishes Birgitte Scandinavian Knitting Design
22.08.2006 - 18:30
|
||||||||||||||||||||||
DROPS 60-3 |
||||||||||||||||||||||
 |
 |
|||||||||||||||||||||
DROPS Cardigan in Bomull-Lin
DROPS 60-3 |
||||||||||||||||||||||
|
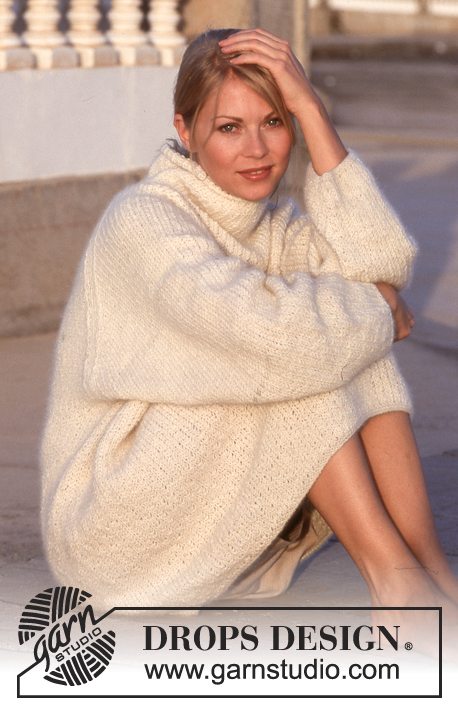
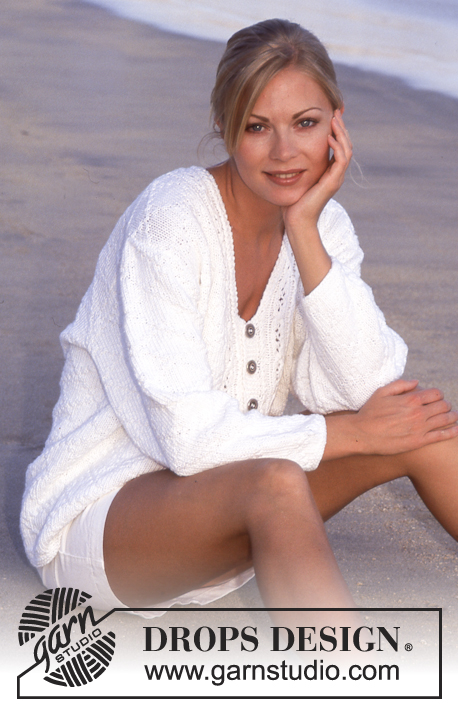
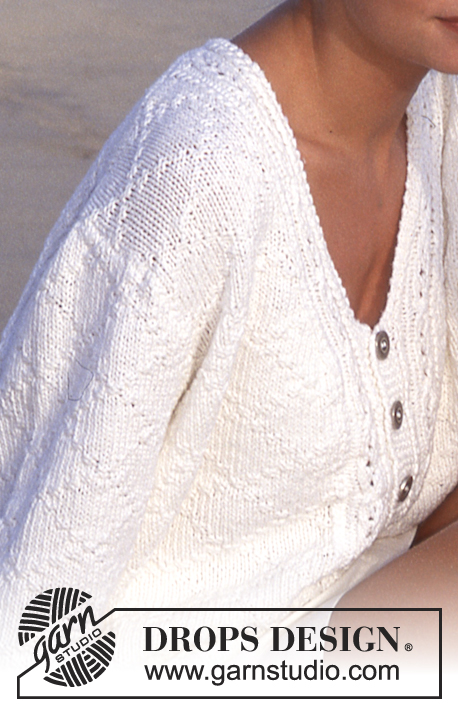
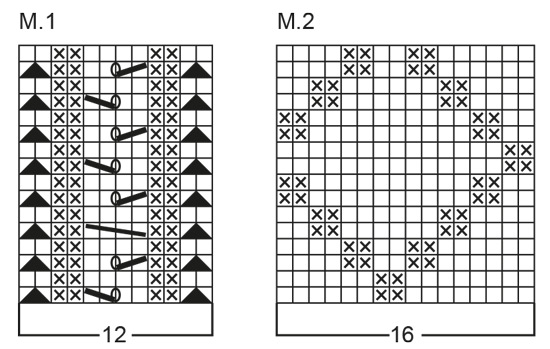
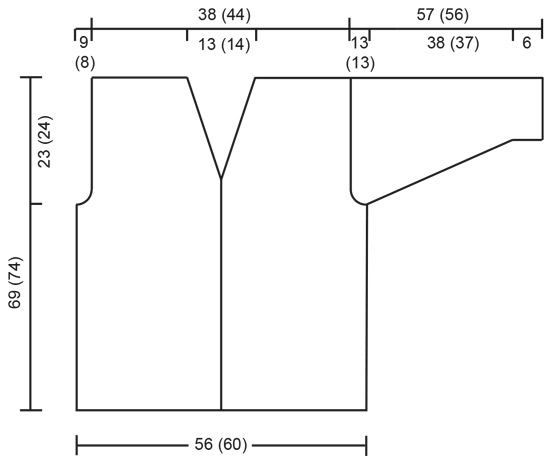
Gauge: 21 sts x 28 rows on larger needles in stockinette st = 10 x 10 cm. Pattern: See charts (1 chart = 1 repeat). The pattern is seen from the right side. Buttonholes: Make buttonholes on the right front as follows: bind off the 4th and 5th sts and cast on 2 new sts over the bound-off sts on the next row when the work measures: 1 cm 7 (8) cm 13.5 (14.5) cm 19.5 (21.5) cm 25.5 (28.5) cm 31.5 (35.5) cm 38 (42) cm and 44 (49) cm Garter st, when knitting flat: Knit all sts, all rows. Garter st, when knitting in the round: *Rnd 1, knit. Rnd 2, purl.* Repeat from * - *. Right side piece: There is a split at the center back; because of this, knit the cardigan in two parts for the first 12 (14) cm. Cast on 125 (133) sts on smaller needles and knit 4 rows garter st. Change to larger needles and knit the next row as follows beginning at the center front: 6 sts garter st (for the button band, knit these sts in garter st throughout), Pattern 1, 103 (111) sts of Pattern 2, 4 sts garter st (for the split placket). Continue with pattern as established. Make buttonholes as instructed above. When the work measures 12 (14) cm bind off the 4 garter sts at the center back and put the work aside. Left side piece: Cast on and work like right side piece, but reversed and without button holes, and do not bind off the 4 sts in garter st mid back. Body: Put both side pieces on the same circular needle with the two sides of the split placket meeting in the center of the row = 246 (262) sts. Attach a marker for each side, fronts = 65 (69) sts each, back = 116 (124) sts. Continue with the pattern as established, but now knit the 4 placket sts from the left side piece into Pattern 2. When the work measures 44 (49) cm bind off 1 st at each center front edge every other row 4 times, and at the same time decrease for the neck inside Pattern 1 (make decreases in Pattern 2 sts) as follows: 1 st 11 (12) times every other row, 1 st 4 times every 4th row, then 1 st 2 times every 6th row. Make decreases as follows: on the right front: slip 1, K 1, psso; and on the left front: K 2 tog. At the same time, when the work measures 46 (50) cm, bind off 2 sts each side of each marker for armholes (4 sts bound off for each armhole), and knit the rest of the front and back separately. Front: Bind off for armholes every other row: 3 sts 2 times, 2 sts 3 (2) times, 1 st 4 times. When all sts have been bound off for the neck and the armholes 26 (31) sts remain on the needles. Bind off when the work measures 69 (74) cm. Back: = 112 (120) sts. Bind off for armholes as on the front = 80 (92) sts. When the work measures 66 (71) cm knit 4 rows garter st over the center 28 (30) sts (keep the rest of the row in pattern st), then bind off the center 24 (26) sts for the neck on the next row. Bind off 1 st 2 times at each neck edge every row inside the 2 edge sts which are knit in garter st throughout. Bind off when the work measures 69 (74) cm. Sleeves: Cast on 48 (48) sts on smaller double pointed needles; join and place a marker at the join. Knit 4 rows garter st. Change to larger double pointed needles and knit Pattern 2, centering the pattern on the sleeve. When the work measures 6 cm, inc 1 st each side of marker 22 (23) times every 4th row = 92 (94) sts. When the work measures 44 (43) cm bind off 2 sts each side of marker, and knit the rest back and forth on the needles. Bind off at each side for sleeve caps every other row: 3 sts 2 times, 2 sts 4 (5) times, 1 st 5 (4) times, 2 sts 5 times, 3 sts 2 times, bind off. The work measures 57 (56) cm. Assembly: Sew shoulder seams. Sew in the sleeves and the buttons. Lay the bound-off placket sts underneath and sew together at the top. You can crochet a row of single crochets around the neck to make a firmer edge. |
||||||||||||||||||||||
Diagram explanations |
||||||||||||||||||||||
|
||||||||||||||||||||||
 |
||||||||||||||||||||||
 |
||||||||||||||||||||||
Have you finished this pattern?Tag your pictures with #dropspattern or submit them to the #dropsfan gallery. Do you need help with this pattern?You'll find 23 tutorial videos, a Comments/Questions area and more by visiting the pattern on garnstudio.com. © 1982-2026 DROPS Design A/S. We reserve all rights. This document, including all its sub-sections, has copyrights. Read more about what you can do with our patterns at the bottom of each pattern on our site. |
||||||||||||||||||||||


With over 40 years in knitting and crochet design, DROPS Design offers one of the most extensive collections of free patterns on the internet - translated to 17 languages. As of today we count 324 catalogues and 12290 patterns translated into English (UK/cm). 12290
We work hard to bring you the best knitting and crochet have to offer, inspiration and advice as well as great quality yarns at incredible prices! Would you like to use our patterns for other than personal use? You can read what you are allowed to do in the Copyright text at the bottom of all our patterns. Happy crafting!
Post a comment to pattern DROPS 60-3
We would love to hear what you have to say about this pattern!
If you want to leave a question, please make sure you select the correct category in the form below, to speed up the answering process. Required fields are marked *.