
Popular categories
Looking for a yarn?


Comments / Questions (50)
![]() Carmen wrote:
Carmen wrote:
La chaqueta se ve fácil pero las explicaciones son complicadísimas. La he tenido que hacer por las fotos
03.12.2022 - 19:08
![]() Viollette wrote:
Viollette wrote:
Par quelle laine peut on remplacer la big delight coloris 11 (la big delight semble ne lus se faire)
15.04.2022 - 10:21DROPS Design answered:
Bonjour Violette, pour conserver un dégradé, vous pouvez utiliser soit Delight soit Fabel + un autre fil du groupe A au choix pour obtenir la même épaisseur qu'un fil du groupe C comme Big Delight - pour le choix des couleurs, n'hésitez pas à vous rapprocher de votre magasin DROPS, ils pourront ainsi vous proposer les coloris adéquats en fonction des nuances souhaitées. Bon crochet!
19.04.2022 - 09:07
![]() Ercilia Kazuko I wrote:
Ercilia Kazuko I wrote:
Se voces colocar metragem eu entendo melhor obrigada sempre
19.01.2022 - 16:22
![]() Ambra Gregorio wrote:
Ambra Gregorio wrote:
Modello bellissimo. Unica cosa prima di cominciare il lavoro: il bordo del collo a scialle, in basso sul davanti, sia a destra che a sinistra, cade giù oltre il bordo della giacca. Come posso sapere quanti maglie alte in meno devo fare per non ottenere questo brutto effetto?
29.11.2021 - 20:47DROPS Design answered:
Buonasera Ambra, per un'assistenza così personalizzata può rivolgersi al suo rivenditore DROPS di fiducia. Buon lavoro!
08.12.2021 - 19:14
![]() Tig wrote:
Tig wrote:
I have made the two hexagonal pieces but I am completely stuck with what to do next (for the smallest size). I have read and re read the instructions over and over! I tried turning the sleeve the right way and working the first vertical row of chains (A4a and A4b) from the bottom back to the shoulder but then I can’t work out how to work A4e at the shoulder before turning it or what to do next??
24.10.2021 - 11:44
![]() Katerina wrote:
Katerina wrote:
It’s not possible to fold according to the diagram. The shape is different. There is not enough material in the hexagon . There is a mistake in the pattern.
15.09.2021 - 23:05DROPS Design answered:
Dear Katerina, look at the 3rd picture on the top of the pattern, you will see 3 of the corners from the hexagon (= the dotted lines in the chart), this might help you to fold piece. For any individual assistance, bring your piece to your store or send them a picture per mail, they will be able to help you better. You can also try to ask other crocheters in our DROPS Worskhop. Happy crocheting!
16.09.2021 - 07:40
![]() Kimberly wrote:
Kimberly wrote:
I asked for row by row written instructions and was given a guide to the illustrated pattern, which as an older crocheter, makes no sense to me. Are there written instructions, for example, " ch 2 at beg of row and make 2dc in each stitch across to end of row" I am afraid to purchase the yarn from you and not be able to make the sweater.
04.04.2021 - 15:26DROPS Design answered:
Dear Kimberly, there is no written out pattern, only the diagrams (for the pattern itself). Not only because the patterns are available in a number of languages, but also because we believe that with the diagrams you not only see the very next step, but also the "bigger picture" as how stitches and rows relate to each other en large. We do have a lesson on how to read crochet diagrams here, and if you are still stuck, you can always ask for help (either in person or over the phone) in the store you bought your DROPS yarn from. Happy Crafting!
04.04.2021 - 21:19
![]() Kimberly wrote:
Kimberly wrote:
Is an old fashioned written version of this pattern available in U.S. English? I find diagrams very difficult. If so can you please post a link. Thank you.
30.03.2021 - 20:55
![]() Jane wrote:
Jane wrote:
Hoi, Ik kom er niet aan uit hoe het rechter voor en achterpand wordt gemaakt. A2 en A3 worden in de rondte gehaakt om een 6hoek te maken maar A2 vervangt een stokje met losse. Dan haak je de toer toch helemaal niet vast? Er staat geen halve vaste oid.
23.12.2020 - 12:34
![]() Ich wrote:
Ich wrote:
Die Anleitung ist verwirrend. Aber das Resultat ist toll. Habe allerdings oft nach dem Bild gearbeitet
01.03.2020 - 17:48
|
|||||||||||||||||||||||||||||||
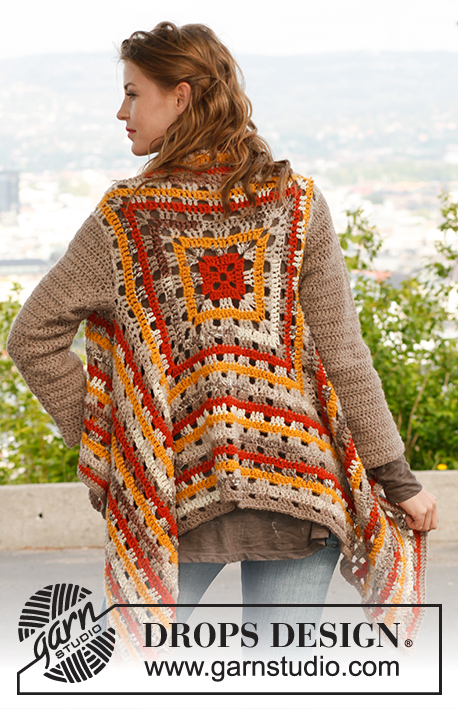
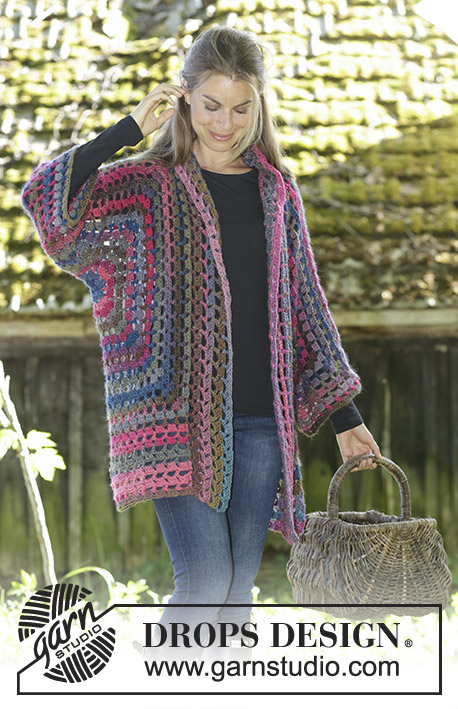
Granny Glam#grannyglamjacket |
|||||||||||||||||||||||||||||||
 |
 |
||||||||||||||||||||||||||||||
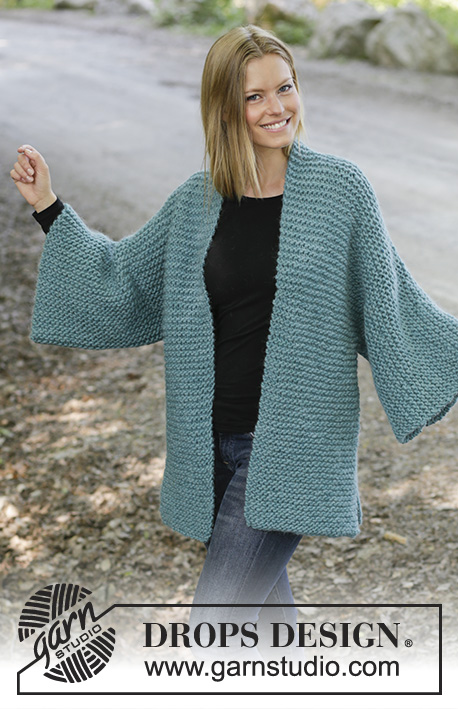
Crocheted kimono in DROPS Big Delight. Piece is crocheted with treble crochet groups and lace pattern. Size: S - XXXL
DROPS 196-33 |
|||||||||||||||||||||||||||||||
|
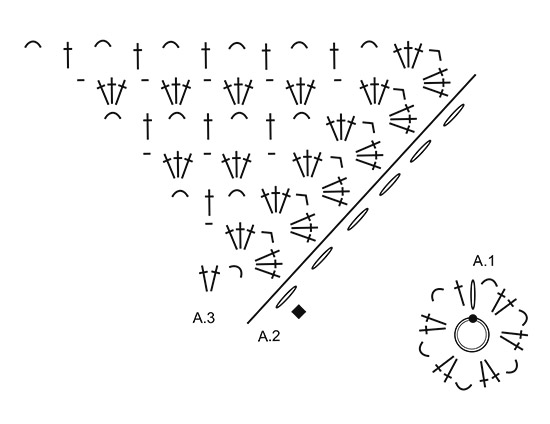
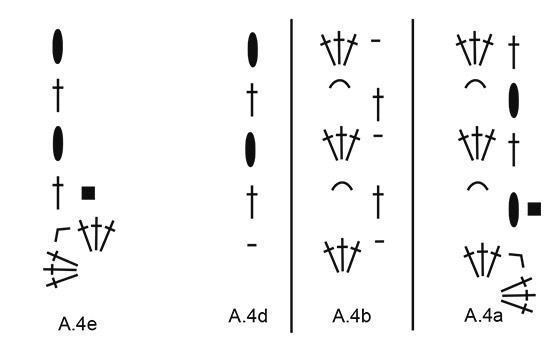
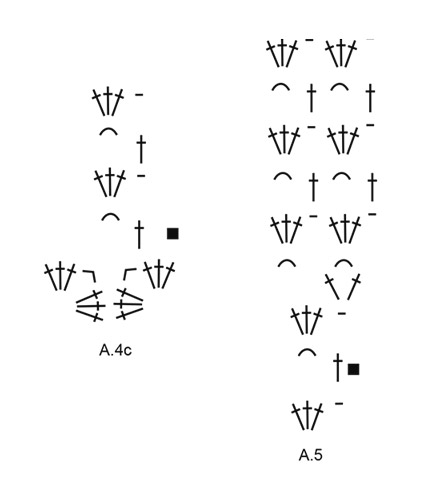
EXPLANATION FOR THE PATTERN: ---------------------------------------------------------- PATTERN: See diagrams A.1 to A.5. ---------------------------------------------------------- START THE PIECE HERE: ---------------------------------------------------------- KIMONO - SHORT SUMMARY OF PIECE: Worked in parts. First work right front and back piece in the round as a hexagon. Then work shoulder and sleeve seam together before continuing back and forth towards mid back. Then work left front and back piece the same way before continuing back and forth down the body. Then work the shawl collar and bands. KIMONO: RIGHT FRONT AND BACK PIECE: Begin with hook size 5.5 mm and Big Delight and work pattern according to diagram A.1. When entire A.1 has been worked, continue as follows: A.2 (shows how round begins and ends and replaces first treble crochet on round), A.3 6 times in total on round. REMEMBER THE CROCHET TENSION! Continue in the round like this until A.2 and A.3 are done. Then repeat the last 2 rounds in A.2 and A.3 until piece measures 28 cm from the centre and outwards (i.e. every time the 2 last rounds have been worked, there is room for 2 treble crochet groups more between each of the 6 corners on hexagon) – adjust to finish after a round with 3 treble crochets + 1 chain stitch. Cut the yarn. The hexagon now forms first part of right sleeve, shoulder and front and back piece: Centre of A.1 = mid under sleeve. Fold right front and back piece so that right side is against right side and all corners meet another corner - chart: The dotted lines shows where increase on hexagon is and hexagon is folded under sleeves and in side seam. Now work shoulder and sleeve seam together through both layers from wrong side as follows: Begin at the bottom of sleeve and work 1 double crochet around chain space in corner, * 4 chain stitches, 1 double crochet around next chain space *, work from *-* up to shoulder, but finish with 1 double crochet in chain space in corner. Fasten off. Now work pattern in the different sizes as follows: SIZE S-M: Now work back and forth on back piece as follows: Begin in corner at the bottom of body on back piece, work pattern back and forth towards mid back from wrong side as follows: Work A.4a, A.4b up to next corner before crochet together mid on top of shoulder, work A.4e around chain space in the corner. Turn and work back and forth until diagrams have been worked vertically (= 4 rows). SIZE L/XL AND XXL/XXXL: Begin in corner at the bottom of body on back piece and work pattern back and forth over the shoulder and down towards the corner on front piece from wrong side as follows: Work A.4a, A.4b up to crochet together mid on top of shoulder, work A.4c over crochet together on shoulder and continue with A.4b as before down to next corner, work A.4e around chain space in corner. Turn and work back 2nd row in A.4 (= a total of 2 rows from hexagon edge). Size L/XL is now done. In size XXL/XXXL work 2 rows vertically (= a total of 4 rows from hexagon edge). Do not cut the yarn. Now work back and forth on back piece as follows: Turn and work A.4a, A.4b up to chain stitch in A.4c on shoulder, work A.4d around chain stitch, turn and work back and forth until 4-6 rows has been worked vertically on the back piece (= a total of 6-10 row from the hexagon edge). Cut the yarn. LEFT FRONT AND BACK PIECE: Work the same way as right front and back piece. Work together shoulder and sleeve seam - see black star on chart! NOTE: When working back and forth, make sure that row with treble crochets is worked from right side and row with chain spaces is worked from wrong side! I.e. when working back and forth begin at the bottom of body on front piece instead of back piece. ASSEMBLY: Work back pieces together mid back as follows: Place the 2 part with right side against right side and work through both layers from wrong side as follows: Work 1 double crochet at the bottom of corner, * work 4 chain stitches, 1 double crochet around next chain stitch *, work from *-* up to the neck on kimono, and finish with 1 double crochet in last stitch on row. Fasten off. EDGE AT THE BOTTOM OF BODY: NOW MEASURE PIECE FROM HERE! Now work an edge at the bottom of kimono as follows: Begin at the bottom in the corner on right front piece and work from wrong side as follows: Work A.4a, A.4b until next corner (= on back piece), continue with 6-8-10 repetitions of A.4b over parts worked back and forth towards mid back, then work A.4b until corner at the front on left front piece, finish with A.4e. Continue back and forth like this until entire piece measures approx. 16-22-28 cm. Fasten off. BAND AND SHAWL COLLAR: Begin at the bottom in the corner towards mid front on left front piece and work from wrong side as follows: Work A.4a in the corner, work A.4b up along edge at the bottom of kimono and skip approx. 2½ cm for every repetition (= approx. 6-9-11 repetitions), continue with A.4b up to shoulder, work A.5 7-7-9 times in total along edge at the neck and continue with A.4b down along edge on right front piece the same way, finish with A.4d at the bottom on right front piece. Work back and forth like this until entire A.5 has been worked vertically. When A.4a, A.4b and A.4d have been worked vertically, repeat the last 2 rows in diagrams. Fasten off. |
|||||||||||||||||||||||||||||||
Diagram explanations |
|||||||||||||||||||||||||||||||
|
|||||||||||||||||||||||||||||||
 |
|||||||||||||||||||||||||||||||
 |
|||||||||||||||||||||||||||||||
 |
|||||||||||||||||||||||||||||||
 |
|||||||||||||||||||||||||||||||
Have you finished this pattern?Tag your pictures with #dropspattern #grannyglamjacket or submit them to the #dropsfan gallery. Do you need help with this pattern?You'll find 6 tutorial videos, a Comments/Questions area and more by visiting the pattern on garnstudio.com. © 1982-2026 DROPS Design A/S. We reserve all rights. This document, including all its sub-sections, has copyrights. Read more about what you can do with our patterns at the bottom of each pattern on our site. |
|||||||||||||||||||||||||||||||


With over 40 years in knitting and crochet design, DROPS Design offers one of the most extensive collections of free patterns on the internet - translated to 17 languages. As of today we count 324 catalogues and 12290 patterns translated into English (UK/cm). 12290
We work hard to bring you the best knitting and crochet have to offer, inspiration and advice as well as great quality yarns at incredible prices! Would you like to use our patterns for other than personal use? You can read what you are allowed to do in the Copyright text at the bottom of all our patterns. Happy crafting!
Post a comment to pattern DROPS 196-33
We would love to hear what you have to say about this pattern!
If you want to leave a question, please make sure you select the correct category in the form below, to speed up the answering process. Required fields are marked *.