
Popular categories
Looking for a yarn?


Comments / Questions (50)
![]() Irene wrote:
Irene wrote:
I do a read the diagram
03.09.2024 - 09:47
![]() Ferial wrote:
Ferial wrote:
Désolée encore Toute les lignes de A3 Dans chaque arceau....je comprend toujours pas vraiment Désolée.. ...est ce qu il y a une video pour les hexagones?....ou des modèles de gilet en CARRES granny?....vraiment gentil de repondre aussi vite
11.06.2024 - 01:46DROPS Design answered:
Bonjour Mme Ferial, crochetez le 1er tour de A.3 ainsi: 3 ml (cf A.2 = pour remplacer la 1ère bride)+2 brides + 3 mailles en l'air+ 3 brides dans le 1er arceau, 1 maille en l'air, puis *3brides, 2 ml, 3 brides, 1 maille en l'air*, crochetez de *à* jusqu'à la fin du tour (5 fois au total, soit 6 avec le 1er motif du tour); puis au 2ème tour: crochetez des mc jusqu'au 1er arceau, et crochetez (3 ml, 2 b, 3 ml, 3b dans le 1er arceau, 4 ml, 1 b dans l'arceau, 4 ml, répétez ensuite *3 b,3ml,3b dans l'arceau suivant, 4 ml, 1 b dans l'arceau suivant,4 ml* ,répétez de *à* tout le tour et. ainsi de suite. Bon crochet!
11.06.2024 - 08:17
![]() Ferial wrote:
Ferial wrote:
Its me again from the question i had about the disgramme...so basically its a big square granny ?
10.06.2024 - 04:19DROPS Design answered:
Dear Mrs Ferial, yes it is a kind of granny, but a granny is usually a square while you work here an hexagone from A.1 - see answer below in French. Happy crocheting!
10.06.2024 - 08:46
![]() Ferial wrote:
Ferial wrote:
Allo J essaye de faire ce beau gilet mais je comprend pas le diagramme A2 et A3..Commencer ou et retourner ou...même avec les explications de "comment lire un diagramme au crochet" le triangle la est droit et facile a suivre...mais celui de ce patron il est incliné et je comprend plus le sens...y as t il une video de ce diagramme?....je commence au carré noir...ensuite je vais ou? Si vous pouviez me dire
10.06.2024 - 02:37DROPS Design answered:
Bonjour Mme Ferial, quand vous avez terminé A.1 vous avez 6 arceaux, vous allez crocheter A.2 (début des tours) puis A.3 dans chacun de ces 6 arceaux, autrement dit, vous répétez 6 fois A.3 pour former l'hexagone. Comme vous crochetez en rond, vous lisez le diagramme tous les tours de droite. gauche. Bon crochet!
10.06.2024 - 08:45
![]() Deborah wrote:
Deborah wrote:
Als er gemeten word, is dat dan dan vanaf het midden naar de hoek of vanaf het midden naar de zeikant?
25.04.2024 - 09:19DROPS Design answered:
Dag Deborah,
Dit is vanaf het midden naar de zijkant en niet naar de hoek. Je meet dus over het rechte stuk en niet over het diagonale stuk.
30.04.2024 - 21:11
![]() Gail wrote:
Gail wrote:
What are the measurements guides on the hexagon graph please. Inches or ?
15.02.2024 - 06:58DROPS Design answered:
Dear Gail, all measurements are taken flat from side to side and are in cm; read more about the charts here. Happy crocheting!
15.02.2024 - 07:48
![]() Christine Simon wrote:
Christine Simon wrote:
Hallo, wenn ich ein sechseck Ecke auf Ecke lege erhalte ich nie einen rechten Winkel! Wie machen sie das? Bitte um antwort. Mfg Frau Simon
14.01.2024 - 12:02DROPS Design answered:
Liebe Frau Simon, schauen Sie die Maßskizze, die gestrichten Lininen zeigen 3 von den 6 "Ecken" vom Sechseck Quadrat. Falten Sie so daß die Arbeit genauso wie bei der Maßskizze aussieht. Viel Spaß beim häkeln!
15.01.2024 - 08:22
![]() VICHIDVONGSA BUSARAKAM wrote:
VICHIDVONGSA BUSARAKAM wrote:
Bonjour, Je suis assez débutante pour crocheter les vêtements alors j'essaie de faire celui là sauf que je ne sais pas COMBIEN DE RANG que je devrais faire par taille !?! Merci pour votre aide...
08.11.2023 - 17:25DROPS Design answered:
Bonjour Mme Busakaram, tout dépend de la taille et de votre tension en hauteur, suivez les indications en mesurant bien comme indiqué, ainsi, vous aurez les bonnes mesures finales, comme celles du schéma. Bon crochet!
09.11.2023 - 08:14
![]() Karina wrote:
Karina wrote:
Hier ben ik weer. Klopt het dat u geen symmetrische zeshoek bedoeld maar een L-vorm? Die heeft ook zes hoeken. Als ik de foto bekijk, staat de middenachternaad haaks op de onderkant. Dat kan niet als je van een zeshoek uitgaat. Als dit niet klopt, mag u het me nog eens duidelijk uiteggen!
09.10.2023 - 16:11DROPS Design answered:
Dag Karina,
Je begint als het ware in de oksel te haken. Als het rechter voor- en achterpand klaar is en je vouwt het dubbel, dan heb je een L-vorm.
11.10.2023 - 19:07
![]() Karina wrote:
Karina wrote:
Het patroon is lastig te begrijpen. Ik ben met een proeflap begonnen om de zeshoek te haken, en meen nu te begrijpen dat de zeshoek niet gesloten is, maar dat de schuine lijn van A2 betekent dat je heen en weer moet haken? Dan zou het omvouwen logisch zijn. Graag jullie reactie.
09.10.2023 - 15:12DROPS Design answered:
Dag Karina,
Nee, je moet wel in de rondte haken. Zie ook mijn andere bericht waarin ik uitleg dat het midden van de cirkel op het punt van de oksel komt.
11.10.2023 - 19:09
|
|||||||||||||||||||||||||||||||
Granny Glam#grannyglamjacket |
|||||||||||||||||||||||||||||||
 |
 |
||||||||||||||||||||||||||||||
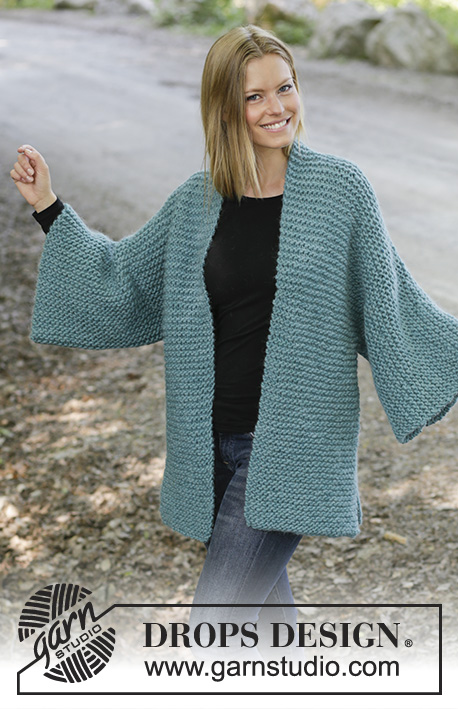
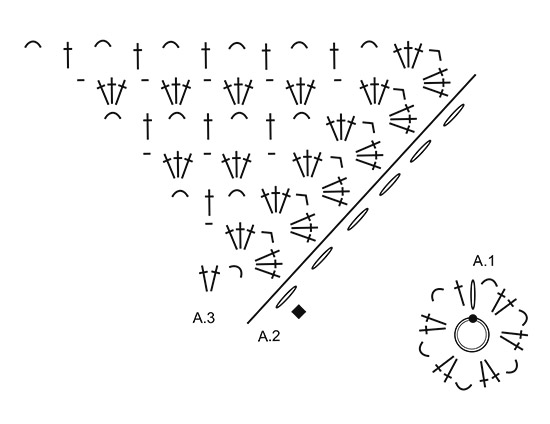
Crocheted kimono in DROPS Big Delight. Piece is crocheted with treble crochet groups and lace pattern. Size: S - XXXL
DROPS 196-33 |
|||||||||||||||||||||||||||||||
|
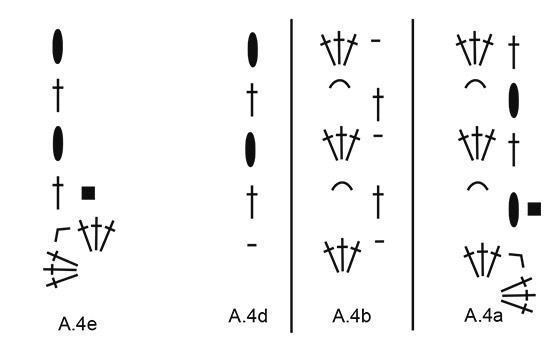
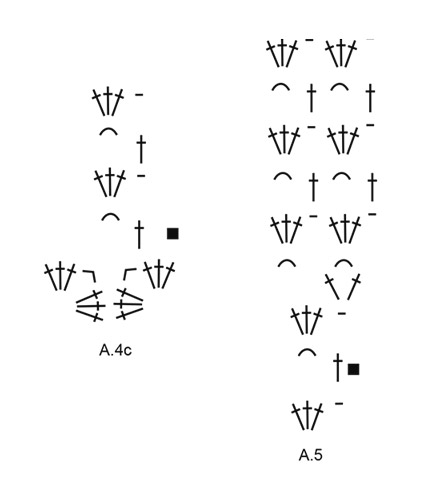
EXPLANATION FOR THE PATTERN: ---------------------------------------------------------- PATTERN: See diagrams A.1 to A.5. ---------------------------------------------------------- START THE PIECE HERE: ---------------------------------------------------------- KIMONO - SHORT SUMMARY OF PIECE: Worked in parts. First work right front and back piece in the round as a hexagon. Then work shoulder and sleeve seam together before continuing back and forth towards mid back. Then work left front and back piece the same way before continuing back and forth down the body. Then work the shawl collar and bands. KIMONO: RIGHT FRONT AND BACK PIECE: Begin with hook size 5.5 mm and Big Delight and work pattern according to diagram A.1. When entire A.1 has been worked, continue as follows: A.2 (shows how round begins and ends and replaces first treble crochet on round), A.3 6 times in total on round. REMEMBER THE CROCHET TENSION! Continue in the round like this until A.2 and A.3 are done. Then repeat the last 2 rounds in A.2 and A.3 until piece measures 28 cm from the centre and outwards (i.e. every time the 2 last rounds have been worked, there is room for 2 treble crochet groups more between each of the 6 corners on hexagon) – adjust to finish after a round with 3 treble crochets + 1 chain stitch. Cut the yarn. The hexagon now forms first part of right sleeve, shoulder and front and back piece: Centre of A.1 = mid under sleeve. Fold right front and back piece so that right side is against right side and all corners meet another corner - chart: The dotted lines shows where increase on hexagon is and hexagon is folded under sleeves and in side seam. Now work shoulder and sleeve seam together through both layers from wrong side as follows: Begin at the bottom of sleeve and work 1 double crochet around chain space in corner, * 4 chain stitches, 1 double crochet around next chain space *, work from *-* up to shoulder, but finish with 1 double crochet in chain space in corner. Fasten off. Now work pattern in the different sizes as follows: SIZE S-M: Now work back and forth on back piece as follows: Begin in corner at the bottom of body on back piece, work pattern back and forth towards mid back from wrong side as follows: Work A.4a, A.4b up to next corner before crochet together mid on top of shoulder, work A.4e around chain space in the corner. Turn and work back and forth until diagrams have been worked vertically (= 4 rows). SIZE L/XL AND XXL/XXXL: Begin in corner at the bottom of body on back piece and work pattern back and forth over the shoulder and down towards the corner on front piece from wrong side as follows: Work A.4a, A.4b up to crochet together mid on top of shoulder, work A.4c over crochet together on shoulder and continue with A.4b as before down to next corner, work A.4e around chain space in corner. Turn and work back 2nd row in A.4 (= a total of 2 rows from hexagon edge). Size L/XL is now done. In size XXL/XXXL work 2 rows vertically (= a total of 4 rows from hexagon edge). Do not cut the yarn. Now work back and forth on back piece as follows: Turn and work A.4a, A.4b up to chain stitch in A.4c on shoulder, work A.4d around chain stitch, turn and work back and forth until 4-6 rows has been worked vertically on the back piece (= a total of 6-10 row from the hexagon edge). Cut the yarn. LEFT FRONT AND BACK PIECE: Work the same way as right front and back piece. Work together shoulder and sleeve seam - see black star on chart! NOTE: When working back and forth, make sure that row with treble crochets is worked from right side and row with chain spaces is worked from wrong side! I.e. when working back and forth begin at the bottom of body on front piece instead of back piece. ASSEMBLY: Work back pieces together mid back as follows: Place the 2 part with right side against right side and work through both layers from wrong side as follows: Work 1 double crochet at the bottom of corner, * work 4 chain stitches, 1 double crochet around next chain stitch *, work from *-* up to the neck on kimono, and finish with 1 double crochet in last stitch on row. Fasten off. EDGE AT THE BOTTOM OF BODY: NOW MEASURE PIECE FROM HERE! Now work an edge at the bottom of kimono as follows: Begin at the bottom in the corner on right front piece and work from wrong side as follows: Work A.4a, A.4b until next corner (= on back piece), continue with 6-8-10 repetitions of A.4b over parts worked back and forth towards mid back, then work A.4b until corner at the front on left front piece, finish with A.4e. Continue back and forth like this until entire piece measures approx. 16-22-28 cm. Fasten off. BAND AND SHAWL COLLAR: Begin at the bottom in the corner towards mid front on left front piece and work from wrong side as follows: Work A.4a in the corner, work A.4b up along edge at the bottom of kimono and skip approx. 2½ cm for every repetition (= approx. 6-9-11 repetitions), continue with A.4b up to shoulder, work A.5 7-7-9 times in total along edge at the neck and continue with A.4b down along edge on right front piece the same way, finish with A.4d at the bottom on right front piece. Work back and forth like this until entire A.5 has been worked vertically. When A.4a, A.4b and A.4d have been worked vertically, repeat the last 2 rows in diagrams. Fasten off. |
|||||||||||||||||||||||||||||||
Diagram explanations |
|||||||||||||||||||||||||||||||
|
|||||||||||||||||||||||||||||||
 |
|||||||||||||||||||||||||||||||
 |
|||||||||||||||||||||||||||||||
 |
|||||||||||||||||||||||||||||||
 |
|||||||||||||||||||||||||||||||
Have you finished this pattern?Tag your pictures with #dropspattern #grannyglamjacket or submit them to the #dropsfan gallery. Do you need help with this pattern?You'll find 6 tutorial videos, a Comments/Questions area and more by visiting the pattern on garnstudio.com. © 1982-2026 DROPS Design A/S. We reserve all rights. This document, including all its sub-sections, has copyrights. Read more about what you can do with our patterns at the bottom of each pattern on our site. |
|||||||||||||||||||||||||||||||


With over 40 years in knitting and crochet design, DROPS Design offers one of the most extensive collections of free patterns on the internet - translated to 17 languages. As of today we count 324 catalogues and 12290 patterns translated into English (UK/cm). 12290
We work hard to bring you the best knitting and crochet have to offer, inspiration and advice as well as great quality yarns at incredible prices! Would you like to use our patterns for other than personal use? You can read what you are allowed to do in the Copyright text at the bottom of all our patterns. Happy crafting!
Post a comment to pattern DROPS 196-33
We would love to hear what you have to say about this pattern!
If you want to leave a question, please make sure you select the correct category in the form below, to speed up the answering process. Required fields are marked *.