
Popular categories
Looking for a yarn?


Comments / Questions (25)
![]() Maddie wrote:
Maddie wrote:
Bonjour, Merci de votre réponse mais elle ne correspond pas à ma question, après avoir augmenté à 187 mailles puis avoir fait A1, il est dit de continuer en côtes 1/1 mais comment faire avec un nombre de mailles impair? Si je suis les instructions je me retrouve avec une maille à l'endroit à la fin du tour, collée à la maille à l'endroit du début du tour, ce qui ne correspond pas aux côtes. Je vous remercie de votre réponse.
18.11.2024 - 11:06DROPS Design answered:
Bonjour Maddie et désolée, j'ai lu au mauvais endroit - augmentez/diminuez d'1 maille au 1er rang puis réajustez le nombre de mailles en conséquence, je transmets cette info à nos stylistes. Bon tricot!
18.11.2024 - 16:13
![]() Maddie wrote:
Maddie wrote:
Bonjour, Je fais le modèle en taille M, quand on obtient 187 mailles il est dit de continuer en côtes comme avant mais comment faire vu que le nombre de mailles est impair ? Je vous remercie
17.11.2024 - 22:30DROPS Design answered:
Bonjour Maddie, lorsque vous avez augmenté 45 mailles à intervalles réguliers au 1er tour de A.1, vous continuez le diagramme A.1 sur ces 187 mailles soit, après le 1er tour: 1 tour envers, 1 tour endroit, 1 tour (2 m ens à l'end, 1 jeté) répétez de (à) et terminez par 1 m end, 1 tour end, et 1 tour envers. Bon tricot!
18.11.2024 - 08:39
![]() Immy wrote:
Immy wrote:
Hi, I can’t find how to download the pattern thank you
26.01.2023 - 21:23DROPS Design answered:
Dear Immy, our patterns can only be printed, but using a virtual printer you will be able to download it as a .pdf. Happy knitting!
27.01.2023 - 08:46
![]() Kim wrote:
Kim wrote:
Thank you for your answer, but I thought on the yoke you are using the short circular needle. I am unclear if you need dpns plus short and long circular needles in both sizes
20.03.2021 - 18:26DROPS Design answered:
Dear Kim, we used DPN-s for the sleeves, because many knitters prefer, but if you are comfortable to knit the sleeves on circulars, you will not need DPNs at all. If you perefer to use DPNs for knitting the sleeves, you will need the 5 mm and the 4,5 mm ones to knit the sleeves. You can also start to knit the sleeves with 5 mm circulars and change to 4.5 mm DPNs for the ribbing, it is really up to you. Happy Knitting!
21.03.2021 - 23:29
![]() Kim wrote:
Kim wrote:
Hi, When are the double pointed needles size 5mm used? They don’t seem to be mentioned in the pattern
19.03.2021 - 16:46DROPS Design answered:
Dear Kim! You change to 5 mm needles, right sfter you start the yoke, after you finished the ribbing, and knit 2 ridges with garter stitch, Happy Knitting!
20.03.2021 - 07:14
![]() Magda wrote:
Magda wrote:
Hi, how does the garment stretch after washing? I have used the big merino for a cardigan once and it got 4 sizes bigger - now I am very afraid of making the mistake again.
18.02.2021 - 00:26DROPS Design answered:
Dear Magda, stretching always depends on a lot of different factors, among them , for example, the gauge you knit with. Therefore the sure way is to knit a swatch, wash it dry it and then you can check exactly how it behaves. Happy Knitting!
18.02.2021 - 08:44
![]() Kathryn Hatton wrote:
Kathryn Hatton wrote:
The diagram shows the back neck higher than the front. How is this achieved when there doesn't seem to be any short rows worked in the pattern? Thank you.
11.01.2021 - 00:20DROPS Design answered:
Dear Mrs Hatton, chart with measurements is standard, in this pattern there are no elevation on back piece, this means neck will be same on front and on back piece. Happy knitting!
11.01.2021 - 10:38
![]() Dagmar wrote:
Dagmar wrote:
Liebes Dropsteam, nehme ich wenn ich bei A1 angelangt bin, die Zunahme in der 1ten linke Reihe machen.? Vielen Dank im voraus
30.12.2020 - 17:26DROPS Design answered:
Liebe Dagmar, die Zunahmen in A.1, die gleichmäßig verteilt gestrickt werden, werden bei der 1. Reihe in A.1 gestrickt (= 1 Umschlaga) - bei der 2. Reihe in A.1 werden diese Umschläge links verschränkt gestrickt um Löcher zu vermeiden. Viel Spaß beim stricken!
04.01.2021 - 13:09
![]() Inge Andersen wrote:
Inge Andersen wrote:
Der er fejl i strikkeopskrifter det er ryg og forstykke der skal man tage 20 masker ud til sidst . Så står der når arbejdet måler 37 cm strikkes 1 retsind hvor der tages 24 m ud og så 5 cm rib bort man kan jo godt regne at blusen skal være længere.
11.10.2020 - 16:57
![]() Ninni wrote:
Ninni wrote:
Jag har kommit till att börja på en ärm. Jag har satt 48 m på en tråd.Sedan ska 6 m läggas upp. Var läggs de upp? På samma sticka där garntråden finns eller på stickan efter de maskor som finns på en tråd?
07.05.2020 - 21:46DROPS Design answered:
Hej Ninni. Du lägger upp de på stickan där garntråden finns (de kommer då i sidan under ärmen). Mvh DROPS Design
08.05.2020 - 07:33
|
|||||||||||||
Belfast#belfastsweater |
|||||||||||||
 |
 |
||||||||||||
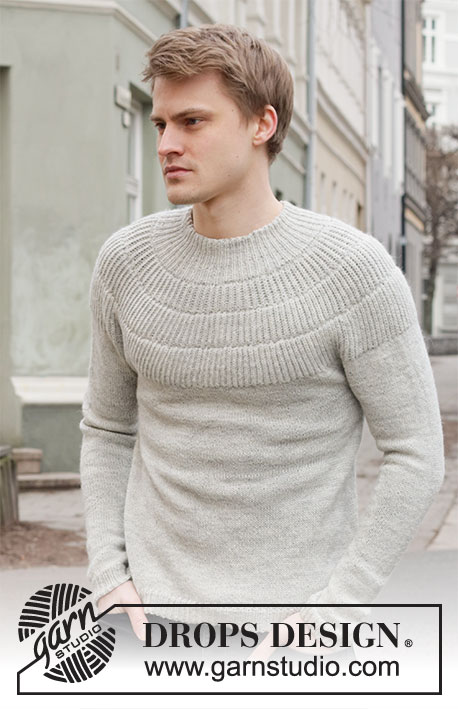
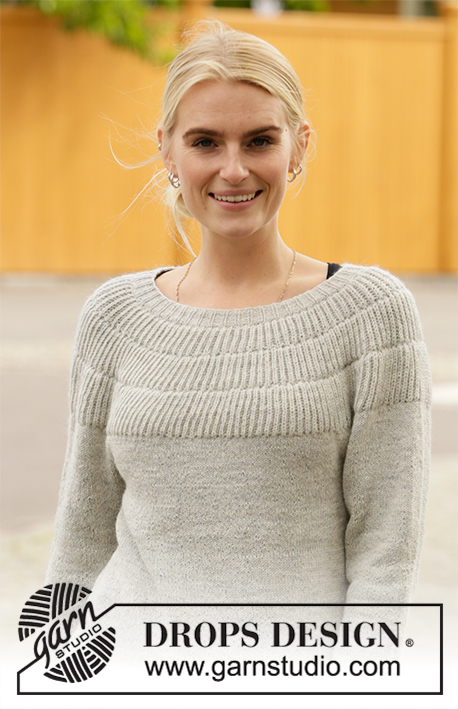
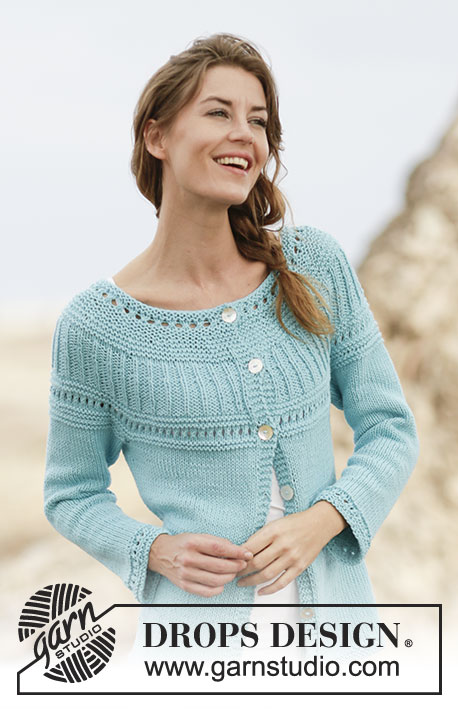
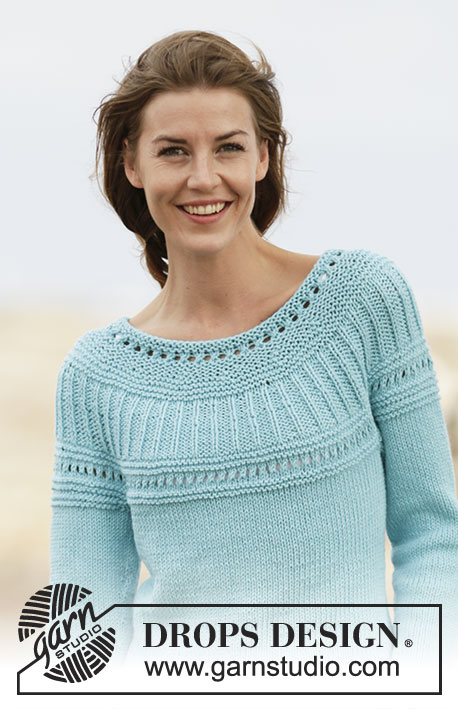
Knitted jumper in DROPS BIG MERINO. The piece is worked top down, with textured pattern and stocking stitch.
DROPS 195-33 |
|||||||||||||
|
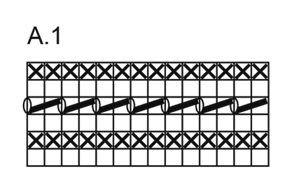
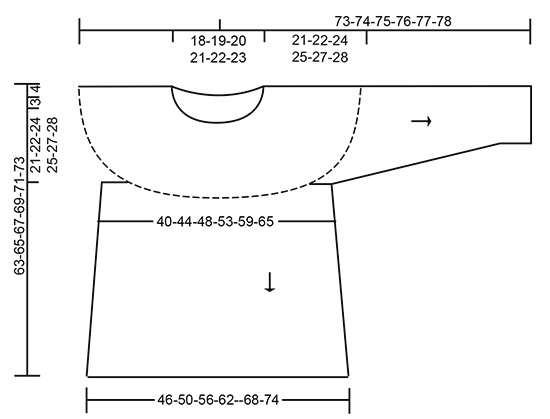
------------------------------------------------------- EXPLANATIONS FOR THE PATTERN: ------------------------------------------------------- RIDGE/GARTER STITCH (worked in the round): 1 ridge = 2 rounds. Knit 1 round and purl 1 round. INCREASE TIP (evenly spaced): To work out how to increase evenly, count the total number of stitches on the needle (e.g. 82 stitches) and divide by the number of increases to be made (e.g. 10) = 8.2. In this example, increase by making 1 yarn over after approx. each 8th stitch; on the next round work the yarn overs twisted to avoid holes. PATTERN: See diagram A.1. The diagram shows all the rows in the pattern seen from the right side. INCREASE TIP (for sides of body): Start 1 stitch before the marker thread, make 1 yarn over, knit 2 (marker thread sits between these 2 stitches), 1 yarn over (= 2 stitches increased). On the next round work the yarn overs twisted to avoid holes. DECREASE TIP (for mid under sleeve): Start 3 stitches before the marker thread, knit 2 together, knit 2 (marker thread sits between these 2 stitches), slip 1 stitch as if to knit, knit 1 and pass the slipped stitch over the knitted stitch (= 2 stitches decreased). ------------------------------------------------------- START THE PIECE HERE: ------------------------------------------------------- JUMPER - SHORT OVERVIEW OF THE PIECE: The piece is worked in the round with circular needle, from mid back and top down. When you have worked as far as the armholes, the piece is divided - the body is continued in the round with circular needle and the sleeves are worked in the round with short circular needle/double pointed needles. YOKE: Cast on 82-84-88-92-96-102 stitches with circular needle size 4.5 mm and Big Merino. Knit 1 round. On the next round work rib as follows: * Knit 1 /purl 1 *, work from *-* to end of round. Continue this rib for 2-3-2-3-2-3 cm. Change to circular needle size 5 mm. Then work as follows: Work 2 RIDGES – see description above. On the last round of the ridges increase 10-14-14-18-22-24 stitches evenly on round – read INCREASE TIP = 92-98-102-110-118-126 stitches. Work rib as follows: * Knit 1 /purl 1 *, work from *-* to end of round. Work this rib for 4-4-5-5-6-6 cm. On the next round work A.1 over all stitches, AT THE SAME TIME on the first round of A.1 increase 40-44-50-58-62-64 stitches evenly on round = 132-142-152-168-180-190 stitches. Work rib as before for 4-4-5-5-6-6 cm, then work A.1, AT THE SAME TIME on the first round in A.1 increase 40-45-50-58-62-65 stitches evenly on round = 172-187-202-226-242-255 stitches. NOTE! Finish the 4th round in A.1 with knit 0-1-0-0-0-1 stitch. REMEMBER THE KNITTING TENSION! Work rib as before for 4-4-5-5-6-6 cm, then work A.1, on the first round in A.1 increase 40-45-50-58-62-65 stitches evenly on round = 212-232-252-284-304-320 stitches. The piece measures approx. 21-22-24-25-27-28 cm from the cast-on edge. The next round is worked as follows: Knit the first 31-34-37-41-45-49 stitches (= half back piece), place the next 44-48-52-60-62-62 stitches on a thread for sleeve, cast on 6-6-8-8-10-12 new stitches on the needle (= in side under sleeve), knit 62-68-74-82-90-98 stitches (= front piece), place the next 44-48-52-60-62-62 stitches on a thread for sleeve, cast on 6-6-8-8-10-12 new stitches on the needle (= in side under sleeve) and knit the remaining 31-34-37-41-45-49 stitches (= half back piece). Body and sleeves are finished separately. THE PIECE IS NOW MEASURED FROM HERE! BODY: = 136-148-164-180-200-220 stitches. Insert 1 marker thread in each side, in the middle of the new stitches cast on under the sleeve. Work stocking stitch in the round. When the piece measures 3 cm from the division, increase 2 stitches on each side – read INCREASE TIP (= 4 stitches increased). Increase like this every 8-6½-5-4½-4½-4½ cm a total of 5-6-7-8-8-8 times = 156-172-192-212-232-252 stitches. When the piece measures 37-38-38-39-39-40 cm, knit 1 round where you increase 24-20-20-18-22-24 stitches evenly on round = 180-192-212-230-254-276 stitches. Change to circular needle size 4.5 mm. Work rib (knit 1 /purl 1) for 5 cm, then cast off with knit over knit and purl over purl, The piece measures approx. 63-65-67-69-71-73 cm from the shoulder down. SLEEVE: Place the 44-48-52-60-62-62 stitches from the one thread on short circular needle size 5 mm and knit up 1 stitch in each of the 6-6-8-8-10-12 stitches cast on under the sleeve = 50-54-60-68-72-74 stitches. Insert 1 marker thread in the middle of the cast on stitches under the sleeve = beginning of round. Work stocking stitch in the round. When the sleeve measures 4 cm from the division, decrease 2 stitches mid under sleeve – read DECREASE TIP. Decrease like this every 4½-3½-3-2-2-2 cm a total of 8-9-11-14-15-15 times = 34-36-38-40-42-44 stitches. Continue working until the piece measures 37-37½-36-35½-34-33½ cm from the division (shorter measurements in larger sizes due to longer yoke). Knit 1 round where you increase 8 stitches evenly on round = 42-44-46-48-50-52 stitches. Change to double pointed needles size 4.5 mm and work rib in the round (= knit 1 / purl 1). When the rib measures 5 cm (or to desired length) cast off with knit over knit and purl over purl. The sleeve measures approx. 43-42½-42-40½-39-37 cm from the division. Work the other sleeve in the same way. |
|||||||||||||
Diagram explanations |
|||||||||||||
|
|||||||||||||
 |
|||||||||||||
 |
|||||||||||||
Have you finished this pattern?Tag your pictures with #dropspattern #belfastsweater or submit them to the #dropsfan gallery. Do you need help with this pattern?You'll find 25 tutorial videos, a Comments/Questions area and more by visiting the pattern on garnstudio.com. © 1982-2026 DROPS Design A/S. We reserve all rights. This document, including all its sub-sections, has copyrights. Read more about what you can do with our patterns at the bottom of each pattern on our site. |
|||||||||||||


With over 40 years in knitting and crochet design, DROPS Design offers one of the most extensive collections of free patterns on the internet - translated to 17 languages. As of today we count 324 catalogues and 12290 patterns translated into English (UK/cm). 12290
We work hard to bring you the best knitting and crochet have to offer, inspiration and advice as well as great quality yarns at incredible prices! Would you like to use our patterns for other than personal use? You can read what you are allowed to do in the Copyright text at the bottom of all our patterns. Happy crafting!
Post a comment to pattern DROPS 195-33
We would love to hear what you have to say about this pattern!
If you want to leave a question, please make sure you select the correct category in the form below, to speed up the answering process. Required fields are marked *.