
Popular categories
Looking for a yarn?


Comments / Questions (13)
![]() Emilia wrote:
Emilia wrote:
Proszę o podpowiedź jak zacząć zwężanie. Zrobiłam 26 cm robótki. Zaznaczyłam 2 markery. Zaczynam ten rząd normalnie a potem przy markerze przed 25 oczkiem robię zamykanie według instrukcji? Tj przerabiam 2 oczka razem na prawo, zdejmuję jedno i przerabiam prawe, przekładam zdjęte? I to samo na końcu rzędu? Cały czas pod koniec tych rzędów zmniejszających wychodzi mi że będę mieć 26 oczek a nie 24.
03.02.2023 - 15:34DROPS Design answered:
Witaj Emilio, zamykasz zgodnie z opisem w części ZAMYKANIE OCZEK, czyli przerobić 2 oczka razem na prawo, 2 oczka prawe (marker jest między tymi 2 oczkami), zdjąć 1 oczko jak do przerobienia na prawo, 1 oczko prawe, przełożyć oczko zdjęte nad przerobionym oczkiem. Są zamknięte 4 o. w okrążeniu (5 powtórzeń powtórzeń 4 oczka = 20 zamkniętych oczek). Zostaje 30 oczek na drucie. Dodatkowo zamknąć 2 oczka w każdym warkoczu (3 warkocze x 2 oczka = 6). 30-6=24. Powinno zostać 24 oczka. Pozdrawiamy!
03.02.2023 - 16:50
![]() Cynthis wrote:
Cynthis wrote:
I feel length sizing is incorrect. Suggestion.. start thimb gusset at Row 6, not after 5.5in. Length above thumb opening should be about 4in. Then do dec. Making w local alpaca dk. Will probably use all,100g will do again w the mentioned adjustments.
06.05.2022 - 15:17
![]() SylvF wrote:
SylvF wrote:
Danke, ich habe es jetzt herausgefunden, trotzdem erscheinen mir 14 cm ein wenig lang bis zu Daumenkeil, oder ?
17.02.2022 - 15:31DROPS Design answered:
Oh sorry Ich hatte Ihren Kommentar übersehen - die Zunahmen beginnen nach 14 cm, aber gerne können Sie je nach der gewüsnchten Länge etwas länger stricken. Viel Spaß beim stricken!
17.02.2022 - 16:27
![]() SylvF wrote:
SylvF wrote:
Hallo liebes Drops Knitting Team In der obigen Anleitung steht 48 M anschlagen, im Bündchenmuster stricken und dann mehrere Abnahmen bei linken M. Dann wechseln auf Nd 3,5 und das nun 50M auf den Nadeln liegen. Was übersehe ich? Hilfe! Müssten das nicht 4 Maschen weniger sein? 46? Oder bei Zunahmen, die für mich mehr Sinn ergeben, 52M ? Vielen Dank und beste Grüsse Sylv
17.02.2022 - 15:18DROPS Design answered:
Liebe Sylv, bei der letzten Runde mit Bündchen werden Sie Maschen abnehmen, aber in der 1. Reihe A.1 werden Sie 6 Maschen zunehmen - siehe letzte Symbol. So bekommen Sie 50Maschen nach der Ab- und Zunahmen-Runde. Viel Spaß beim stricken!
17.02.2022 - 16:18
![]() Ingrid Ressem wrote:
Ingrid Ressem wrote:
Det står at man skal felle 2 masker over hver flette. Skal dette gjøres samtidig som de andre fellingene(altså på første runde med felling) eller etterpå?
15.06.2021 - 14:08
![]() Mara wrote:
Mara wrote:
Grazie di cuore per la Vostra disponibilità Buone feste ! Mara
19.12.2020 - 03:57
![]() Mara wrote:
Mara wrote:
Buongiorno , Non capisco la lavorazione che devo fare dopo il lavoro a coste! Potreste spiegarmi meglio? Io ho iniziato in sequenza quelli che c’è scritto ma non mi sembra giusto il lavoro che sto’eseguendo Cioè 2maglie dritto 2 maglie rovescio insieme per tutto il giro per 2 volte? Poi? Grazie in anticipo
18.12.2020 - 07:47DROPS Design answered:
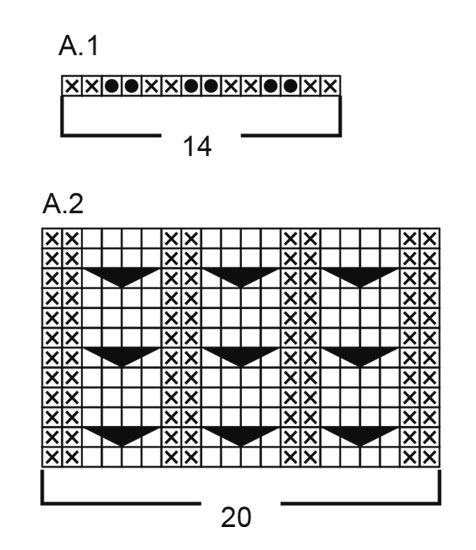
Buongiorno Mara, dopo la lavorazione a coste deve lavorare in questo modo: Ripetere la sequenza * 2 maglie diritto, 2 maglie insieme a rovescio, 2 maglie diritto, 2 maglie rovescio *, per 3 volte in totale, 2 maglie diritto, 2 maglie rovescio, 2 maglie diritto, lavorare A.1 sulle 14 maglie successive, 2 maglie diritto, 2 maglie insieme a rovescio. Buon lavoro!
18.12.2020 - 08:59
![]() Pia wrote:
Pia wrote:
Hei. Jeg har strikket til og med A1, men har nå 51 masker. Det står " Strikk * 2 rett, 2 vrang sammen, 2 rett, 2 vrang *, gjenta fra *-* 2 ganger til". Menes det at dette skal gjøres tre ganger totalt? Isåfall felles det 3 masker, det er altså 45 masker da på pinnen. Når man strikker A1 øker man med totalt 6 masker, da er det altså 51 masker på pinnen. Hvordan får dere det til å bli 50 masker?
26.10.2020 - 13:58DROPS Design answered:
Hei Pia, Etter A.1, Du feller 3 masker før A.1 og 1 maske etter A.1. Med de 6 økte masker i A.1 det skal da være 50 masker på pinnene. God fornøyelse!
27.10.2020 - 07:03
![]() Christine McKay wrote:
Christine McKay wrote:
I noticed the thumb gusset increase is every 2 rows is this correct. Or is it every second row of pattern is row 2 of the pattern sequence
30.07.2020 - 13:54DROPS Design answered:
Dear Mrs Mc Kay, you increase for thumb on every other round. Happy knitting!
30.07.2020 - 15:40
![]() RachelleLoyer wrote:
RachelleLoyer wrote:
Je suis perdu, Comment est possible de monter 48 mailles, d'effectuer 5 diminutions et de terminer avec 50 mailles? Sois que je comprends pas bien les instructions ou il y a une erreur dans le patron. Merci de votre aide Rachelle
25.11.2018 - 22:26DROPS Design answered:
Bonjour Mme Loyer, après les 7 cm de côtes, on diminue dans les côtes, et on augmente 6 m dans A.1 - cf légende du point noir. Bon tricot!
26.11.2018 - 10:21
|
|||||||||||||
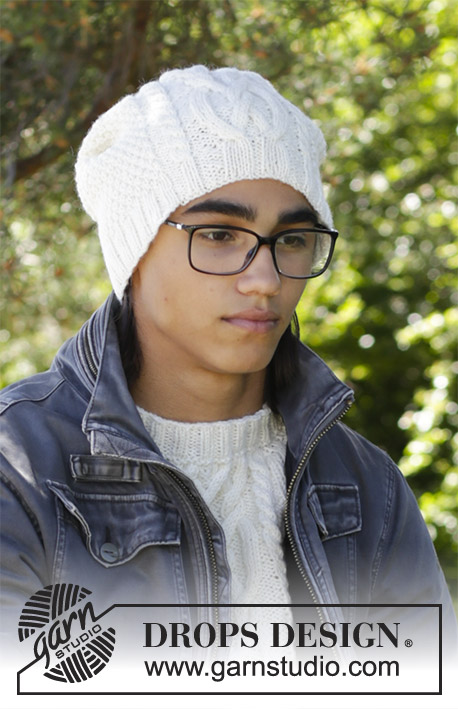
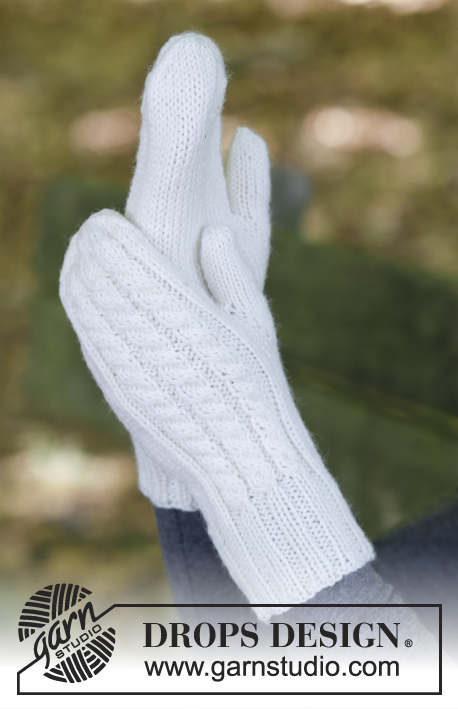
Morgenfrost#morgenfrostmittens |
|||||||||||||
|
|
|||||||||||||
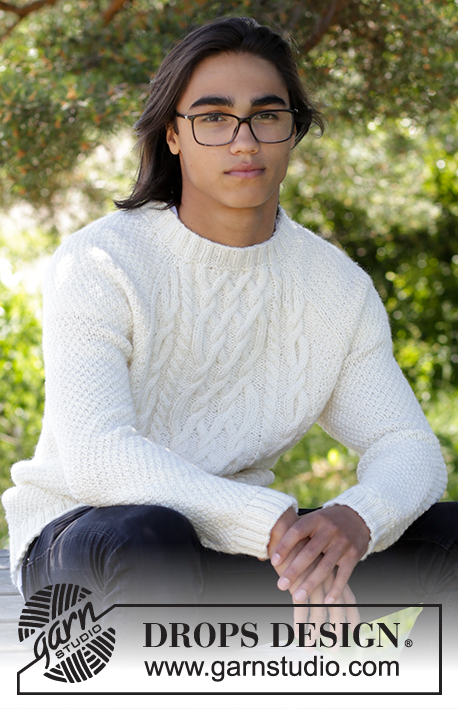
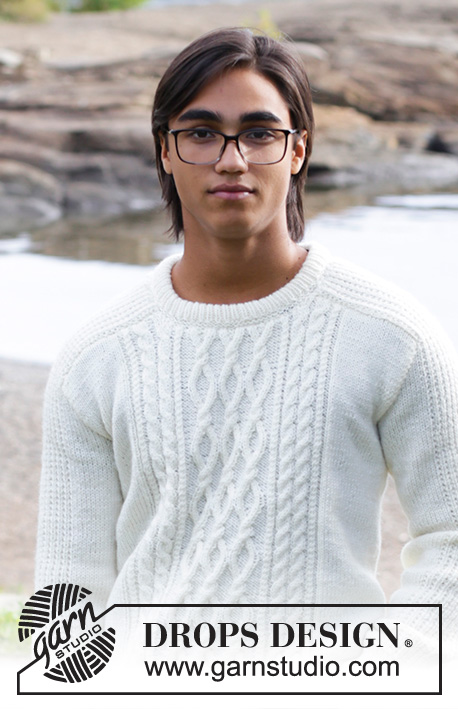
Men’s knitted mittens with cables and textured pattern. The piece is worked in DROPS Karisma.
DROPS 185-18 |
|||||||||||||
|
INFORMATION FOR THE PATTERN: PATTERN: See diagrams A.1 and A.2. The diagrams show all the rows in the pattern seen from the right side. INCREASE TIP: Increase 1 stitch by making 1 yarn over, on the next round knit the yarn over twisted to avoid a hole. DECREASE TIP: Decrease as follows (start 3 stitches before marker): Knit 2 together, knit 2 (the marker sits in the middle of these 2 stitches), slip 1 stitch as if to knit, knit 1, pass the slipped stitch over the knitted stitch. ---------------------------------------------------------- MITTENS: The piece is worked in the round with double pointed needles. RIGHT MITTEN: Cast on 48 stitches with double pointed needles size 3 mm and Karisma and knit 1 round. Then work rib (= knit 2 / purl 2) for 7 cm. The next row is worked as follows: * Knit 2, purl 2 together, knit 2, purl 2 *, repeat from *-* 2 more times, knit 2, purl 2, knit 2, A.1 over the next 14 stitches, knit 2, purl 2 together = 50 stitches. Change to double pointed needles size 3.5 mm and work the next round as follows: Knit 26 (= inside of hand), A.2 (= 20 stitches) and knit 4 stitches. Continue the pattern in this way. REMEMBER THE KNITTING TENSION! When the piece measures 14 cm increase 1 stitch on each side of the first stitch on the round for the thumb – read INCREASE TIP above. Increase in this way on each side of the increased stitches every 2nd round 5 more times = 62 stitches. Now place the 13 thumb stitches on 1 thread. Continue in the round as before and cast on 1 new stitch behind the thumb on the next round = 50 stitches. When the mitten measures approx. 26 cm (you can try the mitten on, there are 3 cm left to finished length), insert 1 marker after the first stitch on the round and 1 marker after 24 stitches. Now decrease 1 stitch on each side of both markers – read DECREASE TIP above. Decrease in this way every 2nd round a total of 3 times and then every round a total of 2 times - in addition, decrease 2 stitches on each cable = 24 stitches. Knit together all stitches 2 and 2 = 12 stitches. Knit all stitches together again 2 and 2 = 6 stitches. Cut the strand, pull it through the remaining stitches, tighten and fasten well. THUMB: Place the 13 thumb stitches from the thread back on double pointed needles size 3.5 mm. In addition, knit up 3 stitches at the back of the thumb = 16 stitches. Work stocking stitch in the round until the thumb measures approx. 5 cm (you can try the mitten on, there is ½ cm left to finished length). Knit 2 rounds and knit all stitches together 2 and 2 on both rounds = 4 stitches left on the needle. Cut the strand, pull it through the remaining stitches, tighten and fasten well. LEFT MITTEN: Cast on and work as for right mitten, but increase to thumb on each side of the 22nd stitch on the round. |
|||||||||||||
Diagram explanations |
|||||||||||||
|
|||||||||||||
 |
|||||||||||||
Have you finished this pattern?Tag your pictures with #dropspattern #morgenfrostmittens or submit them to the #dropsfan gallery. Do you need help with this pattern?You'll find 23 tutorial videos, a Comments/Questions area and more by visiting the pattern on garnstudio.com. © 1982-2026 DROPS Design A/S. We reserve all rights. This document, including all its sub-sections, has copyrights. Read more about what you can do with our patterns at the bottom of each pattern on our site. |
|||||||||||||


With over 40 years in knitting and crochet design, DROPS Design offers one of the most extensive collections of free patterns on the internet - translated to 17 languages. As of today we count 325 catalogues and 12298 patterns translated into English (UK/cm). 12298
We work hard to bring you the best knitting and crochet have to offer, inspiration and advice as well as great quality yarns at incredible prices! Would you like to use our patterns for other than personal use? You can read what you are allowed to do in the Copyright text at the bottom of all our patterns. Happy crafting!
Post a comment to pattern DROPS 185-18
We would love to hear what you have to say about this pattern!
If you want to leave a question, please make sure you select the correct category in the form below, to speed up the answering process. Required fields are marked *.