
Popular categories
Looking for a yarn?


Comments / Questions (17)
![]() Brigitte wrote:
Brigitte wrote:
Bonjour. Comment avoir les explications pour tricoter votre jolie chenille svp?
24.01.2026 - 15:11DROPS Design answered:
Bonjour Brigitte, retrouvez les explications de cette chenille ici, en français. Bon tricot!
26.01.2026 - 08:20
![]() Elsa wrote:
Elsa wrote:
En tosiaankaan tekisi tuollaista hyi!
03.01.2026 - 11:42
![]() Refah Konrad wrote:
Refah Konrad wrote:
Wie nähe ich die Abkettkante am Kopf so zusammen, dass ich einen runden Kopf bekomme?
27.12.2025 - 07:41
![]() Anna wrote:
Anna wrote:
Moi! Haluaisin kysyä että miten nuo silmät oikein tehdään? Olen nimittäin juuri äskettäin vasta aloittanut kutomisen.
21.05.2025 - 20:39DROPS Design answered:
Hei, silmät kirjotaan valmiiseen työhön. Voit käyttää esim. etupistoja ja ranskalaisia solmuja. Katso myös verkkosivujemme ohjevideoita, joissa näytämme, miten ommellaan erilaisia pistoja.
22.05.2025 - 16:32
![]() Julie wrote:
Julie wrote:
Hej! Hvilket mærke af garn bruger du?
26.03.2025 - 09:45DROPS Design answered:
Hej Julie, den strikkes i DROPS Merino Extra Fine :)
27.03.2025 - 13:46
![]() Angèle wrote:
Angèle wrote:
Bonjour, Je viens de faire la chenille, mais je ne comprends pas comment faire les oreilles. Qu'entends vous par faufiler quelques mailles autour du coin de la tête. Merci pour votre explication. Cordialement.
21.03.2025 - 15:03DROPS Design answered:
Bonjour Angèle, passez un fil dans les mailles dans chaque coin de la tête (comme lorsque l'on faufile), ainsi vous allez "séparer" une petite portion du coin et en serrant le fil, vous allez former une petite boule = l'oreille. Bonne continuation!
21.03.2025 - 15:33
![]() Jie wrote:
Jie wrote:
您好,这是一项非常好的工作,我已经尝试过几次了,谢谢您。
05.03.2025 - 09:59
![]() Nefasa wrote:
Nefasa wrote:
Moi! Kiva työ. :)
05.03.2025 - 09:55
![]() Anne-Christine Sundberg wrote:
Anne-Christine Sundberg wrote:
Kan man sticka kålmasken som en tub med rundsticka istället för att sy ihop den?
13.11.2024 - 12:17DROPS Design answered:
Hei Anne-Christine. Ja, det kan du. Bare tilpasse oppskriften slik at den stemmer med det som står i oppskriften (f.eks at det strikkes 1 omgang rett og 1 omgang vrang (rätstickning) og ikke räta på alla varv). mvh DROPS Design
18.11.2024 - 11:46
![]() Marga wrote:
Marga wrote:
Como se hace el cambio de color al tejer a rayas? Tengo entendido que en un trabajo tejido por ejemplo a punto de musgo ,el primer punto de cada hilera se pasa sin tejer ,excepto el primero.Mi pregunta es : Si estoy tejiendo una bufanda a rayas de 10 cm cada color ,trabajo siempre el primer punto ?o solo cuando cambio de color?.Gracias
13.11.2022 - 17:40DROPS Design answered:
Hola Marga, puedes ver el siguiente vídeo sobre cómo cambiar de color: https://www.garnstudio.com/video.php?id=64&lang=es.
14.11.2022 - 00:33
|
|
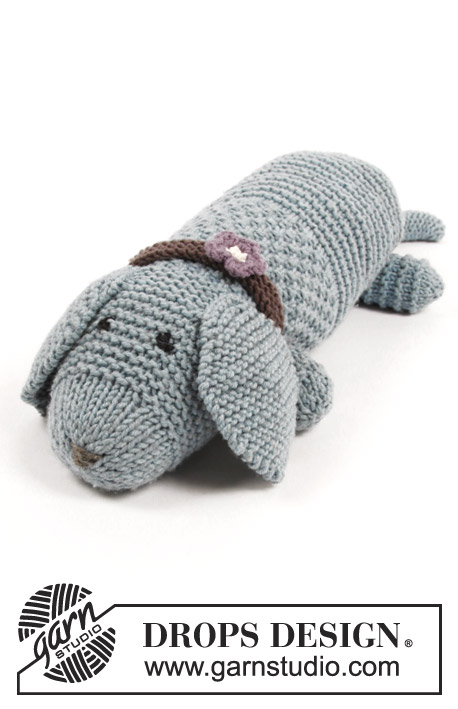
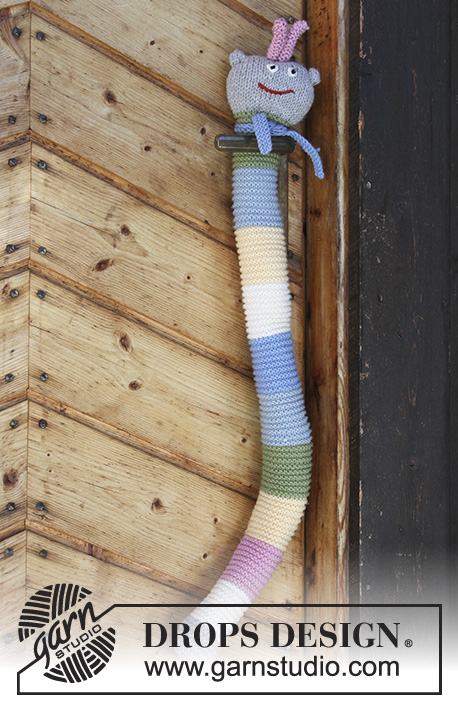
Arnie the Caterpillar#dropsarniethecaterpillar |
|
 |
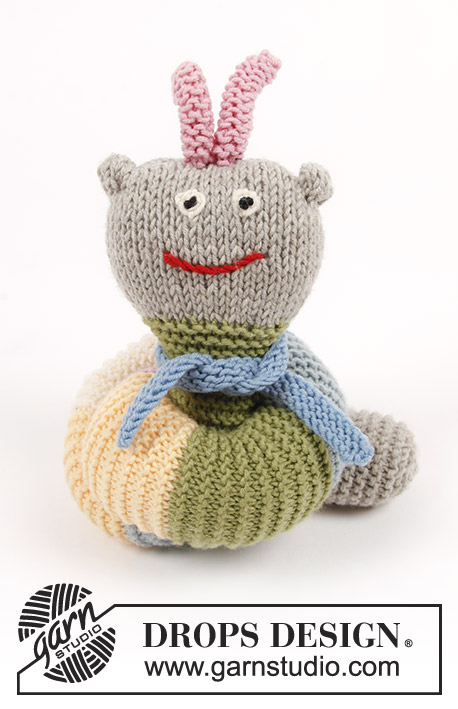 |
Knitted toy caterpillar with garter stitch and stripes. The piece is worked in DROPS Merino Extra Fine.
DROPS Children 30-23 |
|
|
INFORMATION FOR THE PATTERN: RIDGE/GARTER STITCH (worked back and forth): 1 ridge = Knit 2 rows. INCREASE TIP: Increase 1 stitch by making 1 yarn over. On the next row knit the yarn over twisted to prevent a hole. STRIPES: Work 5 cm garter stitch in each colour in the following order: off white, pink, light yellow, green, light greyish green, light grey blue, off white, light yellow, light greyish green, green. NOTE: Leave approx. 25-30 cm strand at each change of colour to sew the caterpillar together with. ---------------------------------------------------------- CATERPILLAR: The piece is worked back and forth on the needle to finished length and is sewn together at the end. BODY: Cast on 30 stitches with needle size 3.5 mm and light beige. Work GARTER STITCH – see description above. REMEMBER THE KNITTING TENSION! When the piece measures 5 cm, work STRIPES – see description above. After the last stripe, the piece measures approx. 55 cm. HEAD: Change to light beige and work stocking stitch back and forth as follows: ROW 1 (= right side): * Knit 2, 1 yarn over * work from *-* a total of 14 times and finish with knit 2 = 44 stitches. ROW 2 (= wrong side): Knit 1, purl until there is 1 stitch left (the yarn overs are purled twisted to prevent holes), finish with knit 1. Continue working stocking stitch with 1 edge stitch in garter stitch in each side until the head measures approx. 8 cm, cast off. The whole caterpillar measures approx. 63 cm from top down. Embroider small eyes with off white and black and a mouth with red mid front of head – see photo. ASSEMBLY: Sew the caterpillar together mid back in the outermost loop of the outermost stitch so that the seam is flat – NOTE: Each stripe is sewn together with the same colour. Fill the caterpillar with padding (push the padding in from both ends) so that it is the right softness. Sew the head together at the top, inside the cast-off edge. Tack a few stitches in the other end with light beige, up and down through the stitches around the opening, pull the strand tight to close the opening and fasten well. SCARF: Cast on 48 stitches with light grey blue. Knit 3 rows and cast off with knit. Tie the scarf around the neck, just below the head. FEELERS: Cast on 5 stitches with pink. Work garter stitch back and forth for 7 cm. Cut the strand (leave enough of the strand to be able to sew the feeler together). Pull the strand first through the 5 stitches on the needle, tighten so that the stitches are pulled together. Then (without cutting and fastening the strand) sew the feeler together along the edge in the outermost loop of the outermost stitch so that the seam is flat. When the seam has been sewn all the way down, pull slightly in the strand so that the tip of the feeler bends a little, fasten the strand well. Work another feeler in the same way and sew them on to the top-middle of the head with small stitches. EARS: Tack some stitches with light beige around the one corner at the top of the head. Tighten the strand to make a small ear and fasten the strand well. Work the other corner in the same way. |
|
Have you finished this pattern?Tag your pictures with #dropspattern #dropsarniethecaterpillar or submit them to the #dropsfan gallery. Do you need help with this pattern?You'll find 11 tutorial videos, a Comments/Questions area and more by visiting the pattern on garnstudio.com. © 1982-2026 DROPS Design A/S. We reserve all rights. This document, including all its sub-sections, has copyrights. Read more about what you can do with our patterns at the bottom of each pattern on our site. |
|


With over 40 years in knitting and crochet design, DROPS Design offers one of the most extensive collections of free patterns on the internet - translated to 17 languages. As of today we count 324 catalogues and 12290 patterns translated into English (UK/cm). 12290
We work hard to bring you the best knitting and crochet have to offer, inspiration and advice as well as great quality yarns at incredible prices! Would you like to use our patterns for other than personal use? You can read what you are allowed to do in the Copyright text at the bottom of all our patterns. Happy crafting!
Post a comment to pattern DROPS Children 30-23
We would love to hear what you have to say about this pattern!
If you want to leave a question, please make sure you select the correct category in the form below, to speed up the answering process. Required fields are marked *.