
Popular categories
Looking for a yarn?


Comments / Questions (88)
![]() Annette wrote:
Annette wrote:
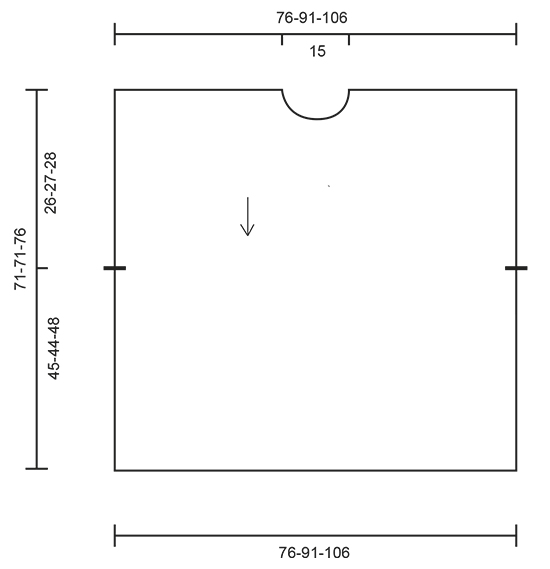
Hallo, ich häkle dieses Modell in der mittleren Größe - die Maschenprobe stimmt (91 cm), jedoch ist der Halsausschnitt sehr viel zu klein. Verstehe ich es richtig, dass die Verbindung vom linken zum rechten Schulterteil lediglich 15 Luftmaschen beträgt, oder habe ich etwas falsch verstanden? Vielen Dank und Gruß
11.03.2016 - 14:33DROPS Design answered:
Liebe Annette, der Abstand zwischen den Schultern beträgt 15 cm. zusammen mit der Tiefe des Ausschnitts (vorne und hinten) ergibt es die Ausschnittgrösse, die auf dem Foto und der Schnitteichnung gezeigt wird. Ich würde den Ausschnitt nicht grösser machen, damit der Poncho nicht über die Schultern rutscht.
14.03.2016 - 08:47
![]() Leonie Kooistra wrote:
Leonie Kooistra wrote:
Hoi! Ik ben begonnen aan deze poncho in de maat S/M. Ik kom echter na deel 1 uit op 185 stokjes ipv 155. Nu zag ik in het zweeds al een vraag over dit ontwerp op hetzelfde punt., misschien goed om het even na te kijken. Groetjes, Leonie
09.03.2016 - 15:29DROPS Design answered:
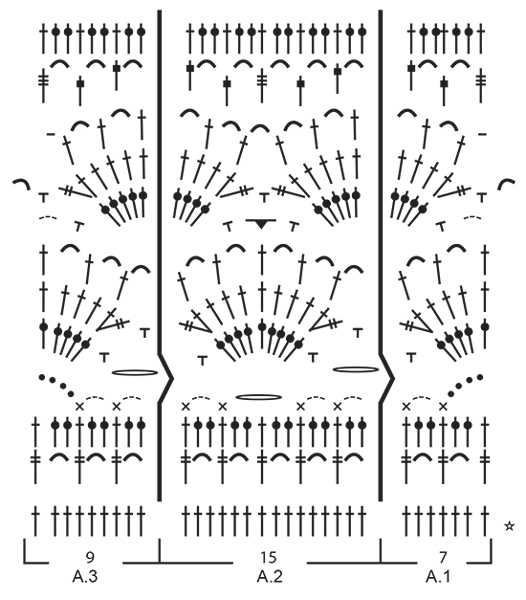
Hoi Leonie. Je begint en eindigt met 155 stk: 2 kantstk, A.1 (= 7 st), 135 st volgens A.2 (9 herhalingen), 9 st volgens A.3 en 2 kantstk. Het aantal verandert onderweg, maar in de laatste toer heb je weer hetzelfde aantal st.
11.03.2016 - 11:29
![]() Anna Wärlander wrote:
Anna Wärlander wrote:
Hej! jag Har börjat på denna poncho men får det inte att stämma. Har gjort hela första mönstret 1gång dvs början på framstycket och i strl L/XL ska det vara 185 stolpar och jag har många fler. Var kan jag ha gjort fel. Har tittat på mönstret flera gånger och hittar inget fel. MVH Anna
07.03.2016 - 17:01DROPS Design answered:
Hej Anna, Du virkar A.2 11 ggr och du har 15 st når du börjar diagrammet och även när du slutar diagrammet. Sätt i en märktråd efter varje rapport m 15 st, så ser du om du har rätt antal m i varje rapport. Lycka till!
08.03.2016 - 09:08
![]() Alejandra Rosillo Castro wrote:
Alejandra Rosillo Castro wrote:
Me encanta! Estaba deseando ver el patrón. Gracias!!!
13.02.2016 - 14:19
![]() Eva wrote:
Eva wrote:
Diese geniale Anleitung würde meine Kreativität für diese Saison vervollständigen. Ich warte ungeduldig darauf.
08.02.2016 - 08:50
![]() Mamita wrote:
Mamita wrote:
Superbe j'attends ses explications avec impatience
28.01.2016 - 08:35
![]() Yolanda wrote:
Yolanda wrote:
Cuando vais a publicar los patrones que faltan. Hay modelos que me gustan
24.01.2016 - 21:22
![]() Eva wrote:
Eva wrote:
Genial. Sehr vielseitig für die Sommergarderobe.
22.01.2016 - 10:14
![]() Everlien Van Driel wrote:
Everlien Van Driel wrote:
Echt leuk kan niet wachten op het patroon
11.01.2016 - 20:26
![]() Gitte Ammitzbøll Langholm wrote:
Gitte Ammitzbøll Langholm wrote:
Glæder mig til at komme igang. Den er fantastisk flot 😊
11.01.2016 - 16:16
|
|||||||||||||||||||||||||||||||||||||||||||||||||||||||||||||||||||
Graceful Mermaid#gracefulmermaidponcho |
|||||||||||||||||||||||||||||||||||||||||||||||||||||||||||||||||||
|
|
|||||||||||||||||||||||||||||||||||||||||||||||||||||||||||||||||||
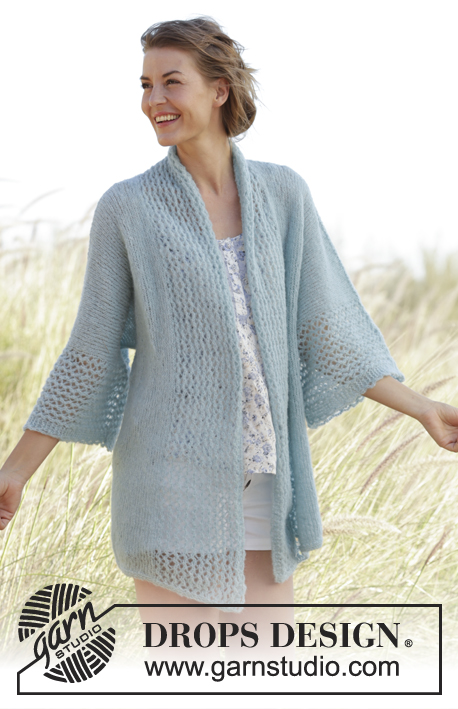
Crochet DROPS poncho with lace pattern, worked top down in ”Cotton Merino”. Size: S - XXXL.
DROPS 168-29 |
|||||||||||||||||||||||||||||||||||||||||||||||||||||||||||||||||||
|
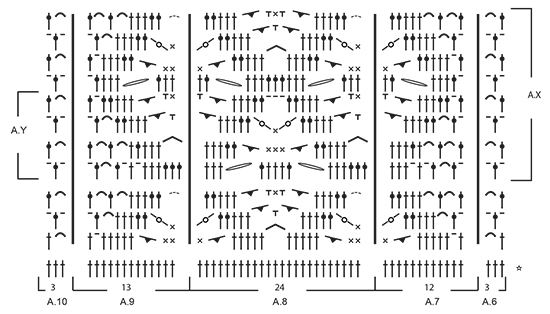
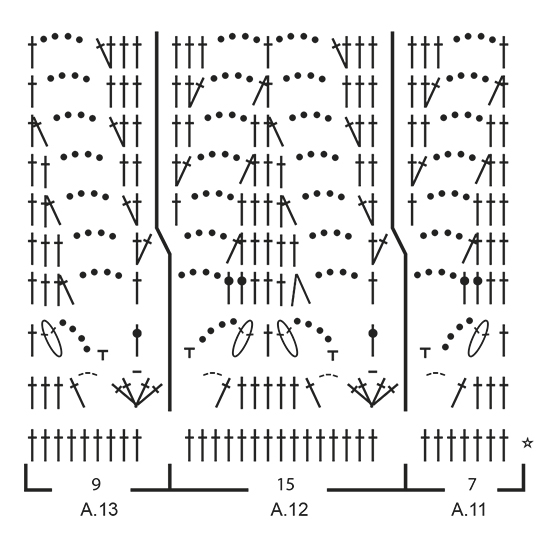
PATTERN: See diagrams A.1 to A.16. CROCHET INFO: Replace first tr at beg of every tr row with 3 ch. Replace first dtr at beg of every dtr row with 4 ch. Replace first dc at beg of every dc row with 1 ch. ---------------------------------------------------------- PONCHO: The poncho is the same at the front and back with opening in the sides. Work back and forth, top down. RIGHT SHOULDER - FRONT PIECE: Work 80-98-117 ch on hook size 3.5 mm with Cotton Merino. Turn and work 1 tr in 4th ch from hook (= 2 tr), 1 tr in each of the next 1-4-3 ch, * skip 1 ch, 1 tr in each of the next 4 ch *, repeat from *-* the entire row = 63-78-93 tr (incl 2 edge sts in the side). Work next row (= from RS) as follows: READ CROCHET INFO! 1 tr in each of the first 2 tr (= edge sts), A.1 over the next 7 tr, A.2 over the next 45-60-75 tr (=3-4-5 times), finish with A.4 over the next 9 tr. Work to and with 6th row. Put piece aside and work left shoulder. REMEMBER THE CROCHET TENSION! LEFT SHOULDER - FRONT PIECE: Work first row as on right shoulder - front piece = 63-78-93 tr. Work next row (= from RS) as follows: A.5 over the first 7 tr, A.2 over the next 45-60-75 tr (=3-4-5 times), A.3 over the next 9 tr, finish with 1 tr in each of the next 2 tr (= edge sts). Work to and with 6th row - NOTE: Fasten sl st at the end of A.5 in right shoulder so that the shoulder are fastened tog. Cut the yarn and beg to work from RS over both shoulders. FRONT PIECE: Continue on diagram (= 7th row), i.e. work next row (= from RS) as follows: 1 dc in each of the first 2 tr (= edge sts), A.1 over the next 7 tr, A.2 over the next 135-165-195 tr/ch (= 9-11-13 times) - NOTE: See last row in A.4/A.5 on how 7th row is worked over the middle 2 repetitions, A.3 over the next 9 tr, finish with 1 dc in each of the next 2 tr (= edge st). Work diagram A.1/A.2/A.3 1 time in total vertically (NOTE! You also begin and finish with 1 dc in first and last 2 dc's on row 8 and hereafter you work 1 tr in first 2 and last st on remaining rows)= 155-185-215 tr on last row. Work next row (= from WS) as follows: 1 tr in each of the first 2 tr, A.10 over the next 51-66-69 tr (= 17-22-23 times), A.9 over the next 13 tr, A.8 over the next 24-24-48 tr (= 1-1-2 times), A.7 over the next 12 tr, A.6 over the next 51-66-69 tr (= 17-22-23 times), finish with 1 tr in each of the next 2 tr. Work to and with 3rd row. Then work A.X 2-2-3 times in total vertically. Then work A.Y 1-1-0 times in total vertically. Work next row (= from RS) as follows: Work 1 tr in every tr/dc, 1 tr around every ch, 2 tr around every ch-space with 2 ch, 3 tr around every ch-space with 3 ch and 4 tr around every ch-space with 5 ch = 155-185-215 tr. Work next row (= from WS) as follows: Work 1 tr in each of the first 2 tr, A.3 over the next 9 tr, A.2 over the next 135-165-195 tr (= 9-11-13 times), A.1 over the next 7 tr, finish with 1 tr in each of the next 2 tr. Work A.3/A.2/A.1 1 time in total vertically = 155-185-215 tr on last row. Work next row (= from RS) as follows: Work 1 tr in each of the first 2 tr, A.11 over the next 7 tr, A.12 over the next 135-165-195 tr (= 9-11-13 times), A.13 over the next 7 tr, finish with 1 tr in each of the next 2 tr. Work A.11/A.12/A.13 1 time in total vertically. Work next row (= from WS) as follows: Work 1 tr in each of the first 2 tr, A.16 over A.13, A.15 over A.12 and A.14 over A.11. Then work 4th and 5th row in A.1/A.2/A.3, i.e. work next row (= from RS) as follows: Work 1 tr in each of the first 2 tr, A.1 over A.14, A.2 over A.15, A.3 over A.16, finish with 1 tr in each of the next 2 tr. Fasten off. LEFT SHOULDER - BACK PIECE: Work in left shoulder on front piece but in opposite direction, beg from WS. Instead of working ch and first tr-row work as follows: Work 1 dc in each of the 78-93-108 tr. Then work as right shoulder - front piece. RIGHT SHOULDER - BACK PIECE: Work in right shoulder on front piece but in opposite direction, beg from WS. Instead of working ch and first tr-row work as follows: Work 1 dc in each of the 78-93-108 tr. Then work as left shoulder - front piece. BACK PIECE: Continue as on front piece. NECK EDGE: Beg on one shoulder, work as follows along the entire neck from RS: 2 dc around every tr-row, 1 ch, 3 dc around every dtr row/ch-space, 1 ch etc. Finish with 1 sl st in first dc. Fasten off. TWINED STRING: Cut 2 lengths Cotton Merino yarn of 6 metres each. Twine the strands tog until they resist, fold the string double so that it twines again. Tie a knot in each end and thread it through a hole in the side on front and back piece, approx. 26-27-28 cm down from shoulder, tie a bow. Make another string and fasten it to the other side of poncho. |
|||||||||||||||||||||||||||||||||||||||||||||||||||||||||||||||||||
Diagram explanations |
|||||||||||||||||||||||||||||||||||||||||||||||||||||||||||||||||||
|
|||||||||||||||||||||||||||||||||||||||||||||||||||||||||||||||||||
 |
|||||||||||||||||||||||||||||||||||||||||||||||||||||||||||||||||||
 |
|||||||||||||||||||||||||||||||||||||||||||||||||||||||||||||||||||
 |
|||||||||||||||||||||||||||||||||||||||||||||||||||||||||||||||||||
 |
|||||||||||||||||||||||||||||||||||||||||||||||||||||||||||||||||||
 |
|||||||||||||||||||||||||||||||||||||||||||||||||||||||||||||||||||
Have you finished this pattern?Tag your pictures with #dropspattern #gracefulmermaidponcho or submit them to the #dropsfan gallery. Do you need help with this pattern?You'll find 9 tutorial videos, a Comments/Questions area and more by visiting the pattern on garnstudio.com. © 1982-2026 DROPS Design A/S. We reserve all rights. This document, including all its sub-sections, has copyrights. Read more about what you can do with our patterns at the bottom of each pattern on our site. |
|||||||||||||||||||||||||||||||||||||||||||||||||||||||||||||||||||


With over 40 years in knitting and crochet design, DROPS Design offers one of the most extensive collections of free patterns on the internet - translated to 17 languages. As of today we count 324 catalogues and 12245 patterns translated into English (UK/cm). 12245
We work hard to bring you the best knitting and crochet have to offer, inspiration and advice as well as great quality yarns at incredible prices! Would you like to use our patterns for other than personal use? You can read what you are allowed to do in the Copyright text at the bottom of all our patterns. Happy crafting!
Post a comment to pattern DROPS 168-29
We would love to hear what you have to say about this pattern!
If you want to leave a question, please make sure you select the correct category in the form below, to speed up the answering process. Required fields are marked *.