Comments / Questions (88)
![]() CHEVALLIER Ursula wrote:
CHEVALLIER Ursula wrote:
Important !!!!! bonjour, plusieurs femmes avec moi ont trouvé 185 B en rg 12 au lieu de 155 B , avant de commencer A6-A10. L'erreur est dans le 1ier rang: 63 B....mais sur 78 mailles qui vont donner 78 B en rg 3 !!! calculez comme suit: 2 x 78 b (l'épaule d + g)= 156 B + (2 x 7 = 14 B (l'arrondissement du cou entre rg 4 et rg 7 )= 170 B + 15 (= les 15 ml pour la connexion entre A4 et A5 en rg 7) = 185 !!! Veuilllez corriger svp.
14.05.2018 - 16:01DROPS Design answered:
Bonjour Mme Chevallier, au 1er rang vous devez avoir 63 brides sur les 80 ml: 1 bride dans la 4ème ml (= 2 brides / 4 ml), 1 bride dans la ml suivante, puis (on saute 1ml, et on crochète 1 bride dans chacune des 4 ml suivantes) x 15 (= on va crocheter 15 x 4 brides au-dessus de 15 x 5 ml soit 60 brides au-dessus de 75 ml), on a donc bien 63 brides sur 80 ml. Bon crochet!
15.05.2018 - 10:09
![]() CHEVALLIER Ursula wrote:
CHEVALLIER Ursula wrote:
Merci de votre réponse; en effet j'ai 176 brides au lieu de 155 avant de commencer A6-A10 ! J'ai du faire une erreur après le rg 8 , car je tombe un peu près juste avec les motifs : 12 ! comme je constate sur la photo.
14.05.2018 - 11:19
![]() Ursula CHEVALLIER wrote:
Ursula CHEVALLIER wrote:
Bonjour, c\\\\\\\'est la 3ième fois que je commence ce modèle (taille S/M) Je viens de commencer A6, A7, A8, A9 et A10. Le 1ier rang (tout en brides) est fait. Si je compte pour A6 et A10 à chaque fois 51 brides + les 2 brides du bord= 53 brides de chaque côté. Pour crocheter A7, A8 et A9 dans le milieu du modèle = sur 49 brides en tout , or j'ai 75 brides ....donc 26 brides de trop . Je ne trouve pas l'erreur. Pouvez-vous m'aider ? Merci d'avance
12.05.2018 - 00:35DROPS Design answered:
Bonjour Mme Chevalier, aviez-vous bien 155 brides avant de commencer? car la suite tombe juste sur ce nombre de mailles: vous avez bien 53 brides (= 2 brides + 51 brides de A.10/A.6) de chaque côté des 49 m centrales (A.9, A.8 et A.7) - (soit 53+49+53=155). Bon crochet!
14.05.2018 - 09:15
![]() Alex wrote:
Alex wrote:
In patroon staat a.x en a.y haken echter geen idee wat ik dan moet haken staat niet beschreven of ik lees er over heen
19.04.2018 - 20:59
![]() Nancy wrote:
Nancy wrote:
Beste, Heb al meerdere patronen mét succes gemaakt. Deze beschrijving lijkt nergens op. Jammer, want het is een prachtige poncho. Ik ga op zoek naar een ander patroon voor dit garen!
09.07.2017 - 15:44
![]() Karina wrote:
Karina wrote:
Jeg giver op. Har hæklet forstykket og trevlet op fordi hullet til halsen ikke var stort nok. Er gået en nål op, startet HELT forfra og hullet til halsen er stadig så lille at hovedet ikke kan komme igennem. :(
30.06.2017 - 17:30
![]() Kelly wrote:
Kelly wrote:
Ik kom maar niet verder met dit patroon, ik maak steeds een fout bij de 6e toer. Moet ik op de goede kant van rechts naar links werken en op de andere kant van links naar rechts? En waarom moet er aan het eind van de linkerschouder voorpand met een hv aan de rechterschouder worden verbonden? Hopelijk kan ik snel weer verder want ik kijk er naar uit om deze mooie poncho te maken.
22.06.2017 - 16:49DROPS Design answered:
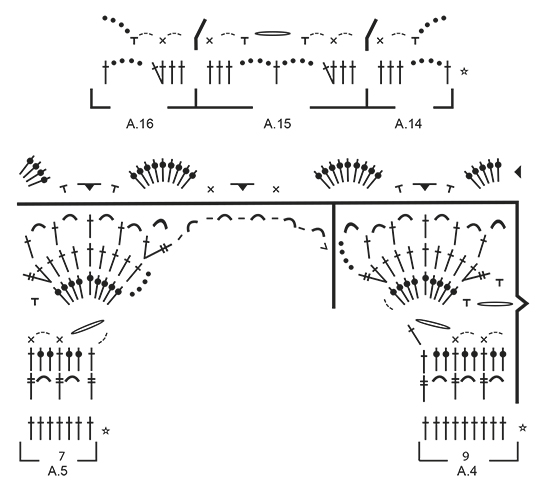
Hoi Kelly, Voor het rechter schouder kijk je bij telpatroon A.4 (voor het linker schouder bij telpatroon A.5 = gespiegeld). Toer 1 van het telpatroon haak je op de goede kant en dat geldt voor alle oneven toeren. Toer 6 haak je op de verkeerde kant. Als je rechtshandig bent haak je van rechts naar links, je keert het werk en haakt weer van rechts naar links, alleen ben je dan op de andere kant van het werk. Nadat je het rechter schouder hebt gemaakt, laat je deze rusten en haak je het linker schouder. Aan het eind van het linker schouder en na toer 6 verbind je de beide schouders midden voor met een halve vaste.
25.06.2017 - 20:00
![]() Katja wrote:
Katja wrote:
När man gör axel- framstycke så ska man virka tom varv 6, vilket varv räknar ni som varv 6? Är första varvet det varv man gör direkt efter luftmaskorna eller är första varvet det varv som är efter stjärnmarkeringen i diagrammet.Efter varv 6 skriver ni att man gör en sm i slutet på A5 som virkas fast i höger axel, men axlarna kan väl inte virkas ihop utan luftmaskor för halsen?
13.06.2017 - 10:07DROPS Design answered:
Hej! Varven räknas från och med det första varvet i diagrammet. När du virkar samman vänster och höger axel kan du se hur det virkas på mitten av arb i det sista varvet i diagram A.4/A.5.
20.06.2017 - 14:06
![]() Karina wrote:
Karina wrote:
Tak for svar, som ikke svarer på mit spørgsmål. Måske du misforstår mig. Jeg omformulerer: Når jeg hækler str. L/XL hvor mange gange skal jeg lave AX i højden? 2 eller 3 gange? Det ser for mig ud til at der er en fejl i opskriften. Den er i 3 str. S/M - L/XL - XXL/XXXL (x-x-x). Men vejledningen i AX ser ud til at referere til 4 str. (x-x-x-x).
07.06.2017 - 12:59DROPS Design answered:
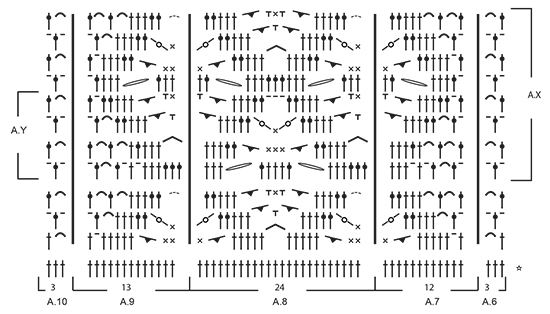
Hei Karina. Ser nå hva du mener og ja, her er det en str for mye. Du skal hekle (str.L/XL) A.X totalt 2 ganger i høyden. Deretter hekles A.Y totalt 1 ganger i høyden. Vi vil lage en rettelse asap. Takk for at du oppmerksom på feilen og god fornøyelse videre på denne flotte ponchoen.
08.06.2017 - 08:14
![]() Karina wrote:
Karina wrote:
Jeg forstår ikke antal gentagelser i hhv AX og AY. Opskriften er i 3 str. Og i AX og AY nævnes nu 4 str. Jeg hækler str. L/XL. Skal jeg gentage AX 2 eller 3 gange?
06.06.2017 - 19:03DROPS Design answered:
Hei Karina. Der det står: "Derefter hækles A.X totalt 2-2-3-3 gange i højden. Derefter hækles A.Y totalt 1-1-0-0 gange i højden.". Dette gjelder hvor mange ganger det skal hekles i høyden (og har ikke noe med størrelser å gjøre). God Fornøyelse!
07.06.2017 - 09:44
Graceful Mermaid#gracefulmermaidponcho |
|||||||||||||||||||||||||||||||||||||||||||||||||||||||||||||||||||
|
|
|||||||||||||||||||||||||||||||||||||||||||||||||||||||||||||||||||
Crochet DROPS poncho with lace pattern, worked top down in ”Cotton Merino”. Size: S - XXXL.
DROPS 168-29 |
|||||||||||||||||||||||||||||||||||||||||||||||||||||||||||||||||||
|
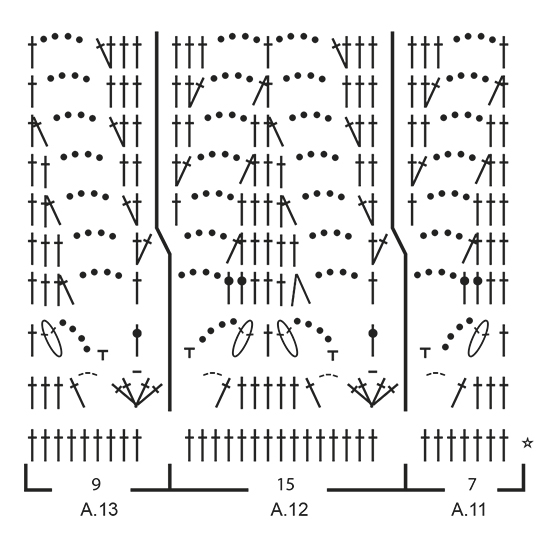
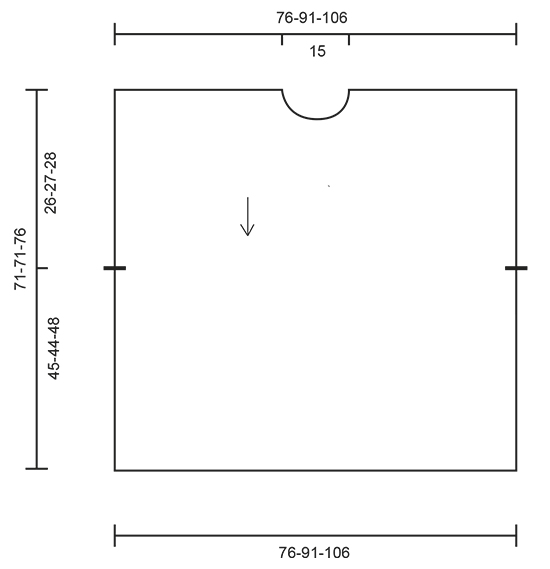
PATTERN: See diagrams A.1 to A.16. CROCHET INFO: Replace first tr at beg of every tr row with 3 ch. Replace first dtr at beg of every dtr row with 4 ch. Replace first dc at beg of every dc row with 1 ch. ---------------------------------------------------------- PONCHO: The poncho is the same at the front and back with opening in the sides. Work back and forth, top down. RIGHT SHOULDER - FRONT PIECE: Work 80-98-117 ch on hook size 3.5 mm with Cotton Merino. Turn and work 1 tr in 4th ch from hook (= 2 tr), 1 tr in each of the next 1-4-3 ch, * skip 1 ch, 1 tr in each of the next 4 ch *, repeat from *-* the entire row = 63-78-93 tr (incl 2 edge sts in the side). Work next row (= from RS) as follows: READ CROCHET INFO! 1 tr in each of the first 2 tr (= edge sts), A.1 over the next 7 tr, A.2 over the next 45-60-75 tr (=3-4-5 times), finish with A.4 over the next 9 tr. Work to and with 6th row. Put piece aside and work left shoulder. REMEMBER THE CROCHET TENSION! LEFT SHOULDER - FRONT PIECE: Work first row as on right shoulder - front piece = 63-78-93 tr. Work next row (= from RS) as follows: A.5 over the first 7 tr, A.2 over the next 45-60-75 tr (=3-4-5 times), A.3 over the next 9 tr, finish with 1 tr in each of the next 2 tr (= edge sts). Work to and with 6th row - NOTE: Fasten sl st at the end of A.5 in right shoulder so that the shoulder are fastened tog. Cut the yarn and beg to work from RS over both shoulders. FRONT PIECE: Continue on diagram (= 7th row), i.e. work next row (= from RS) as follows: 1 dc in each of the first 2 tr (= edge sts), A.1 over the next 7 tr, A.2 over the next 135-165-195 tr/ch (= 9-11-13 times) - NOTE: See last row in A.4/A.5 on how 7th row is worked over the middle 2 repetitions, A.3 over the next 9 tr, finish with 1 dc in each of the next 2 tr (= edge st). Work diagram A.1/A.2/A.3 1 time in total vertically (NOTE! You also begin and finish with 1 dc in first and last 2 dc's on row 8 and hereafter you work 1 tr in first 2 and last st on remaining rows)= 155-185-215 tr on last row. Work next row (= from WS) as follows: 1 tr in each of the first 2 tr, A.10 over the next 51-66-69 tr (= 17-22-23 times), A.9 over the next 13 tr, A.8 over the next 24-24-48 tr (= 1-1-2 times), A.7 over the next 12 tr, A.6 over the next 51-66-69 tr (= 17-22-23 times), finish with 1 tr in each of the next 2 tr. Work to and with 3rd row. Then work A.X 2-2-3 times in total vertically. Then work A.Y 1-1-0 times in total vertically. Work next row (= from RS) as follows: Work 1 tr in every tr/dc, 1 tr around every ch, 2 tr around every ch-space with 2 ch, 3 tr around every ch-space with 3 ch and 4 tr around every ch-space with 5 ch = 155-185-215 tr. Work next row (= from WS) as follows: Work 1 tr in each of the first 2 tr, A.3 over the next 9 tr, A.2 over the next 135-165-195 tr (= 9-11-13 times), A.1 over the next 7 tr, finish with 1 tr in each of the next 2 tr. Work A.3/A.2/A.1 1 time in total vertically = 155-185-215 tr on last row. Work next row (= from RS) as follows: Work 1 tr in each of the first 2 tr, A.11 over the next 7 tr, A.12 over the next 135-165-195 tr (= 9-11-13 times), A.13 over the next 7 tr, finish with 1 tr in each of the next 2 tr. Work A.11/A.12/A.13 1 time in total vertically. Work next row (= from WS) as follows: Work 1 tr in each of the first 2 tr, A.16 over A.13, A.15 over A.12 and A.14 over A.11. Then work 4th and 5th row in A.1/A.2/A.3, i.e. work next row (= from RS) as follows: Work 1 tr in each of the first 2 tr, A.1 over A.14, A.2 over A.15, A.3 over A.16, finish with 1 tr in each of the next 2 tr. Fasten off. LEFT SHOULDER - BACK PIECE: Work in left shoulder on front piece but in opposite direction, beg from WS. Instead of working ch and first tr-row work as follows: Work 1 dc in each of the 78-93-108 tr. Then work as right shoulder - front piece. RIGHT SHOULDER - BACK PIECE: Work in right shoulder on front piece but in opposite direction, beg from WS. Instead of working ch and first tr-row work as follows: Work 1 dc in each of the 78-93-108 tr. Then work as left shoulder - front piece. BACK PIECE: Continue as on front piece. NECK EDGE: Beg on one shoulder, work as follows along the entire neck from RS: 2 dc around every tr-row, 1 ch, 3 dc around every dtr row/ch-space, 1 ch etc. Finish with 1 sl st in first dc. Fasten off. TWINED STRING: Cut 2 lengths Cotton Merino yarn of 6 metres each. Twine the strands tog until they resist, fold the string double so that it twines again. Tie a knot in each end and thread it through a hole in the side on front and back piece, approx. 26-27-28 cm down from shoulder, tie a bow. Make another string and fasten it to the other side of poncho. |
|||||||||||||||||||||||||||||||||||||||||||||||||||||||||||||||||||
Diagram explanations |
|||||||||||||||||||||||||||||||||||||||||||||||||||||||||||||||||||
|
|||||||||||||||||||||||||||||||||||||||||||||||||||||||||||||||||||
 |
|||||||||||||||||||||||||||||||||||||||||||||||||||||||||||||||||||
 |
|||||||||||||||||||||||||||||||||||||||||||||||||||||||||||||||||||
 |
|||||||||||||||||||||||||||||||||||||||||||||||||||||||||||||||||||
 |
|||||||||||||||||||||||||||||||||||||||||||||||||||||||||||||||||||
 |
|||||||||||||||||||||||||||||||||||||||||||||||||||||||||||||||||||
Have you finished this pattern?Tag your pictures with #dropspattern #gracefulmermaidponcho or submit them to the #dropsfan gallery. Do you need help with this pattern?You'll find 9 tutorial videos, a Comments/Questions area and more by visiting the pattern on garnstudio.com. © 1982-2026 DROPS Design A/S. We reserve all rights. This document, including all its sub-sections, has copyrights. Read more about what you can do with our patterns at the bottom of each pattern on our site. |
|||||||||||||||||||||||||||||||||||||||||||||||||||||||||||||||||||


Post a comment to pattern DROPS 168-29
We would love to hear what you have to say about this pattern!
If you want to leave a question, please make sure you select the correct category in the form below, to speed up the answering process. Required fields are marked *.