
Popular categories
Looking for a yarn?


Comments / Questions (31)
![]() Delia wrote:
Delia wrote:
Sono arrivata allo scalfo ma non ho capito cosa vuol dire "lavorare 2 coste sulle 17 maglie...". In pratica cosa devo fare, considerando anche il numero dispari di maglie?
12.03.2024 - 14:27DROPS Design answered:
Buongiorno Delia, 1 costa sono 2 ferri a maglia legaccio, come indicato nelle spiegazioni. Buon lavoro!
12.03.2024 - 16:03
![]() E M wrote:
E M wrote:
I have just completed the back of this - in the pattern it says after 7 repeat a4 and a1 alternating but the picture goes straight from 7 to a1. Have I misunderstood?
26.05.2023 - 13:56DROPS Design answered:
Dear E M, the photo is for a size M. Since there wasn't much space for a full repeat of both charts, the designer simply chose one of them to finish off. If you only have space for one chart, then you can repeat whichever you prefer. However, if you have space for more than 1 chart repeat, it'd be better to follow the sequence of A.4 and A.1 alternately, starting with A.4. This would match the sequence from before, when you had: new chart A.1, A.4, new chart, A.4, A.1, new chart, A.1, A.4, new chart. Happy knitting!
28.05.2023 - 19:37
![]() Marita wrote:
Marita wrote:
Hallo, wenn ich dieses Shirt länger machen möchte welcher Teil des Musters eignet sich am besten dazu? Ich habe so an 10 bis 15 cm länger gedacht
07.07.2022 - 18:43DROPS Design answered:
Liebe Marita, leider können wir nicht jede Anleitung nach jeder Anfrage anpassen - gerne kann Ihnen aber Ihr DROPS Laden damit -auch per E-Mail or Telefon - weiterhelfen. Danke im voraus für Ihr Verständnis. Viel Spaß beim stricken!
08.07.2022 - 09:51
![]() Claudine Azoulay wrote:
Claudine Azoulay wrote:
Ce modèle est pas mal compliqué et il faut être très attentive en le réalisant, certainement pas en regardant la télévision!!! J'ai tricoté le dos en jersey avec une bande de trous de part et d'autre, car je n'avais pas le courage de refaire tous ces motifs. Je l'ai tricoté en rose fuchsia mais je crois que le résultat est plus intéressant et que le motif ressort plus si on utilise du fil blanc ou d'une couleur claire.
15.04.2022 - 22:42
![]() Adoracion wrote:
Adoracion wrote:
Tengo que hacer 14 hileras del diagrama A1 y despues canviar al A2? En la foto se ve el calado antes de la 7 fila,no estoy interpretando bien los diagramas?
23.03.2022 - 19:25DROPS Design answered:
Hola Adoración, el diagrama es correcto, tienes que trabajar las 14 filas de A.1.
26.03.2022 - 19:29
![]() Claudia Mesquita wrote:
Claudia Mesquita wrote:
It seems to me, the pattern description between markers A and B does not really match the image of the garment. Shouldn't we knit rows in garter stitch between A.4 and A.5, between A.5 and A.4 and so on? Also, shouldn't the number of repetitions vary according to the size being knitted? The instructions do not account for that. Finally, we see there are regular decreases from bottom up that shape the garment. How should de decreases be done? Thanks for the feedback.
20.10.2021 - 21:36DROPS Design answered:
Dear Mrs Mesquita, the garter stitch rows between diagrams are drawn in the diagrams, see for example the last 4 rows in A.4 = you will knit them from RS (white square) and knit them from WS (small line) = 2 ridges. Decreases are explained under DECREASE TIP-1 (applies to sides of body): at the beg of the pattern. Happy knitting!
21.10.2021 - 07:09
![]() Sandra wrote:
Sandra wrote:
Bonjour, Pensez vous que ce modèle puisse être réaliser en une seule partie (avec des aiguilles circulaires) jusqu’au emmanchures ? (en faisant A2B et A2A à la suite sur les cotés sans mousse)
30.06.2021 - 18:00DROPS Design answered:
Bonjour Sandra, probablement, pensez à bien adapter votre nombre de mailles en conséquence - il vous faudra tricoter le point mousse avant les emmanchures (il sert de bordure d'emmanchure avant de rabattre les mailles). N'hésitez pas à demander conseil à votre magasin pour toute assistance individuelle. Bon tricot!
01.07.2021 - 08:49
![]() Lisbeth wrote:
Lisbeth wrote:
Jeg er ved at strikke mønster hvor man anvender diag A.5. Og når man har strikket A5 een gang skal man i strikningen tage ind. Derefter er der overskrifter med først “indtagning i siderne” efter 6 cm!! Hvornår er det?? Herefter er der indtagninger for ærmegab og hals. Men det er de der indt. I siderne jeg undrer mig over
22.06.2020 - 20:19DROPS Design answered:
Hej Lisbeth, Samtidig som du strikker MØNSTER står det LÆS HELE AFSNITTET FØR DET STRIKKES VIDERE det er fordi at samtidig som du strikker mønster skal der tages ind i siderne når arbejdet måler 6 cm og det skal du gøre for hver 6.eller4.cm (ifølge din størrelse) God fornøjelse!
25.06.2020 - 09:17
![]() Josien wrote:
Josien wrote:
Hallo, Er staat tussen markeerders a en b een kantrand breien, wordt hiermee patroon a4 bedoelt? Ik snap het niet helemaal. Alvast bedankt.
06.02.2020 - 14:40DROPS Design answered:
Dag Josien,
Deze kantrand tussen de markeerders is het middengedeelte van het achterpand en als je verder leest bij 'LEES ALLE ONDERSAANDE...etc, wordt uitgelegd hoe je deze kantrand breit.
09.02.2020 - 11:07
![]() Thea wrote:
Thea wrote:
Bijna toe aan het armsgat, dan pas de alinea over het minderen vanaf 6 cm. Waarom wordt dit niet vermeld in de eerste alinea? Nu weer opnieuw beginnen
01.03.2019 - 15:43DROPS Design answered:
Dag Thea,
Dat is inderdaad jammer. Er staat halverwege de tekst wel dat je alle onderstaande aanwijzingen door moet lezen voordat je verder gaat.
05.03.2019 - 20:42
|
|||||||||||||||||||
Erica Singlet#ericasinglet |
|||||||||||||||||||
|
|
|||||||||||||||||||
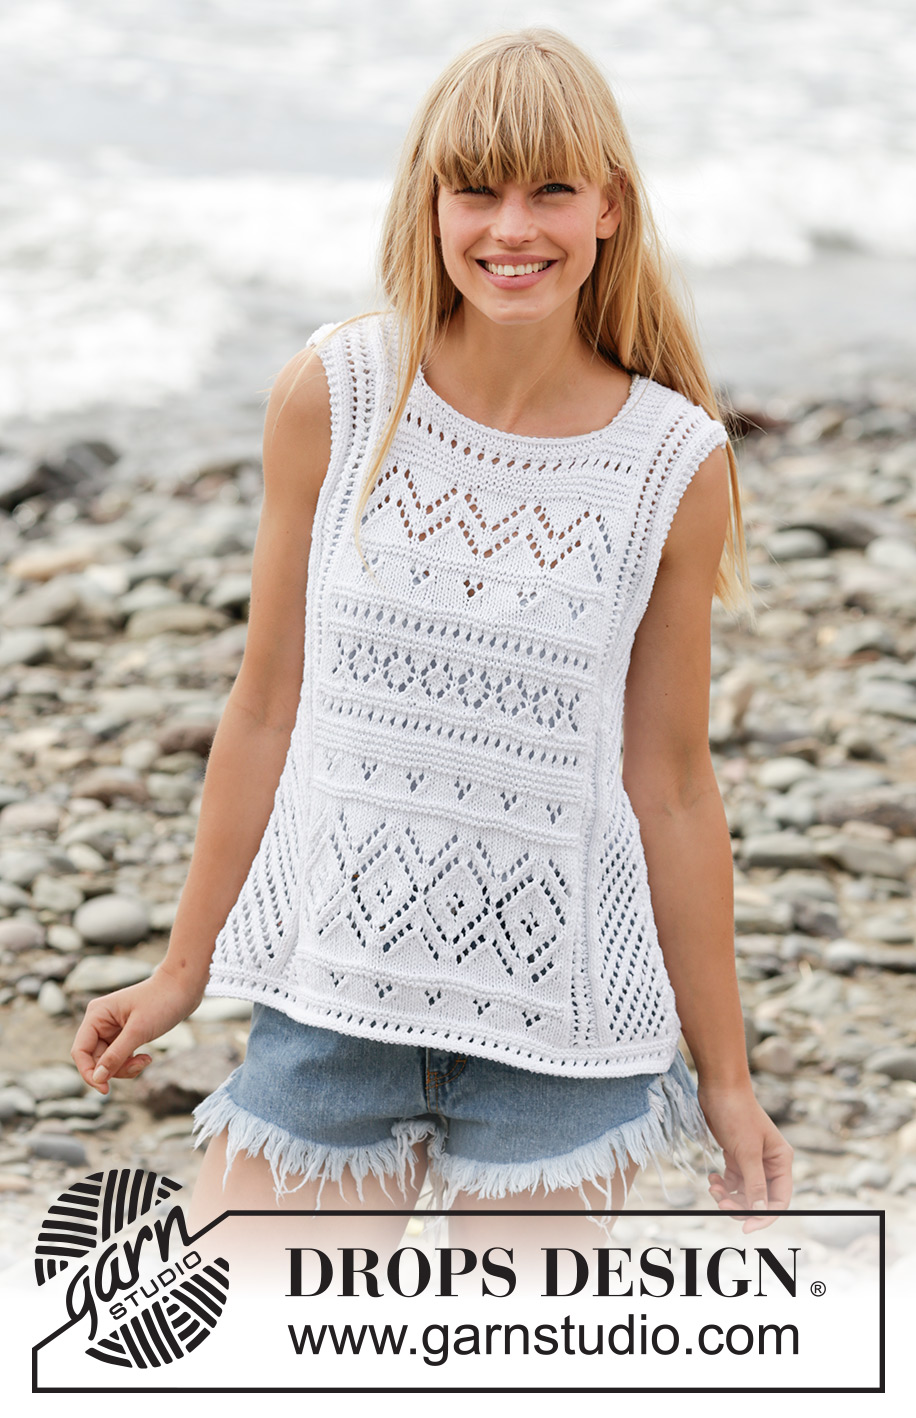
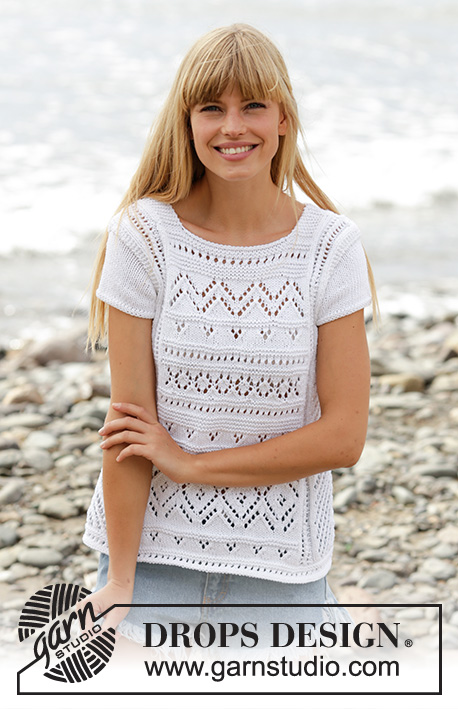
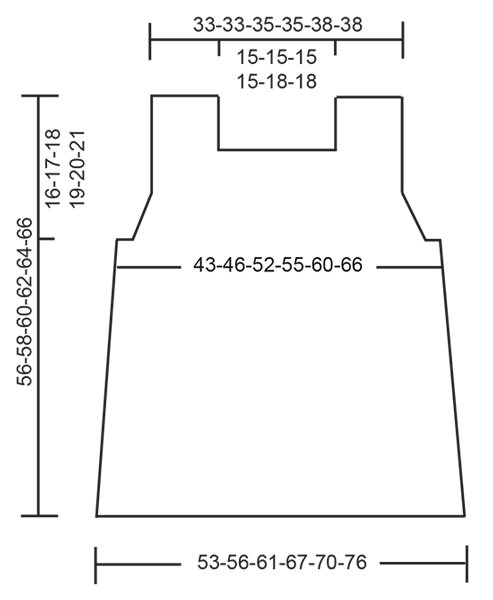
Knitted DROPS top with lace pattern and A-shape in ”Cotton Light”. Size: S - XXXL.
DROPS 169-20 |
|||||||||||||||||||
|
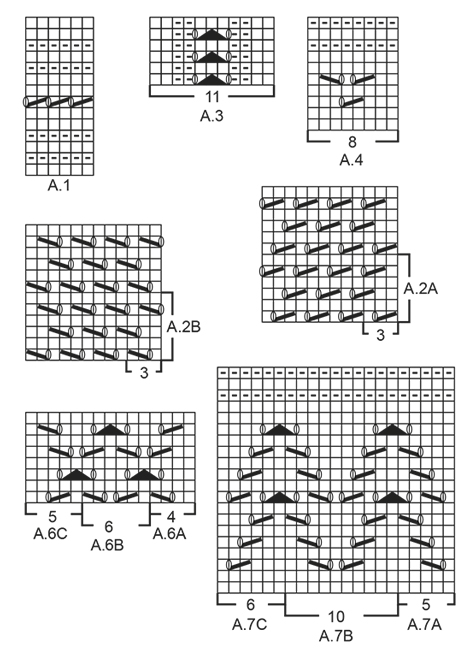
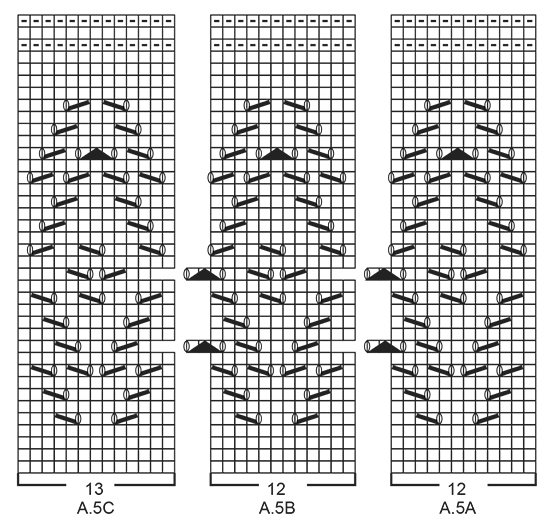
GARTER ST (back and forth): K all rows. 1 ridge = 2 rows K. PATTERN: See diagrams A.1 to A.7. The diagrams show all rows in pattern seen from RS. DECREASE TIP-1 (applies to sides of body): Dec inside 2 edge sts in garter st. All dec are done from RS! Dec as follows after 2 edge sts: K 2 tog. Dec as follows before 2 edge st: Beg 2 sts before edge st, slip 1 st as if to K, K 1, psso. DECREASE TIP-2 (applies to armholes): Dec inside 2 edge sts in garter st. All dec are done from RS! Dec as follows after 2 edge sts: Slip 1 st as if to K, K 1, psso. Dec as follows before 2 edge st: Beg 2 sts before edge sts and K 2 tog. ---------------------------------------------------------- TOP: Worked back and forth on needle in 2 parts. BACK PIECE: Cast on 111-117-129-141-147-159 sts on needle size 4 mm with Cotton Light. Work first row as follows from RS: 2 edge sts in GARTER ST - see explanation above, work pattern according to diagram A.1 until 3 sts remain on row, work 1st st in A.1 and finish with 2 edge sts in garter st - NOTE: On 7th row in A.1 K last st before edge sts. When A.1 has been worked, work next row as follows from RS: 2 edge sts in garter st, work pattern according to diagram A.2A over the next 18-21-27-33-36-42 sts (= 6-7-9-11-12-14 repetitions of 3 sts), work A.3 (=11 sts), insert 1 marker (= marker A), work pattern according to diagram A.4 over the next 48 sts (= 6 repetitions of 8 sts), work 1st st in A.4, insert 1 marker (= marker B – there are now 49 sts between markers), work A.3 (= 11 sts), work pattern according to diagram A.2B over the next 18-21-27-33-36-42 sts and finish with 2 edge sts in garter st. Continue pattern like this. NOTE: Continue A.2 and A.3 upwards outside of marker A and B up to armhole. Between marker A and B work a lace edge, no of sts between markers will vary upwards. READ ALL OF THE FOLLOWING SECTION BEFORE CONTINUING! PATTERN (applies to sts between marker A and B): When A.4 has been worked 1 time vertically, work pattern according to diagram A.5 as follows (continue sts before marker A and after marker B as before): Work A.5A (= 12 sts), repeat A.5B over the next 24 sts (= 2 repetitions of 12 sts) and finish with A.5C (= 13 sts). When A.5 has been worked 1 time vertically, work pattern according to A.4 again the same way as last time. Then work A.1 while AT THE SAME TIME on last row from RS dec 4 sts evenly in size S + M + L + XL and inc 2 sts evenly in size XXL + XXXL (between marker A and B) = 45-45-45-45-51-51 sts between markers. On next row from RS work A.6 as follows: Work A.6A (= 4 sts), repeat A.6B over the next 36-36-36-36-42-42 sts (= 6-6-6-6-7-7 repetitions of 6 sts) and finish with A.6C (= 5 sts). After A.6 work A.1 again AT THE SAME TIME on last row from RS dec 4-4-4-4-2-2 sts evenly = 41-41-41-41-49-49 sts between markers. After A.1 work A.4 again AT THE SAME TIME on last row from RS inc 2 sts in size XXL + XXXL = 41-41-41-41-51-51 sts between markers. Then work A.7 as follows: Work A.7A (= 5 sts), repeat A.7B over the next 30-30-30-30-40-40 sts (= 3-3-3-3-4-4 repetitions of 10 sts) and finish with A.7C (= 6 sts). On last row from RS in A.7 dec 2 sts evenly in size XXL + XXXL (do not dec in the other sizes) = 41-41-41-41-49-49 sts. After A.7 repeat A.4 and A.1 alternately up to neck dec. DECREASE IN THE SIDES: AT THE SAME TIME when piece measures 6 cm, dec 1 st in each side - READ DECREASE TIP-1! Repeat dec every 6-6-6-4-4-4 cm a total of 6-6-6-9-9-9 times - NOTE: Work sts that do not fit the pattern out towards the side in stocking st when dec. After dec in the sides, 12-15-21-24-27-33 sts remain in A.2 in each side. ARMHOLE: When piece measures 39-40-41-42-43-44 cm, work 2 ridges over the outermost 14-17-23-26-29-35 sts in each side (i.e. over all sts on outside of A.3 in each side - work the other sts as before). Then cast off the outermost 4-6-6-8-10-14 sts at beg of the next 2 rows for armholes. Continue pattern between marker A and B as explained above, continue A.3 on outside of marker A and B as before and work in garter st over the outermost 10-11-17-18-19-21 sts in each side. AT THE SAME TIME dec for armholes in each side every other row (i.e. every row from RS) as follows - READ DECREASE TIP-2: Dec 1 st 7-8-12-13-16-18 times in total. NECK: When piece measures approx. 50-50-54-54-54-54 cm - adjust after one whole repetition of A.1 or A.4 - cast off the middle 31-31-31-31-37-37 sts for neck and finish each shoulder separately. Continue A.3 as before with 5-5-5-5-6-6 edge sts in garter st towards the neck and 3-3-5-5-3-3 edge st in garter st towards the armhole. Continue until piece measures 56-58-60-62-64-66 cm and cast off. Repeat on the other shoulder. FRONT PIECE: Cast on and work as back piece. ASSEMBLY: Sew the shoulder seams. Sew side seams - sew edge to edge with 1 stitch in every st to get a flat seam. |
|||||||||||||||||||
Diagram explanations |
|||||||||||||||||||
|
|||||||||||||||||||
 |
|||||||||||||||||||
 |
|||||||||||||||||||
 |
|||||||||||||||||||
Have you finished this pattern?Tag your pictures with #dropspattern #ericasinglet or submit them to the #dropsfan gallery. Do you need help with this pattern?You'll find 18 tutorial videos, a Comments/Questions area and more by visiting the pattern on garnstudio.com. © 1982-2026 DROPS Design A/S. We reserve all rights. This document, including all its sub-sections, has copyrights. Read more about what you can do with our patterns at the bottom of each pattern on our site. |
|||||||||||||||||||


With over 40 years in knitting and crochet design, DROPS Design offers one of the most extensive collections of free patterns on the internet - translated to 17 languages. As of today we count 324 catalogues and 12290 patterns translated into English (UK/cm). 12290
We work hard to bring you the best knitting and crochet have to offer, inspiration and advice as well as great quality yarns at incredible prices! Would you like to use our patterns for other than personal use? You can read what you are allowed to do in the Copyright text at the bottom of all our patterns. Happy crafting!
Post a comment to pattern DROPS 169-20
We would love to hear what you have to say about this pattern!
If you want to leave a question, please make sure you select the correct category in the form below, to speed up the answering process. Required fields are marked *.