
Popular categories
Looking for a yarn?


Comments / Questions (30)
![]() Cornelia wrote:
Cornelia wrote:
Gibt es ein Tutorial zum Magischen Ring? Ich verstehe die Erklärung nicht. 🤔
29.03.2019 - 20:58DROPS Design answered:
Liebe Cornelia, dieses Video zeigt, wie man die Maschen anschlägt. Viel Spaß beim stricken!
01.04.2019 - 11:38
![]() Trude Grimeland wrote:
Trude Grimeland wrote:
Lager dere video til magisk sirkel? Jeg får det ikke til
24.10.2018 - 19:13
![]() Baloub wrote:
Baloub wrote:
Bonjour, Très joli motif... En le realisant je me suis rendue compte d'une inversion dans le diagramme A2 : la 2ème maille de gauche est inversée entre le rang 9 et 10 (en partant du haut). Merci pour tout vos magnifiques patrons !
08.09.2018 - 18:17DROPS Design answered:
Bonjour Mme Baloub et merci pour votre retour. Nos stylistes vont vérifier le diagramme et faire la correction nécessaire. Bon tricot!
11.09.2018 - 09:52
![]() Kristina Ekstrand Dahlberg wrote:
Kristina Ekstrand Dahlberg wrote:
Jag har kört fast på strumpa nr 2. Har stickat färdigt hälen och integrerat A6 o A7. Har 64 maskor kvar. (Storl. 41) När jag nu ska fortsätta mönster uppåt skaftet, får jag det till 70 maskor. Vad är det jag missar? Hade inget problemet strumpa nr1.
19.11.2017 - 14:03DROPS Design answered:
Hej, båda strumporna stickas på samma sätt. Svårt att säga vad som blivit fel, men kontrollera att du inte har gjort för många minskningar på hälen.
20.11.2017 - 14:14
![]() Florence wrote:
Florence wrote:
Er zit een fout in de volgorde van de diagrammen nadat je diagram A1 gebreid hebt. Er staat: brei de volgende naald als volgt: A2, dan A3, dan A4, dan A5. Dit moet zijn: A3, dan A2, dan A5, dan A4.
17.02.2017 - 17:48
![]() Gunilla Romanus wrote:
Gunilla Romanus wrote:
Jag hittar inte instruktionsvideo för Magisk Cirkel.
27.05.2016 - 23:27DROPS Design answered:
Hej Gunilla, det sätter vi på önskelistan!
10.06.2016 - 09:40
![]() Birgit wrote:
Birgit wrote:
Ich habe einen Fehler im Diagramm A2 entdeckt. 2. Reihe von links 17. Reihe von unten darf kein Punkt sein , 18. reihe muß ein punkt sein.
01.02.2016 - 16:51DROPS Design answered:
Ja, Sie haben Recht, der Punkt ist um 1 Reihe nach unten gerutscht, ich leite das an die Designerinnen weiter, damit es behoben wird, vielen Dank für den Hinweis!
07.02.2016 - 13:30
![]() Marie33 wrote:
Marie33 wrote:
Bonjour ces chaussettes sont superbes. Je n'ai pas suffisamment de compétences pour les réaliser, mais elles sont vraiment très belles. Bravo au designer !
17.12.2015 - 19:50
![]() Turid Johansen wrote:
Turid Johansen wrote:
Endelig et par som ikke bare har striper på undersiden- kjempeflott - gleder meg til denne. 😃
14.12.2015 - 18:50
![]() Paula wrote:
Paula wrote:
Ssååå mysiga till de svala kvällarna.
10.12.2015 - 23:05
|
||||||||||||||||
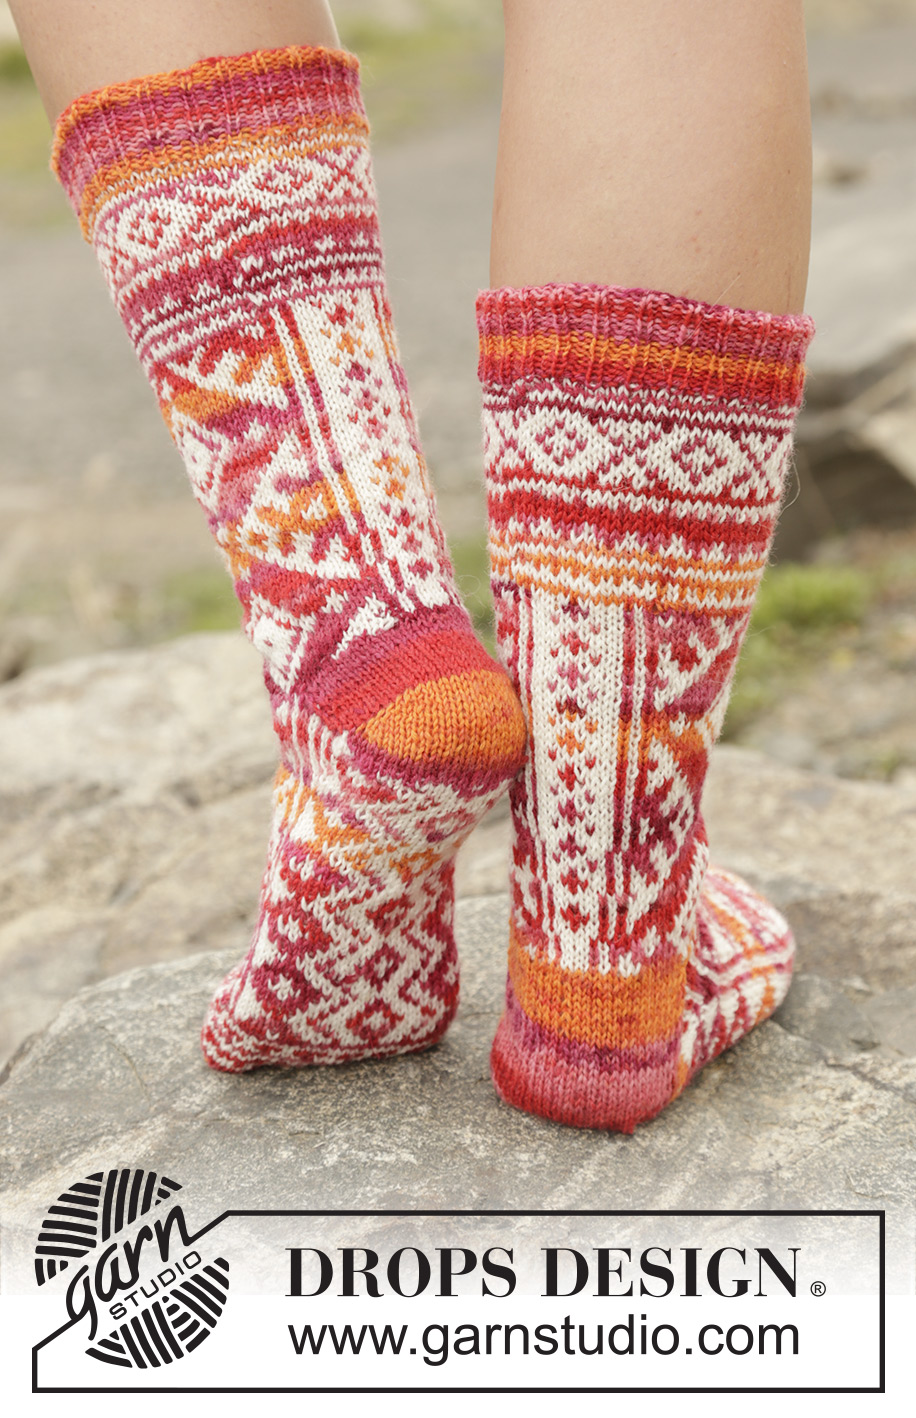
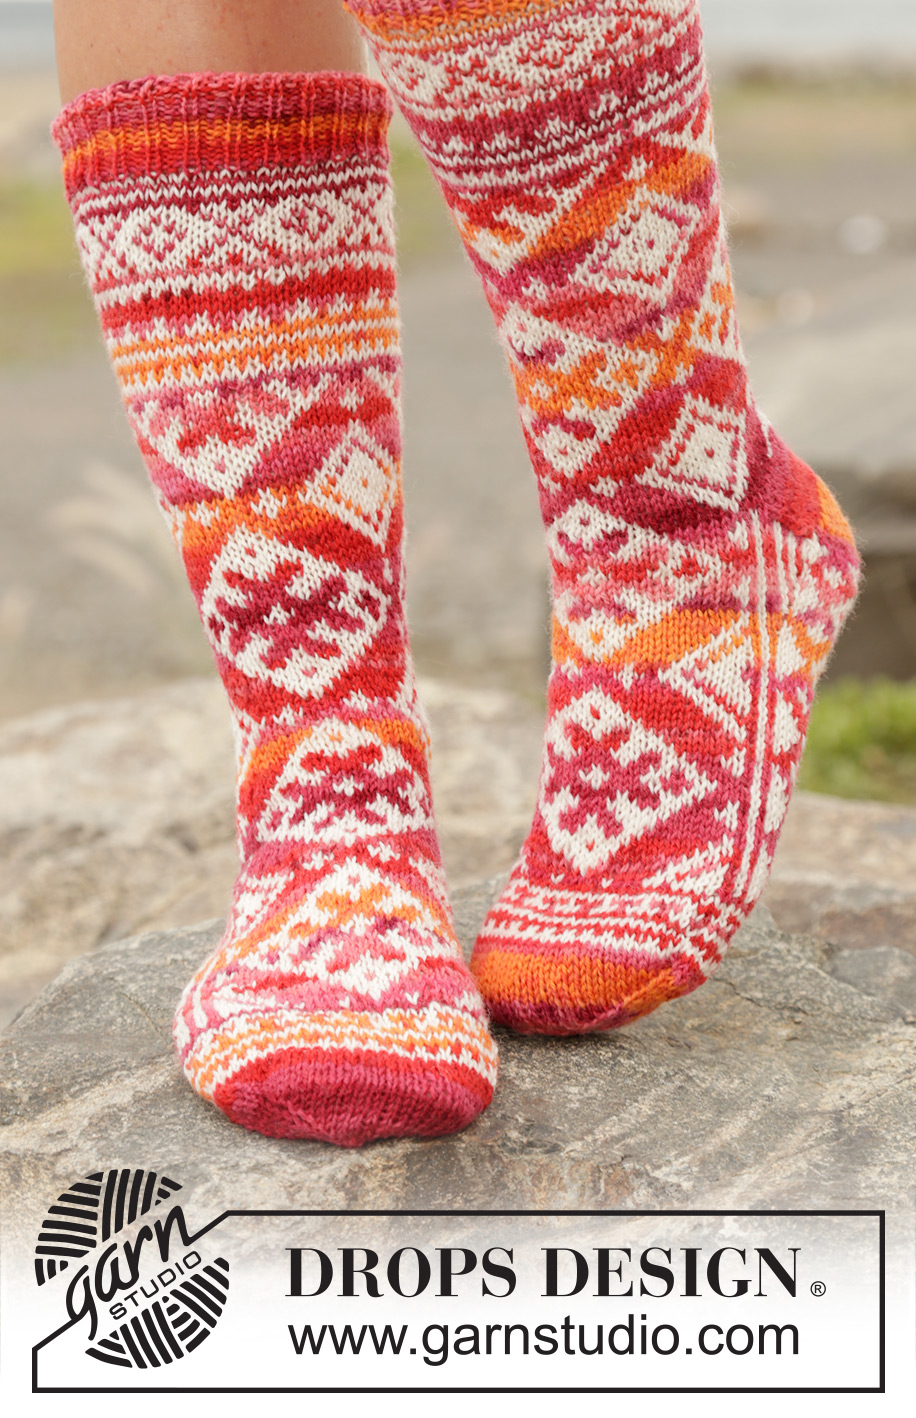
Mexican Sunset#mexicansunsetsocks |
||||||||||||||||
 |
 |
|||||||||||||||
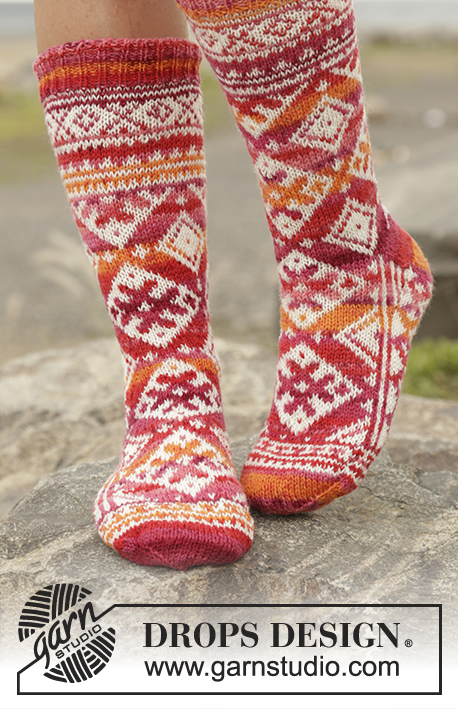
Knitted DROPS socks with Nordic pattern worked from toe up in ”Fabel”. Size 35 - 43
DROPS 170-11 |
||||||||||||||||
|
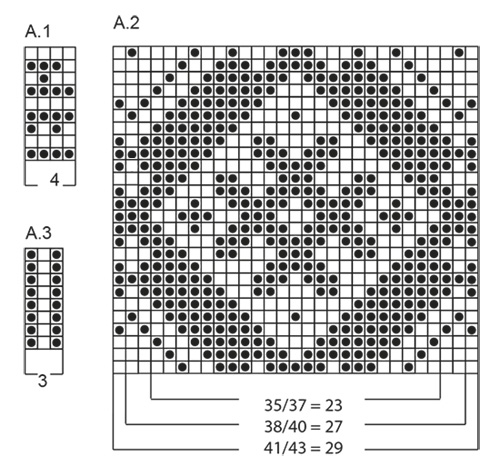
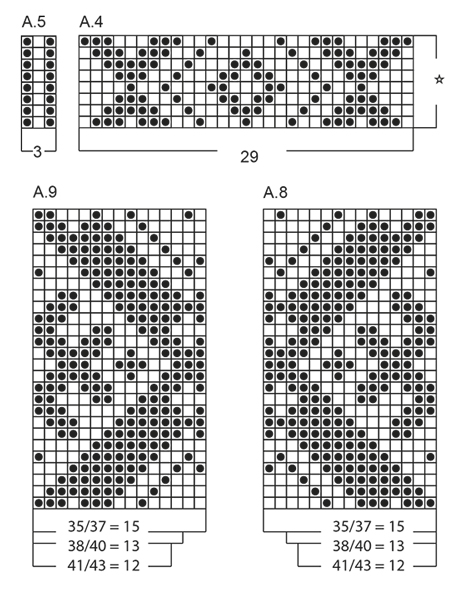
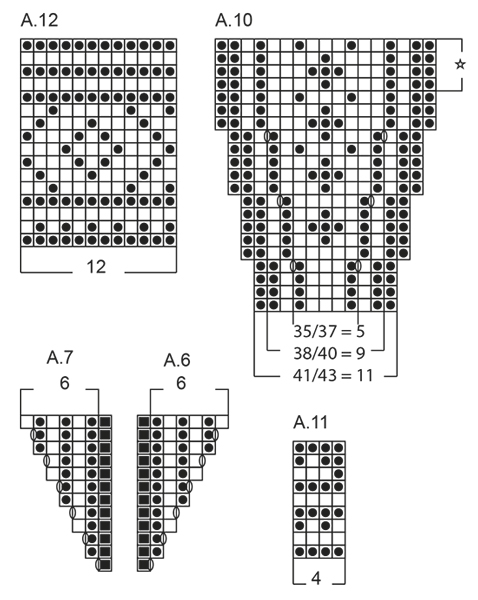
MAGIC CIRCLE: To avoid hole in the middle beg with this technique: Hold yarn end in the left hand and make a loop around left index finger (from left to right). Hold the loop with left thumb and index finger. Insert needle through loop, get yarn from ball, pull yarn back through loop, 1 YO (place yarn from the back and towards you) and pull YO through sts on needle, * insert needle through loop, 1 YO, pull YO through loop, 1 YO and pull YO through outermost st on right needle (i.e. the last st made) *, repeat from *-* until there are 10-10-12 sts on needle. Distribute sts on double pointed needles size 2.5 mm. Then work as explained in pattern – AT THE SAME TIME pull yarn end so that loop is tighten tog and the hole disappears. PATTERN: See diagrams A.1 to A.12 – choose diagram for correct size. Work entire pattern in stocking st. HEEL: Work back and forth. ROW 1 (= RS): Work until 1 sts remain, turn piece. ROW 2 (= WS): Slip first st as if to P, tighten yarn and work until 1 st remains, turn piece. ROW 3 (= RS): Slip first st as if to K, tighten yarn and work until 2 sts remain, turn piece. ROW 4 (= WS): Slip first st as if to P, tighten yarn and work until 2 sts remain, turn piece. Continue short rows the same way until 15 sts remain in the middle of row. Insert 1 marker. Continue back and forth but now work 1 st more for every row over heel. To avoid holes in the transitions, lift the horizontal yarn before the st to be knitted up and slip it twisted on the needle. Work strand tog with next st (from RS K strand and st tog and from WS P strand and st tog). Work like this until all heel sts have been worked. ---------------------------------------------------------- SOCK: Worked from the toe and up. Start with sunset and MAGIC CIRCLE - see explanation above - on double pointed needles 2.5 mm. On next round work as follows: * K 1, YO *, repeat from *-* entire round (K YO twisted on next round) = 20-20-24 sts. Insert 1 marker in a st in each side, 9-9-11 sts between each marker. Inc in each side of every marker as follows: * Work until 1 st remains before st with marker, 1 YO, K 3 (marker is in the 2nd st), 1 YO *, repeat from *-* 2 times in total (= 4 sts inc) - NOTE: On next round K YO twisted to avoid holes. Repeat inc every round a total of 5-3-3 times and then every other round a total of 4-7-7 times = 56-60-64 sts. REMEMBER THE KNITTING TENSION K 1 round. Now work pattern according to diagram A.1 (= 14-15-16 repetitions on round). When A.1 has been worked, K 1 round with sunset while inc 2-2-0 sts evenly = 58-62-64 sts. Work next round as follows: A.2 (= 23-27-29 sts on top of foot), A.3 (= 3 sts), A.4 (= 29 sts under foot) and A.5 (= 3 sts). Continue like this until piece measures approx. 13-15-18 cm from toe. Continue as before but now work A.6 between A.3 and A.4 and A.7 between A.4 and A.5. Continue like this until A.6 and A.7 have been worked vertically = 70-74-76 sts. Work A.2 as before (= 23-27-29 sts), change to sunset and work rest of round. Cut the yarn. Piece measures approx. 17-19-22 cm from toe. Slip the 41-45-47 sts mid top on foot on a stitch holder (i.e. A.7, A.5, A.2, A.3 and A.6) = 29 sts on needle for heel (= A.4). Work HEEL - see explanation above, work entire heel in sunset. After the short rows over heel, continue in stocking st and with sunset over the 29 sts on heel - AT THE SAME TIME at the end of every row (both from RS and WS), work last st on needle tog with outermost st from stitch holder (from RS K the 2 sts twisted tog and from WS P the 2 sts tog). Continue back and forth like this until the 6 outermost sts in each side on stitch holder have been worked tog with sts on heel. Slip the other 29-33-35 sts from stitch holder back on needle = 58-62-64 sts. Cut the yarn. NOW MEASURE PIECE FROM HERE! Start new round in the side, i.e. 15-13-12 sts before first st in A.2 and work next round as follows: Work A.8 (= 15-13-12 sts) - NOTE: Beg on same row as next row in A.2 - continue A.2 as before, work A.9 (15-13-12 sts), finish round with A.10 (= 5-9-11 sts at the back of foot). Continue pattern until piece measures approx. 16- cm - adjust after a half or whole repetition of A.8/A.9 vertically = 64-68-70 sts. Now work A.11 (= 4 sts) over all sts - AT THE SAME TIME on first row inc 4-0-2 sts evenly = 68-68-72 sts. When A.11 has been worked, work A.12 (= 12 sts) over all sts - AT THE SAME TIME on first row inc 4-4-0 sts evenly = 72 sts. When A.12 is done, switch to double pointed needle size 2 mm and work rib (= K 1/P 2) with sunset until rib measures approx. 4 cm. Cast off with K over K and P over P. Fasten off. Knit another sock the same way. |
||||||||||||||||
Diagram explanations |
||||||||||||||||
|
||||||||||||||||
 |
||||||||||||||||
 |
||||||||||||||||
 |
||||||||||||||||
Have you finished this pattern?Tag your pictures with #dropspattern #mexicansunsetsocks or submit them to the #dropsfan gallery. Do you need help with this pattern?You'll find 16 tutorial videos, a Comments/Questions area and more by visiting the pattern on garnstudio.com. © 1982-2026 DROPS Design A/S. We reserve all rights. This document, including all its sub-sections, has copyrights. Read more about what you can do with our patterns at the bottom of each pattern on our site. |
||||||||||||||||


With over 40 years in knitting and crochet design, DROPS Design offers one of the most extensive collections of free patterns on the internet - translated to 17 languages. As of today we count 324 catalogues and 12290 patterns translated into English (UK/cm). 12290
We work hard to bring you the best knitting and crochet have to offer, inspiration and advice as well as great quality yarns at incredible prices! Would you like to use our patterns for other than personal use? You can read what you are allowed to do in the Copyright text at the bottom of all our patterns. Happy crafting!
Post a comment to pattern DROPS 170-11
We would love to hear what you have to say about this pattern!
If you want to leave a question, please make sure you select the correct category in the form below, to speed up the answering process. Required fields are marked *.