
Popular categories
Looking for a yarn?


Comments / Questions (25)
![]() BAYE Sophie wrote:
BAYE Sophie wrote:
Bonjour. Je suis arrivée aux manches de ce joli modèle. Je voulais savoir si comme on augmente sur les cotes'est ce qu'on reprend le motif ou on continue toujours en brides sur cette partie là merci
21.11.2019 - 08:19DROPS Design answered:
Bonjour Mme Baye, vous pouvez crocheter les augmentations en suivant le point ajouré, dès que vous avez suffisamment de mailles pour bien conserver la continuité du motif, ainsi les manches seront plus jolies au niveau du début/fin des tours. Bon crochet!
21.11.2019 - 09:31
![]() Lucienne Brokerhof wrote:
Lucienne Brokerhof wrote:
Op de foto's is slechts een klein sjaalkraagje te zien terwijl hij wel groter in het schemapatroon staat.
21.10.2018 - 13:20
![]() Lene Iversen wrote:
Lene Iversen wrote:
Forstår ikke hvordan opskriften startes. 1.rk består af st med lm huller, 2.rk kun st (ignorerer lm hullerne, så =indtagning), dernæst mønster efter diagram. Hvorfor skal man lave hulmønster på første række og ignorere det på næste? Hvorfor ikke bare slå det færre antal maske op og lave to solide rækker (st rk)?
02.10.2018 - 13:38
![]() Christine wrote:
Christine wrote:
When we work the back section how come it is only 117 sts 265-(69X2)= 127 not 117 would you please explain more
28.02.2018 - 05:07DROPS Design answered:
Dear Christine, you leave 5 sts unworked for armhole on each piece: front pieces are worked over 64 sts (= 5 sts unworked for armhole) and back piece is worked over 117 sts (= 5 sts unworked for armhole on each side), so that you have: 64 sts (front piece), 10 sts unworked (armhole), 117 sts (back piece), 10 sts unworked (armhole), 64 sts (front piece) = 64+10+117+10+64= 265 sts. Happy crocheting!
28.02.2018 - 10:17
![]() SYLVIE PERRIER wrote:
SYLVIE PERRIER wrote:
Mon échantillon est le même que le modèle, mais lorsque je crochète , en taille M , j'ai 10 cm de plus que le modèle. Est ce qu'il y aurait une erreur dans le nombre de brides à faire? Sinon pour que je puisse continuer combien fait la largeur de la manche pour que je recalcule. Merci de otre réponse
29.08.2016 - 00:09DROPS Design answered:
Bonjour Mme Perrier, vérifiez bien le nombre de mailles crochetées pour le dos et les devants, on monte 367 ml mais on doit avoir seulement 293 B au 1er rang. À la fin des augmentations de la manche, vous avez 101 B soit 36 cm de large. Bon crochet!
29.08.2016 - 12:22Gloria wrote:
No veo ninguna pestaña que diga "vídeos"
09.04.2016 - 00:17DROPS Design answered:
Hola Gloria. Cada patrón tiene "Videos" explicativos, para acceder a ellos hay que marcar la pestaña "Videos" al lado de la pestaña "Materiales" en la parte superior del patrón
10.04.2016 - 17:24
![]() Karen Strickholm wrote:
Karen Strickholm wrote:
Elegant! I too would like to see set-in sleeves. Also I hope there is some subtle waist shaping... Lovely design, and particularly flattering for larger bodied women like me!
19.06.2015 - 15:17
![]() Anja Steinhaus wrote:
Anja Steinhaus wrote:
Möchte ich sofort stricken . . . wunderschön!!!!
14.06.2015 - 13:54Fe Canas wrote:
Is this crochet or knit?
11.06.2015 - 08:13
![]() Ellis wrote:
Ellis wrote:
Please give me an option to make set-in sleeves because I like this cardigan a lot but will not wear clothes that do not fit. I have a larger size clothing and need therfore have patterns that fit
08.06.2015 - 21:45
|
||||||||||||||||
Vintage Honeycomb#vintagehoneycombcardigan |
||||||||||||||||
 |
 |
|||||||||||||||
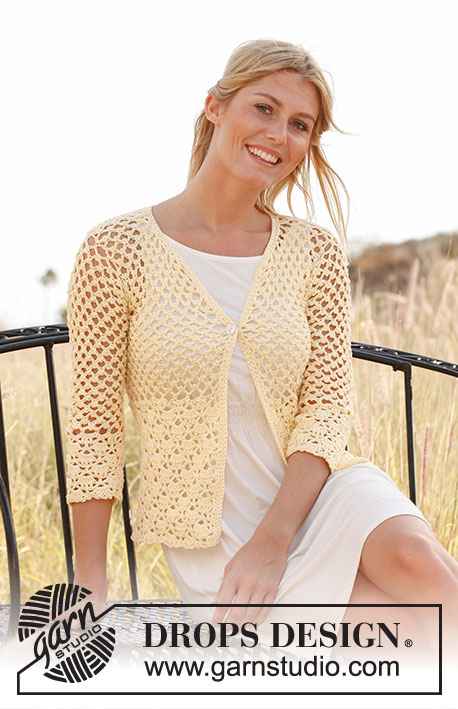
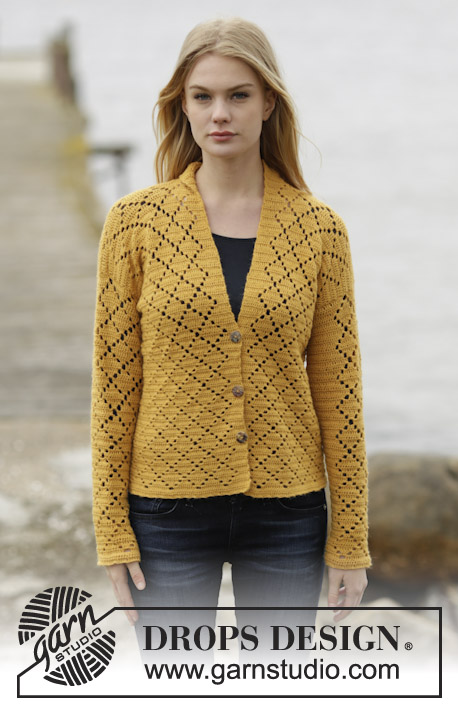
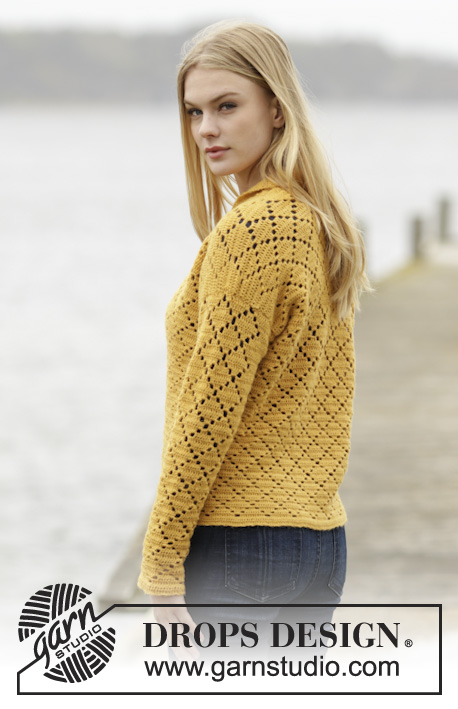
Crochet DROPS jacket with lace pattern in squares and shawl collar in ”Alpaca”. Size: S - XXXL.
DROPS 166-17 |
||||||||||||||||
|
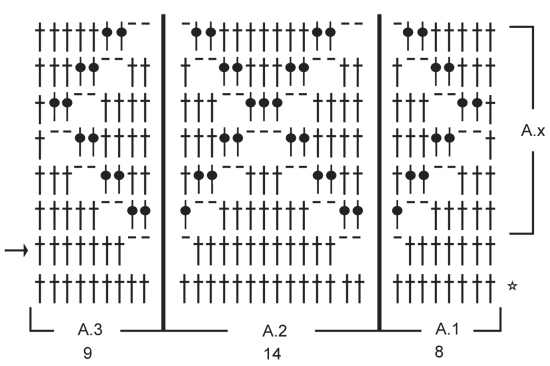
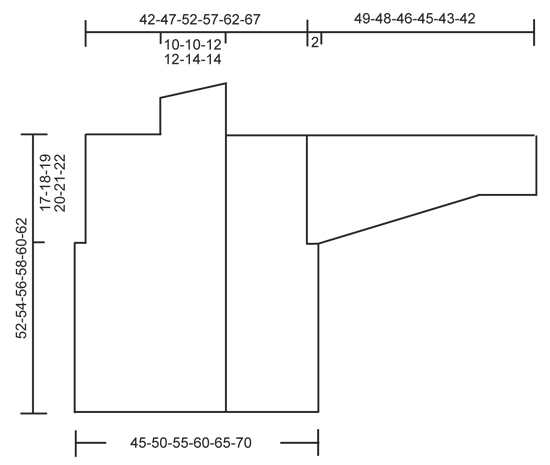
PATTERN: See diagrams A.1 to A.3. The diagrams show all rows in pattern seen from RS. CROCHET INFO: Replace first tr at beg of every tr row with 3 ch. Replace first dc at beg of every dc row with 1 ch. DECREASE TIP: Dec 1 tr by working 2 tr tog as follows: Work 1 tr in first st but wait with last pull through, work 1 tr in next st but on last pull through, pull yarn through all 3 loops on hook. BUTTONHOLES: Make buttonholes on right band. 1 buttonhole = replace fourth tr from edge with 1 ch. On next row work band st as before (work 1 tr around ch). Work for buttonholes when piece measures: SIZE S: 10, 18 and 26 cm SIZE M: 11, 19 and 27 cm SIZE L: 12, 20 and 28 cm SIZE XL: 13, 21 and 29 cm SIZE XXL: 12, 21 and 30 cm SIZE XXXL: 13, 22 and 31 cm ---------------------------------------------------------- BODY: Worked back and forth from mid front. Work 332-367-402-437-472-507 ch (incl 3 ch to turn with) on hook size 2.5 mm with Alpaca. Work first row (= from WS) as follows: 1 tr in 4th ch from hook (= 2 tr) - READ CROCHET INFO, then work 1 tr in each of the next 3 ch, * skip 1 ch, 1 tr in each of the next 4 ch *, repeat from *-* the entire row = 265-293-321-349-377-405 tr. Work 1 row with 1 tr in every tr. Now work pattern according to diagram as follows (1st row = from WS): Work 1 tr in each of the first 5 tr (= left band), A.3 (= 9 sts), repeat A.2 (= 14 sts) 17-19-21-23-25-27 times in total, A.1 (= 8 sts), finish with 1 tr in each of the next 5 tr (= right band). When A.1-A.3 have been worked 1 time vertically, repeat A.x upwards. REMEMBER THE CROCHET TENSION and remember BUTTONHOLES on right band - see explanation above. When piece measures 35-36-37-38-39-40 cm, adjust so that last row is from WS, finish each front piece and back piece separately. Insert 1 marker 69-76-83-90-97-104 sts in from each side (= 127-141-155-169-183-197 sts on back piece). RIGHT FRONT PIECE: Work pattern (from RS) as before until 5 sts remain before marker (= armhole) = 64-71-78-85-92-99 sts - NOTE: Work sts in the side that do not fit A.2 in tr. Work until piece measures 52-54-56-58-60-62 cm - adjust after 1 whole repetition of A.2 (last row = from WS). The outermost 44-51-56-63-67-74 sts towards armhole (= shoulder), are no longer worked. Then work collar over the first 20-20-22-22-25-25 sts from RS as follows: * Work 1 tr (work in tr but around ch) in each of the first 12-12-13-13-14-14 sts, 1 htr in each of the next 2 sts, 1 dc in each of the next 6-6-7-7-9-9 sts, turn and work 1 dc in each of the first 6-6-7-7-9-9 dc - see CROCHET INFO, 1 htr in each of the next 2 sts, 1 tr in each of the next 12-12-13-13-14-14 sts, turn *, repeat from *-* until collar measures approx. 5-5-6-6-7-7 cm on the most narrow part. Fasten off. LEFT FRONT PIECE: Work as right front piece but reversed. Do not work over the first 5 sts on first row from RS. Work until piece measures 52-54-56-58-60-62 cm - adjust after 1 whole repetition of A.2 (last row = from WS). Cut the yarn. The first 44-51-56-63-67-74 sts towards armhole (= shoulder), are no longer worked. Then work collar over the last 20-20-22-22-25-25 sts, beg from RS as follows: * Work 1 dc in each of the first 6-6-7-7-9-9 sts, 1 htr in each of the next 2 sts, 1 tr in each of the next 12-12-13-13-14-14 sts, turn and work 1 tr in each of the first 12-12-13-13-14-14 sts, 1 htr in each of the next 2 sts, 1 dc in each of the next 6-6-7-7-9-9 sts, turn *, repeat from *-* until collar measures approx. 5-5-6-6-7-7 cm on the most narrow part. Fasten off. BACK PIECE: Work pattern as before over the middle 117-131-145-159-173-187 sts (= 5 sts in each side for armholes) - NOTE: Work sts in the side that do not fit A.2 in tr. When piece measures approx. 50-52-54-56-58-60 cm - adjust pattern so that next row is 4th row in A.x (3 rows remain), the middle 27-27-31-31-37-37 tr (= neck) are no longer worked, finish each shoulder separately = 45-52-57-64-68-75 sts for shoulder. Continue pattern as before over the last 3 rows (NOTE: Replace every ch in pattern with 1 tr) - on first row dec 1 tr towards neck - READ DECREASE TIP = 44-51-56-63-67-74 sts. Fasten off. Piece measures approx. 52-54-56-58-60-62 cm. SLEEVE: Worked back and forth. Work 67-72-75-77-82-85 ch (incl 3 ch to turn with) on hook size 2.5 mm with Alpaca. Work first row as follows: 1 tr in 4th ch from hook (= 2 tr), then work 1 tr in each of the next 3-3-1-3-3-1 ch, * skip 1 ch, 1 tr in each of the next 4 ch *, repeat from *-* the entire row = 53-57-59-61-65-67 tr. Remember CROCHET INFO! Work 1 row with 1 tr in every tr. Work next row (= from RS) as follows: 1 tr in each of the first 4-6-7-1-3-4 tr, A.1, A.2 2-2-2-3-3-3 times in total, A.3, finish with 1 tr in each of the next 4-6-7-1-3-4 tr. When A.1-A.3 have been worked 1 time vertically, repeat A.x upwards. When piece measures 10-10-10-10-8-8 cm, inc 1 tr in each side by working 2 tr in the second and next to last tr in each side. Repeat inc in each side of piece every 3rd row 16-14-7-3-0-0 more times, then every other row 4-7-16-21-25-22 times in total and every row 0-0-0-0-0-5 times in total = 95-101-107-111-117-123 sts. When piece measures 49-48-46-45-43-42 cm (shorter measurements in the larger sizes because of wider shoulders), fasten off. Work another sleeve the same way. ASSEMBLY: Sew the shoulder seams. Sew collar tog mid back, edge to edge and then sew collar to neck line on back piece. Sew sleeves in body. Sew sleeve seams edge to edge from the bottom and up. |
||||||||||||||||
Diagram explanations |
||||||||||||||||
|
||||||||||||||||
 |
||||||||||||||||
 |
||||||||||||||||
Have you finished this pattern?Tag your pictures with #dropspattern #vintagehoneycombcardigan or submit them to the #dropsfan gallery. Do you need help with this pattern?You'll find 9 tutorial videos, a Comments/Questions area and more by visiting the pattern on garnstudio.com. © 1982-2026 DROPS Design A/S. We reserve all rights. This document, including all its sub-sections, has copyrights. Read more about what you can do with our patterns at the bottom of each pattern on our site. |
||||||||||||||||


With over 40 years in knitting and crochet design, DROPS Design offers one of the most extensive collections of free patterns on the internet - translated to 17 languages. As of today we count 324 catalogues and 12290 patterns translated into English (UK/cm). 12290
We work hard to bring you the best knitting and crochet have to offer, inspiration and advice as well as great quality yarns at incredible prices! Would you like to use our patterns for other than personal use? You can read what you are allowed to do in the Copyright text at the bottom of all our patterns. Happy crafting!
Post a comment to pattern DROPS 166-17
We would love to hear what you have to say about this pattern!
If you want to leave a question, please make sure you select the correct category in the form below, to speed up the answering process. Required fields are marked *.