
Popular categories
Looking for a yarn?


Comments / Questions (44)
![]() Devijver wrote:
Devijver wrote:
Bonjour, Je travaille sur ce joli modèle mais j'ai un petit souci au niveau du raglan.Si vous pourriez m'expliquer ce que veux dire:au 1er-1er-4eme-3eme-3eme-3eme de tour de diminution du raglan? Merci
12.03.2014 - 15:59
![]() Veronique wrote:
Veronique wrote:
Je suis en train de tricoter ce modele j'ai un problème il faut à 6 cm diminuer 7 fois, le motif A3 ne va etre en entier.Pouvez vous m'éclairer pour résoudre ce problème merci
25.02.2014 - 16:17
![]() Stephanie wrote:
Stephanie wrote:
Besten Dank für die Erklärung. Mein Top ist nun fertig und es gefällt mir sehr gut. Ich habe noch folgende Fragen dazu: müsste beim 2. Ärmel das Muster nicht mit A4B beginnen (Spiegelverkehrt), damit es von vorne und hinten gleich aussieht? Bei Muster A5A fehlt jeweils ein Umschlag beim 2. Lochmuster in der ersten Runde.
22.02.2014 - 12:19DROPS Design answered:
Liebe Stephanie, schön, dass Ihr Top gelungen ist und Ihnen gut gefällt! Ihre Frage zu den Ärmeln habe ich an die Designerinnen weitergeleitet. A.5A wird wegen der fehlenden Umschläge in Kürze korrigiert werden. Vielen Dank für den Hinweis!
22.02.2014 - 13:51
![]() Stephanie wrote:
Stephanie wrote:
Besten Dank für Ihre Rückmeldung. Ich habe nun nochmals eine Frage. Nachdem ich die Maschen für die Ärmel wieder angeschlagen habe, stricke ich sie in der ersten Runde gemäss Ihren Anleitungen ab. Dies ist jedoch fast nicht möglich, da der Abstand der 10 Maschen nicht im Verhältnis der angeschlagenen Maschen ist. Ist die Anleitung da wirklich korrekt? Oder haben Sie einen Tipp wie ich es ausdehnen kann?
19.02.2014 - 19:35DROPS Design answered:
Liebe Stephanie, Sie benötigen ja eine gewisse Anzahl M für den Oberarm, die Anleitung ist korrekt. Es kann jedoch bei einer derartigen Passe durchaus vorkommen, dass es sich anfangs an den Übergängen zwischen Rumpfteil und Ärmeln etwas schwerer strickt, dies gibt sich aber recht bald im Laufe der Raglanabnahmen. Sie können versuchen, 2 oder 3 Rundnadeln zu benutzen, damit es sich am Anfang etwas einfacher stricken lässt. Gutes Gelingen!
20.02.2014 - 00:09
![]() Stephanie wrote:
Stephanie wrote:
Besten Dank für Ihre Rückmeldung. Ich habe nun nochmals eine Frage. Nachdem ich die Maschen für die Ärmel wieder angeschlagen habe, stricke ich sie in der ersten Runde gemäss Ihren Anleitungen ab. Dies ist jedoch fast nicht möglich, da der Abstand der 10 Maschen nicht im Verhältnis der angeschlagenen Maschen ist. Ist die Anleitung da wirklich korrekt?
19.02.2014 - 19:32
![]() Stephanie wrote:
Stephanie wrote:
Hallo, verstehe ich das Strickmuster richtig, dass ich bei den Armausschnitten mit den 10 Maschen total 6 Runden (re-li-re-li-re-li)stricken muss und der Rumpf wird alles rechts gestrickt? Besten Dank
17.02.2014 - 00:38DROPS Design answered:
Liebe Stephanie, Sie stricken diese je 10 M nur in 3 Runden kraus rechts, nicht in 6 Runden. Die anderen M am Rumpf werden glatt rechts gestrickt. Viel Spaß beim Weiterstricken!
17.02.2014 - 09:30Roya wrote:
اين ساىت فوق العاده است من خىلى دوسش دارم و کلى کار بافتنى ازش ىاد گرفتم.عالىه عالىه
05.01.2014 - 12:21
![]() Riccarda wrote:
Riccarda wrote:
Uno dei più bei modelli in assoluto. Non vedo l'ora d'indossarlo!
05.01.2014 - 07:33Sudi wrote:
Lemon sence
04.01.2014 - 12:17
![]() Agnes Andersen wrote:
Agnes Andersen wrote:
Je trouve ce modèle très élégant
25.12.2013 - 12:41
|
|||||||||||||||||||
Daylight#daylighttop |
|||||||||||||||||||
|
|
|||||||||||||||||||
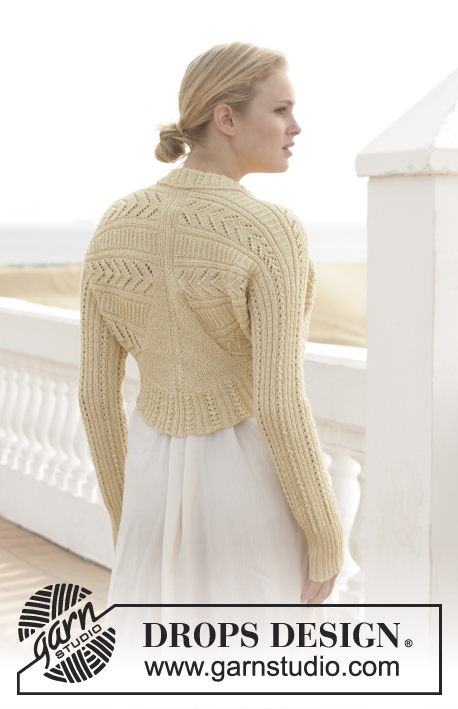
Knitted DROPS top with lace pattern and raglan in ”BabyAlpaca Silk”. Size S-XXXL
DROPS 152-13 |
|||||||||||||||||||
|
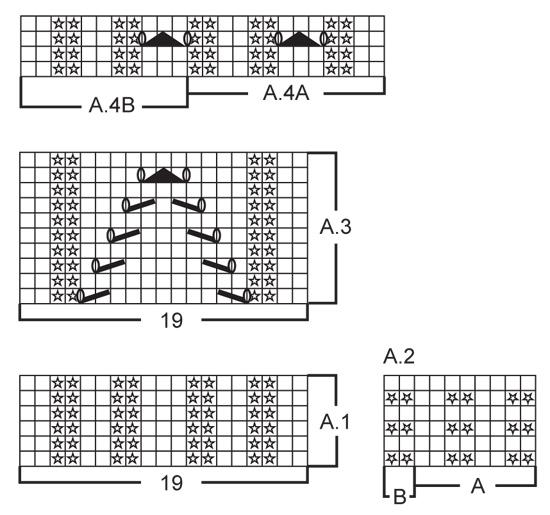
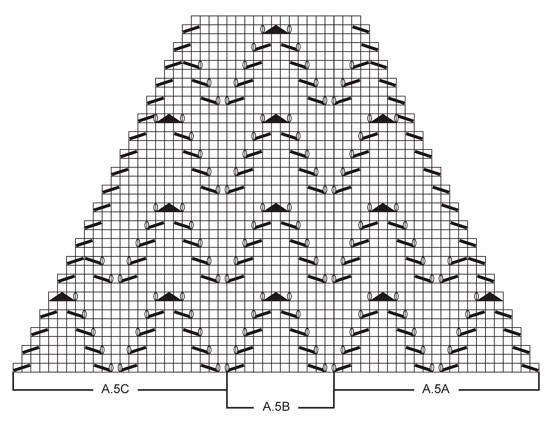
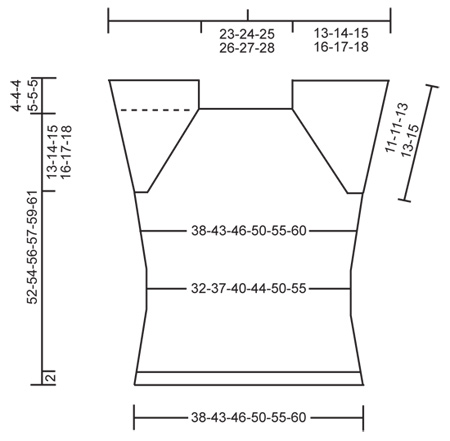
PATTERN: See diagrams A.1 to A.5. The diagrams show all rows in pattern seen from RS. GARTER ST (in the round on circular needle): * K 1 round and P 1 round *, repeat from *-*. 1 ridge = 2 rounds. DECREASE TIP 1: Dec in each side of body, i.e. outside A.3 in each side. Dec as follows after A.3: Slip 1 st as if to K, K 1, psso. Dec as follows before A.3: Beg 2 sts before A.3 and K 2 tog. INCREASE TIP: Inc 1 st by making 1 YO. On next round K YO twisted to avoid holes. DECREASE TIP 2 (applies to raglan): Beg 3 sts before marker: K 2 tog, K 2 (marker is between these 2 sts), slip 1 st as if to K, K 1, psso. ---------------------------------------------------------- TOP: Worked in the round on circular needle from bottom up. BODY: Cast on 226-250-274-298-330-354 sts on circular needle size 2.5 mm with Baby Alpaca Silk. K 1 round. Then work next round as follows: A.1 (= 19 sts), A.2A over the next 92-104-116-128-144-156 sts, A.2B (= 2 sts), A.1 (= 19 sts), A.2A over the next 92-104-116-128-144-156 sts and finish with A.2B (= 2 sts). Continue pattern like this until A.1/A.2 has been worked 1 time vertically, piece measures approx. 2 cm. Switch to circular needle size 3 mm, work next round as follows: A.3 (= 19 sts – work A.3 directly above A.1), work in stocking st over the next 94-106-118-130-146-158 sts AT THE SAME TIME dec 23-23-27-29-33-33 sts evenly over these sts, work A.3 (= 19 sts – NOTE: work A.3 directly above A.1) and work the last 94-106-118-130-146-158 sts AT THE SAME TIME dec 23-23-27-29-33-33 sts evenly over these sts = 180-204-220-240-264-288 sts on needle. Continue in the round in stocking st and A.3 in each side. REMEMBER THE KNITTING TENSION! When piece measures 6 cm, dec 1 st on each side of A.3 in each side on every 6th-6th-6th-6th-7th-7th round 7-7-7-7-6-6 times in total – READ DECREASE TIP = 152-176-192-212-240-264 sts. When piece measures 22-22-23-23-24-24 cm, inc 1 st on each side of A.3 in each side on every 8th-8th-8th-8th-10th-10th round 7-7-7-7-6-6 times in total – READ INCREASE TIP = 180-204-220-240-264-288 sts. When piece measures 38-39-40-40-41-42 cm, work in garter st - see GARTER ST above - over 15 sts in each side (i.e. over the middle 15 sts in A.3 in each side) AT THE SAME TIME on 1st round dec 5 sts evenly in each side over these 15 sts, the remaining sts are worked in stocking st as before. When 3 rounds in garter st have been worked over the 10 sts in each side, cast off 10 sts for armholes = 75-87-95-105-117-129 sts remain on each front and back piece. Piece measures approx. 39-40-41-41-42-43 cm. YOKE: Work next round as follows: Work in stocking st over the first 75-87-95-105-117-129 sts (= back piece), AT THE SAME TIME insert 1st marker after first st and 2nd marker before last st, then cast on 57-57-65-65-73-73 new sts on needle over armhole, work in stocking st over the next 75-87-95-105-117-129 sts (= front piece), AT THE SAME TIME insert 3rd marker after the first of these sts and 4th marker before the last of these, then cast on 57-57-65-65-73-73 new sts on needle over the other armhole = 264-288-320-340-380-404 sts on needle. READ ALL OF THE FOLLOWING SECTION BEFORE CONTINUING! Work first round as follows: K over back piece (i.e. until 1 st past 2nd marker), work as follows over sleeve: * P 2, K 2 *, repeat from *-* 2-2-3-3-4-4 times in total, P 2, work A.4A (= 13 sts) 2 times in total, work A.4B (= 11 sts), * P 2, K 2 *, repeat from *-* 2-2-3-3-4-4 times in total, P 2, K over front piece (i.e. from 1 st before 3rd marker and until 1 st past 4th marker) and work over sleeve as on first sleeve (NOTE: 1 st on each side of all markers are worked in stocking st until finished measurements). RAGLAN: On next round beg dec for raglan and dec for raglan on each side of the 4 markers – READ DECREASE TIP 2 (= 8 sts dec). Repeat dec every other round 21-22-24-25-26-26 times in total. PATTERN: AT THE SAME TIME on 1st-1st-5th-3rd-3rd-3rd round with raglan dec (i.e. on 1st-1st-7th-5th-5th-5th round worked when raglan dec beg) work pattern according to diagram A.5 on front and back piece (work the other sts as explained above). NOTE: When pattern beg, there should be 73-85-85-97-109-121 sts between markers on front and back piece. Work as follows on front and back piece: K 1 st after first marker, work diagram A.5A (= 23 sts, raglan dec is marked in diagram), work pattern according to diagram A.5B over the next 24-36-36-48-60-72 sts, A.5C (= 24 sts, raglan dec is marked in diagram) and finish with K 1 before marker (continue as before over sts on sleeve with raglan dec as explained above). Continue pattern like this. When A.5 has been worked 1 time vertically, work 0-2-0-2-4-4 rounds in stocking st over front and back piece and pattern as before over sleeves AT THE SAME TIME continue raglan dec in size M + XL + XXL + XXXL. After all dec for raglan 96-112-128-140-172-196 sts remain on needle. NECK EDGE: Switch to circular needle size 2.5 mm and P 1 round, K 1 round and P 1 round, before loosely casting off with K. |
|||||||||||||||||||
Diagram explanations |
|||||||||||||||||||
|
|||||||||||||||||||
 |
|||||||||||||||||||
 |
|||||||||||||||||||
 |
|||||||||||||||||||
Have you finished this pattern?Tag your pictures with #dropspattern #daylighttop or submit them to the #dropsfan gallery. Do you need help with this pattern?You'll find 18 tutorial videos, a Comments/Questions area and more by visiting the pattern on garnstudio.com. © 1982-2026 DROPS Design A/S. We reserve all rights. This document, including all its sub-sections, has copyrights. Read more about what you can do with our patterns at the bottom of each pattern on our site. |
|||||||||||||||||||


With over 40 years in knitting and crochet design, DROPS Design offers one of the most extensive collections of free patterns on the internet - translated to 17 languages. As of today we count 324 catalogues and 12290 patterns translated into English (UK/cm). 12290
We work hard to bring you the best knitting and crochet have to offer, inspiration and advice as well as great quality yarns at incredible prices! Would you like to use our patterns for other than personal use? You can read what you are allowed to do in the Copyright text at the bottom of all our patterns. Happy crafting!
Post a comment to pattern DROPS 152-13
We would love to hear what you have to say about this pattern!
If you want to leave a question, please make sure you select the correct category in the form below, to speed up the answering process. Required fields are marked *.