
Popular categories
Looking for a yarn?


Comments / Questions (14)
![]() Agnès Combes wrote:
Agnès Combes wrote:
Les mailles serrées ne seraient elle pas plutôt des m. coulées et pour le tour 3 :"4 m suivantes crocheter 1 DB dans le brin avant et 1 DB dans le brin arrière de la même maille" : le résultat est trop court par rapport au reste alors cela forme un rond. Je ne comprends pas l'intérêt de faire 1DB dans le brin avant puis dans le brin arrière: cela augmente l\'épaisseur et non la longueur. Non ?
03.01.2022 - 10:17DROPS Design answered:
Bonjour Mme Combes, regardez bien la vidéo indiquée dans la réponse précédente, et dites-nous si vous arrivez à bien obtenir la chouette. Bon crochet!
03.01.2022 - 13:20
![]() Combes wrote:
Combes wrote:
Bonjour, en suivant le patron à la lettre je n'arrive pas à obtenir une forme ovale comme vs.
03.01.2022 - 10:16DROPS Design answered:
Bonjour Mme Combes, cette vidéo montre comment réaliser la chouette, cela vous aidera fort probablement. Bon crochet!
03.01.2022 - 13:19
![]() Doris wrote:
Doris wrote:
Selbst ach sovielen Jahren ist die Eule süss. Es hat alles geklappt und sieht echt süß aus. Danke für die Anleitung.
19.03.2018 - 06:49
![]() Zsófi M. wrote:
Zsófi M. wrote:
The hungarian translation is not correct compared to the German and English ones. According to the hungarian translation it is not possible to crochet, Instruction is missleading. Please correct.
10.02.2018 - 21:42
![]() Kerstin wrote:
Kerstin wrote:
Vielen Dank für diese schöne Anleitung. Hat perfekt geklappt.
25.05.2015 - 00:11
![]() Lies wrote:
Lies wrote:
Klopt het dat beide uiltjes hetzelfde patroon zijn? Groot en klein? Ik vraag me dan dus af of ik de grote of de kleine uil maak
06.05.2015 - 15:46DROPS Design answered:
Hoi Lies. Het patroon is hetzelfde, maar omdat je de kleine haakt met Safran en naald 2,5 en de grote met Muskat en naald 3 worden er een verschil in grote.
06.05.2015 - 17:31
![]() Bi wrote:
Bi wrote:
Bij me helaas komt dat niet echt mooi en succesvol uit// dat is eerste keer met jullie modellen, ondanks dat ik alle instructies en hulp van Drop design heb al gebruikt.
02.04.2015 - 16:14
![]() Dinuska wrote:
Dinuska wrote:
Nagyon cukik! (Very nice!)
12.01.2015 - 09:59
![]() Claudia L wrote:
Claudia L wrote:
Gleder meg til å prøve!
06.04.2013 - 23:01
![]() Claudia L wrote:
Claudia L wrote:
Gleder meg til å prøve!
06.04.2013 - 23:01
|
|
Hedwig#dropshedwig |
|
 |
 |
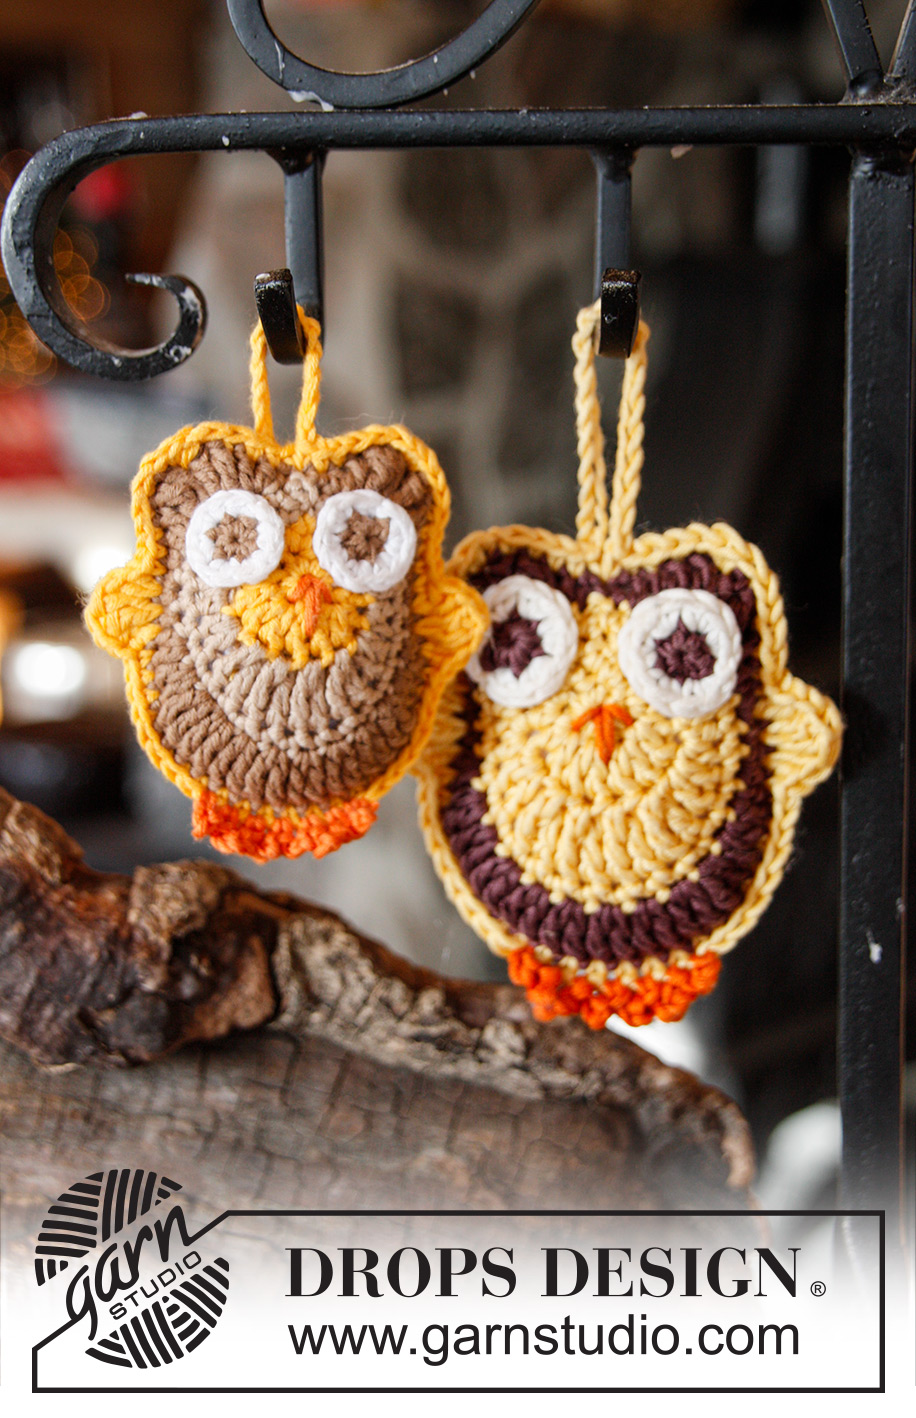
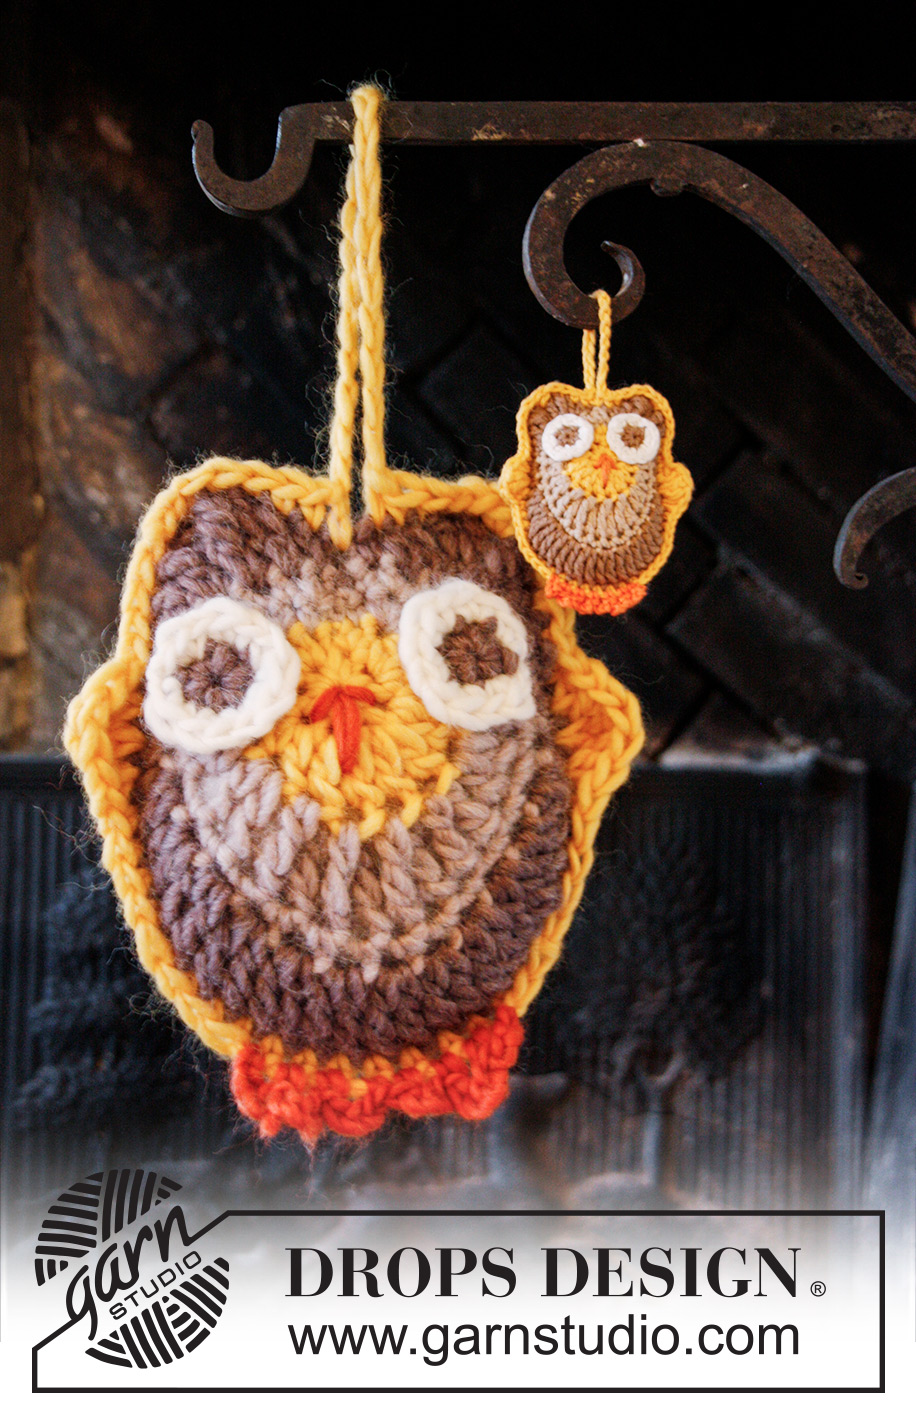
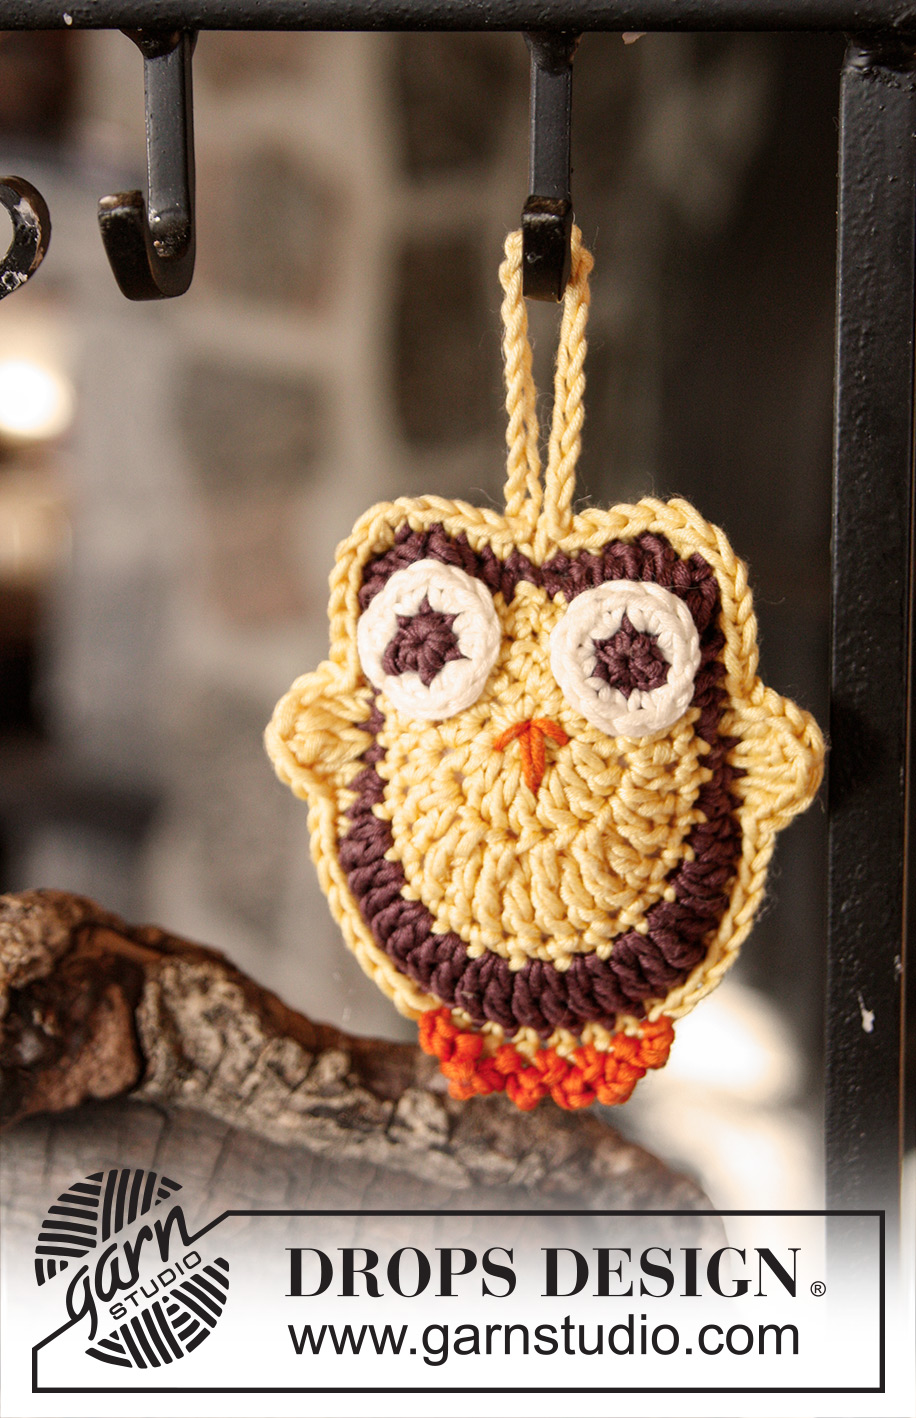
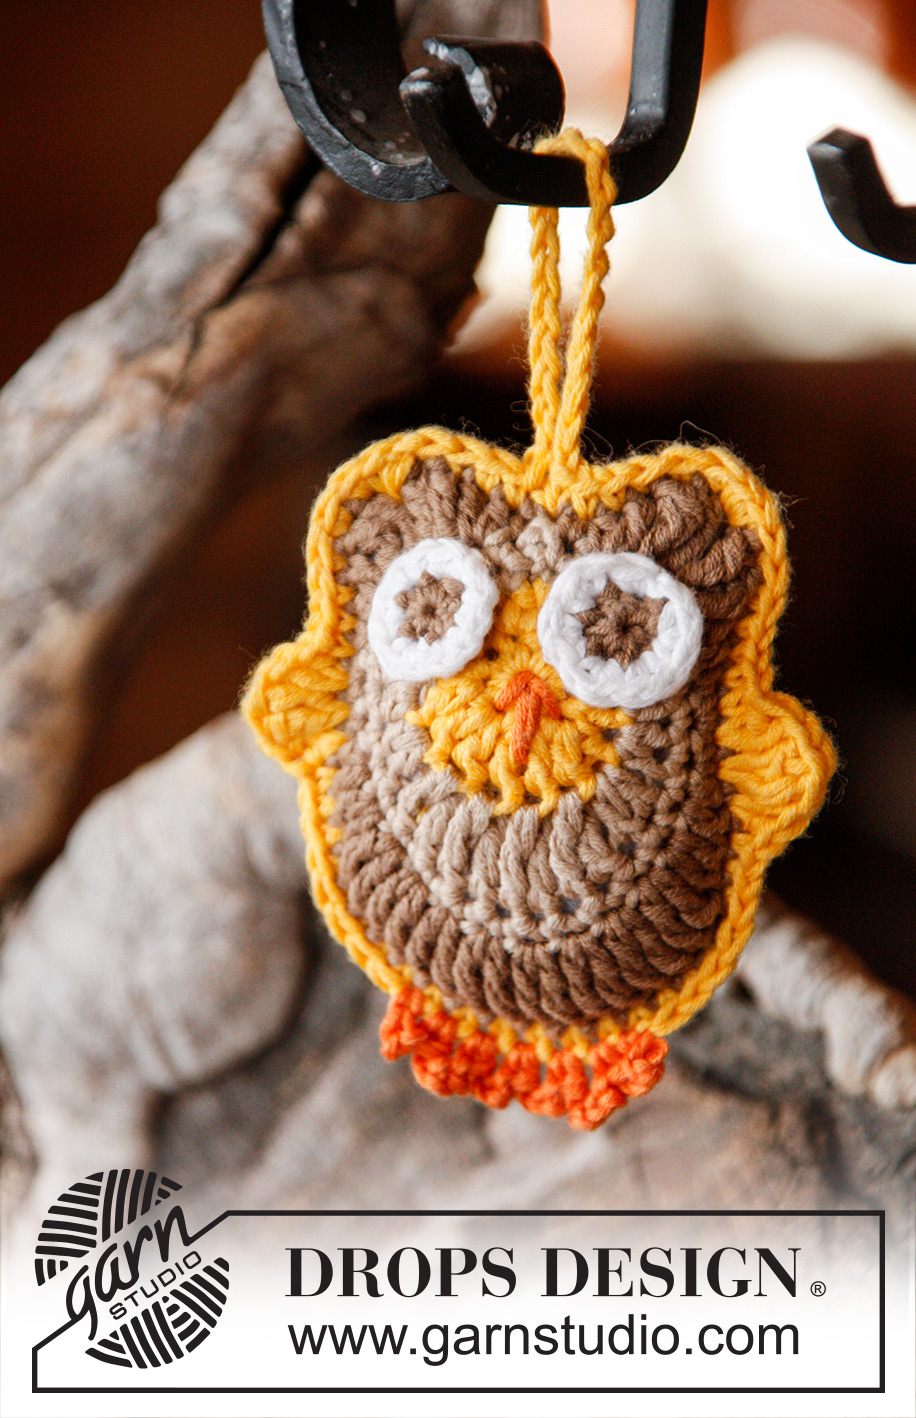
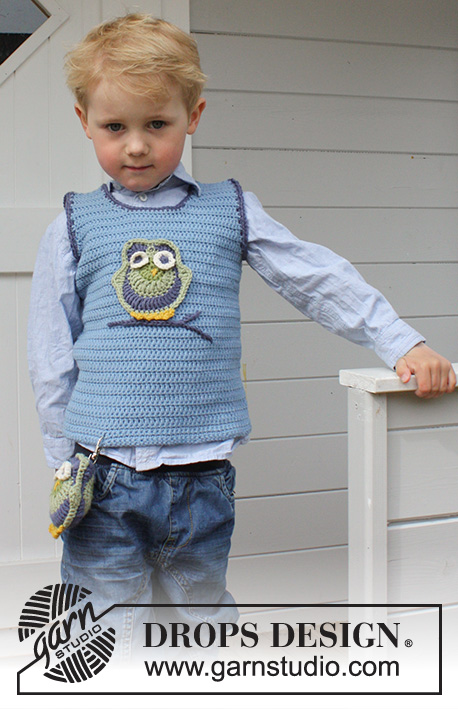
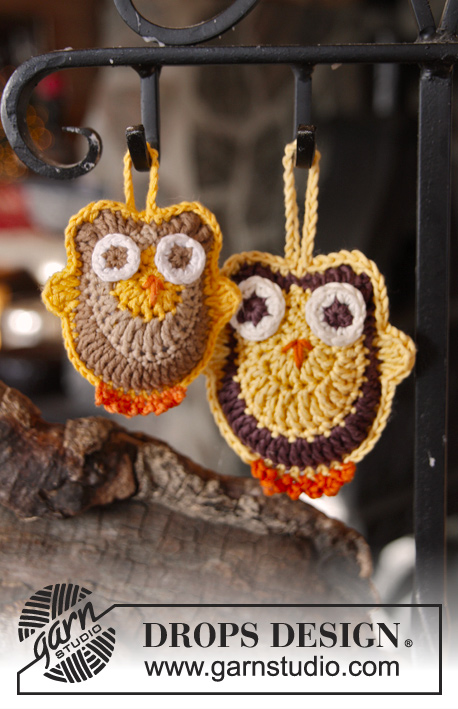
DROPS Easter: Crochet DROPS owls in ”Safran” and ”Muskat”.
DROPS Extra 0-909 |
|
|
MAGIC CIRCLE: When piece is worked in the round, start with this technique to avoid holes in the middle (instead of ch-ring): Hold the yarn end and wind the yarn one time around the index finger to make a loop. Hold the loop with left thumb and middle finger, place the yarn over left index finger. Insert hook through the loop, make a YO and pull yarn through loop, work 1 ch, then work dc around the loop. When the desired no of dc have been reached, pull the yarn end to tighten the loop. Fasten the yarn end at the back. CROCHET INFO: Beg every round with 1 ch and finish with 1 sl st in first ch from beg of round. COLOUR CHANGE: To get a nice transition between the colour changes, work last sl st on round with the new colour as follows: Insert hook in last ch from beg of round, make a YO with the new colour and pull it through st on hook. ---------------------------------------------------------- SMALL OWL: Worked in the round in Safran. Start by making a MAGIC CIRCLE - read explanation above - with strong yellow on hook size 2.5 mm. ROUND 1: Read CROCHET INFO and COLOUR CHANGE! Work 8 dc in the magic circle. ROUND 2: 2 dc in first dc, 2 htr in next dc, 1 htr and 1 tr in next dc, 2 tr in each of the next 2 dc, 1 tr and 1 htr in next dc, 2 htr in next dc, 2 dc in last dc on round = 16 sts. ROUND 3: Switch to light brown and work 1 dc in first st, 2 dc in next st, 1 dc in next st, 2 htr in each of the next 2 sts, 2 tr in next st, in each of the next 4 sts work 1 dtr in front loop and 1 dtr in back loop of the same st, 2 tr in next st, 2 htr in each of the next 2 sts, 1 dc in next st, 2 dc in next st, 1 dc in last st on round = 28 sts. ROUND 4: Work 1 dc in every st the entire round. ROUND 5: Switch to brown and work 1 dc in first st, 1 htr in next st, 1 tr in same st, 2 dtr in next st, 1 ch (= top of ear), 2 dtr in next st, 1 tr in next st, 1 htr in same st, 1 dc in next st, 2 dc in next st, 1 dc in next st, 1 htr in next st and 1 tr in same st, 2 tr in next st, 2 dtr in each of the next 8 sts, 2 tr in next st, 1 tr in next st, 1 htr in same st, 1 dc in next st, 2 dc in next st, 1 dc in next st, 1 htr in next st, 1 tr in same st, 2 dtr in next st, 1 ch (= top of ear), 2 dtr in next st, 1 tr in next st, 1 htr in same st, 1 dc in last st on round = 50 sts (+ 2 ch). Fasten off (NOTE - the last round in diagram is worked later). Work another owl the same way. Fasten off. EYES: Worked in the round. Start by making a MAGIC CIRCLE - read explanation above - with brown on hook size 2.5 mm. ROUND 1: READ CROCHET INFO - Work 6 dc in the magic circle. ROUND 2: Switch to white and work 2 dc in every dc the entire round = 12 dc. Work another eye the same way. Fasten off. ASSEMBLY: Fasten the eyes on the owl. Embroider on the beak with orange as follows: Beg in the mid of the magic circle and sew a stitch down to 2nd round 2 times, and sew from the mid of circle and diagonally down to 1st round on each side of the first stitches; only 1 time on each side. Then work the owl tog with strong yellow on hook size 2.5 mm. Place the two owls on top of each other, WS against WS, with the beak towards you. Work through both layers as follows: Work 2 dc in ch at the top of ear on the left side. Then work as follows: 1 dc in the next 6 sts, 1 htr in next st and 1 tr in same st, 2 dtr in next st, 1 tr in next st and 1 htr in same st, 1 dc in each of the next 8 sts, insert 1 marker in the last st and work 1 dc in each of the next 14 sts, 1 htr in next st and 1 tr in same st, 2 dtr in next st, 1 tr in next st and 1 htr in same st, 1 dc in each of the next 6 sts and work 2 dc in ch (= top of right ear). Fill the owl with some cotton wool and continue as follows: 1 dc in each of the next 5 sts, 15-20 ch, 1 dc in next st, 1 dc in each of the next 4 sts and finish with 1 sl st in first dc from beg of round = 60 sts (+ 20 ch). Fasten off. Work the claws with orange on hook size 2.5 mm. Beg in the st with marker as follows: * 1 dc, 3 ch, 1 dc in next st, 4 ch, 1 dc in next st, 3 ch, 1 dc in next st *, repeat from *-* 1 more time. Fasten off. LARGE OWL: Worked in the round in Muskat. Start by making a MAGIC CIRCLE - read explanation above - with vanilla yellow on hook size 3 mm. ROUND 1: Read CROCHET INFO and COLOUR CHANGE! Work 8 dc in the magic circle. ROUND 2: 2 dc in first dc, 2 htr in next dc, 1 htr and 1 tr in next dc, 2 tr in each of the next 2 dc, 1 tr and 1 htr in next dc, 2 htr in next dc, 2 dc in last dc on round = 16 sts. ROUND 3: Work 1 dc in first st, 2 dc in next st, 1 dc in next st, 2 htr in each of the next 2 sts, 2 tr in next st, in each of the next 4 sts work 1 dtr in front loop and 1 dtr in back loop of the same st, 2 tr in next st, 2 htr in each of the next 2 sts, 1 dc in next st, 2 dc in next st, 1 dc in last st on round = 28 sts. ROUND 4: Work 1 dc in every st the entire round. ROUND 5: Switch to brown and work 1 dc in first st, 1 htr in next st, 1 tr in same st, 2 dtr in next st, 1 ch (= top of ear), 2 dtr in next st, 1 tr in next st, 1 htr in same st, 1 dc in next st, 2 dc in next st, 1 dc in next st, 1 htr in next st and 1 tr in same st, 2 tr in next st, 2 dtr in each of the next 8 sts, 2 tr in next st, 1 tr in next st, 1 htr in same st, 1 dc in next st, 2 dc in next st, 1 dc in next st, 1 htr in next st, 1 tr in same st, 2 dtr in next st, 1 ch (= top of ear), 2 dtr in next st, 1 tr in next st, 1 htr in same st, 1 dc in last st on round = 50 sts (+ 2 ch). Fasten off (NOTE - the last round in diagram is worked later). Work another owl the same way. Fasten off. EYES: Worked in the round. Start by making a MAGIC CIRCLE - read explanation above - with brown on hook size 3 mm. ROUND 1: READ CROCHET INFO - Work 6 dc in the magic circle. ROUND 2: Switch to off white and work 2 dc in every dc the entire round = 12 dc. Work another eye the same way. Fasten off. ASSEMBLY: Fasten the eyes on the owl. Embroider on the beak with dark orange as follows: Beg in the mid of the magic circle and sew a stitch down to 2nd round 2 times, and sew from the mid of circle and diagonally down to 1st round on each side of the first stitches; only 1 time on each side. Then work the owl tog with vanilla yellow on hook size 3 mm. Place the two owls on top of each other, WS against WS, with the beak towards you. Work through both layers as follows: Work 2 dc in ch at the top of ear on the left side. Then work as follows: 1 dc in the next 6 sts, 1 htr in next st and 1 tr in same st, 2 dtr in next st, 1 tr in next st and 1 htr in same st, 1 dc in each of the next 8 sts, insert 1 marker in the last st and work 1 dc in each of the next 14 sts, 1 htr in next st and 1 tr in same st, 2 dtr in next st, 1 tr in next st and 1 htr in same st, 1 dc in each of the next 6 sts and work 2 dc in ch (= top of right ear). Fill the owl with some cotton wool and continue as follows: 1 dc in each of the next 5 sts, 15-20 ch, 1 dc in next st, 1 dc in each of the next 4 sts and finish with 1 sl st in first dc from beg of round = 60 sts (+ 20 ch). Fasten off. Work the claws with dark orange on hook size 3 mm. Beg in the st with marker as follows: * 1 dc, 3 ch, 1 dc in next st, 4 ch, 1 dc in next st, 3 ch, 1 dc in next st *, repeat from *-* 1 more time. Fasten off. |
|
Have you finished this pattern?Tag your pictures with #dropspattern #dropshedwig or submit them to the #dropsfan gallery. Do you need help with this pattern?You'll find 8 tutorial videos, a Comments/Questions area and more by visiting the pattern on garnstudio.com. © 1982-2026 DROPS Design A/S. We reserve all rights. This document, including all its sub-sections, has copyrights. Read more about what you can do with our patterns at the bottom of each pattern on our site. |
|


With over 40 years in knitting and crochet design, DROPS Design offers one of the most extensive collections of free patterns on the internet - translated to 17 languages. As of today we count 324 catalogues and 12290 patterns translated into English (UK/cm). 12290
We work hard to bring you the best knitting and crochet have to offer, inspiration and advice as well as great quality yarns at incredible prices! Would you like to use our patterns for other than personal use? You can read what you are allowed to do in the Copyright text at the bottom of all our patterns. Happy crafting!
Post a comment to pattern DROPS Extra 0-909
We would love to hear what you have to say about this pattern!
If you want to leave a question, please make sure you select the correct category in the form below, to speed up the answering process. Required fields are marked *.