
Popular categories
Looking for a yarn?


Comments / Questions (49)
![]() Hélène wrote:
Hélène wrote:
Bonjour, quand vous mentionnez tricoter 3 fois A3 entre A2 et A4. tricoter les diagrammes 4 fois au total en hauteur, à chaque fois que l’on recommence, on a suffisamment de mailles pour tricoter encore 2 fois A3 en plus entre A2 et A4 donc ce que je comprends je tricote A3 5 fois entre A2 et A4 et ce 4 fois en hauteur. Suis-je dans l’erreur? Merci Hélène
29.01.2018 - 14:03DROPS Design answered:
Bonjour Hélène, quand vous tricotez les diagrammes la 2ème fois en hauteur, vous aurez 5 motifs de A.3 entre A.2 et A.4, la 3ème fois, vous en aurez 7 (2 de plus) et la 4ème fois 9 (2 de plus). Bon tricot!
29.01.2018 - 17:02
![]() Micha wrote:
Micha wrote:
Bonjour, concernant les rapports A5, A6, A7 : faut-il augmenter les 8 mailles à chaque dernier rang de rapport ou bien seulement 1 fois sur le dernier rang du 4ème rapport ? merci pour votre attention.
17.07.2016 - 20:13DROPS Design answered:
Bonjour Micha, on augmente 8 m pour en avoir 301 au dernier rang des diagrammes A.5-A.7 c'est-à-dire sur l'envers, au 8ème rang. Bon tricot!
18.07.2016 - 09:28
![]() Marimar wrote:
Marimar wrote:
Bonjour, Pouvez vous me dire où je dois regarder sur le site pour savoir comment lire vos diagrammes de tricots et de crochets. Merci pour votre attention
10.06.2016 - 21:15DROPS Design answered:
Bonjour Mme Marimar, vous trouverez ici toutes les informations sur la lecture des diagrammes. Au-dessus de chaque diagramme, vous trouvez la légende et la signification des symboles adaptés au diagramme/modèle. Bon tricot!
13.06.2016 - 08:31
![]() Kostova, Elena wrote:
Kostova, Elena wrote:
Hallo, ich habe eine Frage: zeigen die Diagramme nur die Hin- oder auch die Rückreihen? Gerade bei A.1. verstehe ich nicht ob jede zweite abgebildete Reihe schon eine Rückreihe ist, die von vorne rechts erscheint oder muss man sie rechts stricken und hinten wird immer links gestrickt (außer den 3 Kraus-rechts gestrickten Maschen)?
11.12.2015 - 10:07DROPS Design answered:
Es sind alle R eingezeichnet, also auch die Rück-R. Die Reihen sind so abgebildet, wie sie auf der Vorderseite erscheinen. D.h. in der Rück-R stricken Sie das leere Kästchen links, dann erscheint es ja auf der Vorderseite rechts, und das Kästchen mit dem Punkt stricken Sie in der Rück-R rechts, dann erscheint es auf der Vorderseite links.
13.12.2015 - 13:42
![]() Janice wrote:
Janice wrote:
Hallo allerseits, ich habe das wunderschöne Tuch nachgestrickt bzw. versucht nachzustricken. Die Maschenzahlen haben mit der Anleitung immer übereingestimmt, daher hatte ich das Gefühl alles richtig gemacht zu haben. Nur leider ist das Teil - auch nach dem Spannen - nicht zu einem Dreieck geworden. Hat jemand eine Idee, was ich falsch gemacht habe?
13.07.2015 - 21:31DROPS Design answered:
Das Prinzip der Zunahmen ist wichtig, damit sich die Dreieckform ergibt, Sie nehmen in jeder Hin-R 4 M zu, davon je 1 an beiden Seiten nach den 3 kraus-re-M und 2 in der Mitte, d.h. je 1 neben der Mittel-M. Diese Zunahmen sind in den Diagrammen enthalten, die Sie an den entsprechenden Stellen stricken.
20.07.2015 - 12:19
![]() Isa wrote:
Isa wrote:
Excuse my english. Are You sure this pattern is fo Lysa ? I don't have the same holes. It don't look like the photo. Waiting for your help, I continue the A2,A3,A4. Thanks
25.11.2014 - 19:12DROPS Design answered:
Dear Isa, please read more about diagrams clicking here (in French). Cliquez ici pour plus d'infos sur les diagrammes. Le châle est ensuite étiré à ses dimensions finales et donnera un résultat plus aéré - pensez à vérifier votre tension comme indiqué. Bon tricot!
26.11.2014 - 09:35
![]() Sylvie wrote:
Sylvie wrote:
Dommage. je n'ai pas eu ma réponse... Plus la peine, j'ai fait un autre modèle..;
15.07.2014 - 17:44DROPS Design answered:
Bonjour Sylvie, les explications ont été modifiées, la m centrale se tricote en jersey tout du long, du début jusqu'à la fin. Désolée pour la réponse tardive. Bon tricot!
26.11.2014 - 15:27
![]() Sylvie wrote:
Sylvie wrote:
Je suis impatiente de réaliser ce chale, mais je ne comprends toujours pas s'il y a une erreur pour la maille centrale du début en jersey endroit ou au point mousse et si cela a de l'importance
30.06.2014 - 22:09DROPS Design answered:
Bonjour Sylvie, nous vous remercions encore pour votre patience et vous répondrons ici dès que possible. Merci encore.
02.07.2014 - 18:45
![]() Pat wrote:
Pat wrote:
I just completed pattern to the point of having 301 stitches. Now if I do A2 A3 and A4 again one more time vertically won't there be 349 stitches total? Or do I stop when there are a total of 333 stitches?
28.06.2014 - 00:01DROPS Design answered:
Dear Pat, a correction has been now made and pattern has been edited. Thank you. Happy knitting!
30.06.2014 - 08:45
![]() Pat wrote:
Pat wrote:
After finishing adding the 8 stitches = 301 stitches then doing A2 A3 A4 until diagrams have been worked 1 more time vertically won't there be a total of 349 stitches?
27.06.2014 - 23:57
|
|||||||||||||||||||
Lisa#lisashawl |
|||||||||||||||||||
 |
 |
||||||||||||||||||
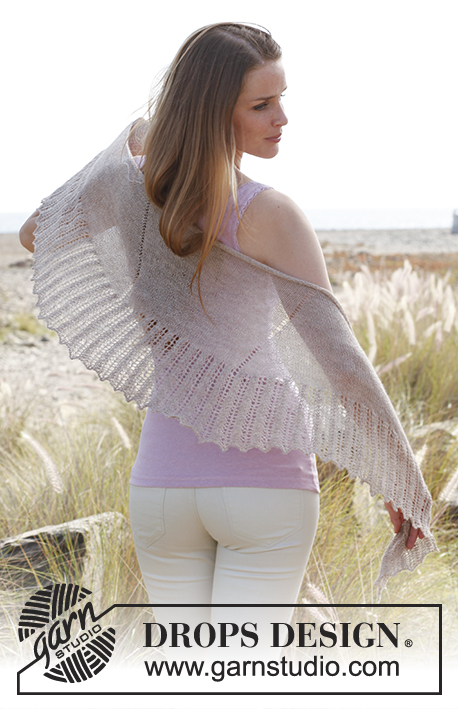
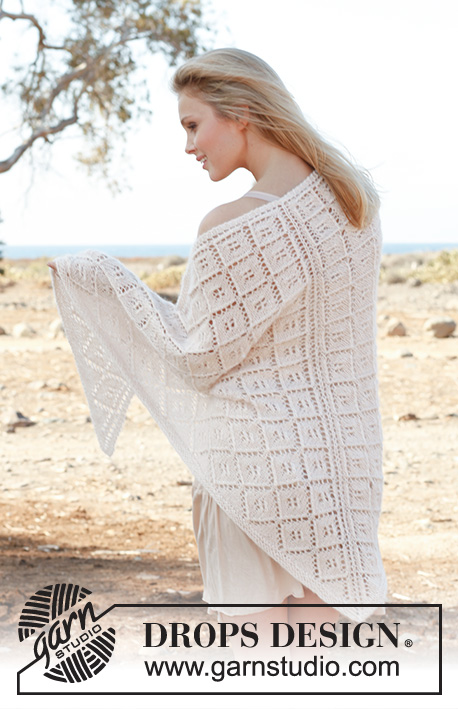
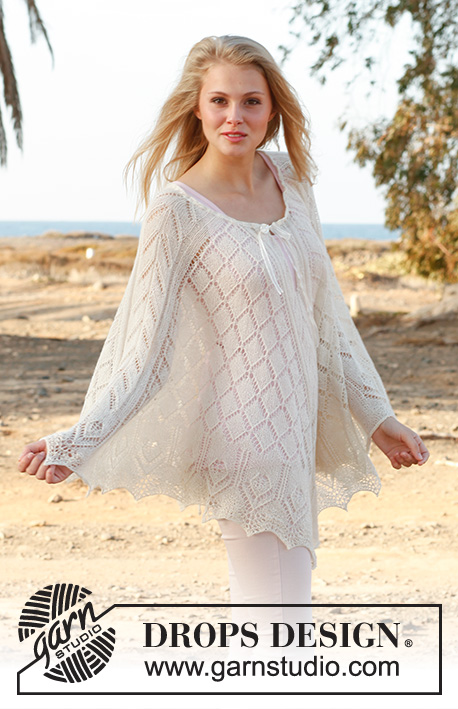
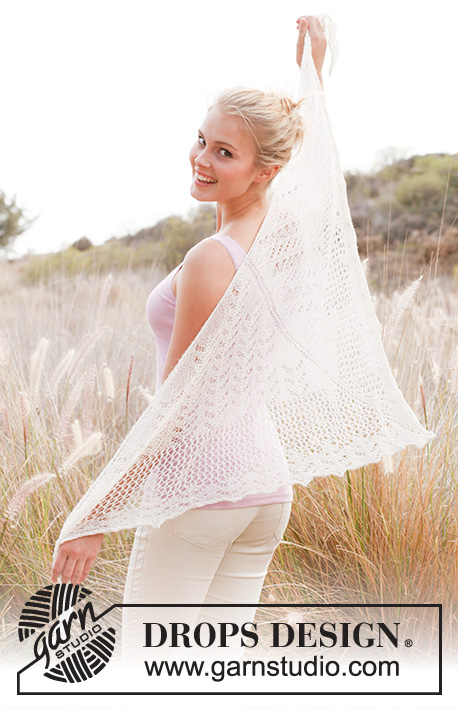
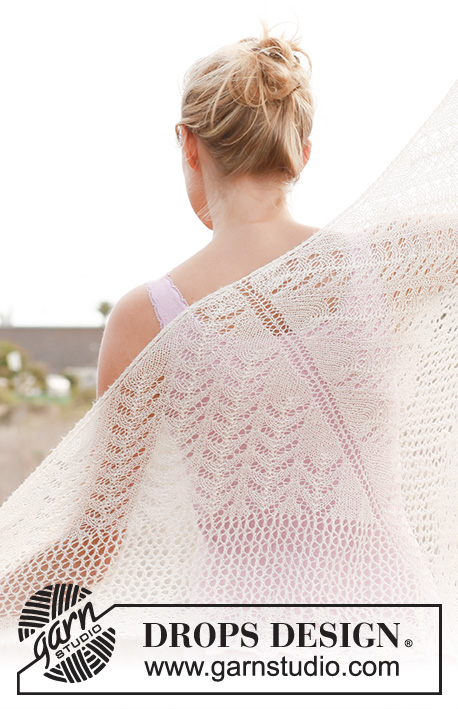
Knitted DROPS shawl with lace pattern in ”Lace”.
DROPS 146-15 |
|||||||||||||||||||
|
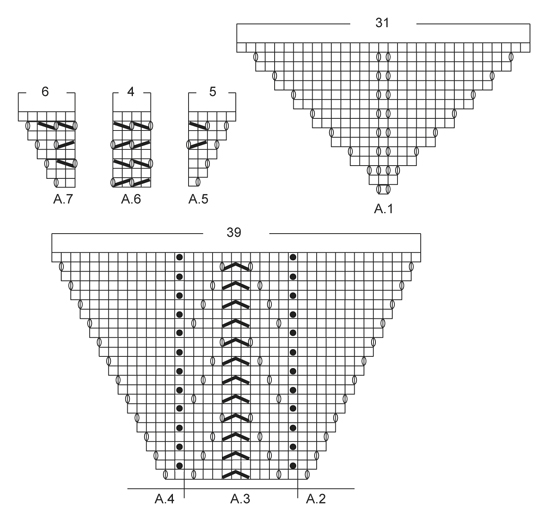
GARTER ST (back and forth on needle): K all rows. 1 ridge = 2 rows K. PATTERN: See diagrams A.1 to A.7. Diagrams show all rows in pattern seen from RS. ---------------------------------------------------------- SHAWL: Worked back and forth on circular needle to make room for all the sts. Cast on 7 sts on circular needle size 3.5 mm with Lace. Insert 1 marker in the 4th st and move it upwards when working (= mid st - marks mid back of shawl). Then work as follows: (1st row = RS) 3 sts in GARTER ST – see explanation above, diagram A.1 and 3 sts in garter st. On next row P YOs to make holes = 9 sts. Continue to work according to diagram A.1 with 3 sts in garter st in each side, when diagram A.1 has been worked 1 time vertically, there are 37 sts on row. Now continue as follows: 3 sts in garter st, diagrams A.2/A.3/A.4 and K 1 st (= mid st), diagrams A.2/A.3/A.4 and 3 sts in garter st. When diagrams have been worked 1 time vertically (= 85 sts), start over; 3 repetitions of A.3 will fit between A.2 and A.4. Work diagrams a total of 4 times vertically, every time you start over, there is room for 2 more repetitions of A.3 between A.2 and A.4. When diagrams have been worked 4 times vertically, there are 229 sts on row. Piece measures approx. 37 cm measured in knitting direction from cast on edge up to needle. Now continue as follows: 3 sts in garter st, A.5, A.6 over the next 108 sts, work until 2 sts remain before mid st, work A.7, K 1 st (= mid-st), A.5, A.6 over the next 108 sts until 5 sts remain, work A.7 and 3 sts in garter st. Continue to work according to diagrams A.5/A.6/A.7 until diagrams have been worked 4 times vertically. Every time A.5/A.6/A.7 have been worked 1 time vertically, there is room for 2 more repetitions of A.6 between A.5 and A.7 on each side of mid st - AT THE SAME TIME on last row of last repetition (= WS), inc 8 sts evenly by working 2 sts in 1 st = 301 sts. Piece measures approx. 48 cm measured in knitting direction. Now continue as follows: 3 sts in garter st, A.2, A.3 over the next 144 sts, work until 2 sts remain before mid st, work A.4, K 1 st (mid-st), A.2, A.3 over the next 144 sts, 5 sts remain, work A.4 and 3 sts in garter st. Continue to work according to diagrams A.2/A.3/A.4 until diagrams have been worked 1 time vertically = 349 sts. On next row from RS, loosely cast off as follows – NOTE: It is very important to cast off very LOOSELY otherwise the edge cannot be shaped into tips: Cast of the first 3 edge sts (lightly pull them when casting off so that they are loose), * make 1 loose YO on right needle, cast off YO, cast off 2 sts (lightly pull when casting off so that they are loose) *, repeat from *-* the entire row. BLOCKING: Place the shawl in lukewarm water until it is soaking wet. Carefully squeeze the water out of the shawl - do not twist the shawl - then roll the shawl in a towel and squeeze to remove more water - the shawl will now only be moist. Place the shawl on a carpet or mattress - carefully stretch it out to size and fasten it with pins. NOTE: 1 pin in the outermost st in each side of shawl, fasten 1 pin in the middle of every repetition along the 2 diagonal sides and 1 pin in mid st (= at the bottom of tip on shawl), lightly pull at every pin so that the edge is shaped into small tips. Leave to dry. Repeat the process when the shawl has been washed. |
|||||||||||||||||||
Diagram explanations |
|||||||||||||||||||
|
|||||||||||||||||||
 |
|||||||||||||||||||
Have you finished this pattern?Tag your pictures with #dropspattern #lisashawl or submit them to the #dropsfan gallery. Do you need help with this pattern?You'll find 14 tutorial videos, a Comments/Questions area and more by visiting the pattern on garnstudio.com. © 1982-2026 DROPS Design A/S. We reserve all rights. This document, including all its sub-sections, has copyrights. Read more about what you can do with our patterns at the bottom of each pattern on our site. |
|||||||||||||||||||


With over 40 years in knitting and crochet design, DROPS Design offers one of the most extensive collections of free patterns on the internet - translated to 17 languages. As of today we count 324 catalogues and 12290 patterns translated into English (UK/cm). 12290
We work hard to bring you the best knitting and crochet have to offer, inspiration and advice as well as great quality yarns at incredible prices! Would you like to use our patterns for other than personal use? You can read what you are allowed to do in the Copyright text at the bottom of all our patterns. Happy crafting!
Post a comment to pattern DROPS 146-15
We would love to hear what you have to say about this pattern!
If you want to leave a question, please make sure you select the correct category in the form below, to speed up the answering process. Required fields are marked *.