
Popular categories
Looking for a yarn?


Comments / Questions (44)
![]() Daniela wrote:
Daniela wrote:
Eine Frage zur Öffnung im Schritt. Bleibt dieser offen? Wird zusammengenäht? Oder gehören - wie ich es eher vermute noch drei der 6 Knöpfe hier angenäht? Dann jedoch die Knopflöcher nicht vergessen...
24.09.2014 - 13:48DROPS Design answered:
Liebe Daniela, Sie arbeiten 2 x 3 Knopflöcher ein, beschrieben unter "Vorderteil" (das ist dann die Öffnung unten) und "Öffnung am Rücken".
24.09.2014 - 23:38
![]() Claudia wrote:
Claudia wrote:
Hallo, ich glaube ich habe noch einen Fehler gefunden. Ich glaube, sie haben die Überschriften Vorderteil und Rückenteil vertauscht. Ein Body ist normalerweise hinten breiter und länger. Laut Ihrer Anleitung entsteht aber ein Body, der vorne breiter und länger ist.
18.12.2013 - 18:47DROPS Design answered:
Liebe Claudia, wir haben es geprüft, die Überschriften sind richtig, wie im norwegischen Original. Dieser Body ist so geschnitten.
19.12.2013 - 07:47
![]() Claudia wrote:
Claudia wrote:
Hallo, wieso soll ich die Umschläge für die Knopflöcher in der nächsten Reihe verschränkt stricken? Dabei entsteht dann doch kein Loch (jedenfalls bei mir nicht).
17.12.2013 - 09:49DROPS Design answered:
Liebe Claudia, haben Sie die beiden Maschen daneben zusammengestrickt? Dann ergibt sich ein kleines Loch, dies ist am Vorderteil so gewünscht.
19.12.2013 - 07:51
![]() Christina Skovholm wrote:
Christina Skovholm wrote:
Jeg forstår simpelthen ikke, hvad der menes under stykket "BENÅBNING: Strik ca 16 m op fra retsiden per 5 cm langs den ene benåbning..."? Jeg kunne tænke mig til at det er en form for elastisk stykke som skal laves, for at det strikkede stof kommer til at sidde tæt om bleen. Men det der "per 5 cm", betyder det, at jeg skal starte 5 cm inde i benåbningen med at strikke de 16 masker op og ieg så slutte 5 cm før benåbningen igen?
08.02.2013 - 15:11DROPS Design answered:
Det er en bodystocking, saa naar du er saa vidt, har du to benaabninger nederst. Du skal nu strikke en kant omkring denne. Du tager ca 16 m op per 5 cm langs hele aabningen. Det er det antal vi anbefaler for at faa en paen kant som ikke er for stram eller for lös. Strik derefter 1 cm Rib rundt om hele benaabningen, luk af o g gentag processen om den anden benaabning. God fornöjelse.
12.02.2013 - 12:57
![]() Ces wrote:
Ces wrote:
Schattig truitje! Nu nog eraan beginnen..
29.12.2012 - 09:52
![]() Mona Victoria Fjellstad wrote:
Mona Victoria Fjellstad wrote:
Jeg strikker Little Williams body, og lurer på noe i følgende oppskrift: " Gjenta økningen fra retten på hver 2.p totalt 12-12-12 (13-15) ganger, deretter på hver 4.p totalt 2-3-4 (4-4) ganger. Vil det si at jeg skal øke på HVER pinne jeg strikker på retten, eller ANNEN HVER gang jeg strikker på retten? Takk for svar!
11.10.2012 - 15:07DROPS Design answered:
Heisann. Du skal øke på hver 2. pinne (= hver pinne rett).
15.10.2012 - 11:10
![]() I.schneider wrote:
I.schneider wrote:
Ich hab die ANleitung genommen und einen Pullover gestrickt. Sieht super aus !!!!
29.05.2012 - 11:40Christine wrote:
Hello. If this is knitted from top down (I am knitting the yoke right now) then how do I read the charts? Because if I read them tóp down it does not end up looking like the photo...
08.03.2012 - 09:04DROPS Design answered:
You work the piece top down, but when working charts you always start in the bottom right corner of the chart, and follow the chart from bottom and up, row by row.
09.03.2012 - 18:14
![]() Linn wrote:
Linn wrote:
Har strikket den og det blir ikke likt som på bildet. I oppskriften på bolen står det "fortsett med M.4 og videre M.5 1 gang i høyden". På BILDET er de 3 siste omg av M.3 mellom M.4 og M.5 hvis en ser nøye etter... ?
11.01.2012 - 18:13
![]() DROPS Design wrote:
DROPS Design wrote:
Nei, det stemmer. Husk at arb. strikkes ovenfra og ned.
31.12.2011 - 18:12
|
|||||||
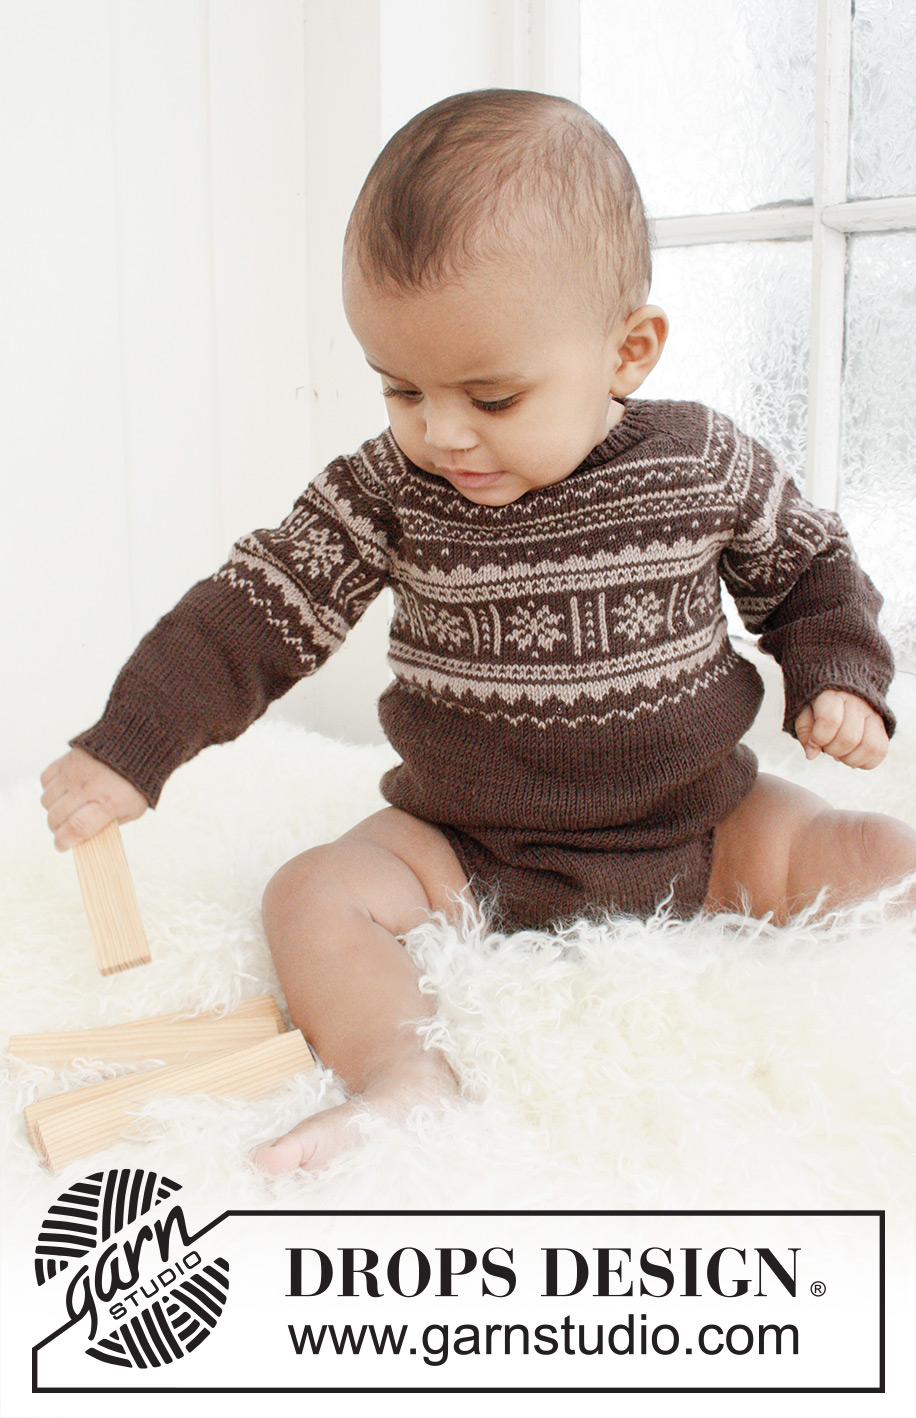
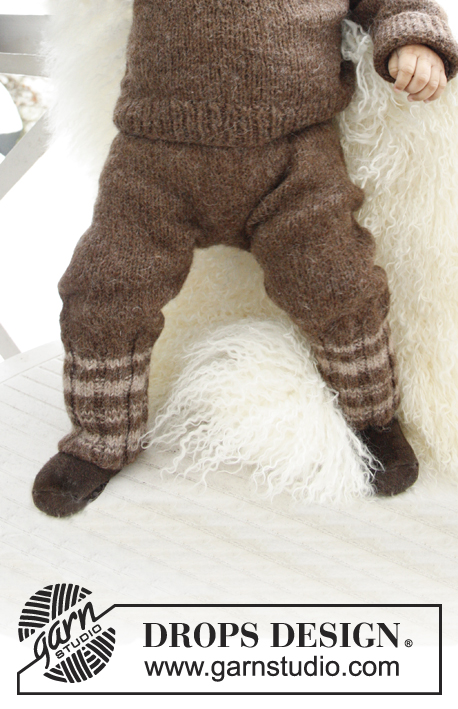
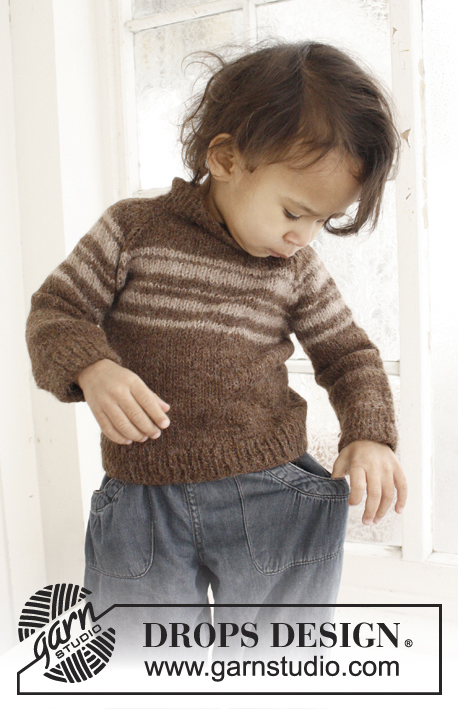
Litte William`s Body#littewilliamsbody |
|||||||
|
|
|||||||
Knitted body with raglan and Nordic pattern for baby and children in DROPS BabyMerino or DROPS BabyAlpaca Silk
DROPS Baby 21-32 |
|||||||
|
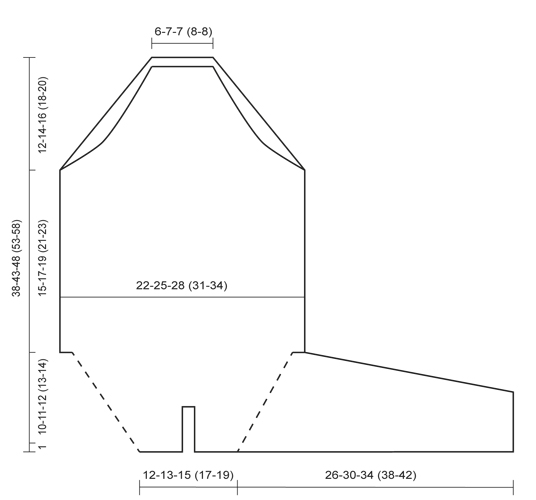
ST WORKED TWISTED: Work in back loop of st instead of front. INCREASE TIP: Inc 1 st before and after st with marker by making 1 YO. On next row work YO twisted to avoid holes. DECREASE TIP 1 (applies to front and back piece): Dec from RS 1 st after and before 1 edge st in each side as follows: After 1 edge st: Slip 1 st as if to K, K 1, psso. Before 1 edge st: K 2 tog. Dec from WS 1 st after and before 1 edge st in each side as follows: After 1 edge st: P 2 twisted tog. Before 1 edge st: P 2 tog. DECREASE TIP 2 (applies to sleeve): Dec 1 st on each side of marker as follows: Work until 2 sts remain before marker, slip 1 st as if to K, K 1, psso, (marker), K tog the next 2 sts. PATTERN ON YOKE: See diagrams M.1 - M.3. Firstly work diagrams M.1, M.2, and M.3 1 time vertically, then diagram M.2 0-0-0 (1-1) time = 25-25-25 (30-30) rows in total. PATTERN ON BODY/SLEEVE: See diagrams M.4 and M.5. First work diagram M.4 and then diagram M.5 1 time vertically. -------------------------------------------------------- YOKE: The piece is first worked back and forth and then in the round. Worked top down from the neck. Cast on 49-57-65 (73-81) sts on circular needle size 2 mm with brown. Work rib back and forth (1st row = RS) as follows: * K 1, P 1 *, repeat from *-*, K last st on row. When rib measures approx. 1 cm, K next row from WS - While at the same time inc 7-9-11 (13-15) sts evenly on row = 56-66-76 (86-96) sts. On next row (= RS) switch to circular needle size 2.5 mm and work as follows: K 1 (= mid back), K 7-9-12 (14-16) (= right back piece), K 1, insert a marker in this st, K 8-9-8 (9-10) (= right sleeve), K 1, insert a marker in this st, K 20-24-30 (34-38) (= front piece), K 1, insert a marker in this st, K 8-9-8 (9-10) (= left sleeve), K 1, insert a marker in this st, K 7-9-12 (14-16) (= left back piece), K 1 (= mid back) = 4 sts with markers in total before increase for raglan. REMEMBER THE KNITTING TENSION. READ ALL OF THE FOLLOWING SECTION BEFORE CONTINUING! Continue in stocking st - While at the same time inc on next row from RS 1 st on each side of every st with marker = 8 new sts per inc. Repeat inc from RS on every other row a total of 12-12-12 (13-15) times, then on every 4th row a total of 2-3-4 (4-4) times. At the same time when piece measures 3-4-5 (5-6) cm from cast on edge, work PATTERN ON YOKE - Read explanation above. NOTE: Work the new sts gradually in the pattern. When piece measures 8-9-9 (10-10) cm from cast on edge, cast on 4 sts at the end of next row from WS (= sts at the bottom of neck opening, worked into the pattern) - Now work the piece in the round on circular needle from here. When PATTERN ON YOKE has been worked (all inc are now done), there are 172-190-208 (226-252) sts on needle. Front piece = back piece = 48-54-62 (68-76) sts. Slip sts on sleeves and sts with markers (38-41-42 (45-50) sts for each sleeve) on a stitch holder. Now divide the piece, front/back piece and sleeves are finished separately. BODY: Front piece + back piece = 96-108-124 (136-152) sts. Continue in the round on circular needle (round beg in the side). On the next round, work 1st round in diagram M.4 as follows: Cast on 4 sts for armhole, work 48-54-62 (68-76) sts (= front piece), cast on 8 sts for armhole, work 48-54-62 (68-76) sts (= back piece), cast on 4 sts for armhole = a total of 112-124-140 (152-168) sts on needle. On next round (= 2nd round in diagram M.4), inc 0-4-4 (8-8) sts evenly = 112-128-144 (160-176) sts. Continue with diagram M.4 and then diagram M.5 1 time vertically. Then work in stocking st with brown until piece measures 15-17-19 (21-23) cm from armhole (piece measures approx. 26-29-32 (35-38) cm in total). Now divide the piece and front and back piece are finished separately. BACK PIECE: = 56-64-72 (80-88) sts. Then work back and forth (1st row = RS) in stocking st and dec for leg opening as follows: K 1 (= edge st), dec 1 st - Read DECREASE TIP 1 above, work until 3 sts remain, dec 1 st - Read DECREASE TIP 1 above, K 1 (= edge st). Continue in stocking st, repeat dec on every row from RS (= on every other row) inside 1 edge st in each side a total of 20-23-27 (30-34) times = 16-18-18 (20-20) sts remain. Then switch to circular needle size 2 mm and work rib (K 1/P 1) for 1½ cm, loosely cast off all sts. FRONT PIECE: = 56-64-72 (80-88) sts. Then work back and forth (1st row = RS) in stocking st and dec for leg opening as follows: K 1, dec 1 st - Read DECREASE TIP 1 above, work until 3 sts remain, dec 1 st - Read DECREASE TIP 1 above, K 1. Continue in stocking st and repeat dec on every row inside 1 edge st in each side a total of 6-6-8 (8-10) times, then on every row from RS (= on every other row) a total of 14-17-19 (22-24) times = 16-18-18 (20-20) sts remain. Then switch to circular needle size 2 mm and work rib (K 1/P 1). On next row from RS, cast off for 3 button holes as follows: Work 1 st, * 1 YO, K the next 2 sts tog, work 4-5-5 (6-6) sts *, repeat from *-* 1 more time, 1 YO, K the next 2 sts tog, work the last st. On next row work the YOs twisted. When rib measures approx. 1½ cm, loosely cast off all sts. SLEEVE: Worked in the round on double pointed needles, top down. Slip sts from stitch holder on to double pointed needles size 2.5 mm = 38-41-42 (45-50) sts, and cast on 8 sts mid under sleeve = 46-49-50 (53-58) sts. Insert a marker before 1st st on round and move the marker upwards (round beg mid under sleeve). Continue with diagram M.4 and then diagram M.5 (beg with 1st st in the repetition on 1st round in diagram M.4). When sleeve measures 2-3-3 (3-3) cm, dec 1 st before and after marker - Read DECREASE TIP 2 above. Repeat dec every 1½-1½-2 (2½-2½) cm a total of 7-7-7 (6-8) times = 32-35-36 (41-42) sts. Continue until sleeve measures 12-15-18 (20-23) cm from armhole. On next round, dec 0-1-0 (1-0) sts = 32-34-36 (40-42) sts. Then switch to double pointed needles size 2 mm and continue in rib (K 1/P 1) for 3-3-3 (4-4) cm. Loosely cast off all sts. NECK OPENING: Knit up approx. 21 - 25 sts from RS along the opening on right back piece with brown on double pointed needles size 2 mm. Work rib (K 1/P 1) back and forth for approx. 1½ cm (= right band, 1st row = WS). Loosely cast off all sts. Repeat along the opening on left back piece, but on 2nd row (= RS) cast off for 3 button holes (1 button hole = 1 YO, K 2 tog) evenly on band. When rib measures approx. 1½ cm, loosely cast off all sts. Place band with button holes on top of the other at the bottom of neck opening and fasten through both layers with stitches. LEG OPENING: Knit up from RS approx. 16 sts per 5 cm along one leg opening inside 1 edge st with brown on circular needle size 2 mm, no of sts must be divisible by 2 + 1. On next row (= WS) work as follows: * P 1, K 1 *, finish with P 1. Continue back and forth in rib for 1 cm, loosely cast off all sts. Repeat on the other leg opening. ASSEMBLY: Sew the openings under the sleeves. Sew buttons on to rib at the bottom of back piece, and on to right band in neck opening. |
|||||||
Diagram explanations |
|||||||
|
|||||||
 |
|||||||
 |
|||||||
Have you finished this pattern?Tag your pictures with #dropspattern #littewilliamsbody or submit them to the #dropsfan gallery. Do you need help with this pattern?You'll find 20 tutorial videos, a Comments/Questions area and more by visiting the pattern on garnstudio.com. © 1982-2026 DROPS Design A/S. We reserve all rights. This document, including all its sub-sections, has copyrights. Read more about what you can do with our patterns at the bottom of each pattern on our site. |
|||||||


With over 40 years in knitting and crochet design, DROPS Design offers one of the most extensive collections of free patterns on the internet - translated to 17 languages. As of today we count 324 catalogues and 12290 patterns translated into English (UK/cm). 12290
We work hard to bring you the best knitting and crochet have to offer, inspiration and advice as well as great quality yarns at incredible prices! Would you like to use our patterns for other than personal use? You can read what you are allowed to do in the Copyright text at the bottom of all our patterns. Happy crafting!
Post a comment to pattern DROPS Baby 21-32
We would love to hear what you have to say about this pattern!
If you want to leave a question, please make sure you select the correct category in the form below, to speed up the answering process. Required fields are marked *.