
Popular categories
Looking for a yarn?


Comments / Questions (108)
![]() Susan Paton wrote:
Susan Paton wrote:
Kia ora from New Zealand I am unable to decipher what that slanted solid lines mean in diagram m.3 and m.4. can you help please? Thanks Sue
19.08.2021 - 01:19DROPS Design answered:
Dear Mrs Paton, the slanted lines in M.3 is for the cable and is worked following last symbol (= slip 2 sts on cable needle in front of piece, K 2, K 2 from cable needle). The slanted line over 4 sts in M.2 is the next to last symbol (= slip 2 sts on cable needle behind piece, K 2, K 2 from cable needle) and the 2 other slanted lines in M.2 (over 6 sts each) are explained under 3rd and 4th symbol - see diagram text. Hope it will help. Happy knitting!
19.08.2021 - 08:13
![]() Sabine wrote:
Sabine wrote:
Aber dann wird die Blende ja noch höher/länger!? Das Perlmuster auf der anderen Seite des Zopfes zieht sich mehr zusammen (in der Länge)
21.01.2019 - 16:47DROPS Design answered:
Liebe Sabine, Sie sind ja recht, die verkürzten Reihen sind nicht über die Blende gestrickt aber über die Maschen bis zu den 23-25 Blendemaschen gestrickt: bei der 1. Reihe stricken Sie alle Maschen ausser den Blendemaschen, wenden und die nächste Reihe über dieselben Maschen stricken, dann weiter über alle Maschen stricken, dh wie unter VERKÜRZTE REIHEN ÜBER DER BLENDE stricken. Viel Spaß beim stricken!
22.01.2019 - 07:50
![]() Sabine wrote:
Sabine wrote:
Liebes Drops-Team, ist mit den "verkürzten Reihen" gemeint, dass das Bündchen nicht als Musterreihe definiert wird? Ich kann in der Anleitung nicht entdecken, dass ich vor dem Bündchen die Arbeit wenden soll? Liebe Grüße!
21.01.2019 - 15:12DROPS Design answered:
Liebe Sabine, man strickt hier verkürzten Reihen über die Blende, um die gleiche Höhe im Muster sowie über der Blende zu haben. Sie stricken die ersten 23-25 M wie zuvor, wenden, diese 23-25 stricken, wenden und dann wie zuvor über alle Maschen arbeiten. Viel Spaß beim stricken!
21.01.2019 - 16:30
![]() Sonia wrote:
Sonia wrote:
Hola, me gustaría saber si podría hacerse más larga. Qué vueltas habría que repetir??? gracias
10.05.2018 - 13:35DROPS Design answered:
Hola Sonia, tienes que trabajar repitiendo según el patrón el largo deseado de la medida hasta la sisa. La sisa se trabaja según el patrón sin cambios para la talla correspondiente.
13.05.2018 - 12:43
![]() Sussi Beck wrote:
Sussi Beck wrote:
Hej. Man plejer at strikke forkortede pinde over forkanten, men som jeg forstår denne opskrift er det over mønster (M1-M4). Er det korrekt?
24.02.2017 - 07:37DROPS Design answered:
Hej Sussi. Ja, det er korrekt, der bliver flere pinde over mönstret end stolpen. Det er fordi at mönstret traekker sig mere sammen end stolpen.
27.02.2017 - 15:23
![]() Åsa Rangälv wrote:
Åsa Rangälv wrote:
Har stickat minst 10 av era mönster utan problem 1 kantm i rätst, sticka 12-16-20-20-26-32 m M.1, sticka M.2 1-1-1-2-2-2 ggr, sedan M.3 1 gång, fortsätt med resår som förut, avsluta med 1 rm (= 23-23-23-25-25-25 framkantsm i resår). Om det inte står att man ska sticka M2/M4 i beskrivningen skulle jag inte ha dessa problem
02.08.2016 - 17:04DROPS Design answered:
Hej. När vi skriver "sticka 12-16-20-20-26-32 m M.1" så betyder det att du (i strl M) ska sticka 16 m av M.1. Eftersom M.1 består av 2 m så stickar du alltså M.1 8 ggr (strl M). Hoppas det hjälper dig att förstå. Lycka till!
11.08.2016 - 12:18
![]() Nils wrote:
Nils wrote:
1+16+18+6+23=64. Kanske skulle du välja ett lättare mönster?
01.08.2016 - 18:50
![]() Åsa Rangälv wrote:
Åsa Rangälv wrote:
Vad gäller för vänster framstycke stl M? Mönster 1 + 16 + 2(M1) + 18(M2) + 6(M3) + 20(resår?) kantmaska 1= 64
01.08.2016 - 17:14DROPS Design answered:
Hej Åsa. Ja, du strikker: Lägg upp 64 m (inkl 1 kantm i rätst i sidan) på rundst 3,5. På varv 1 (= rätsidan) stickas det så här: 1 kantm i rätst, * 1 rm, 1 am *, upprepa *-*, avsluta med 1 rm. När resåren mäter 3 cm byts det till rundst 4 och nästa v från rätsidan stickas så här: 1 kantm i rätst, sticka 16 m M.1, sticka M.2 1 ggr, sedan M.3 1 gång, fortsätt med resår som förut, avsluta med 1 rm (= 23 framkantsm i resår).
02.08.2016 - 14:37
![]() Sara wrote:
Sara wrote:
Inte 2M4, ska vara 22+1+18+6+16+1=64
01.08.2016 - 12:56
![]() Åsa Rangälv wrote:
Åsa Rangälv wrote:
Har problem med detta mönster - är det fel i beskrivningarna. Ska man aldrig sticka m1/m4? Höger framstycke stl M lägger upp 65 maskar av 1 = 64 sedan stickas mönster 22 + 1 + 18(M2) + 6(M3) + 16 + 2(M4) + 1 = 66 Vänster framstycke stl M Mönster 1 + 16 + 2(M1) + 18(M2) + 6(M3) + 21(resår?) = 64
01.08.2016 - 11:51
|
|||||||||||||||||||
Nordic River#nordicrivercardigan |
|||||||||||||||||||
 |
 |
||||||||||||||||||
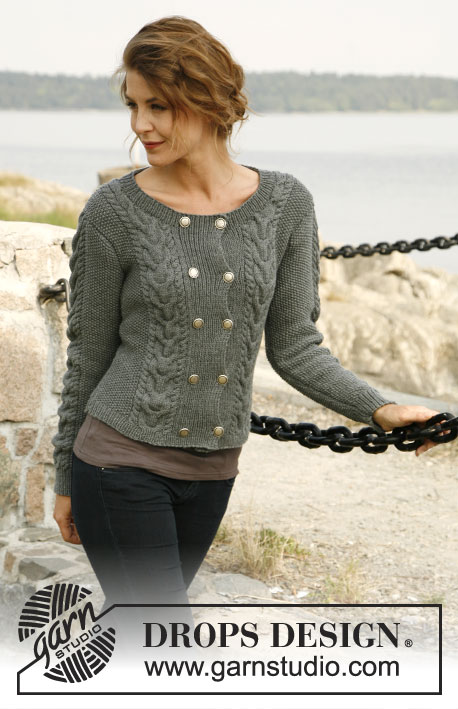
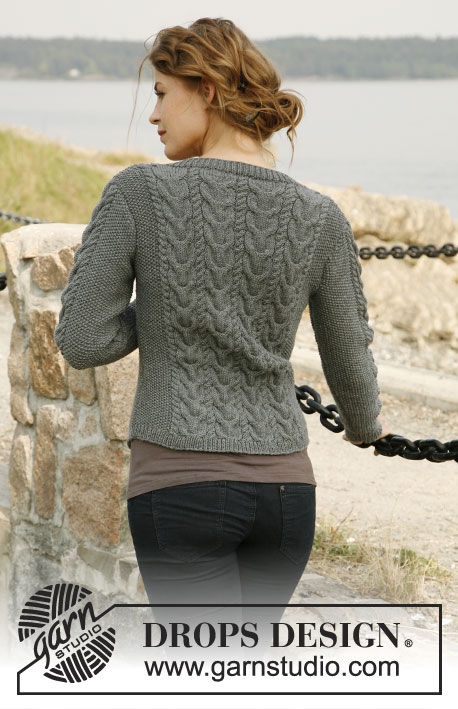
Knitted DROPS jacket with textured pattern in "Merino Extra Fine". Size: S - XXXL.
DROPS 131-3 |
|||||||||||||||||||
|
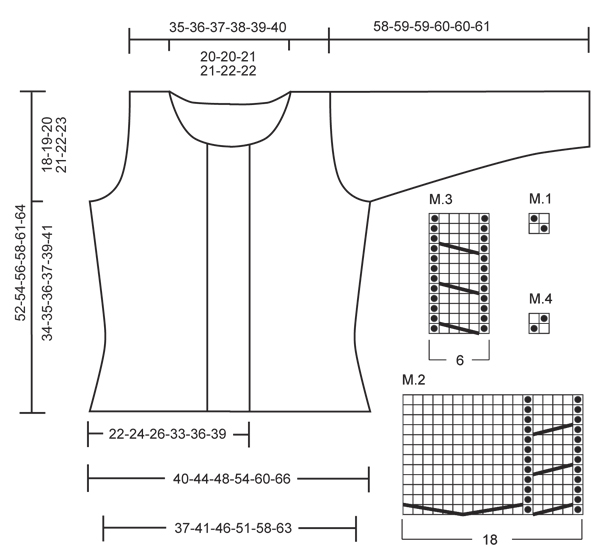
GARTER ST (back and forth on needle): K all rows. DECREASE TIP: At beg of row: Dec 1 st by working the 2 sts after edge st tog, K tog if next st is P, P tog if next st is K. Continue with pattern as before. At end of row: Dec 1 st by working the 2 sts before edge st tog, K tog if previous st was P, P tog if previous st was K. INCREASE TIP: At beg of row: Inc 1 st after edge st by getting thread between 2 sts from previous row - work this st twisted, i.e. work in back loop of st instead of front to avoid holes. K the new st twisted if next st is P, P the new st twisted if next st is K. Continue with pattern as before. At end of row: Inc 1 st before edge st by getting thread between 2 sts from previous row - work this st twisted, i.e. work in back loop of st instead of front to avoid holes. K the new st twisted if previous st was P, P the new st twisted if previous st was K. EDGE ST IN RIB: To get a nice edge mid front, work 1 edge st in rib as follows: Right front piece: 1st row (= RS): * K 1, P 1 *, repeat from *-*, finish row with 1 edge st in garter st. 2nd row (= WS): K last st on row (= 1 edge st in rib), turn piece. 3rd row (= RS): Slip 1st st as if to P and place thread behind piece, slip slipped st back on left needle and K st twisted (= 1 edge st in rib). Work edge st in rib as on 2nd and 3rd row upwards until finished measurements. Left front piece: 1st row (= RS): 1 edge st in garter st, * K 1, P 1 *, repeat from *-*, K last st on row (= 1 edge st in rib), turn piece. 2nd row (= WS): Slip 1st st as if to P and place thread behind piece, slip slipped st back on left needle and K st twisted. Work edge st in rib as 1st and 2nd row upwards until finished measurements. PATTERN: See diagram M.1, M.2, M.3 and M.4 (the diagrams show the pattern from RS) SHORT ROWS ALONG FRONT BAND: To make rib on front band and cable pattern the same height, work short rows over sts on body every 4 cm (measured on band) as follows: 1st row (= WS on right front piece, RS on left front piece): Work until 23-23-23-25-25-25 band sts remain, turn piece (tighten thread when turning to avoid holes). 2nd row (= RS on right front piece, WS on left front piece): Work back, turn piece. 3rd row: Work all sts. Continue with short rows like this until finished measurements. BUTTON HOLES: Cast off for 5-5-5-5-6-6 button holes on right front band. 1 BUTTON HOLE = cast off 5th and 6th st from edge and cast on 2 new sts on next row over these sts. Cast off for button holes when piece measures approx.: SIZE S: 3, 12½, 22, 31½, 41 cm. SIZE M: 3, 13, 23, 33, 43 cm. SIZE L: 3, 13½, 24, 34½, 45 cm. SIZE XL: 3, 14, 25, 35½, 46 cm. SIZE XXL: 3, 12, 21, 30, 39½, 49 cm. SIZE XXXL: 3, 12½, 22, 32, 42, 52 cm. Approx. 2 cm remain up to neck edge after last button hole. MEASURING TIP: Measure length on cable pattern otherwise the piece will be too short because of difference in knitting tension. -------------------------------------------------------- BACK PIECE: Worked back and forth on needle. Cast on 104-112-120-138-150-162 sts (incl 1 edge st in garter st in each side) on circular needle size 3.5 mm with Merino Extra Fine. On 1st row (= RS) work rib as follows: 1 edge st in garter st - See explanation above, * K 1, P 1 *, repeat from *-*, finish with 1 edge st in garter st. When rib measures 3 cm, switch to circular needle size 4 mm and work next row from RS as follows: 1 edge st, work 12-16-20-20-26-32 sts diagram M.1, work diagram M.2 a total of 4-4-4-5-5-5 times, then diagram M.3 1 time, 12-16-20-20-26-32 sts diagram M.4, finish with 1 edge st. REMEMBER THE KNITTING TENSION! Continue like this until piece measures 6 cm - Read Measuring tip above, then dec from RS 1 st in each side of piece - Read decrease tip above. Repeat dec every 3-3-3-3-3-2½ cm a total of 4-4-4-5-5-6 times = 96-104-112-128-140-150 sts. Continue with pattern until piece measures 19-20-21-22-23-24 cm. On next row from RS, inc 1 st in each side of piece - Read increase tip above. Repeat inc every 3½-3½-3½-3-3-2½ cm a total of 4-4-4-5-5-6 times = 104-112-120-138-150-162 sts. When piece measures 34-35-36-37-39-41 cm, cast off and dec for armholes at the beg of every row in each side as follows: Cast off 3 sts a total of 1-1-2-3-3-4 times, 2 sts a total of 0-1-1-2-3-3 times and 1 st a total of 2-3-3-3-6-8 times = 94-96-98-106-108-110 sts. Continue with pattern as before until piece measures 50-52-54-56-59-62 cm. Now cast off the middle 50-50-52-52-56-56 sts for neck and finish each shoulder separately. Cast off 3 sts on next row from neck = 19-20-20-24-23-24 sts remain on shoulder. When piece measures 52-54-56-58-61-64 cm, loosely cast off all sts while AT THE SAME TIME working in pattern. RIGHT FRONT PIECE: Worked back and forth on needle. Cast on 61-65-69-89-95-101 sts (incl 1 edge st in garter st in the side) on circular needle size 3.5 mm. On 1st row (= RS) work as follows: * K 1, P 1 *, repeat from *-*, finish with 1 edge st in garter st - Read EDGE ST IN RIB above. When rib measures 3 cm, dec 1 st in the side on last row from WS by working 2 sts tog after edge st in garter st = 60-64-68-88-94-100 sts. On next row from RS, switch to circular needle size 4 mm and cast off for 1st button hole - Read explanation above - At the same time work as follows: Continue with rib until 22-22-22-24-24-24 sts have been worked (incl cast off sts for button hole), K 1 (= 23-23-23-25-25-25 band sts in rib), work diagram M.2 1-1-1-2-2-2 times, then diagram M.3 1 time, 12-16-20-20-26-32 sts diagram M.4, finish with 1 edge st in garter st. Then work SHORT ROWS and BUTTON HOLES ON RIGHT FRONT BAND - Read explanation above. Continue like this until piece measures 6 cm - Read Measuring tip above, then dec 1 st from RS at end of row. Repeat dec every 3-3-3-3-3-2½ cm a total of 4-4-4-5-5-6 times = 56-60-64-83-89-94 sts. Continue with pattern until piece measures 19-20-21-22-23-24 cm. On next row from RS, inc 1 st at end of row. Repeat inc every 3½-3½-3½-3-3-2½ cm a total of 4-4-4-5-5-6 times = 60-64-68-88-94-100 sts. When piece measures 34-35-36-37-39-41 cm, cast off and dec for armholes at the beg of every row from WS as follows: Cast off 3 sts a total of 1-1-2-3-3-4 times, 2 sts a total of 0-1-1-2-3-3 times and 1 st a total of 2-3-3-3-6-8 times = 55-56-57-72-73-74 sts. Continue with pattern as before until piece measures 40-42-44-45-48-51 cm. On next row from WS, work until 23-23-23-25-25-25 sts (= rib) remain, slip the remaining sts on a stitch holder, turn piece. Then cast off and dec for neck at beg of every row from RS (= dec every other row) - while AT THE SAME TIME working pattern - as follows: Cast off 3 sts a total of 2-2-2-3-3-3 times, 2 sts a total of 2-2-2-4-4-4 times and 1 st a total of 1-1-1-6-8-8 times. Then dec 1 st every 4 rows a total of 2-2-3-0-0-0 times = 19-20-20-24-23-24 sts remain on shoulder. When piece measures 52-54-56-58-61-64 cm loosely cast off all sts while AT THE SAME TIME working in pattern. LEFT FRONT PIECE: Worked back and forth on needle. Cast on 60-64-68-88-94-100 sts (incl 1 edge st in garter st in the side) on circular needle size 3.5 mm. On 1st row (= RS) work as follows: 1 edge st in garter st, * K 1, P 1 *, repeat from *-*, finish with K 1 - Read EDGE ST IN RIB above. When rib measures 3 cm, switch to circular needle size 4 mm and work next row from RS as follows: 1 edge st in garter st, work 12-16-20-20-26-32 sts diagram M.1, work diagram M.2 1-1-1-2-2-2 times, then diagram M.3 1 time, continue with rib as before, finish with K 1 (= 23-23-23-25-25-25 band sts in rib). Continue to work as right front piece but reversed (with SHORT ROWS but without button holes). SLEEVE: Worked back and forth on needle. Cast on 50-52-54-58-60-62 sts (incl 1 edge st in garter st in each side) on circular needle size 3.5 mm. On 1st row (= RS) work rib as follows: 1 edge st in garter st, * K 1, P 1 *, repeat from *-*, finish with 1 edge st in garter st. When rib measures 6 cm, switch to circular needle size 4 mm and work next row from RS as follows: 1 edge st, work 12-13-14-16-17-18 sts diagram M.1, work diagram M.2 and then diagram M.3 one time, work 12-13-14-16-17-18 sts diagram M.4, finish with 1 edge st. When piece measures 8 cm - Read Measuring tip above - inc 1 st from RS in each side of piece. Repeat inc every 4-3½-3-2½-2½-2 cm a total of 10-11-12-14-15-16 times = 70-74-78-86-90-94 sts. Continue until piece measures 49-49-48-48-47-47 cm (shorter measurements in the larger sizes because of broader shoulder width). Then cast off and dec for sleeve cap at beg of every row in each side as follows: Cast off 3 sts 1-1-1-1-1-2 times, 2 sts a total of 1-1-1-2-2-2 times and 1 st a total of 5-4-4-6-6-5 times. When piece measures 56-57-57-58-58-59 cm, cast off at beg of every row in each side as follows: 2 sts 1 times, 3 sts 1-2-2-2-2-2 times = 40-40-44-44-48-48 sts. When piece measures approx. 58-59-59-60-60-61 cm, cast off all sts while AT THE SAME TIME working pattern. Knit another sleeve. ASSEMBLY: Sew the shoulder seams. Sew in sleeves. Sew sleeve and side seams in one inside 1 edge st. NECK EDGE: The neck edge is worked inside 1 edge st from RS on circular needle size 3.5 mm as follows: Start on the right front band, slip sts from stitch holder back on needle and work these sts, knit up approx. 110-130 sts along the neck edge, slip sts from stitch holder on left front band back on needle and work these sts. On next row (= WS) work 23-23-23-25-25-25 band sts in each side of piece in rib as before, P sts between band sts - while at the same time adjusting no of sts around the neck (not over band sts) to 115-115-125-121-131-131 = 161-161-171-171-181-181 sts on needle. Work next row from RS as follows: * K 1, P 1 *, repeat from *-*, and K last st on row. Continue with rib (with edge st in rib - See explanation above). Cast off for last button hole when neck edge measures approx. 1 cm - Read explanation above. When neck edge measures 3 cm, loosely cast off all sts with K over K and P over P. Sew on 5-5-5-5-6-6 buttons approx. 1½ cm from right edge on left band, 5-5-5-5-6-6 buttons approx. 1½ cm from left edge on right band (= decorative buttons without holes). |
|||||||||||||||||||
Diagram explanations |
|||||||||||||||||||
|
|||||||||||||||||||
 |
|||||||||||||||||||
Have you finished this pattern?Tag your pictures with #dropspattern #nordicrivercardigan or submit them to the #dropsfan gallery. Do you need help with this pattern?You'll find 15 tutorial videos, a Comments/Questions area and more by visiting the pattern on garnstudio.com. © 1982-2026 DROPS Design A/S. We reserve all rights. This document, including all its sub-sections, has copyrights. Read more about what you can do with our patterns at the bottom of each pattern on our site. |
|||||||||||||||||||


With over 40 years in knitting and crochet design, DROPS Design offers one of the most extensive collections of free patterns on the internet - translated to 17 languages. As of today we count 324 catalogues and 12290 patterns translated into English (UK/cm). 12290
We work hard to bring you the best knitting and crochet have to offer, inspiration and advice as well as great quality yarns at incredible prices! Would you like to use our patterns for other than personal use? You can read what you are allowed to do in the Copyright text at the bottom of all our patterns. Happy crafting!
Post a comment to pattern DROPS 131-3
We would love to hear what you have to say about this pattern!
If you want to leave a question, please make sure you select the correct category in the form below, to speed up the answering process. Required fields are marked *.