
Popular categories
Looking for a yarn?


Comments / Questions (15)
![]() Katha wrote:
Katha wrote:
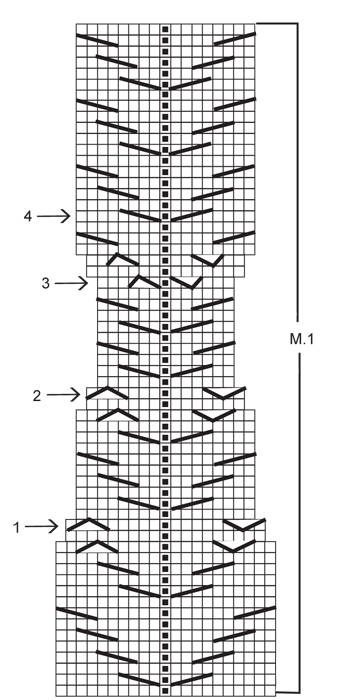
Wo findet man die mittleren 3 li.-Partien damit man die 2 li. Maschen zusammen strickt? ist das dann vom Nadelspiel die Partie auf der 4 Nadel die 3 ersten Maschen, verstehe ich das richtig ? das man so zusagen dann im Muster M1 zwei abnahmen hat und noch zusätzlich die 2 li maschen zusammen strickt bei dem Makierten bereich mit der 1---->? also müssten es dann 3 Abnahmen gesamt sein?
03.11.2025 - 13:33DROPS Design answered:
Liebe Katha, es sind die 3 Linkspartien, die sich nicht direkt neben dem Muster befinden. Sie müssten insgesamt 5 Linkspartien haben. Schauen Sie bei Ihrer Arbeit beidseitig vom Muster, dort gibt es 2 Linkspartien, in denen nehmen Sie nicht ab. Aber in den restlichen drei. Dort nehmen Sie je 1 Masche ab, zusätzlich nehmen Sie auch im Diagramm (Muster) wie gezeigt ab und zwar in insgesamt 4 Runden je 2 Maschen. So kommen Sie dann nach Pfeil 2 auf 34 Maschen (2x3 Maschen im Rippenmuster abgenommen und 4x 2 Maschen im Muster). Viel Spaß beim Weiterstricken!
04.11.2025 - 08:46
![]() Marion De Vries wrote:
Marion De Vries wrote:
In de beschrijving staat \"Minder als u aankomt bij pijl nummer-1 in het telpatroon 1 st in iedere van de 3 middelste av-delen op de palm van de hand door 2 st av samen te breien.\". Echter 2 pennen eerder is al begonnen met minderen in het telpatroon. Ook bij pijl-1 staan minderingen in het telpatroon. Als ik die optel hij het aantal van de minderingen op de palm kom ik op 14+4=18. Dan blijven 48-18=30 steken over i.p.v. 34 steken. Begrijp ik het verkeerd?
11.03.2021 - 21:14
![]() Marion wrote:
Marion wrote:
In de uitleg van het patroon staat "Zet 1 st op een kabelnld en hou deze achter het werk, 2 st recht, 2 st recht in st op kabelnld". Wat wordt bedoeld met 2 st recht in st op kabelnld? Er staat maar 1 st op de kabelnaald.
08.03.2021 - 20:59DROPS Design answered:
Dag Marion,
Er wordt mee bedoeld dat je 2 steken in 1 steek moet breien. Dus je meerdert in 1 steek in de steek van de kabelnaald.
09.03.2021 - 11:57
![]() Rokky wrote:
Rokky wrote:
Thank you for replying I had try it still end up with 45 Sts not 41 you said and how long would I knit before beg the thumb guest because the gloves is long before the thumb begins looking at the picture
07.07.2020 - 00:28
![]() ROKKY wrote:
ROKKY wrote:
Hello am trying to knit this pattern but it said on the pattern dec by p 3 to 2 and there 48 when I dec am getting 44 Sts am comfuss or there is a mistake
05.07.2020 - 18:10DROPS Design answered:
Dear Rokky, you decrease 3 sts (P3 into P2 a total of 3 times) + 4 sts in M.1 (2 sts in row 14 + 2 sts in row with the arrow) = 41 sts. Then you dec the remaining P3 to P1 and 4 more sts will be decreased in M.1 (= 2 on row 26 + 2 on row with the arrow-2) = 34 sts remain. Happy knitting!
06.07.2020 - 09:35
![]() Ida wrote:
Ida wrote:
Op 7 juni heb ik een vraag gesteld. Nog geen antwoord gehad. Hoe”ang moet ik nog wachten? Groeten, Ida
20.06.2019 - 16:17
![]() Ursula Quach wrote:
Ursula Quach wrote:
Hallo liebes Drops-Team, die Mütze ist fertig 😍 danke für die Anleitung. Ich möchte statt Handschuhe lieber, etwas längere, Pulswärmer stricken. Kann ich einfach eine Anleitung aus der Garngruppe C nutzen?
24.03.2018 - 12:33DROPS Design answered:
Liebe Frau Quach, wenn Sie liber Pulswärmer möchten, können Sie auch die Anleitung der Handschuhen folgen, aber ohne Zunahmen für den Daumen, noch keine Teilung der Maschen für die Finger. Viel Spaß beim stricken!
26.03.2018 - 10:56
![]() Alison wrote:
Alison wrote:
Finding the pattern difficult to follow. After the initial rib, when does the grid pattern start? How does the M1 fit in with the number of stitches required? for the left glove, the P3K3 appears to happen in the wrong place, then the M1 no longer fits. Hoping you can help! Alison.
25.12.2015 - 00:38DROPS Design answered:
Dear Alison, start reading A.1 from the bottom corner on the right side and on 1st round you work: P3, then work the 21 sts in M.1 and work in rib P3/K3 to the end of round = you start round towards inside of wrist, work top of hand (pattern) and finish with inside of hand. Happy knitting!
02.01.2016 - 13:42
![]() PROVOST wrote:
PROVOST wrote:
Bonjour, je souhaiterai avoir quelques explications sur le diagramme du modèle des gants. Où sont passées les 1eres mailles du rang de la flèche 1 et du rang du dessous. Est ce des diminutions ? Merci.
22.01.2015 - 17:08DROPS Design answered:
Bonjour Mme Provost, on diminue 1 m dans chacune des torsades 5e et 6e symbole en tricotant 2 m ens à l'end, soit notamment 2 rangs avant la flèche 1 et au rang avec la flèche 1. Bon tricot!
22.01.2015 - 18:08
![]() DROPS Deutsch wrote:
DROPS Deutsch wrote:
Ja, das war ein Übersetzungsfehler. Der Diagrammtext wurde angepasst.
01.02.2012 - 11:57
|
|||||||||||||||||||||||||||||||
DROPS 123-21 |
|||||||||||||||||||||||||||||||
|
|
|||||||||||||||||||||||||||||||
Long knitted DROPS gloves in ”Nepal” with cables.
DROPS 123-21 |
|||||||||||||||||||||||||||||||
|
PATTERN: See diagram M.1 - diagram shows 1 pattern repeat from RS. Explanation to the arrows is in the pattern. -------------------------------------------------------- LEFT GLOVE: Cast on 48 sts on double pointed needles size 3.5 mm with Nepal. Work 8 rounds rib, P3/K3 – NOTE: beg with P3. Change to double pointed needles size 4.5 mm. Continue as follows: P3, M.1 (= 21 sts), * P3, K3 *, repeat from *-* a total of 4 times. When you get to the row in diagram marked by the number-1 dec 1 st in each of the 3 middle P-sections on the palm of hand by P2 tog. When you get to the row marked by the number-2 dec 1 st in each of the same 3 P-sections by P2 tog (i.e. only P1 left in these 3 P-sections). After this round there are 34 sts on round. When you get to the row marked with the number-3 continue to K the 15 sts on palm of hand and work M.1 with P3 each side as before. When you get to the row marked with the number-4 inc for thumb gusset. Inc 1 st each side of the last but one st on round (= K-st) by making 1 YO each side of this st. On next round K YO into back of loop to avoid a hole. Repeat the inc on every other round a total of 5 times – 2 more sts between the 2 YO for each inc. When all inc are complete there are 11 thumb sts and a total of 48 sts on needle. When piece measures 5 cm from beg of thumb gusset slip the 11 thumb sts on a stitch holder and cast on 1 new st behind these = 38 sts. Complete M.1 – piece now measures approx 2 cm from where thumb sts were slipped on stitch holder. Slip the first 17 sts on a stitch holder, keep the next 9 sts on needle and slip the last 12 sts on a stitch holder. LITTLE FINGER = 9 sts, cast on 1 new st towards the hand = 10 sts. Work in the round with K over K and P over P as before – K the new st. When finger measures approx 6 cm K2 tog across the round. Cut the thread and pull it through remaining 5 sts, tighten tog. HAND: Slip sts from stitch holders back on double pointed needles size 4.5 mm, pick up 2 sts towards little finger = 31 sts. Work 2 rounds with K over K and P over P, K the 2 new sts. Keep the 2 sts picked up towards little finger + 5 sts from upper hand and 4 sts from palm of hand on needle. Slip the remaining 20 sts back on stitch holders. RING FINGER = 11 sts, Cast on 1 new st towards sts on stitch holders = 12 sts. Work stocking st in the round for approx 7.5 cm, then K2 tog across the round. Cut the thread and pull it through remaining 6 sts, tighten tog. MIDDLE FINGER: Slip 5 sts from upper hand and 4 sts from palm of hand back on double pointed needles size 4.5 mm, pick up 2 sts towards ring finger and cast on 1 new st towards sts on stitch holder = 12 sts. Work stocking st in the round for approx 8.5 cm, then K2 tog across the round. Cut the thread and pull it through remaining 6 sts, tighten tog. INDEX FINGER: Slip the remaining 11 sts back on double pointed needles size 4.5 mm, and pick up 2 sts towards middle finger = 13 sts. P the 3 sts at the side and K the remaining sts in the round for approx 7 cm, then K2 tog across the round. Cut the thread and pull it through remaining 7 sts, tighten tog. THUMB: Slip the 11 sts over thumb gusset on double pointed needles size 4.5 mm and pick up 3 sts in the edge behind these = 14 sts. Work stocking st in the round for approx 6 cm, then K2 tog across the round. Cut the thread and pull it through remaining 7 sts, tighten tog. RIGHT GLOVE: Like left glove, but mirrored, i.e. beg rib with K3 instead of P3. After 8 rounds in rib continue as follows: K3/P3 on 24 sts, M.1 and P3. Inc for thumb gusset each side of the 2nd st on round. Work the little finger as follows: Slip the first 12 sts on a stitch holder (= palm of hand), keep the next 9 sts on needle and slip the remaining 17 sts on a stitch holder (= upper hand). |
|||||||||||||||||||||||||||||||
Diagram explanations |
|||||||||||||||||||||||||||||||
|
|||||||||||||||||||||||||||||||
 |
|||||||||||||||||||||||||||||||
Have you finished this pattern?Tag your pictures with #dropspattern or submit them to the #dropsfan gallery. Do you need help with this pattern?You'll find 17 tutorial videos, a Comments/Questions area and more by visiting the pattern on garnstudio.com. © 1982-2026 DROPS Design A/S. We reserve all rights. This document, including all its sub-sections, has copyrights. Read more about what you can do with our patterns at the bottom of each pattern on our site. |
|||||||||||||||||||||||||||||||


With over 40 years in knitting and crochet design, DROPS Design offers one of the most extensive collections of free patterns on the internet - translated to 17 languages. As of today we count 324 catalogues and 12290 patterns translated into English (UK/cm). 12290
We work hard to bring you the best knitting and crochet have to offer, inspiration and advice as well as great quality yarns at incredible prices! Would you like to use our patterns for other than personal use? You can read what you are allowed to do in the Copyright text at the bottom of all our patterns. Happy crafting!
Post a comment to pattern DROPS 123-21
We would love to hear what you have to say about this pattern!
If you want to leave a question, please make sure you select the correct category in the form below, to speed up the answering process. Required fields are marked *.