
Popular categories
Looking for a yarn?


Comments / Questions (142)
![]() Anne wrote:
Anne wrote:
Mijn vraag is opgelost.
29.03.2026 - 21:15
![]() Anne wrote:
Anne wrote:
Na de minderingen armsgaten verder met kantpatroon. Maar op de voorpanden wordt niet geminderd in M1 en M2. Dan komen er toch teveel steken bij? Want ierdere rechtse nld moet een omslag . Dus krijg teveel steken . Wat zie ik over het hoofd bij linker en rechter voorpand ?
25.03.2026 - 20:18DROPS Design answered:
Dag Anne,
Na het bij elkaar zetten van de voor- en achterpanden brei je verder met M.4 over M.1 en M.3 over M.2 waarbij de omslagen gecompenseerd worden door samen breien. Het aantal steken blijft daardoor gelijk, dus je meerdert dan niet meer naast de telpatronen.
05.04.2026 - 10:39
![]() Elisabetta wrote:
Elisabetta wrote:
Il modello è molto bello ma le istruzione del triangolo all'uncinetto non sono chiare, almeno per me, infatti invece di un triangolo mi viene un quadrato pure storto. Potreste inviarmi gentilmente una foto ingrandita del triangolo che me le ricavo da sola? Purtroppo da vostro sito non riesco a farlo da sola, grazie
24.02.2026 - 20:00DROPS Design answered:
Buonasera Elisabetta, purtroppo non abbiamo a disposizione altre foto oltre a quelle riportate. Buon lavoro!
15.04.2026 - 22:50
![]() Monique Lavialle wrote:
Monique Lavialle wrote:
Bonjour, Je trouve ce modèle vraiment magnifique ! Mais je suis bloquée au devant gauche car je ne comprends rien aux explications ni au diagramme. Es ce que je dois suivre M1 de droite à gauche sur l'endroit et l'envers ou seulement sur l'endroit ? Merci de votre retour car j'aimerais bien pouvoir démarrer Monique
27.01.2026 - 15:50DROPS Design answered:
Bonjour Monique, les diagrammes se lisent de bas en haut, de droite à gauche sur l'endroit et de gauche à droite sur l'envers; les cases blanches se tricotent à l'endroit sur l'endroit et à l'envers sur l'envers, mais le carré noir se tricote à l'endroit sur l'envers autrement dit, pour M.1 vous aurez 6 m jersey endroit (torsade) et 2 m point mousse, vu sur l'endroit. Bon tricot!
28.01.2026 - 08:43
![]() Elise wrote:
Elise wrote:
Bonjour. Vous annoncez après les trois premiers rangs pour les devants (sur l'endroit) : 2point mousse, 2 m end dans chacune des 3 m suivantes DEUX MAILLES MOUSSE, puis jersey puis 4 m de bordure devant au point mousse. Rang envers, ok. Mais le rang d'après, on oublie les deux mousses au milieu du travail, on parle de jersey. Pourquoi ne pas dire simplement "jersey" pour ces mailles là dès le début ?! Merci
25.01.2024 - 18:45DROPS Design answered:
Bonjour Elise, effectivement, après ces 2 rangs, les 2 mailles au point mousse au milieu du rang sont les 2 dernières mailles de M.1, on va tricoter (devant gauche, vu sur l'endroit): 2 m point mousse, puis les 8 mailles du diagramme M.1 (= les 3 mailles augmentées à 6 mailles au 1er rang + les 2 m point mousse), et on continue en jersey en terminant par les 4 m de bordure devant au point mousse. Bon tricot!
26.01.2024 - 07:42
![]() Paula wrote:
Paula wrote:
Moet ik iedere tour herhalen aan de achterkant? Dat houdt dan in 10 NLD voor ik weer kabel! PATROON: Zie telpatroon M.1 tot en met M.4 – de telpatronen bevatten 1 patroonherhaling en geven de goede kant van het werk weer.
28.11.2021 - 20:19
![]() Paula wrote:
Paula wrote:
PATROON: Zie telpatroon M.1 tot en met M.4 – de telpatronen bevatten 1 patroonherhaling en geven de goede kant van het werk weer.
28.11.2021 - 20:16DROPS Design answered:
Dag Paula,
Kun je aangeven wat je vraag precies is?
01.12.2021 - 12:04
![]() Alice wrote:
Alice wrote:
Kan man få opskriften på hollandsk?
07.02.2021 - 13:33DROPS Design answered:
Hei Alice. Ja, du velger språk i nedtrekksmenyen under bildet. mvh DROPS design
12.02.2021 - 14:43
![]() Bärbel wrote:
Bärbel wrote:
Hallo liebes Drops-Team, ich habe eben die Anleitung ausgedruckt. Leider ist das Diagramm und die Zeichnung mit den Maßen nicht dabei, auch nicht in der Druckvorschau. Da werden auch nur 2 Seiten angezeigt. Wie könnt Ihr mir helfen? LG, Bärbel
10.03.2018 - 10:48DROPS Design answered:
Liebe Bärbel, passen Sie mal auf, daß Sie alle Seiten ausdrücken damit die ganze Anleitung ausgedrückt wird. Viel Spaß beim stricken!
12.03.2018 - 08:32
![]() Birgit wrote:
Birgit wrote:
Hallo, Ich benötige zur besseren Übersicht eine Häkelschrift für die Dreiecke! Nur geschrieben ist es für mich viel zu unübersichtlich und unverständlich! Vielen Dank im Voraus! LG Birgit
06.12.2017 - 18:40DROPS Design answered:
Liebe Birgit, leider gibt es zu der Dreiecke nur schriftliche Anleitung, die große Mehrheit unserer Kunden lesen lieber schriftlichen Erklärungen als Häkelschrift. Viel Spaß beim stricken!
07.12.2017 - 08:56
|
||||||||||||||||||||||
Miss Enid#missenidvest |
||||||||||||||||||||||
 |
 |
|||||||||||||||||||||
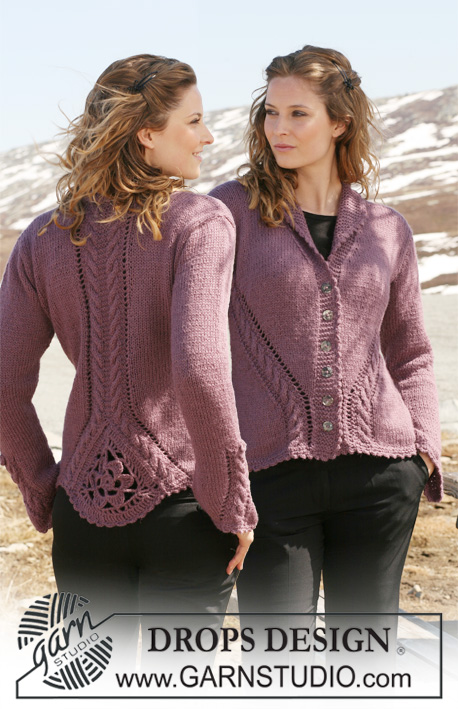
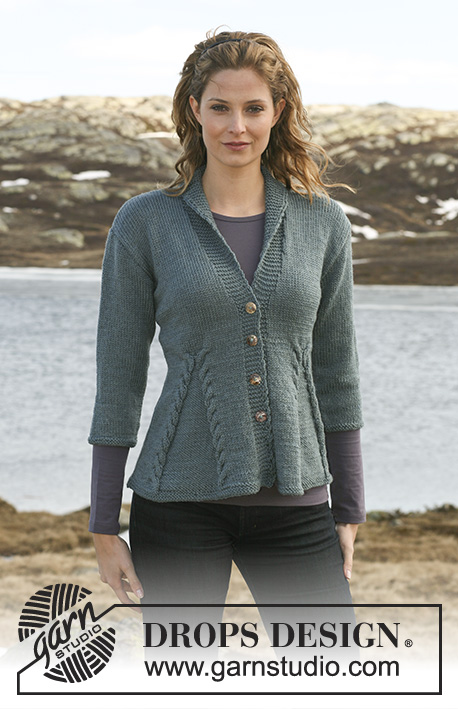
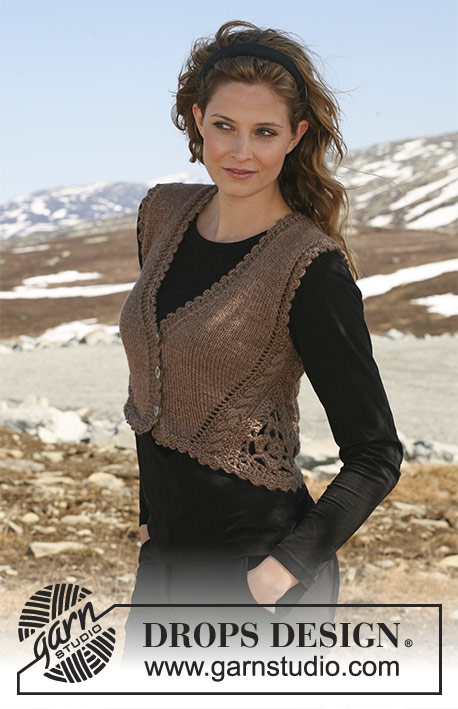
DROPS short waistcoat in ”Alaska” with crochet triangles at the sides. Size XS to XXL.
DROPS 117-3 |
||||||||||||||||||||||
|
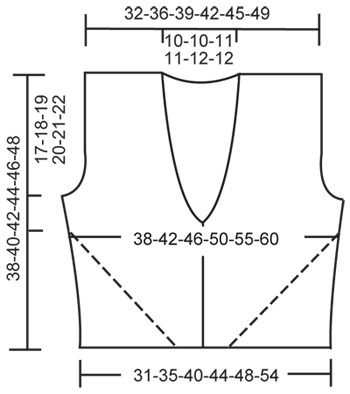
PATTERN: See diagram M.1 to M.4 – diagram is seen from RS and shows 1 pattern repeat. GARTER ST (back and forth on needle): K all rows. DECREASING TIP (neckline): Make all dec from RS. Dec as follows before 4 front band-sts in garter st: K2 tog. Dec as follows after 4 front band-sts in garter st: slip 1 st as if to K, K1, psso. -------------------------------------------------------- WAISTCOAT: First crochet 2 triangles, then work front piece and back piece before sewing all parts tog. CROCHET TRIANGLE: Crochet 6 ch with Alaska on crochet hook size 4.5 mm and form a ring with 1 sl st in first ch. ROUND 1: 3 ch (= 1 tr), 11 tr in ring, finish with 1 sl st in 3rd ch from beg of round (= 12 tr). ROUND 2: 3 ch (= 1 tr), * 5 ch, skip 1 tr, 1 tr in next tr *, repeat from *-* a total of 5 times and finish with 5 ch and 1 sl st in 3rd ch from beg of round (= 6 ch-loops on round). ROUND 3: Crochet as follows in each ch-loop: 1 dc, 1 ch, 1 htr, 1 ch, 1 tr, 1 ch, 2 dtr, 1 ch, 1 tr, 1 ch, 1 htr, 1 ch and 1 dc. Finish with 1 sl st in first dc from beg of round (= 6 leaves). ROUND 4: 5 ch (= 1 triple-tr = corner), 7 ch, 1 dc at the top of next leaf (between the 2 dtr), 5 ch, 1 dc at the top of next leaf, 7 ch, 1 triple-tr between the 2 dc between the next 2 leaves, * 7 ch, 1 dc at the top of next leaf, 8 ch, 1 dc at the top of next leaf, 7 ch, 1 triple-tr between the 2 dc between the next 2 leaves *, repeat from *-* 1 more time along the last side, but finish with 1 sl st in 5th ch from beg of round (instead of 1 triple-tr between 2 leaves) = 9 ch-loops round flower with 1 triple-tr in each corner – one side (= towards bottom edge) is slightly shorter than the 2 other sides. ROUND 5: In triple-tr in corner crochet as follows: 3 ch (= 1 tr), 2 ch, 1 dtr, 2 ch and 1 tr. Along the first side crochet as follows: In first ch-loop crochet: 1 ch, 1 tr, 1 ch, 1 tr, 1 ch, 1 tr (= a total of 3 tr), in next ch-loop crochet: 1 ch, 1 tr, 1 ch and 1 tr (= a total of 2 tr), in the last ch-loop crochet: 1 ch, 1 tr, 1 ch, 1 tr, 1 ch, 1 tr, (= a total of 3 tr), * in triple-tr in corner crochet: 1 ch, 1 tr, 2 ch, 1 dtr, 2 ch and 1 tr, then crochet as follows in all 3 ch-loops: 1 ch, 1 tr, 1 ch, 1 tr, 1 ch, 1 tr (= a total of 3 tr) *, repeat from *-* one more time along the last side, finish with 1 ch and 1 sl st in 3rd ch from beg of round. ROUND 6 : 3 ch, 1 tr in first ch-loop, in dtr in each corner crochet as follows: 1 tr, 2 ch, 1 dtr, 2 ch and 1 tr, then crochet 1 tr in each tr and 1 tr in each ch-loop from previous round. Finish round with 1 sl st in 3rd ch from beg of round. Along the shorter side there are now 23 tr and along the 2 other sides there are 25 tr (dtr in corners not included). Cut the thread. Triangle measures approx 15 cm along the shorter side and 18 cm along the 2 other sides. Crochet 1 more triangle in the same way. LEFT FRONT PIECE: Worked back and forth on needle. Cast on 17-20-24-27-31-36 sts with Alaska on needle size 4.5 mm. Work 2 rows GARTER ST – see above! Continue as follows (from RS): 2-2-3-4-5-6 garter sts, K2 in each of the next 3 sts (i.e. K3 will be K6), 2 garter sts, 6-9-12-14-17-21 stocking sts and 4 front band sts in garter st = 20-23-27-30-34-39 sts. Work 1 row with K over K, P over P and garter st over garter st. Work next as follows: 2-2-3-4-5-6 garter sts, M.1 (= 8 sts), stocking st until 4 front band sts remain, work these in garter st. Continue like this (on every row from RS inc 1 st in M.1 acc to diagram – work this st in stocking st). When there are a total of 19 inc sts in M.1, put piece aside (finish after 1 row from RS). There are now 39-42-46-49-53-58 sts on needle and piece measures approx 18 cm. RIGHT FRONT PIECE: Like left front piece, but mirrored, i.e. work first row after garter st as follows: 4 front band sts in garter st, 6-9-12-14-17-21 stocking sts, 2 garter sts, K2 in each of the next 3 sts and 2-2-3-4-5-6 garter sts. Work 1 row with K over K, P over P and garter st over garter st. Work next row as follows: 4 front band sts in garter st, 6-9-12-14-17-21 stocking sts, M.2 (= 8 sts) and 2-2-3-4-5-6 garter sts. Continue like this and complete piece as described for left front piece. BACK PIECE: Worked back and forth on needle. Cast on 26-33-40-47-55-64 sts with Alaska on needle size 4.5 mm. Work 2 rows garter st. Work next row as follows from RS: 2-2-3-4-5-6 garter sts, K2 in each of the next 3 sts (i.e. K3 will be K6), 2 garter sts, 12-19-24-29-35-42 stocking sts, 2 garter sts, K2 in each of the next 3 sts and 2-2-3-4-5-6 garter sts = 32-39-46-53-61-70 sts. Work 1 row with K over K, P over P and garter st over garter st. Work next as follows: 2-2-3-4-5-6 garter sts, M.1 (= 8 sts), 12-19-24-29-35-42 stocking sts, M.2 (= 8 sts) and 2-2-3-4-5-6 garter sts. Continue like this (on every row from RS inc 1 st in M.1 and M.2 acc to diagram, work these sts in stocking st). When there are a total of 19 inc sts each side, put piece aside (finish after 1 row from RS). There are now 70-77-84-91-99-108 sts on needle. BODY PIECE: Worked back and forth on circular needle in order to fit in all sts. Slip the 3 pieces on the same circular needle size 4.5 mm as follows: right front piece (= 39-42-46-49-53-58 sts), back piece (= 70-77-84-91-99-108 sts) and left front piece (= 39-42-46-49-53-58 sts) = a total of 148-161-176-189-205-224 sts. Work 1 row from WS with K over K, P over P and garter st over garter st. READ ALL OF THE FOLLOWING SECTION BEFORE CONTINUING! PATTERN: Continue as follows: 4 front band sts in garter st, 23-26-29-31-34-38 stocking sts, M.3 (make sure there are the same no of rows between each cable-row), 4-4-6-8-10-12 garter sts, (insert a marker in the middle of these sts = the side) M.4, 46-53-58-63-69-76 stocking sts, M.3, 4-4-6-8-10-12 garter sts (insert a marker in the middle of these sts = the side), M.4, 23-26-29-31-34-38 stocking sts and 4 front band sts in garter st. NECKLINE: AT THE SAME TIME on next row from RS dec 1 st each side for neckline – SEE DECREASING TIP. Repeat the dec on every other row a total of 8-8-9-9-9-10 times and then on every 4th row a total of 4-4-4-4-5-5 times. ARMHOLE: When piece measures 21-22-23-24-25-26 cm from cast on row work K2 tog on sts on all cables (i.e. 3 dec sts on each cable). On next row cast off the 4-4-6-8-10-12 sts between cables at the sides (i.e. 2-2-3-4-5-6 sts each side of marker each side) and complete each piece separately. RIGHT FRONT PIECE: Continue in garter st on 5 sts towards armhole and lace pattern on the next 2 sts as before. Continue dec for neck, AT THE SAME TIME cast off for armhole at the side: 1 st on every other row a total of 3 times. Now continue with 2 garter sts + lace pattern towards armhole as before. When all dec for armhole and neckline are complete there are 19-22-24-26-28-31 sts left on shoulder. Continue as before until piece measures 38-40-42-44-46-48 cm, cast off. LEFT FRONT PIECE: Like right front piece, but mirrored. BACK PIECE: = 60-67-72-77-83-90 sts. Cast off for armhole each side as described for front piece = 54-61-66-71-77-84 sts. Continue in stocking st and 2 garter sts + lace pattern each side as before. When piece measures 36-38-40-42-44-46 cm work 4 rows garter st on the 24-25-26-27-29-30 middle sts (with remaining sts as before). On next row cast off the middle 16-17-18-19-21-22 sts for neck = 19-22-24-26-28-31 sts left on each shoulder. Continue on shoulder sts as before with 4 garter sts towards neckline until piece measures 38-40-42-44-46-48 cm, cast off. ASSEMBLY: Sew 1 crochet triangle to opening each side, make sure the shorter side is towards bottom edge. Sew edge to edge and make sure seam is even. Sew shoulder seams. CROCHET BORDER: Crochet with Alaska on crochet hook size 4.5 mm – beg mid back, continue down along left front piece, along bottom edge, up along right front piece and finish mid back. Crochet as follows: 1 dc in first st, * 4 ch, 1 tr in the first ch (= 1 picot), skip approx 1.5 cm, 1 dc in next st *, repeat from *-*. Crochet a similar border round armholes. Sew buttons to left front piece with approx 6 cm between each - use picots on right front piece as buttonholes. |
||||||||||||||||||||||
Diagram explanations |
||||||||||||||||||||||
|
||||||||||||||||||||||
 |
||||||||||||||||||||||
 |
||||||||||||||||||||||
Have you finished this pattern?Tag your pictures with #dropspattern #missenidvest or submit them to the #dropsfan gallery. Do you need help with this pattern?You'll find 25 tutorial videos, a Comments/Questions area and more by visiting the pattern on garnstudio.com. © 1982-2026 DROPS Design A/S. We reserve all rights. This document, including all its sub-sections, has copyrights. Read more about what you can do with our patterns at the bottom of each pattern on our site. |
||||||||||||||||||||||


With over 40 years in knitting and crochet design, DROPS Design offers one of the most extensive collections of free patterns on the internet - translated to 17 languages. As of today we count 324 catalogues and 12290 patterns translated into English (UK/cm). 12290
We work hard to bring you the best knitting and crochet have to offer, inspiration and advice as well as great quality yarns at incredible prices! Would you like to use our patterns for other than personal use? You can read what you are allowed to do in the Copyright text at the bottom of all our patterns. Happy crafting!
Post a comment to pattern DROPS 117-3
We would love to hear what you have to say about this pattern!
If you want to leave a question, please make sure you select the correct category in the form below, to speed up the answering process. Required fields are marked *.