
Popular categories
Looking for a yarn?


Comments / Questions (30)
![]() Ingrid Bahnsen, DK wrote:
Ingrid Bahnsen, DK wrote:
Hej, jeg vil gerne strikke jakken "Monument Valley", men 3 af de fire varianter af Drops Fabel er udgået: f.nr 672, vinrød mix er udgået f.nr 674, lyng mix er udgået f.nr 912, soft chocolate findes stadig f.nr 543, rød/orange mix er udgået Kan I hjælpe med alternative farver, da jeg ikke ved hvordan de udgåede farver ser ud? P.f.t. Ingrid
31.01.2026 - 14:37DROPS Design answered:
Hei Ingrid. Farge 672 var en dyp mørk rødlig fargen med noe hvit, svart og orange i. Fargen 674 var også en dyp mørk farge med noe brunt, petrol og mørk orange. Farge 543 var en noe lysere utgave av 543. Dessverre har vi ikke noen lignende farge. Men bruk vår søke filter og finn plagg som er strikket i Fabel og se de forskjellige fargene vi har, kanskje det dukker opp noen farger du vil like. mvh DROPS Design
02.02.2026 - 12:15
![]() Silvia Habner wrote:
Silvia Habner wrote:
Hallo. Tolle Jacke, die möchte ich stricken. Auf den Bildern nicht gut zu sehen, ist die Jacke glatt re gestickt? Sieht aus wie Krausrippen. Die Garnfarben gibt es nicht mehr. Um ähnliche Rottöne zu bekommen, welche Farbnr.könnt ihr empfehlen? Herzlichen Dank Silvia Habner
26.09.2024 - 10:44DROPS Design answered:
Liebe Frau Habner, Rumpfteil, Rücken- und Vorderteil sowie Ärmel werden Glattrechts gestrickt, aber dann mit der linken Seite als Vorderseite zusammengenäht - siehe ZUSAMMENNÄHEN. Die Farbkarte wurde seitdem aktualisiert, gerne kann Ihnen Ihr DROPS Händler damit - auch per Telefon oder per E-Mail - helfen, die besten passenden Farben zu finden. Viel Spaß beim Stricken!
27.09.2024 - 08:04
![]() Margreet Van Scherpenzeel wrote:
Margreet Van Scherpenzeel wrote:
Goedendag,\\\\r\\\\nwil dit model maken in dezelfde kleuren maar kan de nummers van de wol niet vinden van Fabel, zijn die nummers verandert?
03.02.2021 - 16:06
![]() Nicole Pelletier wrote:
Nicole Pelletier wrote:
Bonjour, Si je veux exécuter ce modèle avec un fil de brusched alpaca silk en plus, qu'elles sont les quantités requises ? Cordialement Nicole Pelletier
29.11.2020 - 22:49DROPS Design answered:
Bonjour Mme Pelletier, utilisez notre convertisseur (Fabel, 2 fils) ou bien retrouvez ici comment calculer une nouvelle quantité alternative. Bon tricot!
30.11.2020 - 09:53
![]() Robin Charlotte wrote:
Robin Charlotte wrote:
Liebes Drops-Team, wie viel Garn müsste ich verwenden, wenn ich das Modell nicht aus zwei Fäden A-Garn, sondern aus einem Faden der Kategorie C stricken wollte? Ginge das so überhaupt? Vielen Dank für die Antwort!
19.02.2015 - 01:47DROPS Design answered:
Ja, das geht. Sie haben dann natürlich nicht mehr diesen sehr bunten, abwechslungsreichen Effekt. Sie müssen die Gesamtmenge an Garn addieren, die Sie für Ihre Größe benötigen, das Ergebnis dann mit der Lauflänge von Fabel auf die Meter umrechnen (50g = 205m) und diese Menge dann halbieren (da Sie ja doppelfädig stricken). Die erhaltene Lauflänge teilen Sie durch die Lauflänge des Garnes, das Sie als Ersatz wünschen, und erhalten damit die benötigte Anzahl Knäuel. Bei einer "krummen" Zahl runden Sie nach oben.
21.02.2015 - 10:30
![]() Annika wrote:
Annika wrote:
In de beschrijving staat dat je voor het 'lijf' steken op moet nemen. Maar welk onderdeel van het vest is dit? Ik heb 'mouwen', 'achterpand', 'voorpanden' en dan nog de 'domino rand'. Maar wat is dan 'lijf'? Ik hoop dat iemand mij kan helpen!! Alvast bedankt!
02.10.2014 - 18:42DROPS Design answered:
Hoi Annika. Je begint met het opzetten van het vermelde aantal st voor het lijf. = lijf zijn de st voor het achterpand+voorpanden voordat je deze opdelen (lees het patroon helemaal door). De dominovierkantjes komen middenvoor en de mouwen worden ook apart gebreid.
03.10.2014 - 16:06
![]() Reximama wrote:
Reximama wrote:
Ich würde diese Jacke gerne in 2 Farben stricken. Und zwar nur die Dreiecke.Der Rest in der Grundfarbe. Wie muss ich dafür die Wollmenge aufteilen?
04.05.2012 - 09:48DROPS Design answered:
Da würde ich ca. 2 x 150-150-250-250 gr. der Farbe für die Vierecke kaufen (mit Rückgaberecht evt. ein Knäuel mehr).
07.05.2012 - 09:21
![]() Servolle wrote:
Servolle wrote:
J'aimerai savoir si ce modèle a besoin d'être doubler pour une meilleure tenue Qu'en pensez vous? et comment réaliser cette doublure
05.05.2010 - 08:55
![]() DROPS Design NL wrote:
DROPS Design NL wrote:
Hoi Carine. Dit vest moet heel ruim vallen. Het achterpand is ongeveer 62cm breed langs de onderrand (maat S). Er wordt niet verminderd om het lijf smaller te maken, maar de model is gemaakt zodat hij smaller valt. Je kunt eventueel zelf een paar minderingen maken aan de zijkanten om nog meer model in te krijgen. Vind je de model te wijd, dan kan je ook het aantal steken voor het lijf verminderen. Let dan op de steekverhouding en het afkanten voor de mouwen. Succes. gr. Tine.
08.01.2010 - 10:42
![]() Carine wrote:
Carine wrote:
De afmetingen zijn zo groot??? Bij een small heb je een omtrek van 130 cm. Ik heb dit haast nodig voor een XL/XXL. Wordt hij dan niet heel erg groot? In het rugpand zie je op de tekening dat die versmalt, maar in de beschrijving merk je geen vermindering van steken. Hoe kan dit verklaart worden? Ik vind nochthans het model super.
08.01.2010 - 08:39
|
|
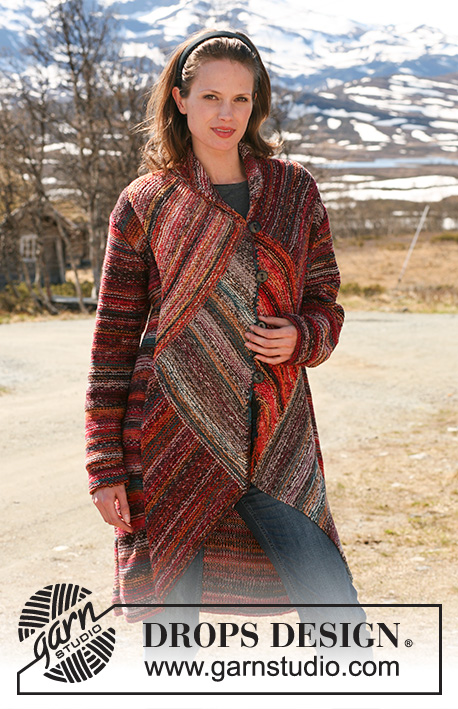
Monument Valley#monumentvalleyjacket |
|
 |
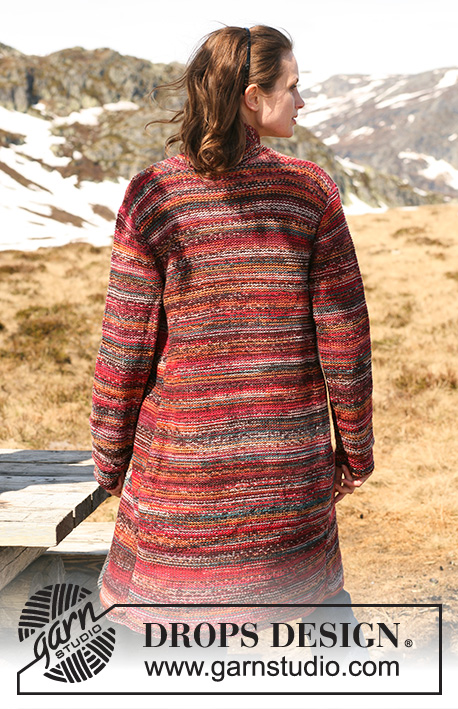 |
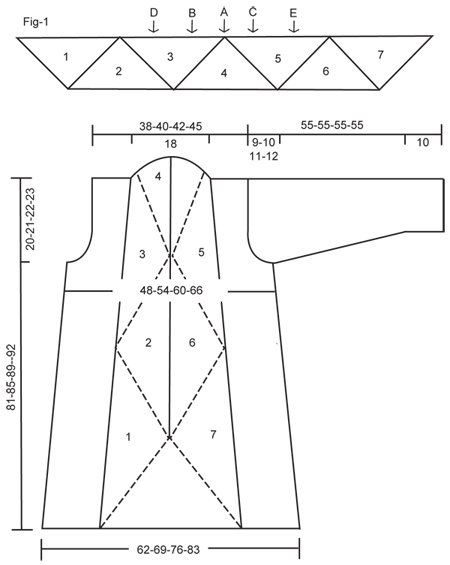
Long DROPS jacket in 2 threads ”Fabel” with half domino squares on front pieces. Size S – XXXL.
DROPS 114-13 |
|
|
COLOUR OF DOMINO SQUARES: All squares worked in 2 threads. Square 1: Colour 672 + 674 Square 2: Colour 674 + 912 Square 3: Colour 912 + 543 Square 4: Colour 912 + 672 Square 5: Colour 672 + 674 Square 6: Colour 672 + 543 Square 7: Colour 674 + 912 HALF DOMINO SQUARE-1: Row 1 (= WS): K all sts. Row 2 (= RS): K all sts until 2 sts remain, K2 tog. Repeat row 1 and 2 until 1 st remain on needle, cut the thread and pull it through remaining st. HALF DOMINO SQUARE-2: Row 1 (= WS): K all sts. Row 2 (= RS): K2 tog, K remaining sts on row. Repeat row 1 and 2 until 1 st remain on needle, cut the thread and pull it through remaining st. -------------------------------------------------------- JACKET: First work a piece with 7 half domino squares, for front pieces. DOMINO SQUARES: Worked in garter st, i.e. K all rows. Cast on 57-59-61-63 sts on needle size 5 mm with colours for square-1 – see COLOURS OF DOMINO SQUARES above. Work HALF DOMINO SQUARE-1– see above. Change to colours for square-2 and pick up 57-59-61-63 sts along the right side of the first half square. Work HALF DOMINO SQUARE-2 – see above. Change to colours for square-3 and pick up 57-59-61-63 sts along the left side of previous square, work half domino square-1 again. Continue to work half domino square-2 and 1 alternately until there are a total of 7 half squares vertically, change colours for each square as described above. MARKING: See Fig-1. Insert MARKER-1 (= arrow A) in transition between 3rd, 4th and 5th half square (= neckline mid back). Measure 13 cm out from each side of this marker and insert MARKER-2 (= arrow B) at one side and MARKER-3 (= arrow C) at the other side. Run a thread through st loops between MARKER-2 and MARKER-3 (= 26 cm). Tighten thread to make distance between the 2 markers = 18 cm. Fasten thread each side to keep piece in place (the 18 cm = width of neckline mid back). Measure 20-21-22-23 cm down from MARKER-2 and insert MARKER-4 (= arrow D), distance between these 2 markers = armhole. Measure 20-21-22-23 cm down from MARKER-3 and insert MARKER-5 (= arrow E), distance between these 2 markers = armhole at the other side. BODY PIECE: Worked back and forth on circular needle. Cast on 134-154-174-194 sts on circular needle size 5 mm with 1 thread 672 + 1 thread 674. K 4 rows and continue in stocking st. REMEMBER THE KNITTING TENSION! When piece measures approx 61-64-67-69 cm cast off for armhole – adjust to length of domino squares, from the top of the first domino square and up to MARKER-4 which marks the beg of armhole. Body piece should be the same length. Work next row as follows: 22-27-32-37 sts (= front/side piece), cast off 8 sts for armhole, 74-84-94-104 sts (= back piece), cast off 8 sts for armhole, 22-27-32-37 sts (= front/side piece). Now complete each piece separately. LEFT FRONT PIECE: = 22-27-32-37 sts. Cast off for armhole at the beg of every row from the side: 3 sts 0-1-1-2 times, 2 sts 1-1-2-2 times and 1 st 3-3-4-4 times = 17-19-21-23 sts left on shoulder. Cast off when armhole measures approx 20-21-22-23 cm. RIGHT FRONT PIECE: Like left front piece, but mirrored. BACK PIECE: = 74-84-94-104 sts. Cast off for armhole each side at the beg of every row as described for front piece = 64-68-72-76 sts. When armhole measures approx 18-19-20-21 cm cast off the middle 26 sts for neck and complete each shoulder separately. Cast off 2 sts on neckline on next row = 17-19-21-23 sts left on shoulder. Cast off when armhole measures approx 20-21-22-23 cm – adjust to front piece. SLEEVE: Worked back and forth on needle. Cast on 46-48-50-52 sts on needle size 5 mm with 1 thread 672 + 1 thread 674. K 4 rows and continue in stocking st. When piece measures 10 cm inc 1 st each side, and repeat the inc on every 4-3.5-3-2.5 cm a total of 9-10-11-12 times = 64-68-72-76 sts. When piece measures 46-45-44-43 cm (less for the larger sizes because of longer sleeve cap and wider shoulder) cast off for sleeve cap each side at the beg of every row: 4 sts 1 time, 3 sts 1 time, 2 sts 2 times and 1 st 3-4-5-6 times, then 2 sts each side until piece measures 54 cm, now cast off 3 sts 1 time each side, and cast off remaining sts. Piece measures approx 55 cm for all sizes. ASSEMBLY: Assemble the jacket with the WS out. Sew shoulder seams and sew sleeve seams inside 1 edge st. Set in sleeves. Sew the longer side of the domino squares to front pieces and to neckline on back piece, edge to edge in outer loops of sts – beg by marker on back piece and sew squares to front pieces each side. CROCHET BORDER: Crochet with 1 thread 672 + 1 thread 674 on crochet hook size 5 mm along the shorter side of domino squares (i.e. up along right front piece, round neckline and down along left front piece) as follows: 1 dc in first st, * 1 ch, skip 0.5 cm, 1 dc in next st *, repeat from *-*, AT THE SAME TIME crochet 4 buttonhole loops along right front piece. 1 BUTTONHOLE LOOP = 4 ch between dc instead of 1 ch. Place the bottom loop approx 25 cm from bottom edge, and the remaining loops with approx 9 cm between each. Sew buttons to left front piece. |
|
 |
|
Have you finished this pattern?Tag your pictures with #dropspattern #monumentvalleyjacket or submit them to the #dropsfan gallery. Do you need help with this pattern?You'll find 20 tutorial videos, a Comments/Questions area and more by visiting the pattern on garnstudio.com. © 1982-2026 DROPS Design A/S. We reserve all rights. This document, including all its sub-sections, has copyrights. Read more about what you can do with our patterns at the bottom of each pattern on our site. |
|


With over 40 years in knitting and crochet design, DROPS Design offers one of the most extensive collections of free patterns on the internet - translated to 17 languages. As of today we count 324 catalogues and 12290 patterns translated into English (UK/cm). 12290
We work hard to bring you the best knitting and crochet have to offer, inspiration and advice as well as great quality yarns at incredible prices! Would you like to use our patterns for other than personal use? You can read what you are allowed to do in the Copyright text at the bottom of all our patterns. Happy crafting!
Post a comment to pattern DROPS 114-13
We would love to hear what you have to say about this pattern!
If you want to leave a question, please make sure you select the correct category in the form below, to speed up the answering process. Required fields are marked *.