
Popular categories
Looking for a yarn?


Comments / Questions (48)
![]() Adam wrote:
Adam wrote:
Kiedy wzor bedzie dostepny w jezyku polskim
11.09.2019 - 21:44DROPS Design answered:
Witam! Na jutro wzór będzie gotowy, a w weekend będzie można zacząć działać :) Pozdrowienia od DROPS Design!
12.09.2019 - 08:38
![]() Christine Jensen wrote:
Christine Jensen wrote:
Skal man klippe tråden over inden man starter på lillefingeren?
01.03.2018 - 15:00DROPS Design answered:
Hej Christine, Det behøver du ikke hvis du strikker maskerne inden du sætter dem på tråden. God fornøjelse!
06.03.2018 - 16:00
![]() Michelle Dontigny wrote:
Michelle Dontigny wrote:
Bonjour ! Je fais ce modèle en taille L/XL. En suivant le patron, 58 mailles me semble énorme. Je l'ai défait et refait en calculant 46 m au lieu de 58. Comment calculer les autres mailles ? Merci de votre gentillesse et bravo pour ce patron magnifique !
22.01.2018 - 17:02DROPS Design answered:
Bonjour Mme Dontigny, ce modèle se tricote sur la base de 22 m x30 rangs = 10 x 10 cm et donc 58 m en taille L/XL en côtes que l'on diminue ensuite à 46 m après les côtes. Bon tricot!
22.01.2018 - 18:09
![]() Dorte Wallin wrote:
Dorte Wallin wrote:
Jeg vil gerne strikke disse vanter til mit barnebarn på 7 år. Vil det være muligt at få ændret på opskriften passer til børn . Mvh Dorte
07.11.2017 - 21:24DROPS Design answered:
Hei Dorte. Det har vi dessverre ikke muligheten til å gjøre nå, men ditt ønske er formidlet videre til design avd. mvh Drops design
08.11.2017 - 13:43
![]() Johanna wrote:
Johanna wrote:
Hei jeg har nå lagd opp 3 masker bak tommelen og skal nå plukke masker for hetta skal det også plukkes mellom de 3 lagd opp masker bak tommlen for hetta?. Hvis det ikke skal plukkes der.Hva skal jeg gjøre da. ? Ps skal de plukka opp maskene på en hjelpe pinne etter på?
13.01.2016 - 10:30DROPS Design answered:
Hej. Om du nu har lagt opp 3 masker bak tommelen så ska du inte plocka upp maskor till hette. Du stickar am på handen och i dessa am ska du senare sticka upp nya maskor som du gör hette av. Nu stickar du först färdigt vanten och fingrarna, sen efter det stickar du hette. Lycka till!
13.01.2016 - 11:31
![]() Johanna wrote:
Johanna wrote:
Prøver igjen. Hva skal jeg gjøre med det maskene som plukkes opp for hetta. ☺
13.01.2016 - 07:21DROPS Design answered:
Hej. Du strikker vrbord (1 r, 1 vr) runt alla m till hetta (de 21-23 du strikket opp oppå handen og de 21-23 du lagt opp i slutet av pinnen). Lycka till!
13.01.2016 - 07:41
![]() Johanna wrote:
Johanna wrote:
Hva skal jeg gjøre med det maskene som plukkes opp for hetta.
12.01.2016 - 23:46
![]() Alexandra wrote:
Alexandra wrote:
Bitte entschuldige, ich bin ein blutiger Anfänger und möchte meinen Mann an Weihnachten überraschen (hab noch etwas Zeit). Ich wollte mit einer Lang Airolo schurwolle diese Handschuhe stricken, bin nun aber mit 5er Nadel bei der Maschenprobe schon am ersten Problem angelangt. Bei meinen 10x10 cm sind 19m auf 23 Reihen vorhanden. Wie muss ich denn nun vorgehen? Hilfeee 🙈 das ist ja peinlich und ihr fragt euj sicher ;) aber ich WILLS VERSUCHEN! Danke für eure Hilfe. Alexandra
02.09.2015 - 17:33DROPS Design answered:
Sie sollten es mit der Nadelstärke probieren, die in der Anleitung angegeben ist, hier ist es 3,5. Mit Nadel 5 erhalten Sie zu wenige M pro 10 cm, also müssen Sie die Maschen kleiner stricken, um mehr M auf 10 cm zu bekommen, das erfolgt über eine kleinere Nadel. Testen Sie so lange verschiedene Nadelstärken, bis Sie die Maschenprobe (MP) erreichen. Allerdings könnte es sein, dass Ihr Garn vielleicht ungeeignet ist. Sie sollten entweder das Originalgarn oder eins mit einer ähnlichen Lauflänge verwenden. Die MP machen Sie so: Sie schlagen einige M mehr an als angeben, sodass Sie mind. ein 12 cm breites Stück haben, stricken 12 cm in die Höhe und messen dann in der Mitte die 10 x 10 cm aus.
08.09.2015 - 10:59
![]() Nathalex wrote:
Nathalex wrote:
Modèle très sympathique à réaliser, à part les fils à rentrer. pour le rabat, j'ai préféré le faire en point de godron.
10.02.2015 - 15:47
![]() K. Van Stipriaan wrote:
K. Van Stipriaan wrote:
Ik heb een opmerking over drops 117-26 patroon is prima maar de bijgeleverde knopen nr513 ,tweemaal zijn te groot! Zeker als in het patroon vermeld staat ,dat er een lusje van 4 lossen moet worden gehaakt! Misschien kunt u dit veranderen?
21.10.2014 - 12:48DROPS Design answered:
Bij ons past het met 4 lossen, maar als u daar niet meer uitkomt, kun u zelf natuurlijk de lossen wat losser haken of meer lossen haken.
23.10.2014 - 12:06
|
|
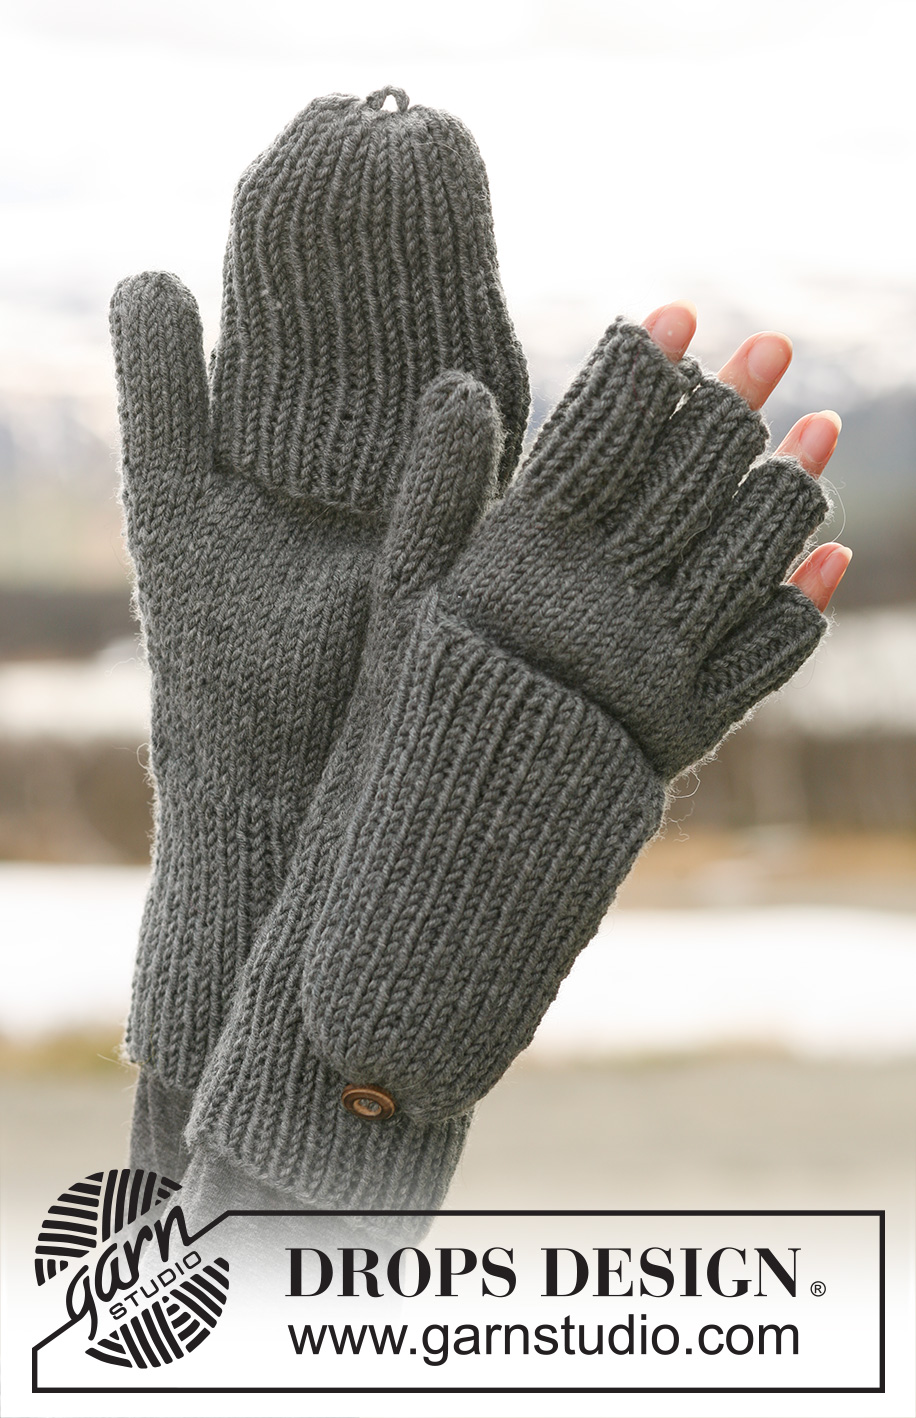
Nesting Fingers#nestingfingersgloves |
|
|
|
|
DROPS gloves with flap in ”Merino Extra Fine”.
DROPS 117-26 |
|
|
RIGHT GLOVE: Worked in the round on double pointed needles. Cast on 54-58 sts on double pointed needles size 3 mm. Work rib, K1/P1 for 9 cm. Change to double pointed needles size 3.5 mm and continue in stocking st - AT THE SAME TIME on first round dec 12 sts evenly = 42-46 sts. Insert a marker in second st on round (= thumb-st). When piece measures 14 cm inc 1 st each side of thumb-st, and repeat the inc on every other round a total of 4-5 times (work inc sts in stocking st) = 9-11 thumb-sts and 50-56 sts in total. When piece measures 17-18 cm slip the 9-11 thumb-sts + 1 st each side off these (= a total of 11-13 sts) on a stitch holder. On next round cast on 3 new sts behind sts on stitch holder = 42-46 sts. Work next round as follows: K 21-23 (= palm of hand), P 21-23 (= upper hand – pick up sts in these sts afterwards for flap). Now continue in stocking st on all sts until piece measures 20-21 cm. Slip the first 17-18 sts on a stitch holder (= palm of hand), keep the next 8-10 sts on needle and slip the last 17-18 sts on a stitch holder (= upper hand). LITTLE FINGER: = 8-10 sts, cast on 2 new sts towards sts on stitch holder = 10-12 sts. Change to double pointed needles size 3 mm, work rib, K1/P1 in the round for approx 3-3.5 cm. Cast off with K over K and P over P. HAND. Slip sts from stitch holder back on double pointed needles size 3.5 mm, pick up 2 sts towards little finger = 36-38 sts. Work 2 rounds stocking st. Keep the 2 new sts cast on towards little finger + 5-5 sts from upper hand and 5-5 sts from palm of hand on needle and slip the remaining 24-26 sts back on stitch holder. RING FINGER: = 12-12 sts, cast on 2 new sts towards sts on stitch holder = 14-14 sts. Change to double pointed needles size 3 mm and work rib, K1/P1 in the round for approx 5-5.5 cm. Cast off with K over K and P over P. MIDDLE FINGER: Slip 5-6 sts from upper hand and 5-6 sts from palm of hand on double pointed needles size 3 mm, pick up 2 sts towards ring finger and cast on 2 new sts towards sts on stitch holder = 14-16 sts. Work rib, K1/P1 in the round for approx 5-5.5 cm. Cast off with K over K and P over P. INDEX FINGER: Slip the remaining 14-14 sts on double pointed needles size 3 mm, pick up 2 sts towards middle finger = 16-16 sts. Work rib, K1/P1 in the round for approx 5-5.5 cm. Cast off with K over K and P over P. THUMB: Slip the 11-13 sts from stitch holder over thumb gusset back on needle and pick up 3 sts in edge behind thumb = 14-16 sts. Work stocking st in the round for approx 5-6 cm, and then K2 tog all the way round. Cut the thread and pull it through remaining sts, tighten and fasten. FLAP: Pick up 1 st in each of the 21-23 P sts on upper hand on double pointed needles size 3.5 mm with Merino, then cast on 21-23 new sts at the end of row = 42-46 sts in total. Work rib K1/P1 in the round for 11-12 cm. Now K2 tog across the round = 21-23 sts. Cut the thread (leave it approx 60 cm long – for crochet buttonhole loop), pull it through remaining sts and tighten. BUTTONHOLE LOOP: Insert crochet hook in a K st by the thread on top of flap and pull the thread through st = 1 loop on hook. Work 4 ch and then 1 dc in the same st on flap. Sew 1 button in the middle of rib on upper hand, approx 5 cm from cast on row. LEFT GLOVE: Like right glove, but mirrored. I.e. insert marker for thumb in the last but one st on round. After slipping thumb sts on a stitch holder work next round as follows: P 21-23 (= upper hand), K 21-23 (= palm of hand). Work little finger as follows: Slip the first 17-18 sts on a stitch holder, keep the next 8-10 sts on needle and slip the last 17-18 sts on a stitch holder. |
|
Have you finished this pattern?Tag your pictures with #dropspattern #nestingfingersgloves or submit them to the #dropsfan gallery. Do you need help with this pattern?You'll find 17 tutorial videos, a Comments/Questions area and more by visiting the pattern on garnstudio.com. © 1982-2026 DROPS Design A/S. We reserve all rights. This document, including all its sub-sections, has copyrights. Read more about what you can do with our patterns at the bottom of each pattern on our site. |


With over 40 years in knitting and crochet design, DROPS Design offers one of the most extensive collections of free patterns on the internet - translated to 17 languages. As of today we count 324 catalogues and 12290 patterns translated into English (UK/cm). 12290
We work hard to bring you the best knitting and crochet have to offer, inspiration and advice as well as great quality yarns at incredible prices! Would you like to use our patterns for other than personal use? You can read what you are allowed to do in the Copyright text at the bottom of all our patterns. Happy crafting!
Post a comment to pattern DROPS 117-26
We would love to hear what you have to say about this pattern!
If you want to leave a question, please make sure you select the correct category in the form below, to speed up the answering process. Required fields are marked *.