
Popular categories
Looking for a yarn?


Comments / Questions (45)
![]() Mari wrote:
Mari wrote:
Erittäin hyvä, selkeä ja toimiva ohje. Kiitos siitä! Tein kolme eri kokoa ja kaikki täsmäsivät.
18.02.2026 - 12:10
![]() Angelika Tumpfer wrote:
Angelika Tumpfer wrote:
Hallo, ist eine Reihe des Diagramms, die Vorderreihe und Rückreihe?
20.10.2024 - 19:05DROPS Design answered:
Liebe Frau Tumpfer, alle Reihen (die Hin sowie die Rückreihen) werden im Diagram gezeichnet; Hinreihen lesen Sie rechts nach links und Rückreihen links nach rechts. Viel Spaß beim Stricken!
21.10.2024 - 09:04
![]() Thouvenin wrote:
Thouvenin wrote:
Merci pour votre réponse. Je pense avoir compris. Mais en regardant le modèle, en zoomant sur le motif, il me semble voir une pointe en bas comme en haut du motif. Et en effectuant ces diminutions comme indiqué, il n'y a qu'une pointe en haut, il me semble. Merci pour la rapidité de votre réponse Marie thouvenin
07.09.2021 - 17:15DROPS Design answered:
Bonjour Mme Thouvenin, c'est probablement un effet d'optique dû au changement mailles endroit/mailles envers, jetés et diminution, vous obtiendrez le même effet sur plusieurs rangs. Bon tricot!
08.09.2021 - 07:22
![]() THOUVENIN wrote:
THOUVENIN wrote:
Bonjour, mes motifs ne ressemblent pas du tout à votre photo. Le deuxième jeté à faire entre le point endroit et le point envers, me semble difficile à faire. De plus le modèle semble montrer un motif avec une pointe en haut et en bas, comme un losange, ce que ne fait pas mon motif: il fait une point seulement en haut du rectangle. Merci de vos explications Cordialement Marie T
07.09.2021 - 15:43DROPS Design answered:
Bonjour Mme Thouvenin, tricotez le 5ème rang ainsi: (1 jeté, glisser 1 m à l'end, 2 m ens à l'end, passer la m glissée par dessus la m tricotée, 1 jeté, 3 m env), et le 11ème rang ainsi: (3 m env, 1 jeté, glisser 1 m à l'end, 2 m ens à l'end, passer la m glissée par dessus la m tricotée, 1 jeté). La petite pointe dont vous parlez est formée par cette double diminution. Attention à bien faire le jeté avant la diminution (= après/avant les mailles envers), de sorte que chaque M.1 se tricote toujours sur 6 mailles (et toujours 3 mailles dans les sections en mailles endroit). Bon tricot!
07.09.2021 - 16:03
![]() Louise Limoges wrote:
Louise Limoges wrote:
Ma petite fille ne supporte pas le fil kid silk. Comment puis-je faire ce modèle avec juste 1 fil alpaca baby silk?
22.03.2021 - 21:18DROPS Design answered:
Bonjour Mme Limoges, pour conserver la même tension, vous pouvez utiliser 2 fils du groupe A (comme Alpaca + Kid-Silk), soit par exemple 2 fils DROPS Baby Alpaca Silk - ou bien également un fil du groupe C (Air par exemple). Retrouvez plus d'infos sur les alternatives ici. Bon tricot!
23.03.2021 - 08:14
![]() Annika wrote:
Annika wrote:
Når jeg skal strikke kastene i M1 i neste omgang, skal jeg da bare strikke det vanlig (vrangt) slik at det blir hullmønster, eller vridd for å unngå hull?
11.12.2020 - 21:43DROPS Design answered:
Hei Annika, Kastene skal strikkes vridd for å unngå hull. God fornøyelse!
14.12.2020 - 10:45
![]() Karin wrote:
Karin wrote:
På vilka stickor ska man sticka? "BAKST: Arb stickas fram och tillbaka på st. Lägg ....." Vilken storlek på stickor ska man sticka på fram och tillbaka? Det står inte, bara vilka man ska lägga upp på.
25.11.2020 - 17:10DROPS Design answered:
Hej Karin. Du stickar med sticka 4,5 fram till att det står i mönstret att du ska byta till sticka 4. Mvh DROPS Design
26.11.2020 - 08:18
![]() Barbara Bättig wrote:
Barbara Bättig wrote:
Guten Tag Sie empfelen Kid-Silk zu verwenden. Könne Sie mir sagen wo her das Mohair stam? Wurde der Tierschutz beachetet? Danke für Ihr Feedback
15.08.2019 - 13:42
![]() Wivi Eriksson wrote:
Wivi Eriksson wrote:
Vilket/vilka garner kan man byta till för att få till en "somrigare" variant, alltså inget "hårigt" eller "ulligt" garn?
28.01.2019 - 09:21DROPS Design answered:
Hej Wivi, du kan använda dubbel tråd DROPS Safran eller 1 tråd DROPS Paris eller Bomull-Lin som alla är sommargarner. Lycka till :)
28.01.2019 - 09:48
![]() Kathrina Fløttum wrote:
Kathrina Fløttum wrote:
Kan man ikke bare strikke jakken, forstykkene og rygg samtidig, fram og tilbake? Hva er grunnen til at oppskriften viser til rygg og framstykker hver for seg i tre deler? Er det for å få den stødigere? Har det noe å si for fasongen? Mvh Kathrina
18.09.2018 - 21:44DROPS Design answered:
Hej Kathrina, Vi prøver at lave vores modeller på lidt forskellige måder, så der er noget for alle. Du må gerne strikke stykkerne i et, men vi kan desværre ikke hjælpe dig med at skrive opskriften om. God fornøjelse!
19.09.2018 - 15:15
|
|||||||||||||
Little Emma#littleemmacardigan |
|||||||||||||
|
|
|||||||||||||
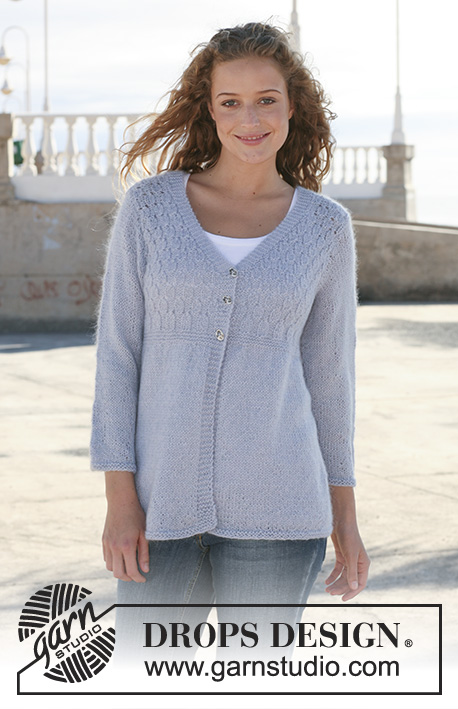
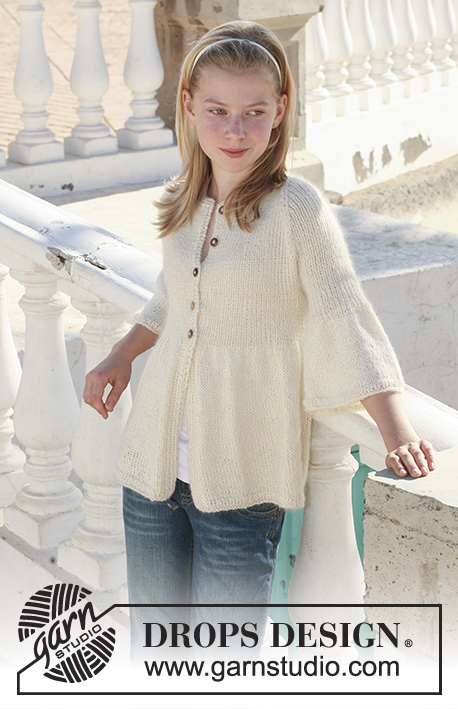
DROPS jacket in ”Alpaca” and ”Kid-Silk” with long sleeves. Size 7 to 14 years.
DROPS 112-38 |
|||||||||||||
|
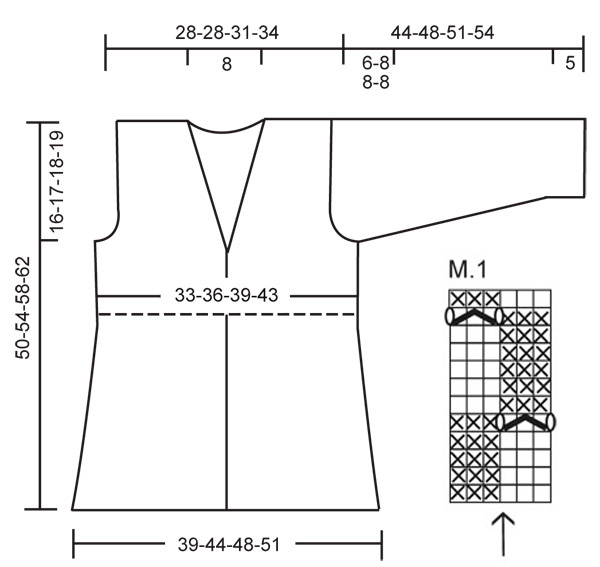
GARTER ST (back and forth on needle): K all rows. PATTERN: See diagram M.1. The diagram shows the pattern from the RS. The arrow indicates the beg of left front piece. DECREASING TIP: Make all dec from the RS. Dec 1 st inside 6 front band sts by K OR P 2 tog – adjust to pattern. BUTTONHOLES: Make buttonholes on right front band. 1 buttonhole = K tog 3rd and 4th st from mid front and make 1 YO. Make buttonholes when piece measures: SIZE 7/8 years: 27, 31 and 35 cm SIZE 9/10 years: 29, 33 and 37 cm SIZE 11/12 years: 31, 36 and 40 cm SIZE 13/14 years: 33, 38 and 43 cm ---------------------------------------------------------- ---------------------------------------------------------- BACK PIECE: Worked back and forth on needle. Cast on 76-82-88-94 sts (includes 1 edge st each side) on needle size 4.5 mm with 1 thread of each quality. K 3 rows (first row = WS) and continue in stocking st. REMEMBER THE KNITTING TENSION! When piece measures approx 26-28-30-32 cm K 1 row from RS, AT THE SAME TIME dec 11 sts evenly = 65-71-77-83 sts. Change to needle size 4 mm and K 7 rows. Now continue in M.1 (beg on the right side of diagram) with 1 edge st each side. When piece measures 34-37-40-43 cm cast off for armhole each side. NOTE: When dec work sts not fitting into M.1 each side in stocking st. Cast off each side at the beg of every row: 4 sts 1-1-1-1 time, 2 sts 0-1-1-1 time and 1 st 2-3-3-3 times = 53-53-59-65 sts. Continue in pattern as before with 1 edge st each side. When piece measures 48-52-56-60 cm work 4 rows garter st – see above – on the middle 27 sts with remaining sts as before. Now cast off the middle 15 sts for neck and complete each shoulder separately = 19-19-22-25 sts. Continue in pattern with 6 garter sts towards neckline. Cast off when piece measures 50-54-58-62cm. LEFT FRONT PIECE: Worked back and forth on needle. Cast on 44-47-50-53 sts (includes 1 edge st at the side and 6 front band sts towards mid front) on needle size 4.5 mm with 1 thread of each quality. K 3 rows (first row = WS) and continue in stocking st with 6 front band sts in garter st. When piece measures approx 26-28-30-32 cm K 1 row from RS, AT THE SAME TIME dec 7 sts evenly = 37-40-43-46 sts. Change to needle size 4 mm and K 7 rows. Now continue as follows: 1 edge st, M.1 on the next 30-33-36-39 sts (beg by arrow) and 6 front band sts in garter st towards mid front. When piece measures 34-37-40-43 cm cast off for armhole at the side as described for back piece. AT THE SAME TIME when piece measures 37-39-42-45 cm work 2 rows garter st back and forth on the 6 front band sts only (to make the neckline neater). Continue on all sts, AT THE SAME TIME dec 1 st towards mid front – SEE DECREASING TIP – and repeat the dec on every other row a total of 12 times. When all dec for neckline and armhole are complete there are 19-19-22-25 sts left on shoulder. Continue until piece measures 50-54-58-62 cm, cast off. RIGHT FRONT PIECE: Like left front piece, but mirrored – make sure that the pattern is identical on both sides mid front. Remember BUTTONHOLES – see above. SLEEVE: Worked back and forth on needle. Cast on 34-36-38-40 sts (includes 1 edge st each side) on needle size 4.5 mm with 1 thread of each quality. K 3 rows (first row = WS) and continue in stocking st. When piece measures 5 cm inc 1 st each side, and repeat the inc on every 3-3-3.5-3.5 cm a total of 10-11-11-12 times = 54-58-60-64 sts. When piece measures 38-40-43-46 cm cast off for sleeve cap each side at the beg of every row: 4 sts 1 time, 2 sts 2 times and 1 st 1-3-3-3 times, then 2 sts each side until piece measures 43-47-50-53 cm, now cast off 4 sts each side 1 time and cast off remaining sts. Piece measures approx 44-48-51-54 cm. ASSEMBLY: Sew shoulder seams. Set in sleeves. Sew sleeve and side seams inside 1 edge st. Sew on buttons. |
|||||||||||||
Diagram explanations |
|||||||||||||
|
|||||||||||||
 |
|||||||||||||
Have you finished this pattern?Tag your pictures with #dropspattern #littleemmacardigan or submit them to the #dropsfan gallery. Do you need help with this pattern?You'll find 18 tutorial videos, a Comments/Questions area and more by visiting the pattern on garnstudio.com. © 1982-2026 DROPS Design A/S. We reserve all rights. This document, including all its sub-sections, has copyrights. Read more about what you can do with our patterns at the bottom of each pattern on our site. |
|||||||||||||


With over 40 years in knitting and crochet design, DROPS Design offers one of the most extensive collections of free patterns on the internet - translated to 17 languages. As of today we count 324 catalogues and 12290 patterns translated into English (UK/cm). 12290
We work hard to bring you the best knitting and crochet have to offer, inspiration and advice as well as great quality yarns at incredible prices! Would you like to use our patterns for other than personal use? You can read what you are allowed to do in the Copyright text at the bottom of all our patterns. Happy crafting!
Post a comment to pattern DROPS 112-38
We would love to hear what you have to say about this pattern!
If you want to leave a question, please make sure you select the correct category in the form below, to speed up the answering process. Required fields are marked *.