
Popular categories
Looking for a yarn?


Comments / Questions (41)
![]() Lysiane wrote:
Lysiane wrote:
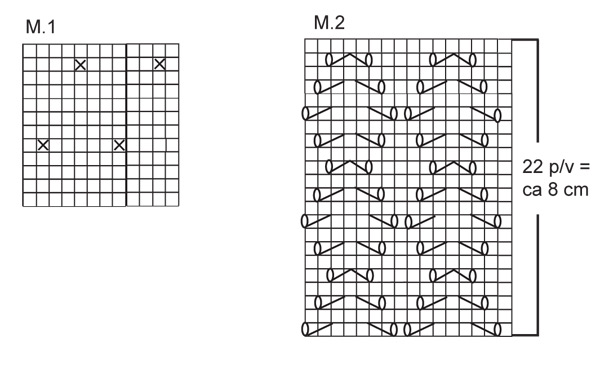
Rebonjour Merci pour la réponse rapide précédente. J'ai encore une autre question. Après les 18cm, il est noté de continuer à partir du rang 7 mais c'est un rang envers. Ne serait ce pas plutôt à partir du rang 8 et de répéter de 8 à 22 sur les 9 mailles? Merci pour votre réponse
06.09.2021 - 14:58DROPS Design answered:
Bonjour Lysiane, le 1er rang de M.2 se tricote sur l'endroit, autrement dit, tous les rangs impairs sont des rangs sur l'endroit - vous répétez ainsi les rangs 7 à 22. Bon tricot!
06.09.2021 - 16:25
![]() Lysiane wrote:
Lysiane wrote:
Je pense qu'il y a une erreur à partir du moment où on tricote M2. Il y a 1 maille qu'il faut tricoter en jersey à la fin du motif avant les 5 mailles de point mousse. Est ce exact?
05.09.2021 - 17:23DROPS Design answered:
Bonjour Lysiane, vous devez effectivement continuer le dernier M.2 comme avant, autrement dit, terminez par 1 m jersey (= 1ère m de M.2) avant les 5 m de bordure devant pour que le motif soit symétrique. Bon tricot!
06.09.2021 - 08:32
![]() Janneke wrote:
Janneke wrote:
Ursäkta, men jag förstår inte ert svar på Danska
29.06.2020 - 13:13DROPS Design answered:
Hej Janneke. Vi menar att du ska öka på vartannat varv, det har nu förtydligats i texten. Mvh DROPS Design
29.06.2020 - 13:27
![]() Janneke wrote:
Janneke wrote:
Angående ärmar. För storlek l/xl ska ökning ske med 2 varvs mellanrum. Det innebär att ökning kommer ske från avigsidan varannan gång man gör ökning. Är det så det är tänkt?
27.06.2020 - 17:40DROPS Design answered:
Hei Janneke. Nei, ikke med 2 pinner mellomrom, men på hver 2. pinne., altså: Strikk 1 pinne, på neste pinne øk, strikk 1 pinne, på neste pinne øk, strikk 1 pinne, på neste pinne...osv God Fornøyelse!
29.06.2020 - 13:08
![]() Stitch Maker wrote:
Stitch Maker wrote:
I'm working on this sweater (XL). The pattern says at 37 cm, work 2 rows garter over the first 5 stitches then one row over all stitches then 2 rows garter over last 5 stitches. Did I read this wrong or am I adding 1 short row to each neck edge?
09.10.2019 - 22:27DROPS Design answered:
Dear Stitch Maker, that's right, you are working short rows over the 5 front band stitches on each side to make the neckline nicer before the decreases. Happy knitting!
10.10.2019 - 08:56
![]() Kat Bowman wrote:
Kat Bowman wrote:
Are there full pattern pictures of M1 & M2 for each piece of the cardigan?
20.06.2019 - 19:20DROPS Design answered:
Dear Kat, unfortunately e only have the pictures and the charts you can find on the page- However, since a number of knitters made this cardigan, you can find pictures of real projects if you look the pattern up on Ravelry. I hope this helps. Happy Knitting!
21.06.2019 - 04:29
![]() Hanne wrote:
Hanne wrote:
Hurra, er færdig med at sy sammen, mangler kun hæklekant 😊
02.08.2016 - 16:54Val Dawe wrote:
Please can you explain how to decrease after 10cm of M1? I am doing size L and need to decrease from 208 to 179? I am stuck x
14.11.2015 - 19:57DROPS Design answered:
Dear Mrs Dawe, please click here to learn how to increase sts evenly. Happy knitting!
16.11.2015 - 09:30Shaunna Jolie wrote:
Hi, my question concerning size L is the following : If after the increases we have 203 sts and the back piece is 89 sts that means that the front pieces are 57 sts. After all the decreases for the neckline(16sts) and the armhole (11 sts) wouldn't that leave us with 30 sts and not 26? Is there something I am missing? Also do we BO more sts in the front than in the back pieces? Thank you VERY much for your time !!!
11.09.2013 - 17:16DROPS Design answered:
Dear Mrs Jolie, do not forget to continue dec for neckline on both front pieces. You should then get 26 sts as for shoulder each side on back piece. Happy knitting!
12.09.2013 - 09:15Shaunna Jolie wrote:
Hi, I would like to ask what are the body measurements for sizes medium and large for this pattern- for example bust in cm. Thank you very much for your time.
16.07.2013 - 18:24DROPS Design answered:
Dear Shauna Jolie, you will find all measurements in the chart at the end of the pattern, and under the US-English pattern below sizes. Happy knitting!
17.07.2013 - 09:33
|
||||||||||||||||
Pink Rails#pinkrailscardigan |
||||||||||||||||
|
|
||||||||||||||||
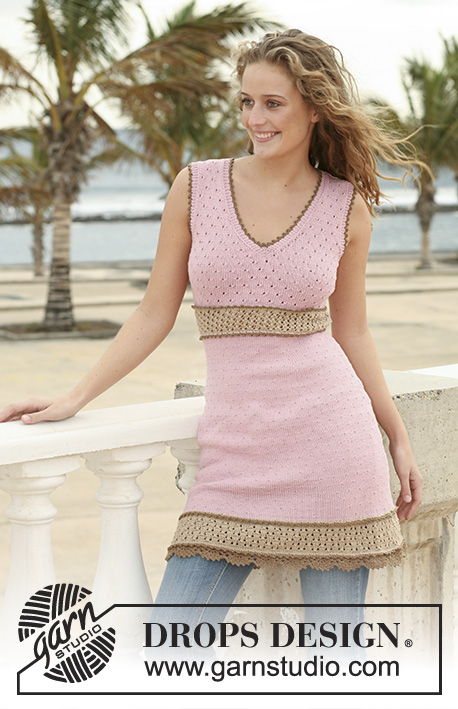
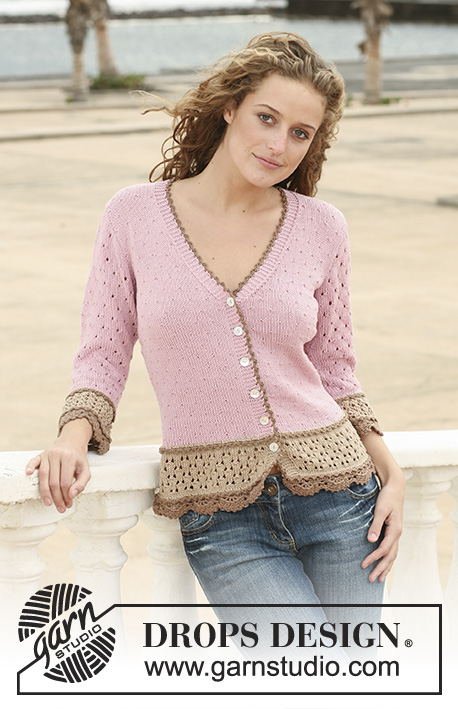
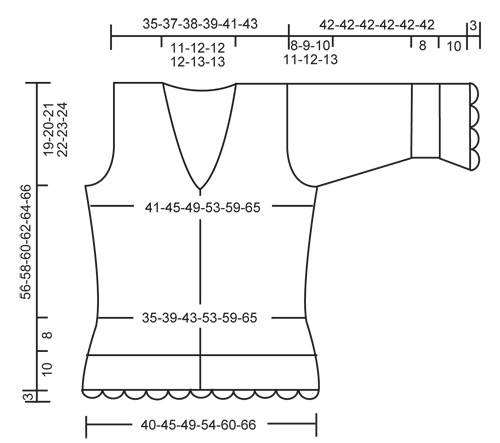
DROPS jacket in ”Muskat” with lace pattern and 3/4 sleeves. Size S - XXXL.
DROPS 111-5 |
||||||||||||||||
|
GARTER ST (back and forth on needle): K all rows. PATTERN: See diagram M.1 and M.2 – the diagrams show the pattern from the RS. BUTTONHOLES: Make buttonholes on right front piece. 1 buttonhole = K tog 3rd and 4th st from mid front and make 1 YO. Make buttonholes when piece measures: SIZE S: 4, 10, 16, 21, 27 and 33 cm SIZE M: 4, 10, 16, 22, 28 and 34 cm. SIZE L: 4, 10, 16, 23, 29 and 35 cm. SIZE XL: 4, 10, 17, 23, 30 and 36 cm. SIZE XXL: 4, 11, 17, 24, 30 and 37 cm SIZE XXXL: 4, 11, 17, 24, 31 and 38 cm. DECREASING TIP: Make all dec from RS inside 9 pattern sts + 5 garter sts = 14 sts. Dec as follows after 14 sts: slip 1 st as if to K, K1, psso Dec as follows before 14 sts: K2 tog ---------------------------------------------------------- BODY PIECE: Worked back and forth on circular needle from mid front. Cast on 172-190-208-226-250-274 sts (includes 5 front band sts each side) on circular needle size 4.5 mm with Muskat. Work 4 rows garter st – see above - and continue in M.1 with 5 garter sts (front band) each side towards mid front. AT THE SAME TIME when piece measures 4 cm make BUTTONHOLE on right front band – see above. REMEMBER THE KNITTING TENSION! When piece measures approx 10 cm – adjust to after at least 2 rows stocking st and next row = RS – K 1 row, AT THE SAME TIME dec 25-27-29-31-31-31 sts evenly = 147-163-179-195-219-243 sts. P 1 row from WS (front band in garter st) and work next as follows from RS: 5 garter sts, M.2 on 137-153-169-185-209-233 sts, 5 garter sts. After 1 vertical repeat of M.2 piece measures approx 18 cm. Continue as follows: 5 garter sts, M.2 on 9 sts (continue from row 7 in chart and repeat from row 7-22), stocking st on 119-135-151-167-191-215 sts, M.2 on 9 sts (continue from row 7 in chart and repeat from row 7-22), 5 garter sts. AT THE SAME TIME insert a marker 39-43-47-51-57-63 sts in from each side (= 69-77-85-93-105-117 sts on back piece). When piece measures 20 cm inc 1 st on each side of both markers, and repeat the inc on every 3 cm a total of 6 times = 171-187-203-219-243-267 sts. NOW READ NECKLINE AND ARMHOLE BEFORE CONTINUING! NECKLINE: When piece measures 34-35-36-37-38-39 cm work 2 rows garter st on the 5 front band sts only on one side (to make the neck neater), work 1 row on all sts and then work 2 rows garter sts on the 5 front band sts the other side only. Continue on all sts, AT THE SAME TIME on next row from RS dec 1 st each side for neck – SEE DECREASING TIP – and repeat the dec on every other row a total of 8 times and then on every 4th row 7-8-8-8-9-9 times. ARMHOLE: AT THE SAME TIME when piece measures 37-38-39-40-41-42 cm cast off 6-6-8-8-10-10 sts each side for armhole (= 3-3-4-4-5-5 sts on each side of marker) and now complete each piece separately. LEFT FRONT PIECE: Continue dec for neck, AT THE SAME TIME cast off for armhole at the beg of every row from the side: 3 sts 0-0-1-1-1-2 times, 2 sts 0-1-1-2-3-3 times and 1 st 3-3-2-3-4-5 times. When all dec are complete there are 24-25-26-27-28-30 sts left on shoulder. Cast off when piece measures 56-58-60-62-64-66 cm. RIGHT FRONT PIECE: Like left front piece, but mirrored. BACK PIECE: = 75-83-89-97-107-119 sts. Cast off for armhole each side as described for front piece = 69-73-75-77-81-85 sts. When piece measures 53-55-57-59-61-63 cm work 4 rows garter st on the middle 31-33-33-33-35-35 sts, with remaining sts as before. Now cast off the middle 21-23-23-23-25-25 sts for neck = 24-25-26-27-28-30 sts left on each shoulder. Continue with 5 garter sts towards neckline and cast off when piece measures 56-58-60-62-64-66 cm. SLEEVE: Worked back and forth on needle. Cast on 62-62-68-68-74-74 sts (includes 1 edge st each side) on needle size 4.5 with Muskat. Work 4 rows garter st and continue in M.1 with 1 edge st each side until piece measures approx 10 cm – adjust to after at least 2 rows stocking st and next row = RS. K 1 row, AT THE SAME TIME dec 12-12-10-10-8-8 sts evenly = 50-50-58-58-66-66 sts. P 1 row from WS and continue in M.2 with 1 edge st each side. After 1 vertical repeat of M.2 piece measures approx 18 cm. Continue in stocking st, AT THE SAME TIME after 2 rows inc 1 st each side, and repeat the inc on every 4-3-3-2-2-2 row a total of 10-12-10-12-11-13 times = 70-74-78-82-88-92 sts. When piece measures 34-33-32-31-30-29 cm (less for the larger sizes because of longer sleeve cap and wider shoulder) cast off for sleeve cap each side at the beg of every row: 4 sts 1 time, 2 sts 3 times and 1 st 2-4-5-6-8-9 times, the 2 sts each side until piece measures 41 cm, now cast off 4 sts each side 1 time and cast off remaining sts. Piece measures approx 42 cm. ASSEMBLY: Sew shoulder seams and sew sleeve seams inside 1 edge st. CROCHET BORDER, BODY PIECE: Crochet a border along bottom edge of jacket with crochet hook size 4 mm as follows: ROW 1: 1 dc in each of the first 2 sts, * 4 ch, skip 2 sts, 1 dc in next st *, repeat from *-*, and finish with 1 dc in each of the last 2 sts, turn piece with 1 ch = 56-62-68-74-82-90 ch-loops. ROW 2: 1 dc in each of the first 2 dc, 1 ch, work sl sts to the middle of first loop, 1 dc round ch-loop, * 5 ch, 1 dc round next ch-loop, 2 ch, 1 dc round next ch loop *, repeat from *-*, and finish with 5 ch, 1 dc in first ch-loop, 1 ch, 1 dc in each of the 2 dc from beg of previous row, turn piece with 3 ch. ROW 3: In each of the large ch-loops crochet as follows: 1 dc, 5 tr and 1 dc, and in each of the small ch-loops crochet 1 dc. After the last large ch-loop work 3 ch and now continue up along right front band, round neckline and down along left front band as follows: 1 dc in first st on front band, * 1 picot (= 4 ch, 1 tr in first ch), skip approx 1.5 cm, 1 dc in next st *, repeat from *-*. CROCHET BORDER, SLEEVE: Crochet a border round sleeve edges with crochet hook size 4 mm as follows: ROUND 1: 1 dc in first st, * 4 ch, skip 2 sts, 1 dc in next st *, repeat from *-*, and finish with 1 sl st in first dc = 20-20-22-22-24-24 ch-loops. ROUND 2: Work sl sts to the middle of first ch-loop, 1 dc round ch-loop, * 2 ch, 1 dc round next ch-loop, 5 ch, 1 dc round next ch-loop *, repeat from *-* and finish with 1 sl st in first dc from beg of round. ROUND 3: In each of the small ch-loops crochet 1 dc and in each of the large ch-loops crochet as follows: 1 dc, 5 tr and 1 dc, finish with 1 sl st in first dc. FURTHER ASSEMBLY: Set in sleeves and sew on buttons. |
||||||||||||||||
Diagram explanations |
||||||||||||||||
|
||||||||||||||||
 |
||||||||||||||||
 |
||||||||||||||||
Have you finished this pattern?Tag your pictures with #dropspattern #pinkrailscardigan or submit them to the #dropsfan gallery. Do you need help with this pattern?You'll find 25 tutorial videos, a Comments/Questions area and more by visiting the pattern on garnstudio.com. © 1982-2026 DROPS Design A/S. We reserve all rights. This document, including all its sub-sections, has copyrights. Read more about what you can do with our patterns at the bottom of each pattern on our site. |
||||||||||||||||


With over 40 years in knitting and crochet design, DROPS Design offers one of the most extensive collections of free patterns on the internet - translated to 17 languages. As of today we count 324 catalogues and 12290 patterns translated into English (UK/cm). 12290
We work hard to bring you the best knitting and crochet have to offer, inspiration and advice as well as great quality yarns at incredible prices! Would you like to use our patterns for other than personal use? You can read what you are allowed to do in the Copyright text at the bottom of all our patterns. Happy crafting!
Post a comment to pattern DROPS 111-5
We would love to hear what you have to say about this pattern!
If you want to leave a question, please make sure you select the correct category in the form below, to speed up the answering process. Required fields are marked *.