
Popular categories
Looking for a yarn?


Comments / Questions (27)
![]() ZOI wrote:
ZOI wrote:
Hallo, please can you tell me which colour has been used for the pattern in the picture? In the material section you say it's : colour no. 51, off-white/red mix, I can't find that no. Is it 1 strand of off white & 1 strand of red?Thank you in advance
13.03.2025 - 01:55DROPS Design answered:
Dear Zoi, this colour consisted on 2 colours printed on the same strand, but it is now discontinued - to get a similar effect you can work with 2 strands any yarn group A different colours. Try the converter to get the maching amount of yarn. Happy knitting!
13.03.2025 - 15:51
![]() Patrícia wrote:
Patrícia wrote:
Olá, sou iniciante em tricô e gostava muito de fazer esta peça, mas tenho uma dúvida ou talvez não esteja a perceber bem... na parte que diz para fazer a peça na parte da FRENTE diz para fazer com ponto meia (direito do trabalho) , nas mangas já diz que é em tricô(direito do trabalho) , na foto pelo que percebo a peça está toda em tricô pelo direito do trabalho ! Obrigada
18.01.2021 - 00:07DROPS Design answered:
Bom dia, Tem toda a razão. Por lapso, foi indicado que a frente e as costas se tricotam em meia mas, é de facto, em liga ou em tricô. Vamos proceder de imediato à correcção. Toda a peça é tricotada em liga/tricô. Obrigado! Bons tricôs
18.01.2021 - 10:38
![]() Anja M wrote:
Anja M wrote:
Ich kann das Garn nicht finden. gibt es noch eine Möglichkeit, diesen Puli mit diesem Farbmix zu stricken?
22.12.2020 - 20:35DROPS Design answered:
Liebe Anja M, diese Farbe haben wir nicht mehr, Sie können vielleicht 2 Fäden Garngruppe A (= 1 Faden Garngruppe C wie Paris) zusammenstricken um ein ähnliches Effekt zu bekommen - benutzen Sie unseren Garnumrechner und hier lesen Sie mehr über Garnalternative, Ihr DROPS Laden wird Ihnen auch gerne damit (auch telefonisch oder per E-Mail) helfen, die besten passenden Garne bzw Farben zu finden. Viel Spaß beim stricken!
23.12.2020 - 06:57
![]() Angelika wrote:
Angelika wrote:
Ich habe mit Ihrer tollen Anleitung schon meinen ersten Raglanpullover von OBEN gestrickt, ich möchte aber jetzt probieren einen Raglanpullover von UNTEN zu stricken, mit Rundnadel in einem Stück von unten nach oben, ich finde allerdings leider im internet keine Anleitung, können Sie mir helfen? Liebe Grüße aus Wien
18.09.2020 - 17:58DROPS Design answered:
Liebe Angelika, dieses Modell ist ein Raglan von unten nach oben gestrickt - hier finden Sie alle unsere Pullover, die von unten nach oben gestrickt sind,, so können Sie bei dieser Auswahl einen Raglan Pullover durchsuchen. Viel Spaß beim stricken!
21.09.2020 - 08:17
![]() Marie-Laure wrote:
Marie-Laure wrote:
Bonjour, je tricote actuellement ce pull en XL et j'ai peur d'avoir mal lu les mesures pour les manches: c'est bien après 0cm de hauteur totale qu'il faut commencer les augmentations? Merci d'avance de votre réponse et merci pour ce beau site, vous m'avez rendue addict à vos ouvrages et vos laines!!
24.07.2020 - 00:27DROPS Design answered:
Bonjour Marie-Laure, il y avait une faute de frappe désolée, il fallait lire 10 cm en taille XL, correction faite, merci! Bon tricot!
29.07.2020 - 09:30
![]() Jeanine wrote:
Jeanine wrote:
Hallo, ich habe alle 4 Teile fertig und auch entsprechend die Nähte zusammengenäht. Wie lang muss die Nadel sein, um alle Teile auf dieselbe Nadel zu bekommen um den Pullover fertig zu stricken? Ich habe Größe L gewählt. Lieben Dank im Voraus und Gruß aus Dänemark, Jeanine
20.07.2020 - 23:31DROPS Design answered:
Liebe Jeanine, da Sie den Pulli weiter in Hin- und Rück-Reihen stricken, ist die Länge des Seils nicht so wichtig. Sie können eine 100 cm-Nadel nehmen, dann liegen die Maschen am Anfang etwas weniger dicht auf der Nadel, oder, falls Sie die nicht haben, geht auf jeden Fall auch eine 80 cm-Nadel, im Laufe der Abnahmen verringert sich dann ja die Maschenzahl. Viele Grüße nach Dänemark und viel Spaß beim Weiterstricken!
21.07.2020 - 08:53
![]() Camilla wrote:
Camilla wrote:
Hi, I'm very confused with this pattern. I am knitting the front and have cast off the middle stitch, have cast off the 4 armhole stitches and carried on to the top of that front decreasing every 4 rows. It now says to stop the other side after the armhole cast offs which will leave them hugely uneven...was I not meant to carry on with my decreases on the first front? If so that is very unclear in the pattern and I'll have a lot to rip out 🤔
18.07.2020 - 22:36DROPS Design answered:
Dear Camilla, when you have cast off the middle stitch for neck you will continue each shoulder separately, ie slip the stitches of one side on a stitch holder and continue over the stitches from other side decreasing for neck as explained and casting off for armhole on the side when required for your size. Now slip sts on a thread/st holder, work 2nd shoulder/side of front piece until you cast off for armhole and put piece aside. Work back piece to armholes and put aside. Work both sleeves until armhole and then slip all stitches on needle to work yoke with decrease for raglan and continuing decrease for neck. Happy knitting!
20.07.2020 - 09:43
![]() Jeanine🇩🇰🇩🇪 wrote:
Jeanine🇩🇰🇩🇪 wrote:
Hallo, wieviele Nadeln brauche ich denn dafür, wenn ich die Teile immer zue Seite legen und erst das nächste anfangen soll? Oder gibt es eine Möglichkeit mit nur 1 Nadel zu arbeiten?
21.06.2020 - 22:35DROPS Design answered:
Liebe Jeanine, die Maschen können Sie auf einen Faden stilllegen - siehe Video. So brauchen Sie nicht eine 2. Nadel. Viel Spaß beim stricken!
22.06.2020 - 08:42
![]() Martine wrote:
Martine wrote:
Une fois toutes les mailles du devant, dos et manches sur l'aiguille circulaire, on commence les diminutions pour les raglans de chaque côté des manches. OK ? Les explications disent : "Diminuer de chaque côté du devant et du dos comme suit ... " ET AUSSI "diminuer de chaque côté des 2 manches comme suit ...". Je ne comprends pas pourquoi il faut encore diminuer "de chaque côté devant et dos" et pas seulement de chaque côte des manches. Merci d'avance.
13.02.2020 - 12:31DROPS Design answered:
Bonjour Martine, les diminutions du raglan se font à un rythme différent sur le dos/le devant et sur les manches, on va donc diminuer soit 8 mailles (= dos, devant et manches) soit 4 mailles seulement (quand on doit diminuer par ex tous les 4 rangs sur le dos/devant et tous les 2 rangs sur les manches). Bon tricot!
14.02.2020 - 07:58
![]() Isabelle wrote:
Isabelle wrote:
Bonjour, comment se font les diminutions pour l'emmanchure du devant ?? Ça dit seulement de rabattre 4 mailles après la première diminution de l'encolure ... Merci
08.11.2019 - 04:18
|
|
DROPS 95-7 |
|
|
|
|
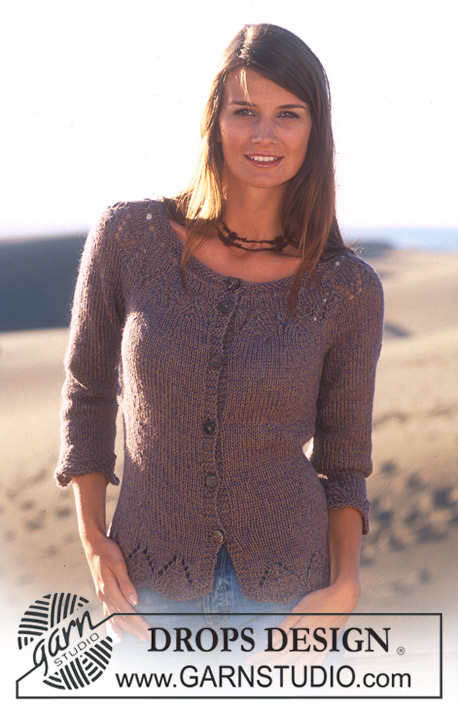
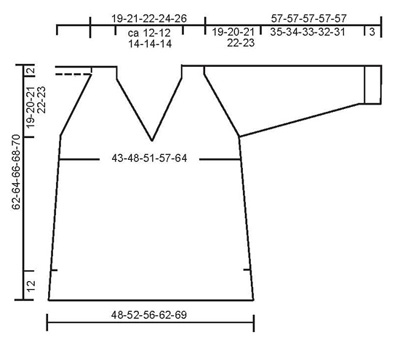
DROPS Jumper with V-neck in Paris
DROPS 95-7 |
|
|
Knitting tension: 17 sts x 22 rows on needles size 5 mm in stocking sts. = 10 x 10 cm. Rib: *K3, P3*, repeat from *-* Decreasing tip 1 (applies to V-neck): All dec are done from the right side and within 2 edge sts that are K on every row. Dec as follows after 2 edge sts: P2 tog into back of st. Dec as follows before 2 edge sts: P2 tog. Decreasing tip 2 (applies to yoke): On the rows where no decreases are made, Kthe 2 sts on both sides of all marking thread from the right side and P them from the wrong side. Dec as follows from the right side: Before marking thread: work until there are 3 sts left before the marking thread, K2 tog, K1. After marking thread: K1, slip 1 st as if to knit, K1, psso. Dec as follows from the wrong side: Before the marking thread: Work until there are 3 sts left before the marking thread, P2 tog into back of st, P1. After marking thread: P1, P2 tog. Knitting tip: If your knitting tension doesn’t fit the measurement chart (too tight), the sleeve cap will be too short. You may adjust this by knitting extra random rows without dec between decreases. ________________________________________________________________ FRONT PIECE: Work back and forth on circular needle. Cast on 81-89-95-105-117 sts on circular needles size 5mm. K2 rows in garter st and continue in reverse stocking stitch with 3 sts each side in garter st (= slit). When piece measures 12 cm, cast on 1 new st each side (seam st) = 83-91-97-107-119 sts. Continue in reverse stocking stitch with 4 sts each side in garter st until there are 4 rows above the slit, now work reverse stocking stitch over all sts. When piece measures 14 cm, dec 1 st each side on every 7 cm a total of 4 times = 75-83-89-99-111 sts. When piece measures 38-39-41-42-43 cm, K4 rows in garter over the middle 5 sts (work other sts as before). Then cast off the middle st and put half the sts on a holder = 37-41-44-49-55 sts each side. Now dec for V-neck inside 2 sts worked in garter st – see Decreasing tips above – dec 1 st on every 4th row a total of 10-10-11-11-11 times. At the same time when piece measures 41-42-43-44-45 cm (after 1 dec for V-neck) cast off 4-4-4-6-8 sts at the side for armhole. Put sts on a holder and repeat the dec on the other side up till the armhole dec. Note! Work 1st row from mid front and start by picking up a st in the st which was cast off and knit this tog with the first st on row (do this to avoid a “hole” at the bottom of the V-neck). Put the piece aside and work back piece. Back piece: Cast on and work as front piece up to the armhole, but do not decrease for V-neck, and cast off for armhole as on the front piece = 67-75-81-87-95 sts. Put piece aside and work the sleeves. Sleeves: Work back and forth on circular needle. Loosely cast on 44-44-44-50-50 sts (includes 1 edge st each side) on circular needles size 5mm and purl 1 row from the wrong side. Continue in Rib with 1 edge st each side in garter st. When sleeve measures 3 cm, continue in reverse stocking stitch. When piece measures 12-12-10-10-11 cm inc 1 st each side on every 2.5-2-2-2-1.5 cm a total of 10-12-13-12-14 times = 64-68-70-74-78 cm. When piece measures 38-37-36-35-34 cm cast off for sleeve cap 4-4-4-6-8 sts each side (i.e cast off in beg of next 2 rows) = 56-60-62-62-62 sts. Put sts on a holder and work the other sleeve. Yoke: Read the whole of this section before continuing! Put the sleeves in on the same circular needle as front and back pieces where you bound off for armholes = 243-267-283-295-311 sts. Insert a marking thread where sleeve meets body pieces (= 4 marking threads). Decreases: See Knitting and Decreasing tip 2 above! Work 1 round on front and back pieces before starting the decreases. Remember dec for V-neck on front pieces! Dec each side of front and back pieces as follows: 1 st on every 4th row a total of 5-3-2-1-0 times and 1 st on every other row a total of 12-17-20-22-25 times. Dec each side of both sleeves as follows: 1 st on every other row a total of 18-18-19-21-23 times and thereafter on every row 1 st a a total of 7-9-9-7-5 times. At the same time, when piece measures 59-61-63-65-67 cm K4 rows in garter over the middle 19-19-21-21-21 sts on back piece, work the other sts as before. Then cast off the middle 19-19-21-21-21 sts and dec 1 st at neck edge on next row – see Decreasing tips 1 above. When all dec have been made, there are 36-40-40-48-56 sts remaining. When piece measures 61-63-65-67-69 cm, K2 rows in garter (1st row = right side) over all sts and cast off – piece measures approx 62-64-66-68-70 cm. Assembly: Sew side seams, sleeve seams and the openings under the arms. Pocket: Cast on 35-35-35-41-41 sts on needle size 5mm and work Rib with 1 edge st and 3 purled sts each side (seen from the right side) – Note: K the edge st each side in garter until finished measurements. When the Rib measures 3 cm continue in reverse stocking stitch. When piece measures 23-23-23-27-27 cm, work Rib again with 1 edge st and 3 purled sts each side (seen from the right side). Cast off when the Rib measures 3 cm. Sew the pocket on the front piece approx 12-13-14-14-15 cm from the bottom edge. |
|
 |
|
Have you finished this pattern?Tag your pictures with #dropspattern or submit them to the #dropsfan gallery. Do you need help with this pattern?You'll find 26 tutorial videos, a Comments/Questions area and more by visiting the pattern on garnstudio.com. © 1982-2026 DROPS Design A/S. We reserve all rights. This document, including all its sub-sections, has copyrights. Read more about what you can do with our patterns at the bottom of each pattern on our site. |


With over 40 years in knitting and crochet design, DROPS Design offers one of the most extensive collections of free patterns on the internet - translated to 17 languages. As of today we count 324 catalogues and 12290 patterns translated into English (UK/cm). 12290
We work hard to bring you the best knitting and crochet have to offer, inspiration and advice as well as great quality yarns at incredible prices! Would you like to use our patterns for other than personal use? You can read what you are allowed to do in the Copyright text at the bottom of all our patterns. Happy crafting!
Post a comment to pattern DROPS 95-7
We would love to hear what you have to say about this pattern!
If you want to leave a question, please make sure you select the correct category in the form below, to speed up the answering process. Required fields are marked *.