
Popular categories
Looking for a yarn?


Comments / Questions (8)
![]() Françoise TEYCHENEY wrote:
Françoise TEYCHENEY wrote:
J'ai bien lu les nouvelles explications, mais cela ne me dit pas à quel moment on passe du tricot en rond au tricot en aller retour, notamment comment faire pour les dessins ? Vous dites de séparer le dos et le devant à 12.5cm et d'ajouter une maille lisière pour les coutures. J'en conclue qu'à partir de là, on tricote le dos et le devant séparemment en aller retour. Donc comment adapter les dessins ?
13.03.2023 - 16:14DROPS Design answered:
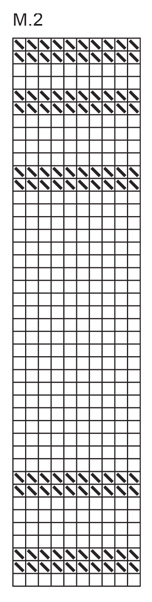
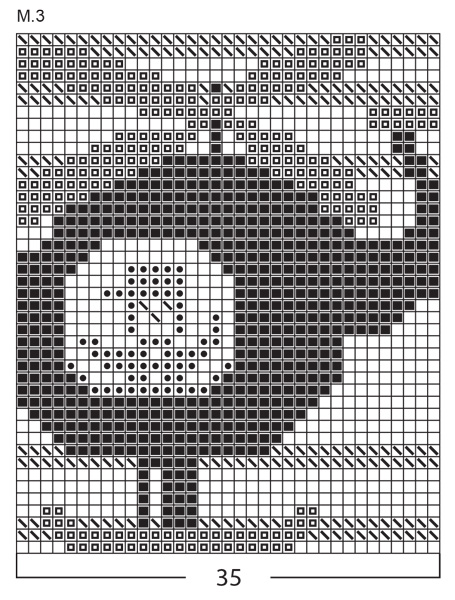
Bonjour Mme Teycheney, effectivement, lorsque vous divisez l'ouvrage en 2 parties, vous terminez le dos et le devant séparément en allers et retours, et tricotez maintenant comme indiqué sous chaque partie, autrement dit, pour le devant, vous tricotez maintenant (3/4 ans): 23 m de M.2, les 35 m de M.3 (l'hélicoptère) et 24 m de M.2 (= 82 m). Quand M.2 et M.3 sont terminés, tricotez M.4 jusqu'à la fin. Pour le dos, vous tricotez M.2 seulement (pas M.3) puis M.4 comme pour le devant. Bon tricot!
14.03.2023 - 09:13
![]() Françoise TEYCHENEY wrote:
Françoise TEYCHENEY wrote:
Je suis désolée, je ne comprends pas, c'est au moment de la séparation entre le devant et le dos que l'on tricote en aller- retour ? Si non, à quel endroit du texte ? J'en suis à la séparation et à l'augmentation des mailles lisières.
13.03.2023 - 13:34DROPS Design answered:
Bonjour Mme Teycheney, vous avez raison, ce modèle comportait quelques erreurs, il a été réécrit et corrigé, on va diviser l'ouvrage bien avant la longueur indiquée auparavant; il peut-être sage d'imprimer les explications à nouveau. Merci pour votre retour.
13.03.2023 - 15:14
![]() Françoise TEYCHENEY wrote:
Françoise TEYCHENEY wrote:
Bonjour, je suis en train de réaliser ce pull, mais je ne comprend pas, lorsque l'on sépare le dos du devant, doit-on tricoter le dos et le devant en aller-retour puisqu'ils sont séparés et comment faire pour le jacquard de l'hélicoptère si on doit le faire en aller-retour ? Merci pour votre réponse.
12.03.2023 - 17:44DROPS Design answered:
Bonjour Mme Teycheney, on tricote en rond jusqu'à la hauteur du jacquard; après avoir divisé le dos et le devant, vous terminez chaque côté séparément et tricotez ensuite l'hélicoptère (sur le devant seulement) soit le diagramme 3 au milieu du devant avec le diagramme 2 comme avant (les rayures) de part et d'autre. Bon tricot!
13.03.2023 - 10:07
![]() Diane Hobbs wrote:
Diane Hobbs wrote:
Is it possible to make the sweater with the helicopter on it, but have the sweater be all in one color.
28.10.2020 - 17:00DROPS Design answered:
Hi Diane, Yes, you can leave the helicopter out of the pattern and just work stripes on the whole jumper. Happy knitting!
29.10.2020 - 07:16Lou wrote:
Thank you for your answer. Your colour chart shows mint as green, but in the photo it appears light blue. So is the photo not a good representation of the colours? Sorry for the confusion!
08.03.2015 - 01:14Lou wrote:
The chart indicates a pattern with colour mint yarn for several rows but I cant see this in the photo. Is this correct? Also is the back of the jumper plain with no pattern? Thanks you
07.03.2015 - 14:20DROPS Design answered:
Dear Lou, Mint is worked on body in stripes together with blue when working M1 (stripes), then you continue each piece separately, helicopter is only on front piece, on back piece you work diagram M2 then M4 - see also written pattern for measurements. Happy knitting!
07.03.2015 - 17:50
![]() Drops Design wrote:
Drops Design wrote:
Yes, you can get it seperatly by automaticcaly toghether with the text when you push the "print this page" button.
07.03.2006 - 09:47
![]() Sara Henson wrote:
Sara Henson wrote:
Do you have the charts for this pattern?
08.02.2006 - 23:41
|
|||||||||||||||||||
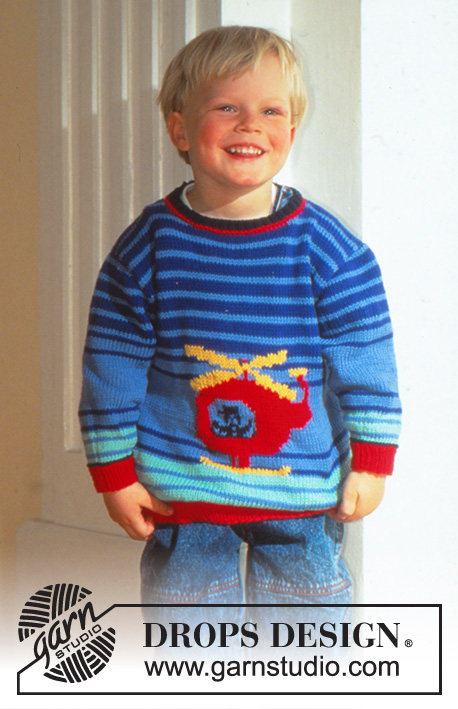
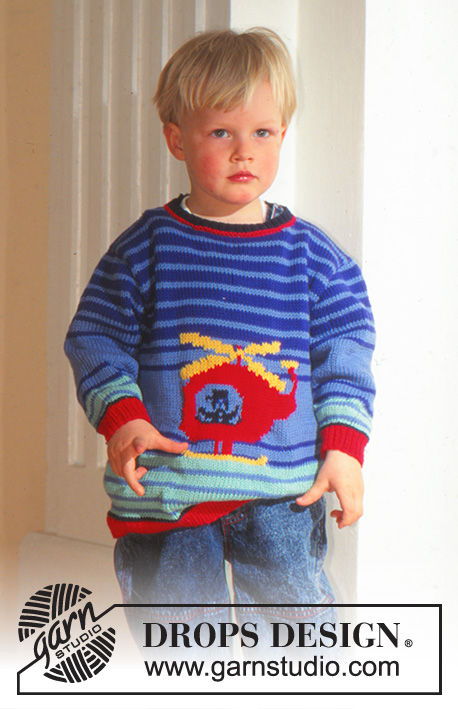
Little Pilot#littlepilotsweater |
|||||||||||||||||||
 |
 |
||||||||||||||||||
Sweater in Muskat with Helicopter
DROPS Baby 5-17 |
|||||||||||||||||||
|
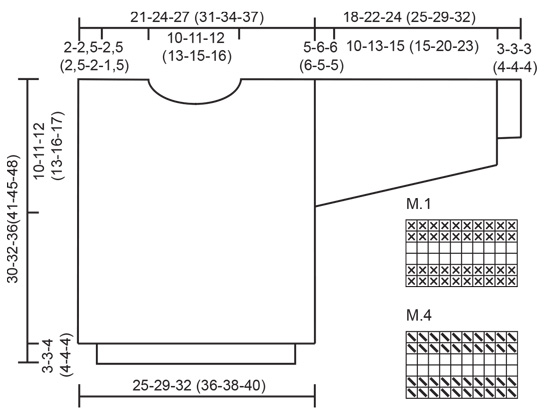
Rib: * K1, P1 *, repeat from *-*. Gauge: 21 sts and 28 rows on larger needles in stockinette st = 10 x 10 cm Pattern: See charts. One chart equals one repeat of the pattern. The pattern is seen from the right side and is knit entirely in stockinette stitch. Garter Stitch, when knitting flat: Knit all sts all rows. Garter Stitch, when knitting in the round: *Rnd 1, knit. Rnd 2, purl. Repeat from * - *. BODY Cast on 104-120-136 (152-160-168) sts on smaller circular needles with red. Join, being careful not to twist the sts. Place a marker at the join and knit rib for 2.5-2.5-3.5 (3.5-3.5-3.5) cm. Change to marine and knit 2 rows garter st. Change to larger circular needles and knit Pattern 1 until the work measures 7-7,5-9,5 (11,5-12,5-13,5) cm . Divide the work into two parts as follows: 52-60-68 (76-80-84) sts for the front and 52-60-68 (76-80-84) sts for the back and at the same time inc 1 st on each side of the front and back for seam. Front: = 54-62-70 (78-82-86) sts (includes 1 edge st on each side for seam). Knit pattern over the row as follows: 9-13-17 (21-23-25) sts of Pattern 2, Pattern 3, 10-14-18 (22-24-26) sts of Pattern 2. At the same time, when piece measures 20-21-24 (28-29-31) cm, bind off on each side for armholes every other row: 2 sts 2-2-3 (2-2-2) times, 1 st 1-2-1 (2-1-0) times. 44-50-56 (66-72-78) sts. After Pattern 2 and Pattern 3 knit the rest with Pattern 4. When the work measures 25-27-31 (36-40-43) cm , bind off the center 10-12-14 (16-20-22) sts for the neck. Bind off at the neck edge every other row: 3 sts 1 time, 2 sts 1 time, 1 st 1 time. Bind off when the work measures 30-32-36 (41-45-48) cm . Back: = 54-62-70 (78-82-86) sts (includes 1 edge st on each side for seam). Knit Pattern 2. At the same time, when piece measures 20-21-24 (28-29-31) cm, bind off for armholes as on the front = 44-50-56 (66-72-78) sts. After Pattern 2 knit the rest with Pattern 4. 3 smallest sizes: When the work measures 25-27-31 cm bind off the center 4-4-4 sts for split and knit the rest of each part separately. 3 largest sizes: When the work measures 28-30-34 (39-43-46) cm, bind off the center (24-28-30) sts. All sizes: Bind off at the neck edge every other row: 7-8-9 (2-2-2) sts 1 time, 2 sts 1-1-1 (0-0-0) times. Bind off when the work measures 30-32-36 (41-45-48) cm . Sleeves: Cast on 34-34-36 (36-36-38) sts on smaller double pointed needles with red. Join, being careful not to twist the sts. Place a marker at the join and knit rib for 2.5-2.5-2.5 (3.5-3.5-3.5) cm. Change to marine and knit 2 rounds garter st. Change to larger double pointed needles and knit Pattern 1 for 1-1-1 (1-2-2) times, increasing 2-4-4 (6-6-8) sts evenly distributed on the first row = 36-38-40 (42-42-46) sts. After the rib, inc 1 st on each side of the marker 3-4-5 (6-13-13) times: Size 1/3 months: every 9th round. Size 6/9: alternately every 8th and 9th round. Size 12/18 months: every 8th round. Size 2 years: alternately every 6th and 7th round. Size 3/4 years: every 4th round. Size 5/6 years: alternately every 4th and 5th round. = 42-46-50 (54-68-72) sts. At the same time, after Pattern 1, knit Pattern 2 and then Pattern 4 to finished dimensions (Pattern 4 is not knit for size 1/3 months). When the work measures 13-16-18 (19-24-27) cm, bind off 1 st on each side of the marker and knit the rest back and forth on the needles. Bind off on each side for sleeve caps every other row: 2-2-2 (2-3-4) sts 6-7-7 (7-6-6) times. Bind off when the work measures 18-22-24 (25-29-32) cm . Assembly: Sew shoulder and side seams. Pick up approx. 78-84 sts around the neck on smaller circular needles with red and knit 2 rows garter st, 1 row stockinette st with marine and then rib with marine until the neck edge measures 2 cm . (Knit back and forth on the needles on the three smallest sizes and in the round on the three largest sizes.) 3 smallest sizes: Pick up approx. 16 to 20 sts along the left side of the split in the back on smaller needles with marine and knit rib for 1.5 cm. Bind off. Repeat along the right side of the split, but after 0.5 cm bind off 2 buttonholes distributed as follows: 1st buttonhole 1 cm from the top and the 2nd buttonhole halfway between the 1st buttonhole and the bottom of the split. (1 buttonhole = bind off 2 sts and cast on 2 new sts over the bound-off sts on the next row.) Bind off. Sew on the sleeves and buttons |
|||||||||||||||||||
Diagram explanations |
|||||||||||||||||||
|
|||||||||||||||||||
 |
|||||||||||||||||||
 |
|||||||||||||||||||
 |
|||||||||||||||||||
Have you finished this pattern?Tag your pictures with #dropspattern #littlepilotsweater or submit them to the #dropsfan gallery. Do you need help with this pattern?You'll find 26 tutorial videos, a Comments/Questions area and more by visiting the pattern on garnstudio.com. © 1982-2026 DROPS Design A/S. We reserve all rights. This document, including all its sub-sections, has copyrights. Read more about what you can do with our patterns at the bottom of each pattern on our site. |
|||||||||||||||||||


With over 40 years in knitting and crochet design, DROPS Design offers one of the most extensive collections of free patterns on the internet - translated to 17 languages. As of today we count 324 catalogues and 12290 patterns translated into English (UK/cm). 12290
We work hard to bring you the best knitting and crochet have to offer, inspiration and advice as well as great quality yarns at incredible prices! Would you like to use our patterns for other than personal use? You can read what you are allowed to do in the Copyright text at the bottom of all our patterns. Happy crafting!
Post a comment to pattern DROPS Baby 5-17
We would love to hear what you have to say about this pattern!
If you want to leave a question, please make sure you select the correct category in the form below, to speed up the answering process. Required fields are marked *.