
Popular categories
Looking for a yarn?





































Comments / Questions (34)
 Kaija wrote:
" Neulo ensimmäisillä 25 silmukalla sileää neuletta (HUOM! Näiden silmukoiden ensimmäinen ja viimeinen silmukka = nurja silmukka) ????????(= hiha), neulo mallineuletta piirroksen A.1 mukaisesti, neulo 23-25-27-29-33-37-41 silmukkaa sileää neuletta, neulo mallineuletta piirroksen A.1 mukaisesti (= 41-43-45-47-51-55-59 silmukkaa etukappaleessa), neulo seuraavilla 25 silmukalla sileää neuletta (= hiha)" jne. Mihin kohtiin tulee nurjat silmukat(piirroksen A.1 lisäksi)?
18.10.2026 - 17:39DROPS Design answered:
Hei, tässä tarkoitetaan, että näiden 25 silmukan ensimmäinen ja viimeinen silmukka on joustinneuleen nurja silmukka. Kaikilla 25 silmukalla neulotaan kuitenkin sileää neuletta.
22.10.2026 - 19:03
 Susanne wrote:
Det jeg mener er, om første og sidste m af de 29 m skal strikkes v, ligesom ved de 25 m.
10.09.2026 - 15:58DROPS Design answered:
Hei Susanne. Se vårt svar på ditt forrige spørsmål :) mvh DROPS Design
14.09.2026 - 09:39
Susanne wrote:
Nej. Der står 1. m vrang ved de 25 m til ærme. Men på de 29 m - for og bagstykke, står der ikke 1 v m, men det sådan ud på billedet.
10.09.2026 - 14:55DROPS Design answered:
Hei Susanne. Du har strikket 3 omganger vrangbord til hals, 1 vrang, 1 rett og (str L?) skal nå strikke 25 masker glattstrikk. Den første og siste masken det strikkes glattstrikk over er en vrangmaske fra vrangborden. Så strikkes A.1 over 9 masker. Deretter strikkes forstykket (47 masker). Den første og siste masken over forstykket strikkes glattstrikk over en vrang maske fra vrangborden. Det samme gjelder for det andre ermet og for bakstykket. Det er det man ser på bildet når det forstørres 200%. mvh DROPS Design
14.09.2026 - 09:39
Susanne wrote:
Hej. Jeg er begyndt på Sunday Mist sweater. Når jeg kigger på fotoet, så ser det ud som om, at man også ved strik af de 29 masker skal strikke første og sidste maske vrang, men det står ikke i opskriften. Hvad er rigtigt ? Mvh, Susan e
10.09.2026 - 12:16DROPS Design answered:
Hei Susanne. Hvilken str. strikker du? Er det de vrangmaskene som strikkes i diagram A.1 du mener, som ikke er forklart, men tegnet inn i diagrammet? mvh DROPS Design
10.09.2026 - 12:39
Kirsten Møller wrote:
Jeg strikker str l
11.06.2026 - 15:57DROPS Design answered:
Hei Kirsten. I str. L har du 144 masker og så strikker du slik: Strikk glattstrikk over de første 25 maskene (1. og siste av disse maskene strikkes vrang (= erme) + strikk A.1 (= 1. raglanlinje / 9 masker) + strikk 29 masker i glattstrikk (= forstykket) + strikk A.1 (= 2. raglanlinje/9 masker). Når A.1, forstykket og A.1 er strikket, er det strikket over 47 masker (= 9 + 29 + 9). Fortsett med 2. erme (25 masker i glattstrikk, der 1. og siste maske strikkes vrang). Så strikkes A.1 (= 3. raglanlinje) + 29 masker i glattstrikk (=bakstykket) + strikk A.1 (= 4. raglanlinje). Bare tall: 25+9+29+9+25+9+29+9=144. mvh DROPS Design
12.06.2026 - 08:25
Kirsten Møller wrote:
Jeg forstår ikke inddeling til raglan, der er for mange masker i opskriften til model 262-20
11.06.2026 - 08:37DROPS Design answered:
Hej Kirsten, hvilken størrelse strikker du, så skal vi prøve at hjælpe dig?
11.06.2026 - 09:45
 Marie-Pia wrote:
Je ne comprends pas les augmentations du raglan. Il faut bien augmenter 8 m à chaque tour, alors pourquoi est-il préciser dans NOTE : au début du tour augmenter après A1 et à la fin du tour augmenter avant A1. Ne faut-il augmenter avant et après A1 à chaque fois ? Merci d'avance
08.04.2026 - 11:51DROPS Design answered:
Bonjour Marie-Pia, on doit effectivement augmenter avant/après chaque A.1 mais les tours commencent par les mailles de la manche et se terminent par les mailles du raglan/A.1, autrement dit, au début du tour, vous augmentez tout de suite après le A.1 entre le dos et la manche et, à la fin du tour, vous augmentez avant le A.1 à la fin du dos; Si vous augmentiez de chaque côté du dernier A.1 du tour, vous décaleriez le début des tours. Bon tricot!
09.04.2026 - 10:03
 Giulia wrote:
C'è scritto di lavorare a maglia rasata (= dritto) le prime 25 maglie (che sono per la manica) ma poi c'è l'annotazione N.B. che indica che la prima e l'ultima maglia sono a rovescio. Quindi sono 25 a diritto o 23 diritto e 2 rovescio? Poi dovrei fare A1 e 27 maglie rasate e A1 (nella taglia M) e però indica tra parentesi =45 maglie per il davanti: ma non ci sono 45 maglie per il davanti! Inoltre se faccio la somma dei punti indicati in questa sezione non torna con i 140 punti del bordo.
16.03.2026 - 09:09DROPS Design answered:
Buonasera Giulia, è corretto: la prima e l'ultima maglia delle 25 della manica sono a rovescio, poi deve lavorare A.1 (9 maglie), 27 maglie a maglia rasata e A.1 (9 maglie), per un totale di 45 maglie per il davanti. Buon lavoro!
26.04.2026 - 22:17
Giulia wrote:
Non riesco a capire il primo giro dopo il bordo del collo. Lavorare il giro successivo come segue: lavorare a maglia rasata sulle prime 25 maglie – NB! La 1° e ultima di queste maglie sono maglie a rovescio (= manica), lavorare A.1, lavorare 23-25-27-29-33-37-41 maglie a maglia rasata, lavorare A.1 (= 41-43-45-47-51-55-59 maglie per il davanti), lavorare a maglia rasata sulle 25 maglie successive (= manica), lavorare A.1, lavorare 23-25-27-29-33-37-41 maglie a maglia rasata….
15.03.2026 - 22:07DROPS Design answered:
Buonasera Giulia, quale parte di questo giro non le è chiara? Buon lavoro!
15.03.2026 - 22:25
Catherine Lejeune wrote:
Dans A1 entre les m envers : glisser 1m, tricoter 2 m end, passer la m glissée par dessus la.m tricotée les 2m tricotées. Il doit y avoir une indication en trop. Je suppose qu’il faut passer par dessus les 2 m end ? Merci de votre réponse. Cordialement
17.02.2026 - 07:45DROPS Design answered:
Bonjour Mme Lejeune, les explications sont correctes: vous glissez la 1ère maille comme pour la tricoter à l'endroit, vous tricotez chacune des 2 mailles suivantes à l'endroit (pas ensemble) puis vous passez la maille glissée par-dessus les 2 mailles tricotées = il reste 2 mailles et la 1ère des 3 mailles entoure les 2 autres. Retrouvez ici, en vidéo comment tricoter ce type de petites torsades. Bon tricot!
18.02.2026 - 09:46
|
||||||||||||||||
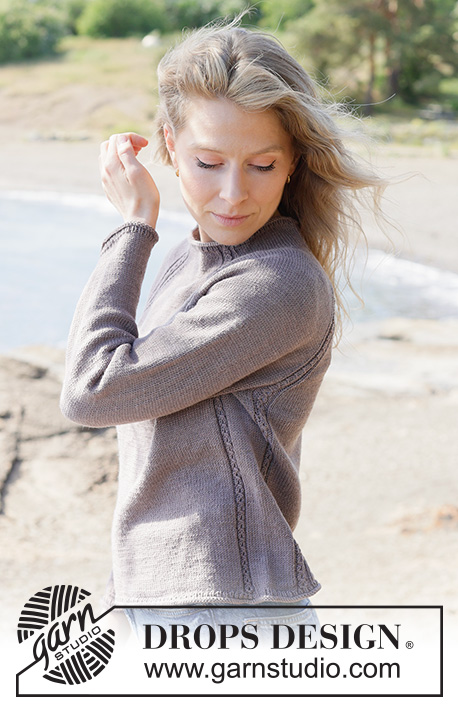
Sunday Mist Sweater#sundaymistsweater |
||||||||||||||||
 |
 |
|||||||||||||||
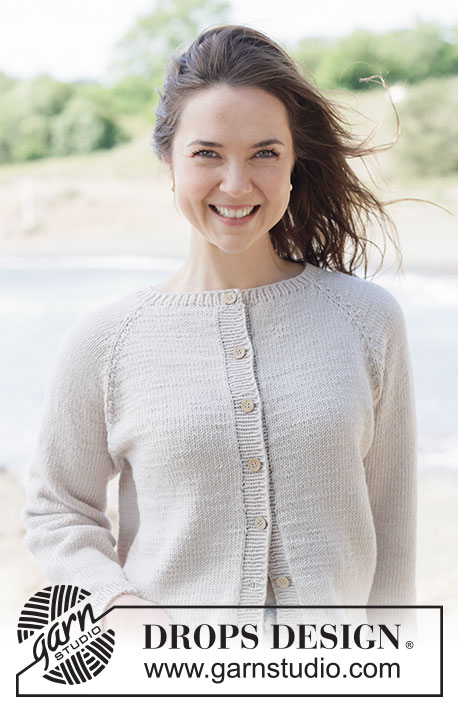
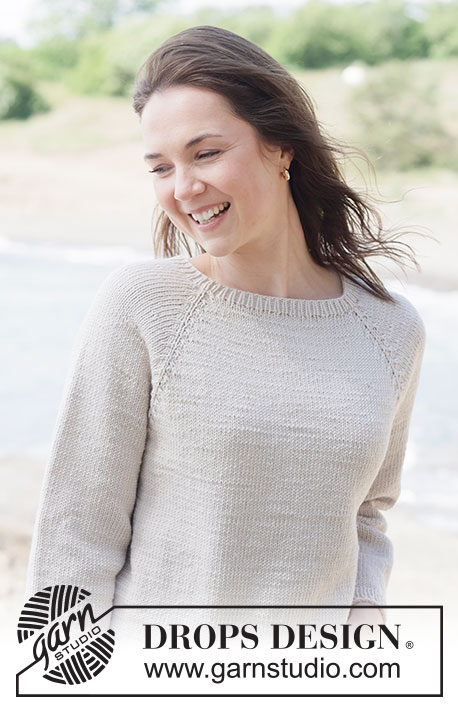
Knitted jumper in DROPS BabyMerino. Piece is knitted top down with raglan, lace pattern and rolling edges. Size XS – XXXL.
DROPS 262-20 |
||||||||||||||||
|
---------------------------------------------------------- EXPLANATION FOR THE PATTERN: ---------------------------------------------------------- PATTERN: See diagram A.1. A.1 is always counted as 9 stitches. RAGLAN: Increase 1 stitch by making 1 yarn over. On next round work yarn overs as explained below: BEFORE A.1: Slip stitch off left needle and put it back on left needle but the opposite way (insert left needle in from behind when slipping it back on needle). Knit yarn overs in front loop of stitches to avoid holes. Then work the new stitches in stocking stitch. AFTER A.1: Knit yarn overs in back loop of stitches to avoid holes. Then work the new stitches in stocking stitch. SLEEVE TIP: When picking up stitches mid under sleeve, there will be a small hole in the transition between stitches on body and sleeves. The holes can be closed by picking up the strand between two stitches - work this strand twisted together with the first stitch between body and sleeve to close the hole. DECREASE TIP: Decrease 1 stitch on each side of marker thread as follows: Work until 3 stitches remain before marker thread, knit 2 together, knit 2 (marker thread is between these 2 stitches), slip 1 stitch knitwise, knit 1, pass slipped stitch over stitch worked (= 2 stitches decreased). ---------------------------------------------------------- START THE PIECE HERE: ---------------------------------------------------------- JUMPER - SHORT OVERVIEW OF THE PIECE: In this pattern needles of different length have been used, begin with fitting length for number of stitches and switch as needed. Work neck edge and yoke in the round on circular needle from right shoulder back, and work top down. When yoke is done, divide piece for body and sleeves. Work body downwards in the round on circular needle while putting the sleeves aside. Then work sleeves downwards in the round on needle. If 0 is given for the chosen size, it means that you skip the information until next information. NECK EDGE: Cast on 132-136-140-144-152-160-168 stitches on circular needle size 3 mm with DROPS Baby Merino. Work 3 rounds in stocking stitch (= rolling edge). Work 3 rounds rib (= purl 1/knit 1). Work next round as follows: Work stocking stitch over the first 25 stitches – NB! 1st and last of these stitches are 1 purl (= sleeve), work A.1, work 23-25-27-29-33-37-41 stitches in stocking stitch, work A.1 (= 41-43-45-47-51-55-59 stitches for front piece), work in stocking stitch over the next 25 stitches (= sleeve), work A.1, work 23-25-27-29-33-37-41 stitches in stocking stitch, work A.1 (= 41-43-45-47-51-55-59 stitches for back piece). Work A.1 and stocking stitch like this for 4 cm - adjust so that last round is last round in A.1. Beginning of round is at right shoulder at the back. Insert 1 marker after the first 45-46-47-48-50-52-54 stitches on round (= approx. mid front), measure piece from this marker. YOKE: Insert 8 markers in piece without working the stitches, insert markers on each side of A.1 (= 9 stitches), these 9 stitches are called raglan stitches and increase is done for raglan on each side of raglan stitches. Insert 1st marker at the beginning of round, count 25 stitches (= sleeve), Insert 2nd marker before next stitch, count 9 stitches (= raglan stitches / A.1), insert 3rd marker in next stitch, count 23-25-27-29-33-37-41 stitches (= front piece), insert 4th marker before next stitch, count 9 stitches (= raglan stitches / A.1), insert 5th marker in next stitch, count 25 stitches (= sleeve), insert 6th marker before next stitch, count 9 stitches (= raglan stitches / A.1), insert 7th marker in next stitch, count 23-25-27-29-33-37-41 stitches (= back piece), insert 8th marker in next stitch, 9 stitches remain after last marker (= raglan stitches / A.1). Work in stocking stitch and pattern in the round and increase for RAGLAN on each side of raglan stitches - read explanation above for increase method. ROUND 1: Work stocking stitch and A.1 as before and increase for raglan on each side of raglan stitches (= 8 stitches increased). NOTE! At the beginning of round increase after A.1 and at the end of round increase before A.1. ROUND 2: Work in stocking stitch and A.1 as before. Work 1st and 2nd ROUND 17-20-28-32-34-33-32 times (= 34-40-56-64-68-66-64 rounds worked) = 268-296-364-400-424-424-424 stitches on needle. Remember to follow the knitting tension! Then work and increase as follows: ROUND 1: Work in stocking stitch and A.1 as before and increase for raglan on each side of raglan stitches (= 8 stitches increased). ROUND 2: Work in stocking stitch and A.1 as before. ROUND 3: Work stocking stitch and A.1 as before and increase for raglan on front piece and back piece, i.e. increase after 3rd and 7th marker and before 4th and 8th marker - do no increase stitches on sleeves (= 4 stitches increased). ROUND 4: Work in stocking stitch and A.1 as before. Work 1st to 4th ROUND 9-9-6-5-5-7-9 times (= 36-36-24-20-20-28-36 rounds worked = 9-9-6-5-5-7-9 increases in height on sleeves and 18-18-12-10-10-14-18 increases in height on front piece/back piece) = 376-404-436-460-484-508-532 stitches on needle. All increases for raglan are now done, 35-38-40-42-44-47-50 increases in height have been done in total on front piece/back piece and 26-29-34-37-39-40-41 increases in height on sleeves. Work in stocking stitch and A.1 as before, without increasing, until piece measures approx. 21-22-24-25-26-28-30 cm from marker mid front. Now divide yoke for body and sleeves. DIVIDING FOR BODY AND SLEEVES: When the piece is divided for body and sleeves, A.1 is place somewhat in on front piece/back piece. AT THE SAME TIME as next round is worked divide yoke for body and sleeves as follows: Knit 1-1-2-3-4-4-4 stitches (= belong to back piece), slip the next 75-81-89-93-95-97-99 stitches on a thread for sleeve, cast on 10-12-14-16-20-22-26 new stitches on needle (= in the side mid under sleeve), work 113-121-129-137-147-157-167 stitches in stocking stitch and A.1 as before (= front piece), slip the next 75-81-89-93-95-97-99 stitches on a thread for sleeve, cast on 10-12-14-16-20-22-26 new stitches on needle (= in the side mid under sleeve) and work the last 112-120-127-134-143-153-163 stitches in stocking stitch and A.1 as before (= back piece). Finish body and sleeves separately. BODY: = 246-266-286-306-334-358-386 stitches. Insert 1 marker in one side of piece (= in the middle of the 10-12-14-16-20-22-26 stitches that were cast on under sleeve). Work until marker as before, round begins here and work in the round. Work in stocking stitch and A.1 as before until piece measures 46-48-50-52-54-56-58 cm from marker mid front. Work 3 rounds rib (= knit 1/purl 1). Knit 3 rounds (= rolling edge), loosely cast off by knitting. Jumper measures 47-49-51-53-55-57-59 cm from marker mid front and approx. 52-54-56-58-60-62-64 cm from the top of shoulder. SLEEVES: Slip 75-81-89-93-95-97-99 sleeve stitches from one thread on to circular needle size 3 mm and pick in addition up 1 stitch in each of the 10-12-14-16-20-22-26 stitches cast on under sleeve - read SLEEVE TIP = 85-93-103-109-115-119-125 stitches. Insert 1 marker in the middle of the 10-12-14-16-20-22-26 new stitches under sleeve - round begins at the marker thread. Work in stocking stitch in the round on needle - AT THE SAME TIME when sleeve measures 2-3-3-2-4-4 cm from division, decrease mid under sleeve – read DECREASE TIP and decrease as follows: Decrease 2 stitches every 3½-2½-2-2-2-1½-1½ cm 11-14-17-17-18-18-18 times in total = 63-65-69-75-79-83-89 stitches. Work until sleeve measures 40-41-39-39-38-36-35 cm from division. Switch rib for 3 rounds (= knit 1/purl 1) while AT THE SAME TIME increasing 1 stitch evenly on 1st round = 64-66-70-76-80-84-90 stitches. Knit 3 rounds (= rolling edge), loosely cast off by knitting. Sleeve measures approx. 41-42-40-40-39-37-36 cm from division. |
||||||||||||||||
Diagram explanations |
||||||||||||||||
|
||||||||||||||||
 |
||||||||||||||||
Have you finished this pattern?Tag your pictures with #dropspattern #sundaymistsweater or submit them to the #dropsfan gallery. Do you need help with this pattern?You'll find 21 tutorial videos, a Comments/Questions area and more by visiting the pattern on garnstudio.com. © 1982-2026 DROPS Design A/S. We reserve all rights. This document, including all its sub-sections, has copyrights. Read more about what you can do with our patterns at the bottom of each pattern on our site. |
||||||||||||||||






With over 40 years in knitting and crochet design, DROPS Design offers one of the most extensive collections of free patterns on the internet - translated to 17 languages. As of today we count 333 catalogues and 12525 patterns translated into English (UK/cm). 12525
We work hard to bring you the best knitting and crochet have to offer, inspiration and advice as well as great quality yarns at incredible prices! Would you like to use our patterns for other than personal use? You can read what you are allowed to do in the Copyright text at the bottom of all our patterns. Happy crafting!
Post a comment to pattern DROPS 262-20
We would love to hear what you have to say about this pattern!
If you want to leave a question, please make sure you select the correct category in the form below, to speed up the answering process. Required fields are marked *.