
Popular categories
Looking for a yarn?


Comments / Questions (149)
![]() Chaima Balil wrote:
Chaima Balil wrote:
Raglan decreases I get that for decrease one size L only 8 decreases for raglan but I’m confused about decrease 2 when it says every round 17 times and 33 times ( for front and back ) my question is the decreases for the front and back should be normal? Or I only should decrease as raglan . And how can I do 17 times at once or 33 lol I only know 8 decreases , please help me out
19.01.2025 - 08:47DROPS Design answered:
Dear Chaima, you have, on each side of each marker, either a sleeve section or a front/back piece section. Depending on which section of the body you need to decrease in at a specific round you will decrease before or after a marker or on both sides of the marker. For the front and back pieces you will decrease on the corresponding sides of the marker every round 33 times in total (that is, decrease 4 stitches in 33 decrease rounds). For the sleeves decrease 8 times every 2nd round (so sometimes you decrease only on the body = 4 sts; and sometimes in the body and sleeves = 8 sts) and then 17 times every round (so for the body and sleeves at the same time = 8 sts). Happy knitting!
19.01.2025 - 22:36
![]() Isabel wrote:
Isabel wrote:
Danke!😍
10.01.2025 - 22:14
![]() Isabel wrote:
Isabel wrote:
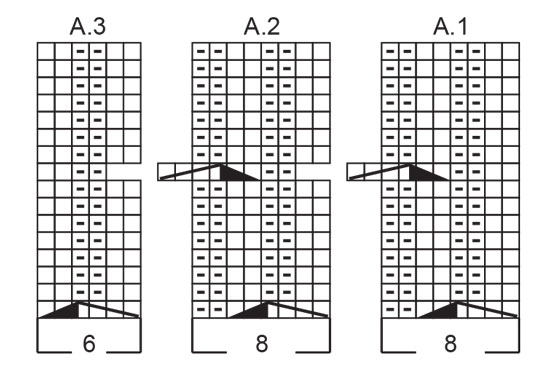
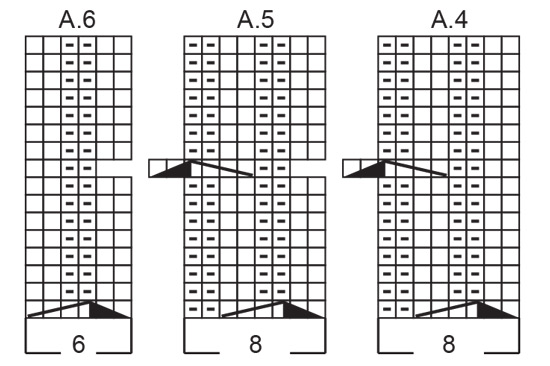
Hallo, ich verstehe die Reihenfolge der Diagramme nicht. So wie diese in der Anleitung angeordnet werden ist das Muster nicht gespiegelt, richtig? Das Foto von dem Pullover sieht aber gespiegelt aus? Ich habe neben der vorderen Mitte rechts A3 mit 6 Maschen und links A4 mit 8 Maschen. Was stimmt da nicht? Danke, liebe Grüße
04.01.2025 - 16:30DROPS Design answered:
Liebe Isabel, so soll es stimmen, A.3 ist nur 6 Maschen dann kommen die 2 linken Maschen, vordere Mitte ist hier, dann stricken Sie A.4 über 8 Maschen (Zopf + 2 li Maschen). Viel Spaß beim Stricken!
06.01.2025 - 09:09
![]() George McDonnell wrote:
George McDonnell wrote:
Hi, Please could you help? Cast on 160-176-208-208-224-256 stitches with circular needle size 6 mm, 1 strand DROPS Air and 1 strand DROPS Brushed Alpaca Silk (= 2 strands). I'm guessing the two strands are worked together, though I am confused! Do the two strands together = 1 stitch? Sorry about this, Kind regards, George
23.12.2024 - 12:08DROPS Design answered:
Dear George, yes, you work with both threads together. So each stitch is worked with both threads at the same time. You'd work similarly to this video, but with 1 thread of each yarn instead of 2 threads of the same yarn: https://www.garnstudio.com/video.php?id=1424&lang=en. Happy knitting!
29.12.2024 - 19:58
![]() Laura wrote:
Laura wrote:
Ya he encontrado el error (mío), muchas gracias igualmente. Me encantan vuestros partrones:)
21.12.2024 - 21:49
![]() Laura wrote:
Laura wrote:
Hola, estoy intentando hacer este jersey en talla XL En la parte de CUERPO no consigo que los números me cuadren. Si hago la suma tal como dice el patrón tendría que ser: 1+4+32+6+2+32+6+4+1=88 y el hilo marcador está aquí, cuando en el inicio del patrón el hilo marcador lo tengo que poner en el punto 104. ¿Entonces que hago con los 16 puntos que me faltan? Muchas gracias.
21.12.2024 - 18:27DROPS Design answered:
Hola Laura, entiendo que te faltan por tener en cuenta los diagramas A.1 y A.4, que son 8 puntos cada uno. En ese caso, tendrías: 1 revés, 4 de elástico, 8 puntos de A.1, 32 puntos de A.2, 6 puntos de A.3, 2 reveses en el centro del delantero, 8 puntos de A.4, 32 puntos de A.5, 6 puntos de A.6, 4 puntos del elástico y 1 revés = 104 puntos. Después repites igual en la espalda.
22.12.2024 - 19:03
![]() Felicia wrote:
Felicia wrote:
Hej, försöker lista ut vad ni menar med minskning 1 och 2 på raglanminskningen. Har ni någon förklaring? Finner ingen förklaring vad minskning 1alt 2 är för något.
17.12.2024 - 10:33DROPS Design answered:
Hej Felicia, du minskar enligt raglan förklaringen, først på vartannat varv 7 ggr (minsk 1) i den minsta storleken och sedan på varje varv 15 ggr (minsk 2) i den minsta storleken... du minskar alltså på samma sätt :)
17.12.2024 - 14:16
![]() Marie wrote:
Marie wrote:
På bærestykket startet jeg gangen før det ene ermet og strikket 1cm før jeg så omgangen skulle startet før bakstykket. Må jeg ta opp, flytte start eller går det fint å fortsette tross det?
06.12.2024 - 16:33DROPS Design answered:
Hei Marie. Litt usikker på hva du mener, men uansett, for å få flettene til å stemme overens (bærestykke og ermene) ville jeg ha fulgt oppskriften. Og ikke få en forskyvning på 1 cm. mvh DROPS Design
10.12.2024 - 07:13
![]() Marit wrote:
Marit wrote:
Hej. Jeg har læst opskriften som Mette d. 23.10.2024. Godt med en forklaring her. Mit spørgmål er: Skal mønsteret ikke være symmetrisk omkring de to vrangmasker midt foran? Hvis det er korrekt, hvorfor skal man så ikke strikke mønster A6 lige efter de to midtervrangmasker? På forhånd tak for svar
03.12.2024 - 15:44DROPS Design answered:
Hej Marit, jo men det bliver korrekt når du afslutter med de 2 retmasker i A.3 før de 2 midterste masker i vrang og så starter de 2 retmasker i A.4 på den anden side af midtermaskerne :)
04.12.2024 - 14:48
![]() Sophie wrote:
Sophie wrote:
Hello! I am struggling with the increases for the sleeves. In the pattern it just says "Then work the new stitches into the rib", how exactly do you do that? (For size L, where the marked stitches are knitted) Do you work both increased stitches as knit stitches or as purl stitches, and do you work cables over them at some point? Thank you in advance :)
07.11.2024 - 13:29DROPS Design answered:
Dear Sophie, you will incorporate the new stitches into rib K2, P2 as before, marker thread at the beg of the round is between K2, so that first increase will be ...P2, K1 (increase), K2 with marker thread in between, K1 (increase, P2... 2nd increase will be P2, K1+K1 (2nd increase), K2 with marker thread in between, K1 (increase) + K1, P2 ... purl the next 2 sts increased, purl the next 2 and so on. Happy knitting!
07.11.2024 - 16:32
|
|||||||||||||
Sand Trails#sandtrailssweater |
|||||||||||||
 |
 |
||||||||||||
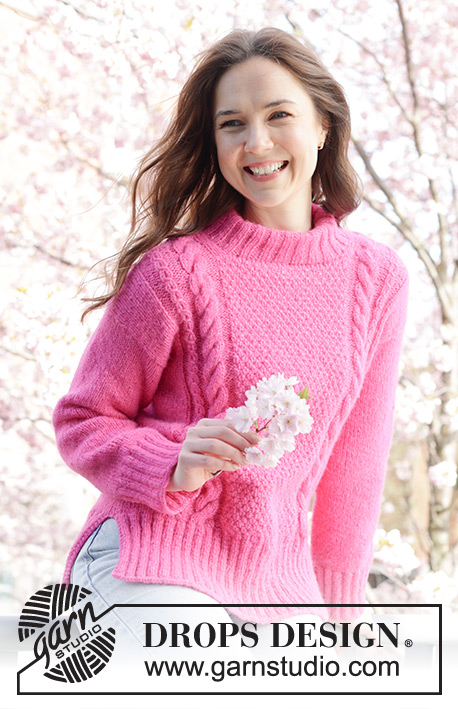
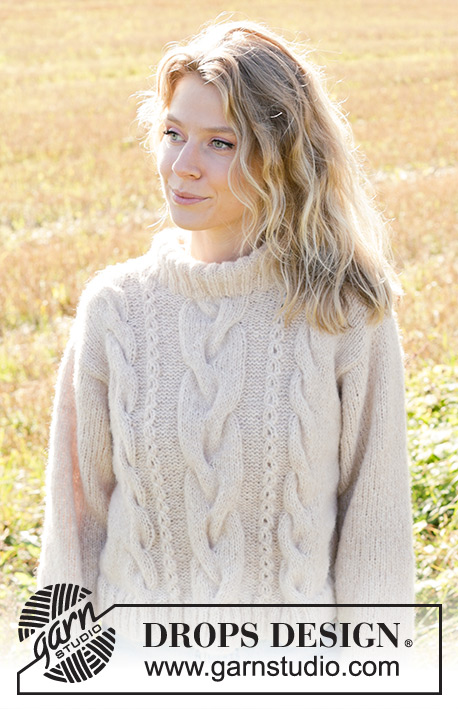
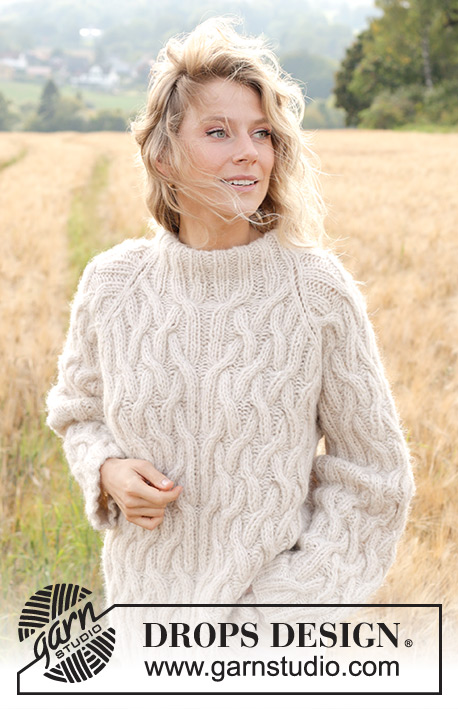
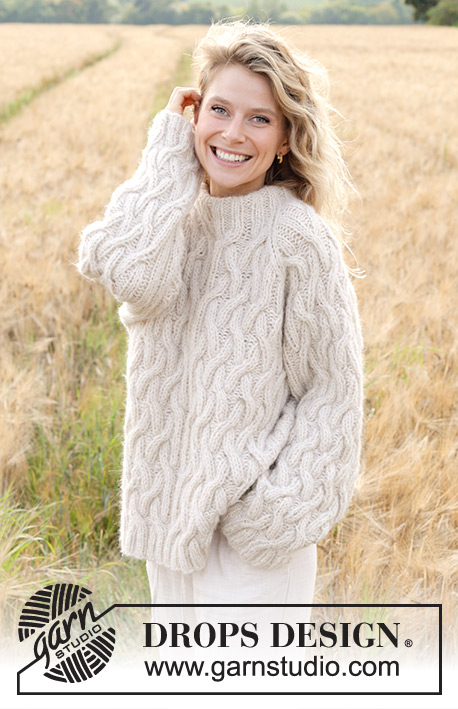
Knitted jumper in DROPS Air and DROPS Brushed Alpaca Silk. The piece is worked bottom up with raglan, cables and double neck. Sizes S - XXXL.
DROPS 248-3 |
|||||||||||||
|
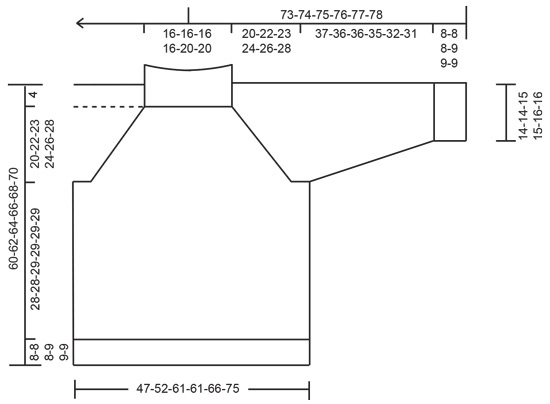
------------------------------------------------------- EXPLANATIONS FOR THE PATTERN: ------------------------------------------------------- KNITTING TIP: If your knitting tension is too tight vertically the armholes will be too small – this can be adjusted for, if necessary, by working more rounds between the decreases. RAGLAN Decrease as follows before and after the marker-threads: DECREASE AFTER MARKER-THREAD: Slip 1 stitch knit-wise, knit 1, pass slipped stitch over knitted stitch (= 1 stitch decreased). DECREASE BEFORE MARKER-THREAD : Knit 2 together (= 1 stitch decreased). INCREASE TIP (for sleeves): Increase 1 stitch on each side of the marker-thread: Work until there is 1 stitch left before the marker-thread, 1 yarn over, knit/purl 2 as before (marker-thread sits between these 2 stitches), 1 yarn over. On the next round work the yarn overs twisted to avoid holes. Then work the new stitches into the rib (it is important to match the rib already worked on each side of A.1, A.2 and A.3, not towards mid-under sleeve). ------------------------------------------------------- START THE PIECE HERE: ------------------------------------------------------- JUMPER - SHORT OVERVIEW OF THE PIECE: The pattern uses both long and short needles; start with the length which fits the number of stitches and change when necessary. The piece is worked in the round with circular needle, bottom up as far as the armholes. The sleeves are worked in the round, bottom up as far as the armholes. The body and sleeves are placed on the same circular needle and the yoke continued in the round while decreasing for raglan. The neck is worked to finish, folded double and sewn down to the inside. If there is a «0» in your chosen size, skip the information and go straight to the next instruction. BODY: Cast on 160-176-208-208-224-256 stitches with circular needle size 6 mm, 1 strand DROPS Air and 1 strand DROPS Brushed Alpaca Silk (= 2 strands). Work rib in the round as follows: Purl 1, rib (knit 2, purl 2) until there is 1 stitch left, purl 1. Insert 1 marker-thread at the beginning of the round and 1 marker-thread after 80-88-104-104-112-128 stitches, inserting the threads between 2 purled stitches. Work the rib for 8-8-8-9-9-9 cm. Change to circular needle size 8 mm and work as follows over the front piece: * Purl 1, rib (knit 2, purl 2) over the next 0-4-4-4-8-8 stitches, A.1, A.2 over the next 24-24-32-32-32-40 stitches, A.3, purl 2 (= mid-front), A.4, A.5 over the next 24-24-32-32-32-40 stitches, A.6, rib (purl 2, knit 2) over the next 0-4-4-4-8-8 stitches, purl 1 *, marker-thread is here, work from *-* 1 more time over the back piece. Continue this pattern onwards. REMEMBER THE KNITTING TENSION! Work until the body measures approx. 36-36-37-38-38-38 cm – note which round in the pattern was worked on the last row. DIVIDE FOR ARMHOLES: On the next round divide for the front and back pieces as follows: Cast off the first 4-4-5-5-7-7 stitches for the armhole, work 72-80-94-94-98-114 stitches as before, cast off 8-8-10-10-14-14 stitches for the armhole, work 72-80-94-94-98-114 stitches as before and cast off the last 4-4-5-5-7-7 stitches. Cut the strand, lay the piece to one side and work the sleeves. SLEEVES: Cast on 48-48-52-52-56-56 stitches with double pointed needles size 6 mm and 1 strand of each quality (= 2 strands). Work rib in the round (knit 2, purl 2) for 8-8-8-9-9-9 cm. Insert 1 marker-thread between the first 2 purled stitches in sizes S, M, XXL and XXXL, and between the first 2 knitted stitches in sizes L and XL – the round starts here. Allow the marker-thread to follow your work onwards; it is used when increasing under the sleeve. Change to double pointed needles size 8 mm and work pattern as follows: Rib as before over the first 5-5-7-7-9-9 stitches, A.1, A.2 over the next 24 stitches, A.3, rib as before over the last 5-5-7-7-9-9 stitches. Continue this pattern. When the sleeve measures 10-10-11-12-12-12 cm from the cast-on edge, increase 2 stitches under the sleeve – read INCREASE TIP. Increase like this every 4-2½-3-2-2-1½ cm a total of 8-12-10-14-12-16 times = 64-72-72-80-80-88 stitches. Work until the sleeve measures approx. 45-44-44-44-41-40 cm – adjust to finish on the same round as for body. Cast off the middle 8-8-10-10-10-10 stitches under the sleeve (4-4-5-5-5-5 stitches on each side of the marker-thread) = 56-64-62-70-70-78 stitches. Work the other sleeve in the same way. YOKE: Place the sleeves on the same circular needle as the body, where stitches were cast off for the armholes = 256-288-312-328-336-384 stitches. Insert 1 marker-thread in each transition between the body and sleeves (= 4 marker-threads, each one inserted between 2 stitches). Start the round at the marker thread before back piece. Continue the pattern in the round. When the yoke measures 1 cm from the division, begin to decrease for raglan at each marker-thread - the decreases are different on the front/back pieces and the sleeves – read RAGLAN-DECREASES ON FRONT/BACK PIECES and RAGLAN-DECREASES ON SLEEVES before continuing. RAGLAN-DECREASES ON FRONT/BACK PIECES: Read RAGLAN and KNITTING TIP above. Decrease a total of 22-26-33-33-31-39 times on each side of the front and back pieces as follows: DECREASE 1: Every 2nd round 7-6-0-2-7-2 times. DECREASE 2: Every round 15-20-33-31-24-37 times. RAGLAN-DECREASES ON SLEEVES: Read RAGLAN and KNITTING TIP above. Decrease a total of 22-26-25-29-29-33 times on each side of the sleeves as follows: DECREASE 1: Every 2nd round 7-6-8-6-9-8 times. DECREASE 2: Every round 15-20-17-23-20-25 times. AFTER LAST DECREASE: After the last decrease there are 80-80-80-80-96-96 stitches. The yoke measures approx. 20-22-23-24-26-28 cm from the join and the jumper measures approx. 60-62-64-66-68-70 cm from the shoulder. There are 28-28-28-28-36-36 stitches between the marker-threads on the front/back pieces and 12 stitches between the marker-threads on the sleeves. NECK: = 80-80-80-80-96-96 stitches. Change to circular needle size 6 mm. Start from the marker-thread before the back piece: * Knit 1, rib (knit 2, purl 2) – the rib should match the pattern on the front/back pieces, knit 1 before the next marker-thread. Over the 12 sleeve-stitches, work as follows from the marker-thread: Knit 1, purl 2 together two times, knit 2, purl 2 together two times, knit 1 (= 4 stitches decreased, 8 stitches left on sleeve) *, work from *-* 1 more time = 72-72-72-72-88-88 stitches; there is now a regular rib (knit 2, purl 2) all the way round. Continue the rib for 13-13-13-15-15-15 cm. Cast off a little loosely and fold the neck double to the wrong side. Sew down – making sure the seam is elastic to avoid the neck being tight. The neck measures approx. 6-6-6-7-7-7 cm when folded. ASSEMBLY: Sew together the 8-8-10-10-10-10 cast-off stitches on the sleeves and the 8-8-10-10-14-14 cast-off stitches on the body. |
|||||||||||||
Diagram explanations |
|||||||||||||
|
|||||||||||||
 |
|||||||||||||
 |
|||||||||||||
 |
|||||||||||||
Have you finished this pattern?Tag your pictures with #dropspattern #sandtrailssweater or submit them to the #dropsfan gallery. Do you need help with this pattern?You'll find 23 tutorial videos, a Comments/Questions area and more by visiting the pattern on garnstudio.com. © 1982-2026 DROPS Design A/S. We reserve all rights. This document, including all its sub-sections, has copyrights. Read more about what you can do with our patterns at the bottom of each pattern on our site. |
|||||||||||||


With over 40 years in knitting and crochet design, DROPS Design offers one of the most extensive collections of free patterns on the internet - translated to 17 languages. As of today we count 324 catalogues and 12290 patterns translated into English (UK/cm). 12290
We work hard to bring you the best knitting and crochet have to offer, inspiration and advice as well as great quality yarns at incredible prices! Would you like to use our patterns for other than personal use? You can read what you are allowed to do in the Copyright text at the bottom of all our patterns. Happy crafting!
Post a comment to pattern DROPS 248-3
We would love to hear what you have to say about this pattern!
If you want to leave a question, please make sure you select the correct category in the form below, to speed up the answering process. Required fields are marked *.