
Popular categories
Looking for a yarn?


Comments / Questions (8)
![]() Martina wrote:
Martina wrote:
Wie strickt man eine „europäische Schulter“?
13.01.2026 - 22:37DROPS Design answered:
Liebe Martina, schauen Sie oben der Seite, rechts zum Tab "Anleitung" finden Sie Videos und Lektionen wo diese Technik gezeigt wird. Viel Spaß beim Stricken!
15.01.2026 - 08:52
![]() Kat wrote:
Kat wrote:
Hi! Is there a reason the sleeves are started flat but joined in the round after a few rows? Can I just work the sleeves in the round from the beginning? Please let me know. Thank you!
25.07.2025 - 18:56DROPS Design answered:
Dear Kat, you can check the diagram at the bottom of the pattern to understand the shape of the sleeve. We need a flat section at the beginning so that there is an opening at the mid-under the sleeve, which will help us adjust the sleeve to the armhole when we join the sweater. If you work the whole piece in the round this opening will be missing and the sleeve will not fit as well into the armhole. Happy knitting!
27.07.2025 - 18:26
![]() Nicole wrote:
Nicole wrote:
Guten Tag Müssen Rücken- und Vorderteil nicht gleich lang sein, bevor man sie als Rumpfteil zusammenstrickt? Angabe für XXXL Rückenteil 19cm und Vorderteil 29cm. Danke für die Antwort!
16.03.2025 - 16:15DROPS Design answered:
Siehe unten :)
17.03.2025 - 09:34
![]() Nicole wrote:
Nicole wrote:
Guten Tag Müssen Rücken- und Vorderteil nicht gleich lang sein, bevor man sie als Rumpfteil zusammenstrickt? Angabe für XXXL Rückenteil 19cm und Vorderteil 29cm. Danke für die Antwort!
16.03.2025 - 16:14DROPS Design answered:
Liebe Nicole, wenn man solche Pullover mit europäischen Schulter strickt, werden die Länge beim Rückenteil immer kürzer als beim Vorderteil da die Schulter etwas schräng hinten legen werden - schauen Sie mal unserer Videos/Lektion (siehe Tab oben nach Tab "Anleitung"), dort zeigen wir, wie man so einen Pullover strickt. Viel Spaß beim Stricken!
17.03.2025 - 09:34
![]() Jamina wrote:
Jamina wrote:
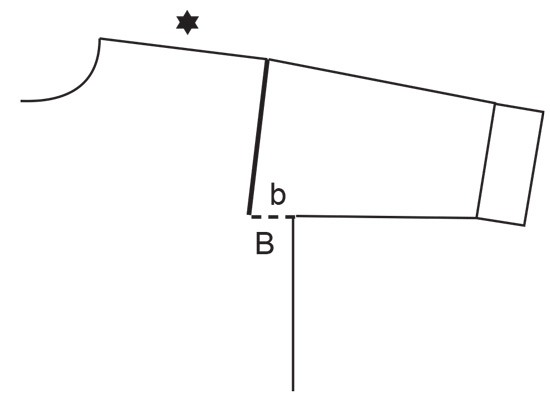
Hallo, ich verstehe die Maschenaufnahme für die Ärmel nicht. Am unteren Rand wurden beim Zusammensetzen von Vorder- und Rückenteil 6 Maschen angeschlagen. Diese Maschen sollen jetzt nicht für den Ärmel aufgenommen werden? ("Maschen ab der Schulter nach unten aus dem Armausschnitt des Rückenteils auffassen, d.h. aus dem unteren, waagerechten Rand des Armausschnitts werden keine Maschen aufgefasst")
15.01.2025 - 21:34DROPS Design answered:
Liebe Jamina, in diesen 6 Maschen nehmen Sie keine Masche für die Ärmel auf; dh die Maschen für die Ärmel werden nur am Armloch (in die Reihen Vorder- + Rückenteil) auffassen, dann stricken Sie 2 cm (2. Größe) in Hin- und Rückreihen => diese 2 cm werden am Armloch (= an den 6 neuen Maschen) genäht (siehe Skizze: B= Armloch / b = die 2 cm) dann stricken Sie in der Runde weiter. Viel Spaß beim Stricken!
16.01.2025 - 10:06
![]() Pernilla wrote:
Pernilla wrote:
I mönstret står det att bakstycket ska ökas efter markören i början av varvet (sett från rätsidan) . Avigsidan ska stickas på samma sätt. Innebär det att ökningen ska ske efter markören i början av varvet även från avigsidan?
17.06.2024 - 20:20DROPS Design answered:
Hei Pernilla. Fra retten skal det økes både før merket (på slutten av pinnen) og etter merket (på begynnelsen av pinne). Fra vrangen økes det på samme måte. Husk les: ÖKNINGSTIPS FRÅN RÄTSIDAN og ÖKNINGSTIPS FRÅN AVIGSIDAN. Ta gjerne en titt på hjelpevideoene som vise hvodan man strikker et plagg med Europeisk axel. mvh DROPS Design
25.06.2024 - 06:42
![]() Hson wrote:
Hson wrote:
I mönstret står det att man börjar plocka upp maskor i vänster axel, men videon visar högra axeln, blir det någon skillnad?
30.12.2023 - 09:39DROPS Design answered:
Hei Hson. Om du ser videoen slik at du får en oversikt over teknikken, og deretter strikker du slik det er forklart i oppskriften (DROPS 245-24). Videoen er en generell video og oppskrifter kan variere litt fra oppskrift til oppskrift. mvh DROPS Design
08.01.2024 - 13:58
![]() Wiola wrote:
Wiola wrote:
PRZÓD: Przerabiać w tę i z powrotem dżersejem, aż długość robótki wynosi 23-25-26-27-28-29 cm, mierzyć wzdłuż podkroju rękawa. - gdzie jest podkroj rękawa? Odkąd dokładnie to liczymy? Dopiero zaczynam prace ze wzorami, dziękuje za odpowiedz :)
29.10.2023 - 17:36DROPS Design answered:
Witaj Wiolu, mierzysz od nabranych oczek na lewe/prawe ramię przodu i dalej w dół, wzdłuż brzegu przodu. Pozdrawiamy!
30.10.2023 - 08:17
|
||||
Stormy Evening Sweater#stormyeveningsweater |
||||
 |
 |
|||
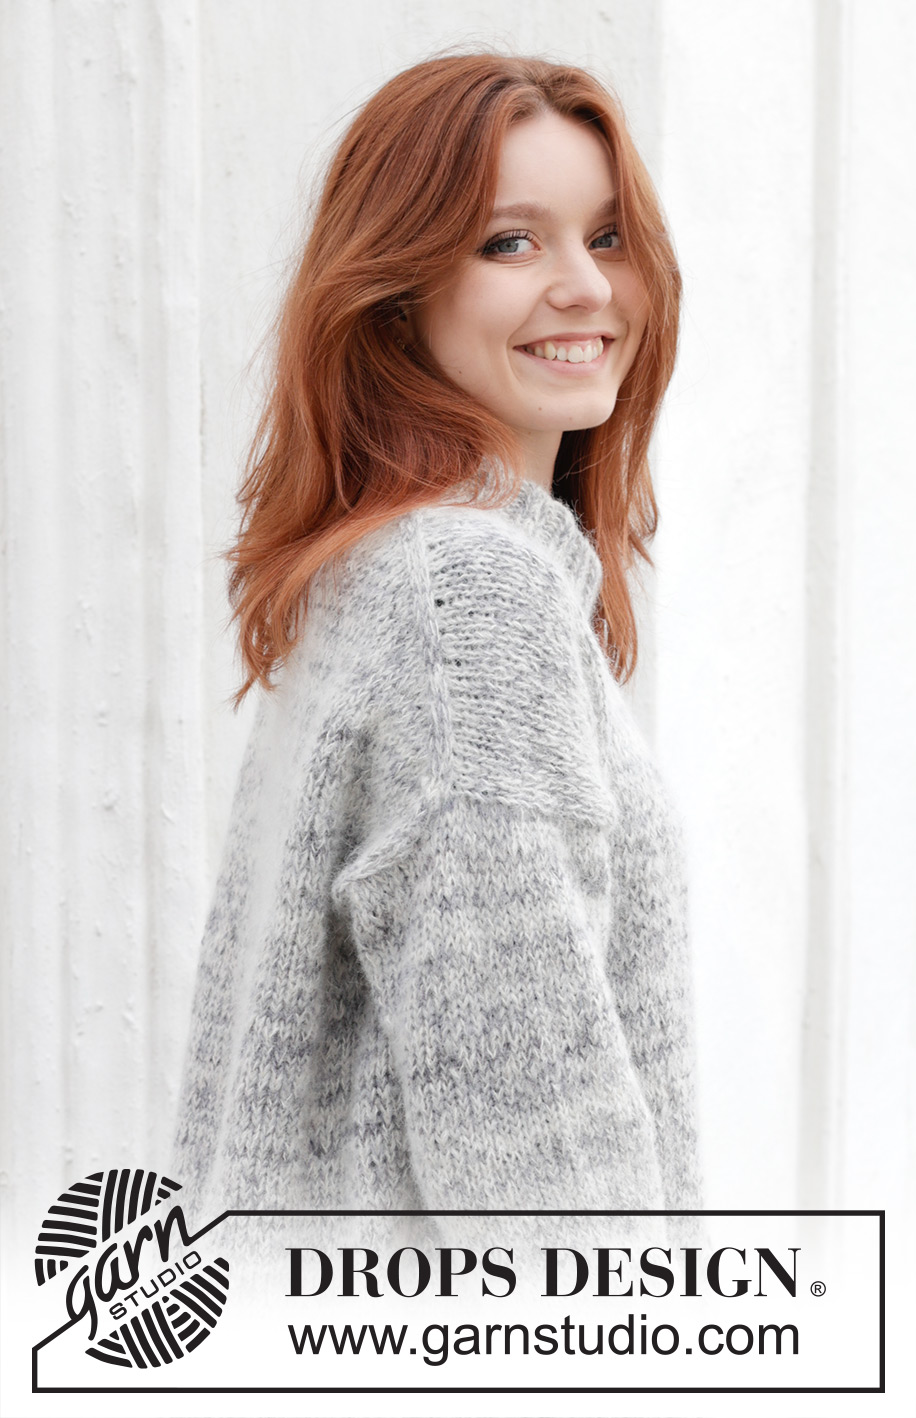
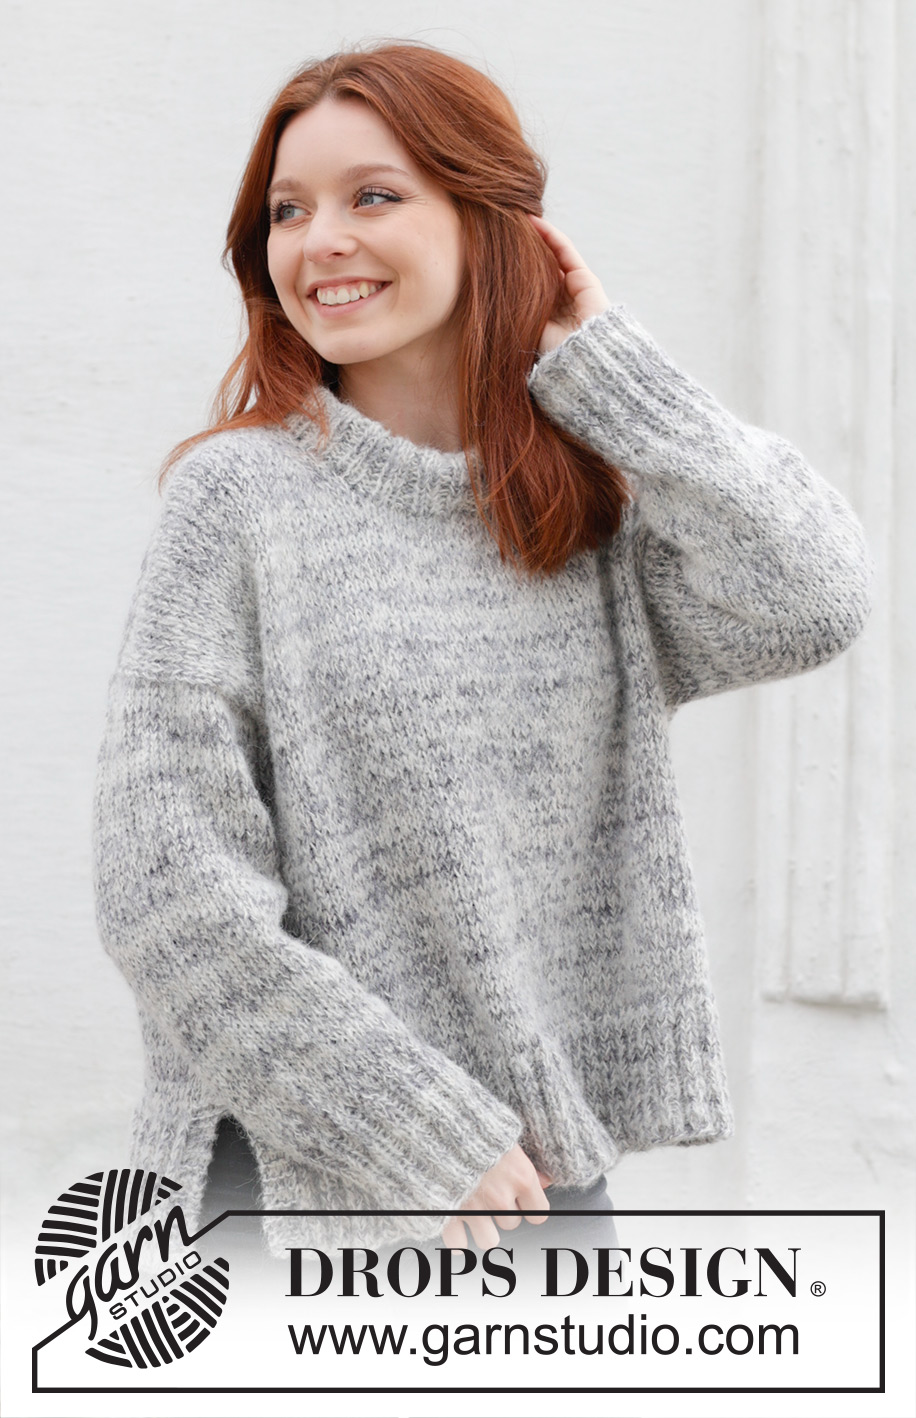
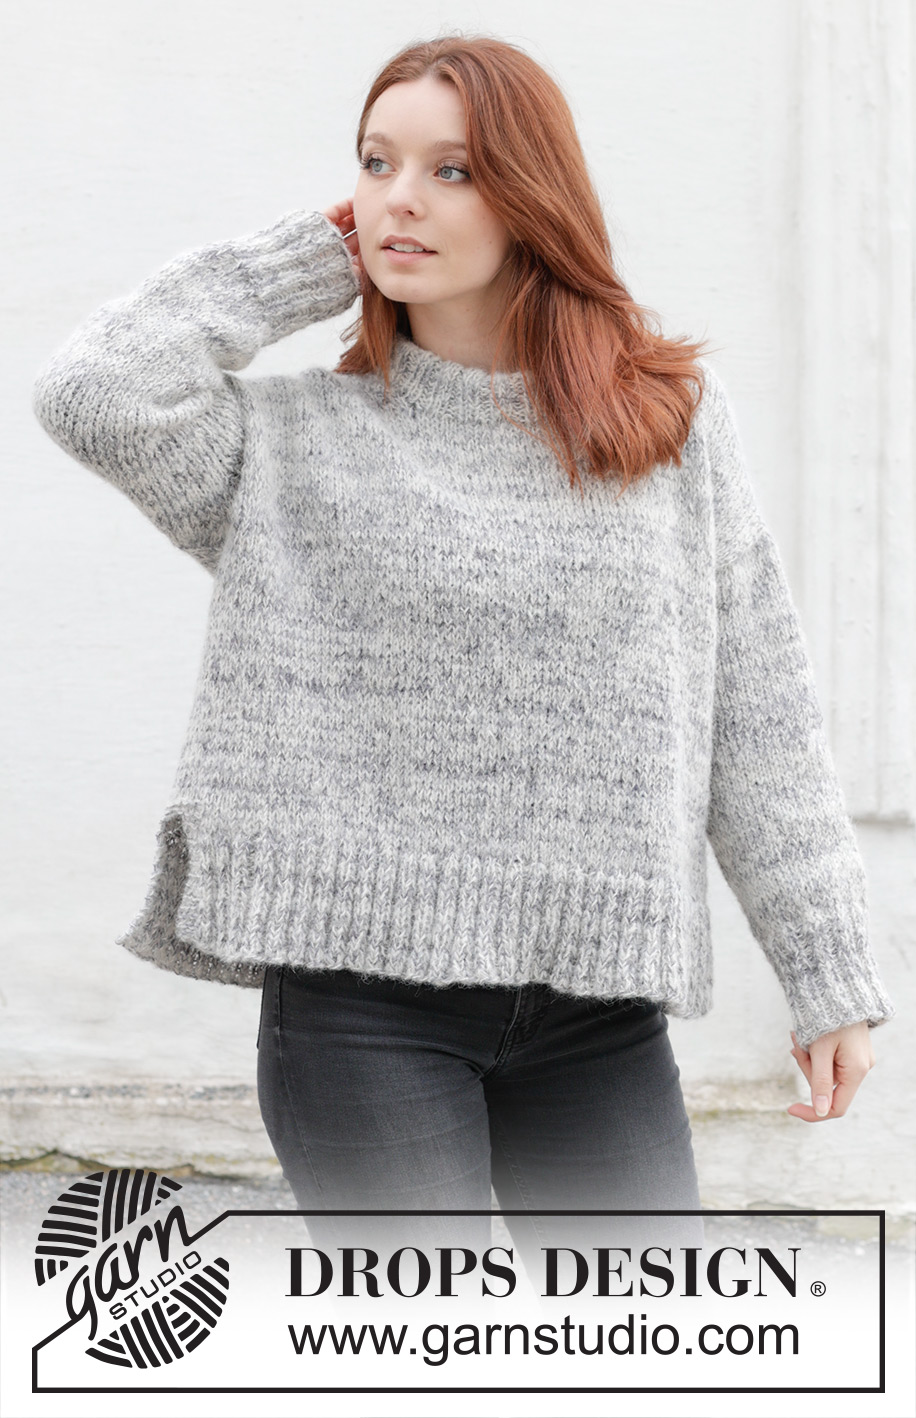
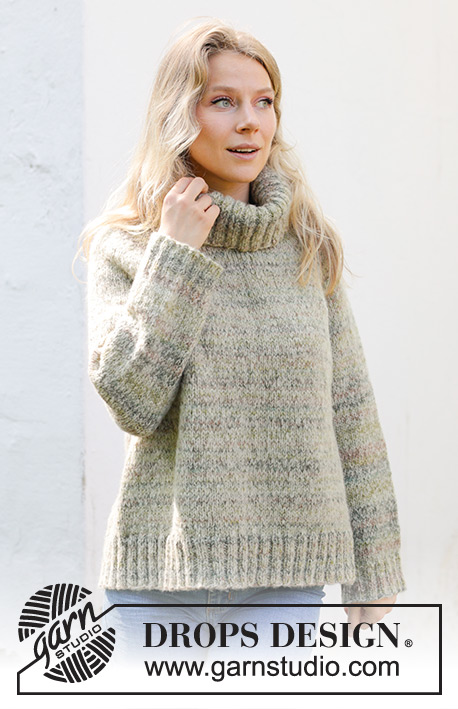
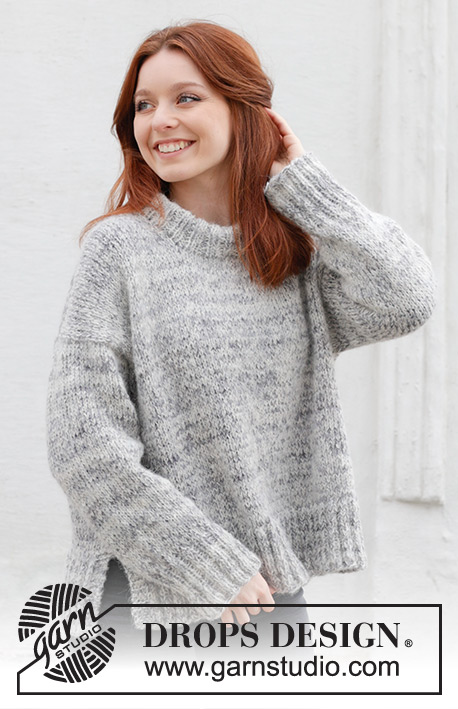
Knitted jumper in DROPS Fabel and DROPS Brushed Alpaca Silk. The piece is worked top down in stocking stitch with European/diagonal shoulders and double neck. Sizes S - XXXL.
DROPS 245-24 |
||||
|
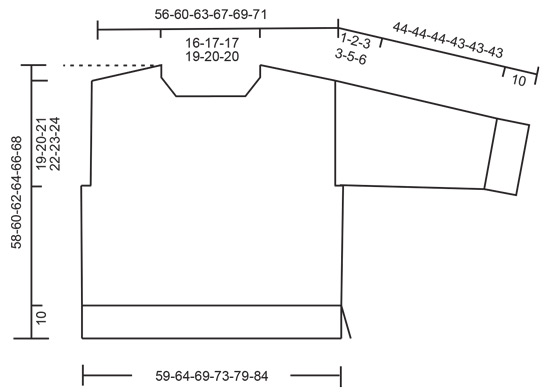
------------------------------------------------------- EXPLANATIONS FOR THE PATTERN: ------------------------------------------------------- INCREASE TIP FROM THE RIGHT SIDE: Increase towards the left AFTER MARKER: Use left needle to pick up yarn between 2 stitches from row below, pick up yarn from the front and knit in the stitch loop that is on the back of the needle. Increase towards the right BEFORE MARKER: Use left needle to pick up yarn between 2 stitches from row below, pick up yarn from the back and knit in the stitch loop that is on the front side of the needle. INCREASE TIP FROM THE WRONG SIDE: Increase towards the right AFTER MARKER: Use left needle to pick up yarn between 2 stitches from row below, pick up yarn from the back and purl in the stitch loop that is on the front side of the needle. Increase towards the left BEFORE MARKER: Use left needle to pick up yarn between 2 stitches from row below, pick up yarn from the front and purl in the stitch loop that is on the back side of the needle. GARTER STITCH (worked in the round): 1 ridge in height = 2 rounds; Knit 1 round and purl 1 round. GARTER STITCH (worked back and forth): Knit all rows. 1 ridge = knit 2 rows. DECREASE TIP (for sleeves): Decrease 1 stitch on each side of the marker-thread as follows: Work until there are 3 stitches left before the marker-thread, knit 2 together, knit 2 (marker-thread sits between these 2 stitches), slip 1 stitch knit-wise, knit 1 and pass the slipped stitch over the knitted stitch. ------------------------------------------------------- START THE PIECE HERE: ------------------------------------------------------- JUMPER – SHORT OVERVIEW OF THE PIECE: The back piece is worked top down, back and forth with circular needle, until the armholes are finished. Stitches are knitted up along each shoulder on the back piece, increased for the neck and the front piece is worked back and forth with circular needle until the armholes are finished. The two pieces are joined and the body worked in the round with circular needle as far as the split, then finished back and forth. Stitches are knitted up around each armhole, the sleeve cap is worked back and forth, then the sleeves are finished in the round with circular needle/double pointed needles. The neck is worked in the round to finish. BACK PIECE: Cast on 26-28-28-30-32-32 stitches with circular needle size 6 mm, 1 strand DROPS Fabel and 1 strand DROPS Brushed Alpaca Silk (2 strands). Purl 1 row from the wrong side. Insert 1 marker inside the 3 outermost stitches on each side. Continue with stocking stitch back and forth. AT THE SAME TIME, increase AFTER the marker at the beginning of the row and BEFORE the marker at the end of the row - read INCREASE TIP FROM RIGHT SIDE. On the next row (wrong side) increase in the same way - read INCREASE TIP FROM WRONG SIDE. Continue increasing on each row, from both the right and wrong side, a total of 26-28-30-32-32-34 times = 78-84-88-94-96-100 stitches. The piece is now measured from here! REMEMBER THE KNITTING TENSION! Continue with stocking stitch back and forth for 15-15-16-17-18-19 cm, measured along the armhole. Cut the strand. FRONT PIECE: Start on the left shoulder (when the garment is worn). Knit up 26-28-30-32-32-34 stitches inside 1 edge stitch along the left shoulder on back piece (i.e., 1 stitch in each row). Work stocking stitch back and forth. When the piece measures 5 cm from the knitted-up stitches, increase 1 stitch (as above) at the beginning of each row from the right side for the neck, increasing only after the first 3 stitches from the right side. Increase 1 stitch 4 times = 30-32-34-36-36-38 stitches. Purl 1 row from the wrong side, cut the strand and work the right shoulder as follows. Knit up 26-28-30-32-32-34 stitches inside 1 edge stitch along the right back shoulder. Work stocking stitch back and forth. When the piece measures 5 cm from the knitted-up stitches, increase 1 stitch at the end of each row from the right side for the neck, increasing only before the last 3 stitches from the right side. Increase 1 stitch 4 times = 30-32-34-36-36-38 stitches. Purl back from the wrong side Work the next row as follows from the right side: Work the 30-32-34-36-36-38 stitches from the right front piece, cast on 18-20-20-22-24-24 stitches for the neck, work the 30-32-34-36-36-38 stitches from the left front piece = 78-84-88-94-96-100 stitches. Work stocking stitch back and forth until the piece measures 23-25-26-27-28-29 cm, measured along the armhole. Now join the front and back pieces for the body. BODY: Work the 78-84-88-94-96-100 stitches from the front piece, cast on 4-6-8-8-14-18 stitches under the sleeve, work the 78-84-88-94-96-100 stitches from the back piece, cast on 4-6-8-8-14-18 stitches = 164-180-192-204-220-236 stitches. Insert a marker-thread in the middle of the cast-on stitches under each sleeve – they are used when dividing for the split. Work stocking stitch in the round until the piece measures 46-48-50-52-54-56 cm from the top of the shoulder on the front piece. Now start the round 4 stitches before 1 marker-thread. Work 8 GARTER STITCHES – read description above, under each sleeve (i.e., 4 stitches on each side of both marker-threads), the other stitches continued in stocking stitch, until the piece measures 48-50-52-54-56-58 cm (with the last row being a knitted row in the garter stitches). Divide at the marker-threads, place the 82-90-96-102-110-118 stitches from the back piece on a stitch holder and work the front piece. FRONT PIECE: = 82-90-96-102-110-118 stitches. Work as follows from the right side: 4 garter stitches, knit 74-82-88-94-102-110 stitches and increase 44-44-50-52-56-60 stitches evenly spaced over these stitches (yarn overs which are worked twisted on the next row), 4 garter stitches = 126-134-146-154-166-178 stitches. Change to circular needle size 5 mm. Work rib as follows from the wrong side: 4 garter stitches, * purl 2, knit 2 *, work from *-* until there are 6 stitches left, purl 2, 4 garter stitches. Work this rib back and forth for 10 cm. Cast off with rib. The jumper measures approx. 58-60-62-64-66-68 cm, measured from the top of the shoulder on the front piece. BACK PIECE: Place the 82-90-96-102-110-118 stitches from the stitch holder on circular needle size 6 mm and work in the same way as the front piece. LEFT SLEEVE: Use circular needle size 6 mm, 1 strand DROPS Fabel and 1 strand DROPS Brushed Alpaca Silk (2 strands). Knit up from the right side 33-35-36-38-40-41 stitches from the bottom of the armhole (along front piece), up the front piece to the shoulder, then 21-21-22-24-24-27 stitches down the back piece to the bottom of the armhole = 54-56-58-62-64-68 stitches. Insert 1 marker in the middle of the row – the sleeve is measured from this marker. Work stocking stitch back and forth for 1-2-3-3-5-6 cm. Now join the sleeve and continue in the round with short circular needle/double pointed needles size 6 mm. Insert 1 marker-thread at the beginning of the round (mid-under sleeve) and allow it to follow your work onwards. Start at the marker-thread and work stocking stitch in the round. When the sleeve measures 4-4-4-4-5-7 cm, decrease 1 stitch on each side of the marker-thread - read DECREASE TIP. Decrease like this every 5-5-5-4-4-3 cm a total of 6-6-6-7-7-8 times = 42-44-46-48-50-52 stitches. Continue working until the sleeve measures 34-34-34-33-33-33 cm from the marker. There is 10 cm left; try the jumper on and work to desired length before the rib. Knit 1 round and increase 6-4-6-4-6-8 stitches evenly spaced = 48-48-52-52-56-60 stitches. Change to double pointed needles size 5 mm. Work rib (knit 2, purl 2) for 10 cm. Cast off a little loosely. The sleeve measures approx. 44-44-44-43-43-43 cm from the marker. Work the other sleeve in the same way but knit up 21-21-22-24-24-27 stitches up the back piece to the shoulder and 33-35-36-38-40-41 stitches down the front piece. Sew the bottom of the armholes together – see sketch. NECK: Start on one shoulder-line and knit up from the right side, inside 1 edge stitch, 76 to 96 stitches with short circular needle size 5 mm and 1 strand of each quality. The stitch count should be divisible by 4. Work rib in the round (knit 2, purl 2) for 9 cm. Cast off with rib. Fold the neck double to the inside and sew down. To avoid the neck being tight and rolling outwards, it is important that the seam is elastic. |
||||
Diagram explanations |
||||
|
||||
 |
||||
 |
||||
Have you finished this pattern?Tag your pictures with #dropspattern #stormyeveningsweater or submit them to the #dropsfan gallery. Do you need help with this pattern?You'll find 30 tutorial videos, a Comments/Questions area and more by visiting the pattern on garnstudio.com. © 1982-2026 DROPS Design A/S. We reserve all rights. This document, including all its sub-sections, has copyrights. Read more about what you can do with our patterns at the bottom of each pattern on our site. |
||||


With over 40 years in knitting and crochet design, DROPS Design offers one of the most extensive collections of free patterns on the internet - translated to 17 languages. As of today we count 325 catalogues and 12298 patterns translated into English (UK/cm). 12298
We work hard to bring you the best knitting and crochet have to offer, inspiration and advice as well as great quality yarns at incredible prices! Would you like to use our patterns for other than personal use? You can read what you are allowed to do in the Copyright text at the bottom of all our patterns. Happy crafting!
Post a comment to pattern DROPS 245-24
We would love to hear what you have to say about this pattern!
If you want to leave a question, please make sure you select the correct category in the form below, to speed up the answering process. Required fields are marked *.