
Popular categories
Looking for a yarn?


Comments / Questions (14)
![]() Tanya wrote:
Tanya wrote:
When I move to the back piece size M and cast on 6 stitches at either end, does either side of the back piece already have some garter stitch from the raglan sleeves? or is the garter stitch from the sleeves on either side of the sleeve pieces? I just cant figure out how the garter stitch that divided the sleeves, flows into the lower part of the sweater once it has been divided and knitted separately.
01.02.2026 - 02:46DROPS Design answered:
Dear Tanya, after you have dividing piece, you finish first the front pieces separately back and forth then back piece; cast on 6 sts (just as you did for the side on each front piece), then work the 74 sts you slipped on a thread for back piece while dividing yoke and cast on - new sts. You now work 4 sts garter stitch on each side and lace pattern in between so: 4 sts in garter stitch, repeat lace pattern as before until 4 sts remain, work 4 sts in garter stitch. Happy knitting!
27.02.2026 - 14:36
![]() Tanya Gullison wrote:
Tanya Gullison wrote:
When finishing the yoke and moving the left front piece, are 4 of the 6 cast on stitches done in garter stitch? Will this make a total of 8 garter stitches under each arm when the back and sides are sewn up? I cant see what the side of the sweater looks like in the picture.
28.01.2026 - 20:00DROPS Design answered:
Hi Tanya, Yes, you will have 4 garter stitches on the front piece and 4 garter stitches from the back piece under each sleeve = 8 stitches when the pieces are sewn together. Regards, Drops Team.
30.01.2026 - 06:54
![]() Felice Meeuwesen wrote:
Felice Meeuwesen wrote:
Hoe voeg ik een markeerdraad in? Is het een draad of een steek?
29.09.2024 - 23:14DROPS Design answered:
Dag Felice,
Je kunt hiervoor restjes garen van een andere kleur gebruiken of speciale steek markeerders. Het gaat erom dat je weet dat je de betreffende punten markeert, zodat je weet waar je bent.
19.10.2024 - 11:51
![]() Helena Witte wrote:
Helena Witte wrote:
Når jeg deler arbejdet i for og bag og skal slå 8 masker op, skal jeg så strikke 4 retmasker til slut der, eller skal jeg fortsætte striben fra raglanærmerne, så jeg strikker 4 ret og så hulmønster? Hilsen Helena
27.05.2024 - 16:55DROPS Design answered:
Hej Helena, ja de 4 yderste masker mod siden og de 6 yderste masker mod midt foran strikkes i retstrik, de sidste 4 nye masker strikkes i samme hulmønster som resten af forstykket :)
28.05.2024 - 10:59
![]() Lucia wrote:
Lucia wrote:
Avrei necessità di capire bene come fare gli aumenti del raglan. C'è per favore un video che spiega questo passaggio? Grazie!
07.01.2024 - 23:37DROPS Design answered:
Buonasera Lucia, non c'è un video specifico per questo passaggio: può spiegarci meglio cosa la mette in difficoltà? Buon lavoro!
09.01.2024 - 20:07
![]() Ania wrote:
Ania wrote:
De modellen op de foto's zijn altijd heel mooi maar waarom nooit een foto van de rugzijde/achterkant van het patroon. Soms is dat echt een must om te zien hoe het model achteraan valt.
23.07.2023 - 20:57
![]() Elena wrote:
Elena wrote:
Hallo, warum werden die vordere Teilen und der Rücken unter den Ärmeln getrennt gestrickt? Kann ich das nicht als ein Teil in hin und rück Reihen weiter Stricken? Danke
15.06.2023 - 22:00DROPS Design answered:
Liebe Elena, dies ist wahrscheinlich die Wahl der Designerin, einige Strickerinnen stricken lieber einzelne Teilen. Viel Spaß beim stricken!
16.06.2023 - 07:23
![]() Tanja wrote:
Tanja wrote:
"Im Lochmuster in Hin- und Rück-Reihen weiterstricken, mit 6 Maschen kraus rechts am vorderen Rand und 4 Maschen kraus rechts an der Seite – darauf achten, dass das Muster passend über den Maschen der Passe fortgesetzt wird. " Hallo, heißt das, dass über die 4 Maschen der Raglanlinie weiterhin 4 M glatt rechts gestrickt wird oder wird nun das Lochmuster über diese 4 M gestrickt? Vielen Dank!
11.04.2023 - 20:05DROPS Design answered:
Liebe Tanja, die 4 Maschen gegen die Seite werden jetzt kraus rechts gestrickt, dh Sie stricken die 6 Blenden-Maschen und das Lochmuster wie zuvor und die 4 Maschen gegen die Seiten (am Ende der Hin-Reihe für das linke Vorderteil/Anfang der Hin-Reihe für das rechte Vorderteil) werden krausrechts gestrickt. Viel Spaß beim stricken!
12.04.2023 - 08:26
![]() Inma wrote:
Inma wrote:
Las instrucciones del patrón dicen que se comienza realizando 6 surcos, y que un surco son dos vueltas, o sea, 12 vueltas para el borde del cuello. Parece un error y que fuesen 3 surcos. ¿Me lo podríais aclarar? Muchas gracias de antemano
06.04.2023 - 20:07DROPS Design answered:
Hola Inma, el patrón es correcto, el escote es bastante ancho, tal y como se ve en la foto. Así que son 6 surcos o 12 vueltas. Pero si prefieres puedes trabajar una cenefa más estrecha, con menos surcos.
07.04.2023 - 00:07
![]() Monica wrote:
Monica wrote:
Ich habe die Maschenzahl für die Jacke in Große S gesteickt, aber nach dem Passe und das Abzählen sind zu wenig Maschen übrig... was soll ich machen
02.04.2023 - 23:12DROPS Design answered:
Liebe Monica, beim Lochmuster sollen Sie beachten, daß es genauso viele Umschläge als Abnahme gibt (noch kommen die Raglanzunahmen dazu). Am besten benutzen Sie Markierer, es kann Ihnen helfen, die Diagramme zu folgen. Viel Spaß beim stricken!
11.04.2023 - 10:55
|
|||||||||||||
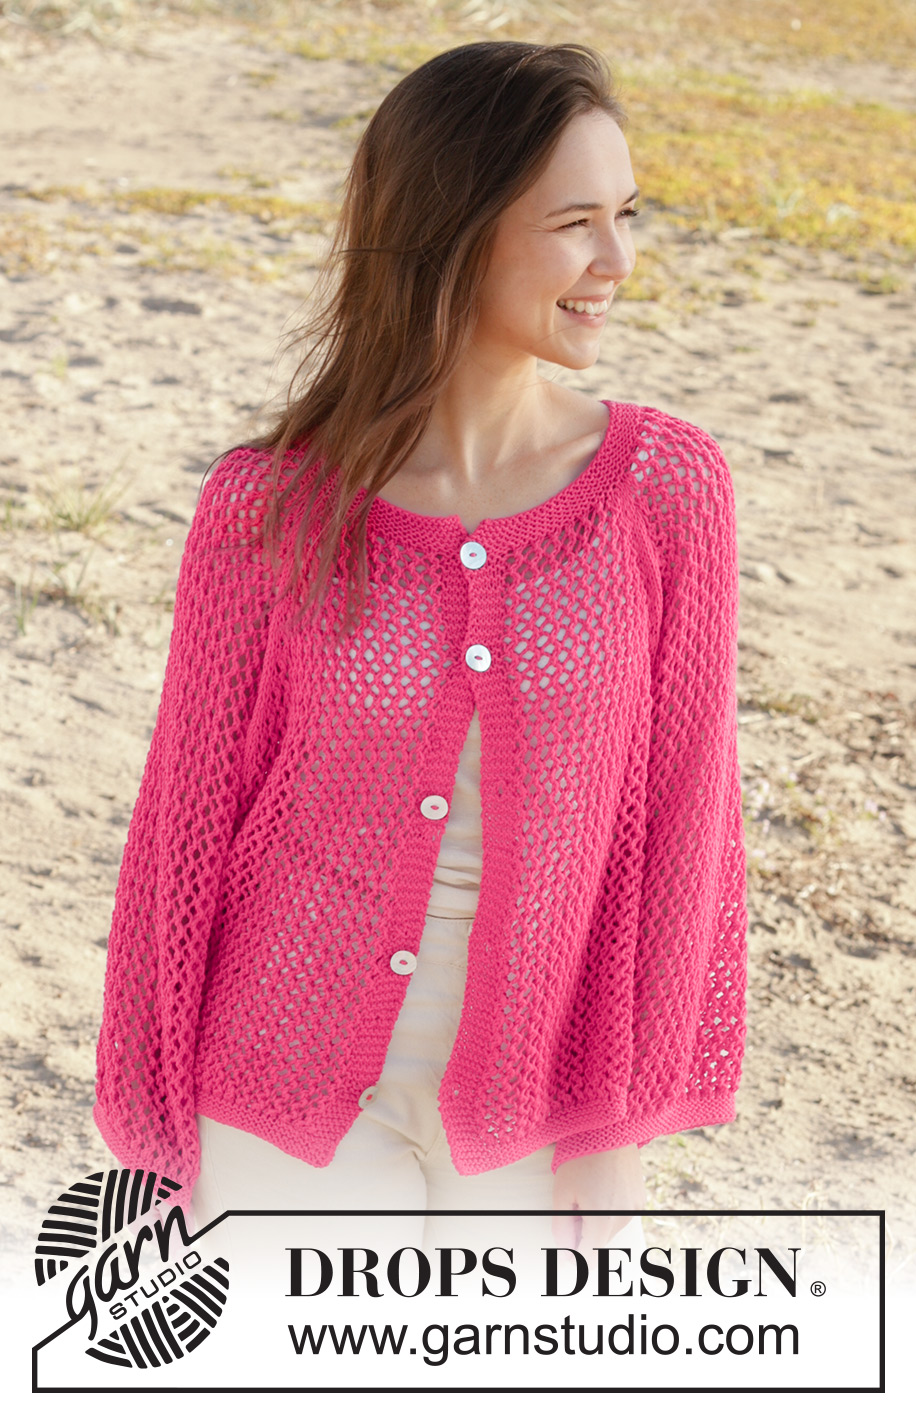
Feel the Beat Cardigan#feelthebeatcardigan |
|||||||||||||
 |
 |
||||||||||||
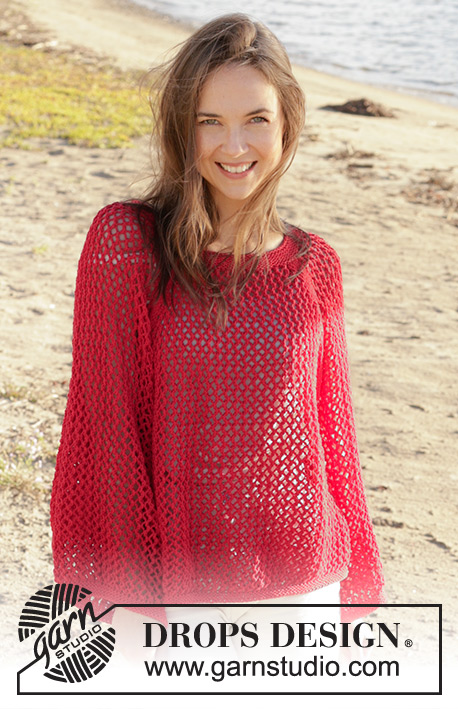
Knitted jacket in DROPS Cotton Light. The piece is worked top down with raglan and lace pattern. Sizes XS - XXL.
DROPS 240-25 |
|||||||||||||
|
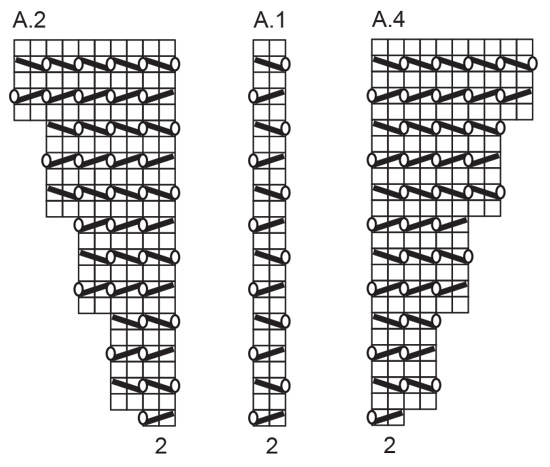
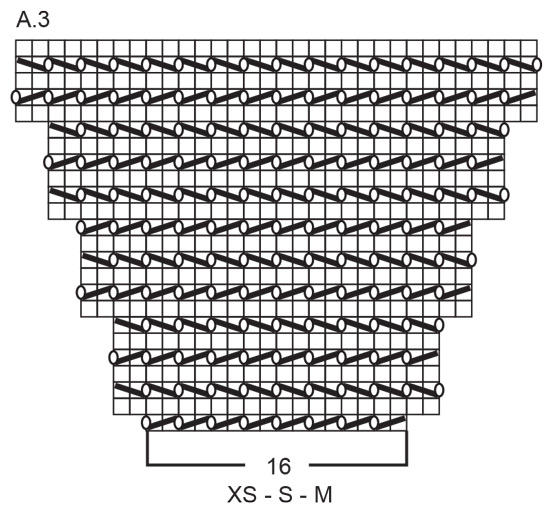
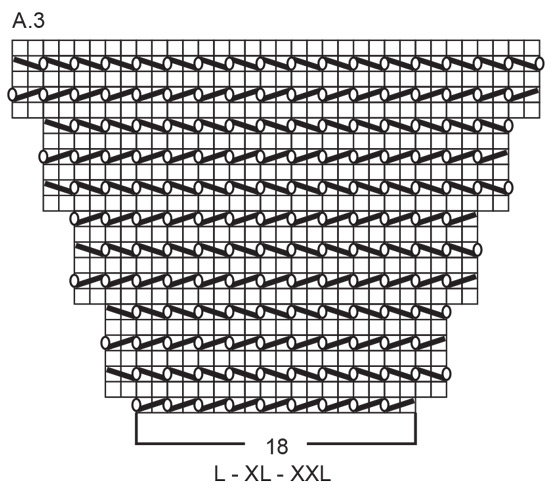
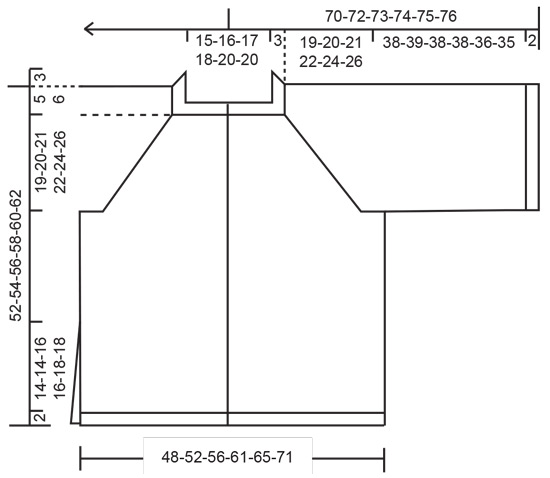
------------------------------------------------------- EXPLANATIONS FOR THE PATTERN: ------------------------------------------------------- RIDGE/GARTER STITCH (worked back and forth): Knit all rows. 1 ridge = knit 2 rows. PATTERN: See diagrams A.1 to A.4. Choose diagram for your size (applies to A.3). The diagrams show all rows in the pattern from the right side. RAGLAN: All increases are worked from the right side. There are 4 stocking stitches in each raglan-line. The marker-threads sit in the middle of these 4 stitches. Increase 4 stitches in each raglan-line, (i.e. 2 stitches towards the right before the marker-thread and 2 stitches towards the left after the marker-thread). Increase as follows: BEFORE MARKER-THREAD: Work until there are 2 stitches left before the marker-thread, use the left needle to pick up the strand between 2 stitches from the previous round, pick up strand from behind and knit the front loop, knit 1, use the left needle to pick up the strand between 2 stitches from the previous round as before and knit the front loop, knit 1. AFTER MARKER-THREAD: Knit 1, use the left needle to pick up the strand between 2 stitches from the previous round, pick up strand from the front and knit the back loop, knit 1, use the left needle to pick up the strand between 2 stitches from the previous round as before and knit the back loop. BUTTONHOLES: Work buttonholes on the right band (when the garment is worn). Work from the right side when there are 4 stitches left on the row as follows: Make 1 yarn over, knit 2 together and knit 2. On the next row (wrong side), knit the yarn over to leave a hole. The first buttonhole is worked when the rib on the neck is finished. The other 4-4-5-5-5-5 buttonholes are worked with approx. 9-9½-8-8½-9-9½ cm between each one. ------------------------------------------------------- START THE PIECE HERE: ------------------------------------------------------- JACKET – SHORT OVERVIEW OF THE PIECE. The neck and yoke are worked back and forth with circular needle, from mid front and top down. The yoke is divided for the back piece, front pieces and sleeves and each is finished separately, back and forth with circular needle. The piece is sewn together leaving a split in each side. NECK: Cast on 118-120-126-130-136-140 stitches with circular needle size 3 mm and DROPS Cotton Light. Work 6 RIDGES back and forth – read description above. YOKE: Change to circular needle size 4 mm. Insert 1 marker inside the outermost 6 stitches on one side; the yoke is measured from this marker! Knit 1 row from the right side – remember the BUTTONHOLES on the right band – read description above. Purl 1 row from the wrong side with the outermost 6 stitches on each side in garter stitch (bands). Insert 4 marker-threads, without working the stitches and inserted between 2 stitches as follows: Count 22-22-24-24-26-26 stitches (front piece), insert 1 marker-thread, count 20-20-20-22-22-22 stitches (sleeve), insert 1 marker-thread, count 34-36-38-38-40-44 stitches (back piece), insert 1 marker-thread, count 20-20-20-22-22-22 stitches (sleeve), insert 1 marker-thread. There are 22-22-24-24-26-26 stitches left after the last marker-thread (front piece). Work the first row from the right side as follows: 6 garter stitches, work A.1 6-6-7-7-8-8 times, A.2, increase for RAGLAN before and after the marker-thread – read description above (4 stitches increased), work A.3 (sleeve), increase for raglan before and after the marker-thread, work A.4, then A.1 13-14-15-15-16-18 times, A.2, increase for raglan before and after the marker-thread, work A.3 (sleeve), increase for raglan before and after the marker-thread, work A.4, then A.1 6-6-7-7-8-8 times, 6 garter stitches = 134-136-142-146-152-156 stitches. Continue this pattern and increase for raglan every 6th row. Each time you increase, there is room for 1 more repeat of A.1 in width – i.e. the lace pattern is always worked up to the 4 stitches in each raglan-line. REMEMBER THE KNITTING TENSION! When you have increased for raglan 7-8-8-9-9-10 times, there are 230-248-254-274-280-300 stitches. The increases are finished in sizes XS and S. Go to ALL SIZES. In the other sizes continue as follows: SIZE M: The increases are finished on the front/back pieces. Continue the pattern for 5 rows without increasing. The next row is worked as follows from the right side: Increase for raglan only on the sleeves (8 stitches increased) = 262 stitches. Go to ALL SIZES. SIZES L, XL and XXL: The increases are finished on the sleeves. Continue the pattern for 5 rows without increasing. The next row is worked as follows from the right side: Increase for raglan only on the back and front pieces (8 stitches increased) = 282-288-308 stitches. Go to ALL SIZES. ALL SIZES: = 230-248-262-282-288-308 stitches. Continue the pattern back and forth without further increases (with 4 stocking stitches in each raglan-line and the bands in garter stitch) until the yoke measures 19-20-21-22-24-26 cm from the marker on the neck. On the next row from the right side divide the piece as follows: Work 38-40-42-46-48-50 stitches (left front piece), place the next 44-48-52-54-54-58 stitches on a thread for the sleeve, place the next 66-72-74-82-84-92 stitches on a thread for the back piece, place the next 44-48-52-54-54-58 stitches on a thread for the sleeve and place the last 38-40-42-46-48-50 stitches on a thread for the right front piece. Each piece is finished separately. LEFT FRONT PIECE: After the 38-40-42-46-48-50 stitches worked from the right side, cast on 4-4-6-6-8-8 stitches (in side under sleeve) = 42-44-48-52-56-58 stitches. Continue the pattern back and forth with 4 garter stitches towards the side and 6 garter stitches mid-front – make sure the pattern matches the yoke. When the piece measures 26-27-28-28-28-28 cm from the division, and the next row is from the right side, change to needle size 3 mm. Work 4 ridges over all stitches and increase 14-17-17-18-18-23 stitches evenly on the first row (do not increase over the band or edge stitches) = 56-61-65-70-74-81 stitches. Cast off with knit from the right side. The piece measures approx.52-54-56-58-60-62 cm from the shoulder. RIGHT FRONT PIECE: Cast on 4-4-6-6-8-8 stitches with circular needle size 4 mm, then work pattern as before from the right side over the 38-40-42-46-48-50 stitches on the right front piece = 42-44-48-52-56-58 stitches. Continue the pattern back and forth with 4 garter stitches towards the side and 6 garter stitches mid-front – make sure the pattern matches the yoke. When the piece measures 26-27-28-28-28-28 cm from the division, and the next row is from the right side, change to needle size 3 mm. Work 4 ridges over all stitches and increase 14-17-17-18-18-23 stitches evenly on the first row = 56-61-65-70-74-81 stitches. Cast off with knit from the right side. BACK PIECE: Cast on 4-4-6-6-8-8 stitches with circular needle size 4 mm, then work pattern as before from the right side over the 66-72-74-82-84-92 stitches on the back piece, cast on 4-4-6-6-8-8 stitches at the end of the row = 74-80-86-94-100-108 stitches. Continue the pattern back and forth with 4 garter stitches on each side. When the piece measures 26-27-28-28-28-28 cm from the division, and the next row is from the right side, change to needle size 3 mm. Work 4 ridges over all stitches and increase 26-30-32-34-36-42 stitches evenly spaced = 100-110-118-128-136-150 stitches. Cast off with knit from the right side. SLEEVES: Cast on 4-4-6-6-8-8 stitches with circular needle size 4 mm and continue the pattern from the right side over the 44-48-52-54-54-58 sleeve stitches on one side of the piece. Cast on 4-4-6-6-8-8 stitches at the end of the first row = 52-56-64-66-70-74 stitches. Continue with 4 garter stitches on each side – make sure the pattern matches the yoke. When the sleeve measures 38-39-38-38-36-35 cm from the division, and the next row is from the right side, change to needle size 3 mm. Work 4 ridges over all stitches and increase 22-22-26-26-28-28 stitches evenly on the first row = 74-78-90-92-98-102 stitches. Cast off with knit from the right side. The sleeve measures approx. 40-41-40-40-38-37 cm from the division. Work the other sleeve in the same way. ASSEMBLY: Sew the sleeve seams in the outermost loop of the outermost stitch so the seam is flat. Sew the side seams in the same way – start at the armhole and work down, leaving a 16-16-18-18-20-20 cm split at the bottom. Sew the openings under the sleeves. Sew the buttons onto the left band. |
|||||||||||||
Diagram explanations |
|||||||||||||
|
|||||||||||||
 |
|||||||||||||
 |
|||||||||||||
 |
|||||||||||||
 |
|||||||||||||
Have you finished this pattern?Tag your pictures with #dropspattern #feelthebeatcardigan or submit them to the #dropsfan gallery. Do you need help with this pattern?You'll find 27 tutorial videos, a Comments/Questions area and more by visiting the pattern on garnstudio.com. © 1982-2026 DROPS Design A/S. We reserve all rights. This document, including all its sub-sections, has copyrights. Read more about what you can do with our patterns at the bottom of each pattern on our site. |
|||||||||||||


With over 40 years in knitting and crochet design, DROPS Design offers one of the most extensive collections of free patterns on the internet - translated to 17 languages. As of today we count 324 catalogues and 12290 patterns translated into English (UK/cm). 12290
We work hard to bring you the best knitting and crochet have to offer, inspiration and advice as well as great quality yarns at incredible prices! Would you like to use our patterns for other than personal use? You can read what you are allowed to do in the Copyright text at the bottom of all our patterns. Happy crafting!
Post a comment to pattern DROPS 240-25
We would love to hear what you have to say about this pattern!
If you want to leave a question, please make sure you select the correct category in the form below, to speed up the answering process. Required fields are marked *.