
Popular categories
Looking for a yarn?


Comments / Questions (50)
![]() Yvette wrote:
Yvette wrote:
I’m trying to understand the increases for neckline (M). So, you should have 8 stitches increases for raglan, which are done before/after A1 in 1st row? We are starting 2 stitches before marker 3, so it’s 1knit, 1 increase, 1 purl, 1 increase, 1 knit (market), 1 increase, 1 purl, 1 increase ? And on the next rows? Increases for raglan before marker stitch, not before A1, as A1 only worked on 1st row?
08.01.2025 - 15:18DROPS Design answered:
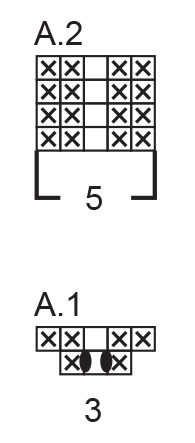
Hi Yvette, A.1 is worked on each raglan-line and consists of 3 stitches on row 1, with the marker in the middle stitch. So you start A.1 from the right side, one stitch before the marker-stitch, purl 1, make 1 yarn over, knit the marker-stitch, make 1 yarn over and purl 1. This is the same on each raglan-line. A.1 consists of 5 stitches on row 2 (from the wrong side) and you purl 1, then purl the yarn over twisted (through the back loop to avoid a hole), knit the marker-stitch, purl the yarn over twisted and purl 1. After A.1 is finished youincrease before and after A.2 in each raglan-line. Happy knitting!
09.01.2025 - 11:00
![]() Pk wrote:
Pk wrote:
I just finished the neckline section for size L. My double neck ended with 100 stitches but the neckline ended with 124. I did the increases as follows= 8 - 4 - 8- 4=24. But the yoke calls for 132 stitches?
03.01.2025 - 17:51DROPS Design answered:
Dear Pk, remeber that in chart A.1 you increase 2 stitches per repeat of A.1 in the first row. You have 4 markers, so you increase 8 stitches in total in the row, apart from the 8 stitches before and after the charts. So you would increase: 16 (8+8) - 4 - 8 - 4 = 132 stitches. Happy knitting!
05.01.2025 - 19:16
![]() Jonna Sørensen wrote:
Jonna Sørensen wrote:
Hvor kan jeg se målene. brystvidden på eksempelvis str S?
23.11.2024 - 20:20DROPS Design answered:
Hei Jonna. Målskisse av plagget finner du helt nederst. Målene står i cm. Det er samme mål nederst som det er over brystet. mvh DROPS Design
25.11.2024 - 14:21
![]() Bernike Pasveer wrote:
Bernike Pasveer wrote:
Ik heb 2 vragen: - aan het eind van 'Dubbele hals' staat: knip de draad af. Betekent dat dat je met een nieuwe draad verder gaat voor de 'Halslijn'? En waarom moet dat? - voor een verkorte toer moet je het werk keren. Maar ik brei rond, dus dan wordt het werk toch niet gekeerd?
21.11.2024 - 22:32DROPS Design answered:
Dag Bernike,
Om een verhoging te maken bij de hals moet het werk halverwege keren om verkorte toeren te breien, om zo de hals aan de achterkant hoger te maken. Dus ook als je in de rondte breit. Als je klaar bent met de verkorte toeren knip je de draad af en hecht je de draad weer aan aan het begin van de toer.
01.12.2024 - 13:39
![]() Katharina wrote:
Katharina wrote:
Guten Tag, ich hätte eine Frage zur Halsblende: am Schluss steht da (Gr. M) "die letzten 11 Maschen rechts stricken...". Jedoch bleiben dann noch 4 Maschen übrig. Ist das ein Fehler in der Beschreibung oder verstehe ich etwas falsch? Vielen Dank schonmal und liebe Grüße, Katharina
03.11.2024 - 15:19DROPS Design answered:
Liebe Katharina, beachten Sie, daß in diesem Modell, die 4 Markierungen für den Raglan in einer Masche- und nicht zwischen 2 Maschen - eingesetzt werden, so haben Sie in M: (12+1)+1+21+1+(23+2)+1+21+1+(11+1)=92M + 4 Zunahmen= 96 Maschen. Viel Spaß beim Stricken!
04.11.2024 - 09:29
![]() Marie-Françoise Alriq wrote:
Marie-Françoise Alriq wrote:
Je tricote la taille L. Après avoir tricoté l'encolure je me retrouve avec un empiècement de 108 mailles et non 132 !!! Un peu perdue...
19.10.2024 - 12:33DROPS Design answered:
Bonjour Mme Alriq, au 1er rang de A.1 vous allez augmenter 2 m dans chaque A.1, soit 8 augmentations au total, puis vous augmentez 24 mailles pour le raglan (8 m au 1er rang, 4 m au 2ème rang, 8 m au 3ème rang et 4 m au 3ème rang) = 100+8+24=132 mailles. Bon tricot!
21.10.2024 - 07:57
![]() Melanie wrote:
Melanie wrote:
Estoy tejiendo una talla CL Ya terminé hasta el camesú con 224 puntos pero está confunsa la parte después de eso cada 2 vueltas hago el cuerpo y cada 4 las mangas es decir cuando haga las mangas aumentaré 8 puntos? Y cuál es el total de aumentos de manga y cuerpo en total el patrón está un poco confuso
25.09.2024 - 15:29DROPS Design answered:
Hola Melanie, quiere decir que trabajas como sigue: 1 vuelta sin aumentos, 1 vuelta de aumentos en el cuerpo solo, 1 vuelta sin aumentos, 1 vuelta con aumentos en mangas y cuerpo. Para aumentar solo en el cuerpo, aumentas antes de los marcadores 1 y 3 y después del 2 y 4 (por el lado derecho), o después del 1 y 3 y antes del 2 y 4 (por el lado revés) (= 4 puntos aumentados). Para aumentar en mangas y cuerpo, aumenta a ambos lados de los 4 marcadores. Repites estas 4 vueltas 8 veces, para aumentar 8 veces en las mangas y 16 en el cuerpo (ya que en la 4ª vuelta aumentas en el cuerpo y las mangas). El 31 y 21 veces en total está incluyendo los aumentos antes de llegar a 224 puntos.
29.09.2024 - 19:24
![]() Melanie wrote:
Melanie wrote:
En la línea de escote para talla XL terminó con 128 puntos no con 136 esa parte no la tengo muy clara serían 16 puntos aumentados pero en se supone que A1 es el raglán. Donde se hacen exactamente los aumentos. La 2da duda es después de tejer las 11 vueltas de aumentos, no entiendo como hacer la división de los aumentos del cuerpo y las mangas es decir en el raglán aumentos solo 1 punto en la parte del frente y trasero y ninguno en la mangas?
21.09.2024 - 01:34DROPS Design answered:
Hola Melanie, en la línea del escote, te explican 4 filas de aumentos. En la 1ª y la 3ª trabajas aumentos antes y después de cada uno de los 4 marcapuntos, por lo tanto aumentas 8 puntos. En la 2ª y la 4ª aumentas solo para las secciones del cuerpo (antes de los marcadores 1 y 3 y después del 2 y 4 cuando se teje por el LD, después del marcadores 1 y 3 y antes del 2 y 4 cuando se teje por el lado LR). Puedes ver más información sobre cómo trabajar estos aumentos en la sección EXPLICACIONES PARA REALIZAR EL PATRÓN, en RAGLÁN. Al aumentar solo en el cuerpo los aumentos se hacen en todos los marcapuntos, pero en el lado que esté más cerca a las piezas del cuerpo.
23.09.2024 - 00:37
![]() Amber wrote:
Amber wrote:
Me again. Where do I make the increases in A2?
09.06.2024 - 20:07DROPS Design answered:
Dear Amber, you increase before or after A.2, not inside it. These increases are explained in the RAGLAN section. Increase for the body before markers 1 and 3 and after markers 2 and 4 when working from the right side, after markers 1 and 3 and before markers 2 and 4 when working from the wrong side. Increase for the sleeves after markers 1 and 3 and before markers 2 and 4. Always increase from the right side on the sleeves. You increase for the body on alternate rounds (one with increases, one without) while you increase for the sleeves every 4th round (3 rounds without increases, one with increases). Happy knitting!
09.06.2024 - 22:54
![]() Amber wrote:
Amber wrote:
Hello again, I am knitting 233 -10. I have finished the short rows. So now I am starting the yoke. I don't understand diagram A2. Please can you explain.
03.06.2024 - 12:25DROPS Design answered:
Dear Amber, when you work the short rows on neckline, you read the RS rows from the right towards the left and the WS rows from the left towards the right - when working A.2 in the round, always read from the right towards the left every row, so last row in A.1 and all rows in A.2 are worked as follows, seen from RS: P2, K1, P2. Happy knitting!
03.06.2024 - 12:55
|
||||||||||
Spice Market#spicemarketsweater |
||||||||||
 |
 |
|||||||||
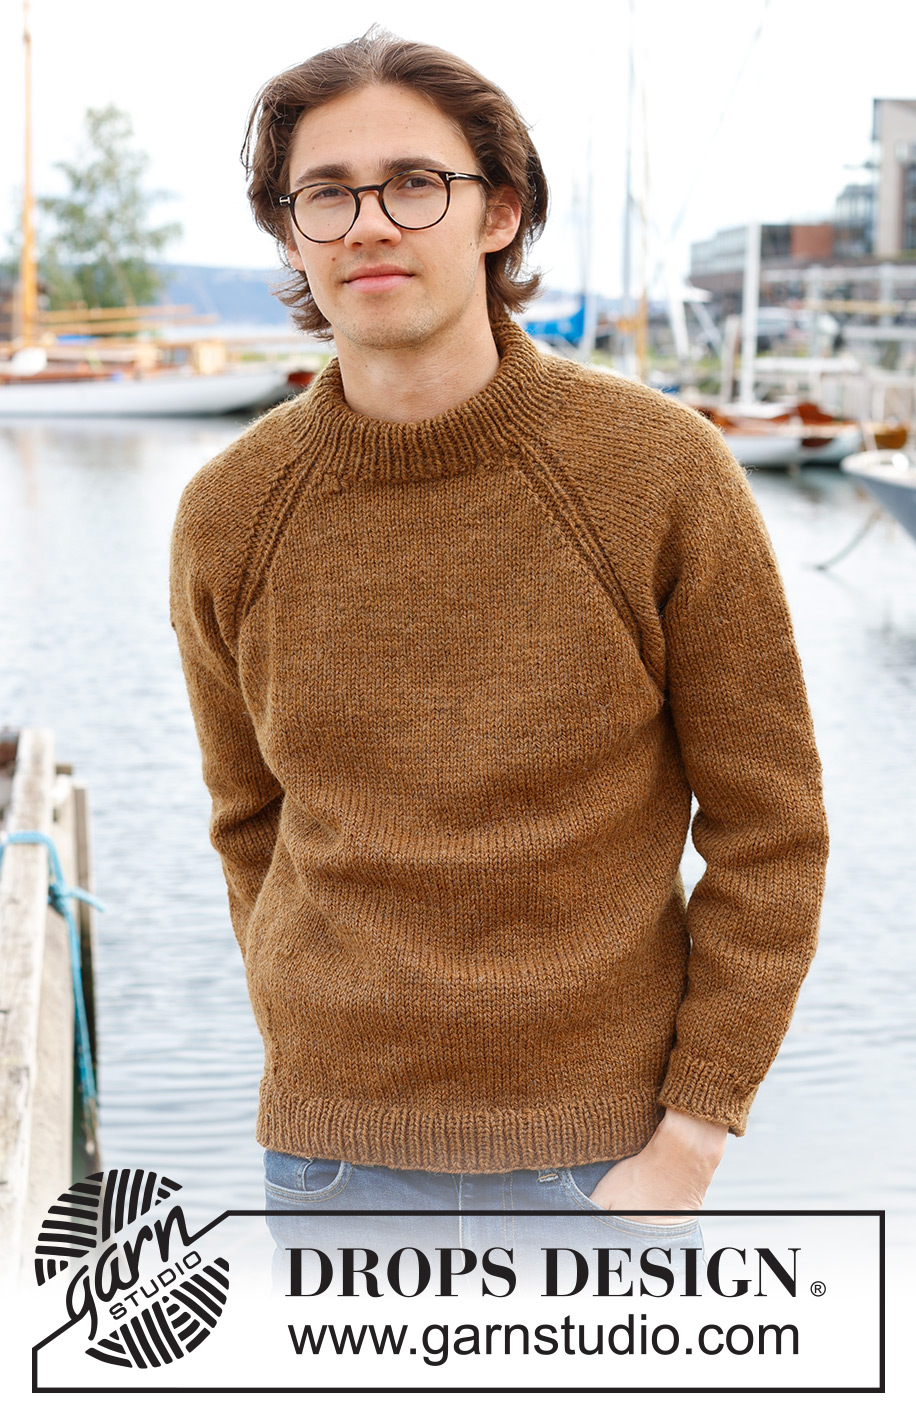
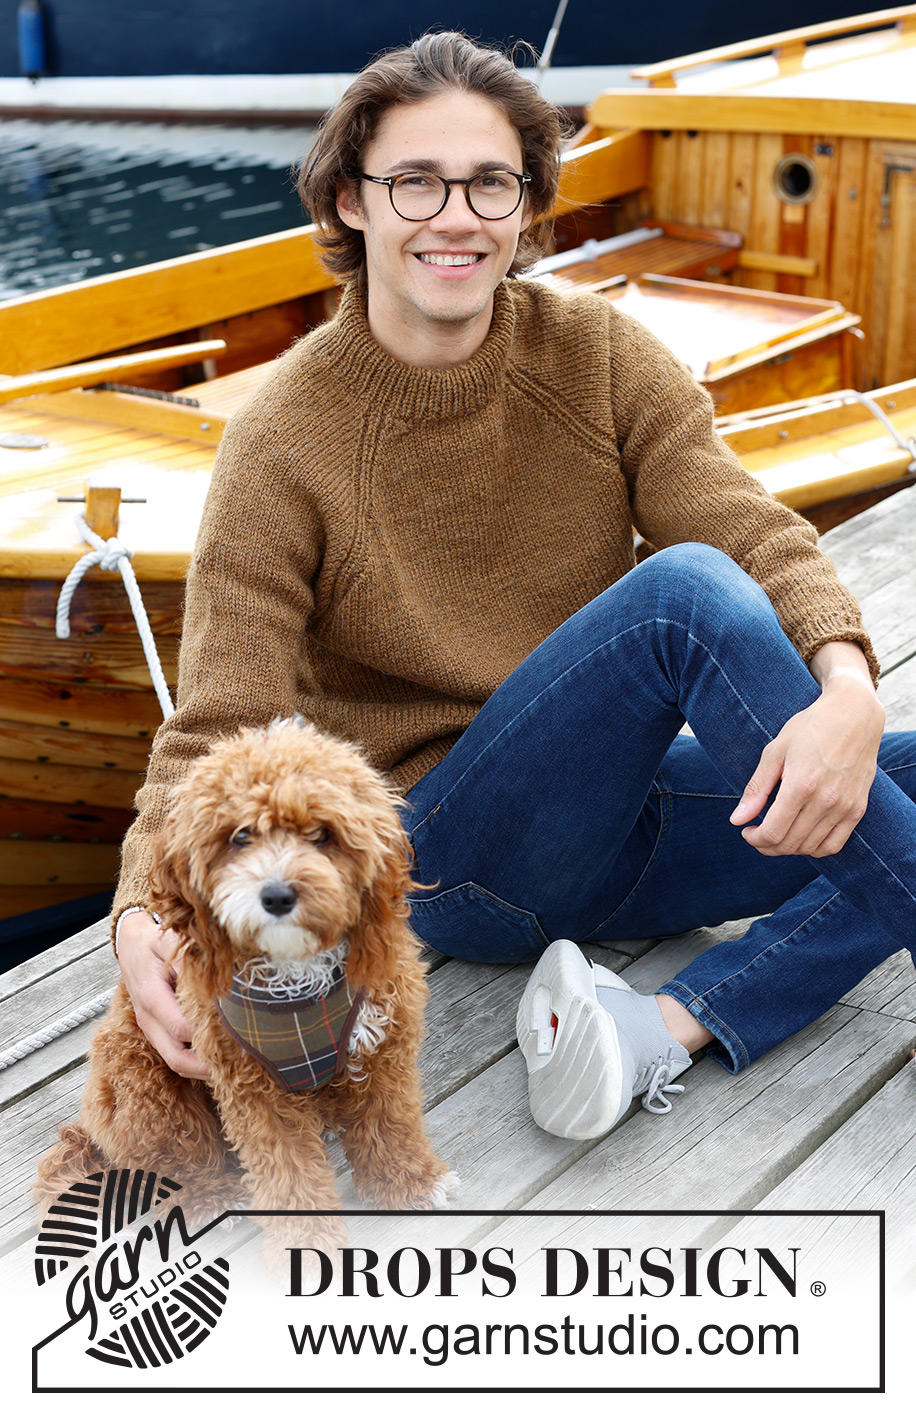
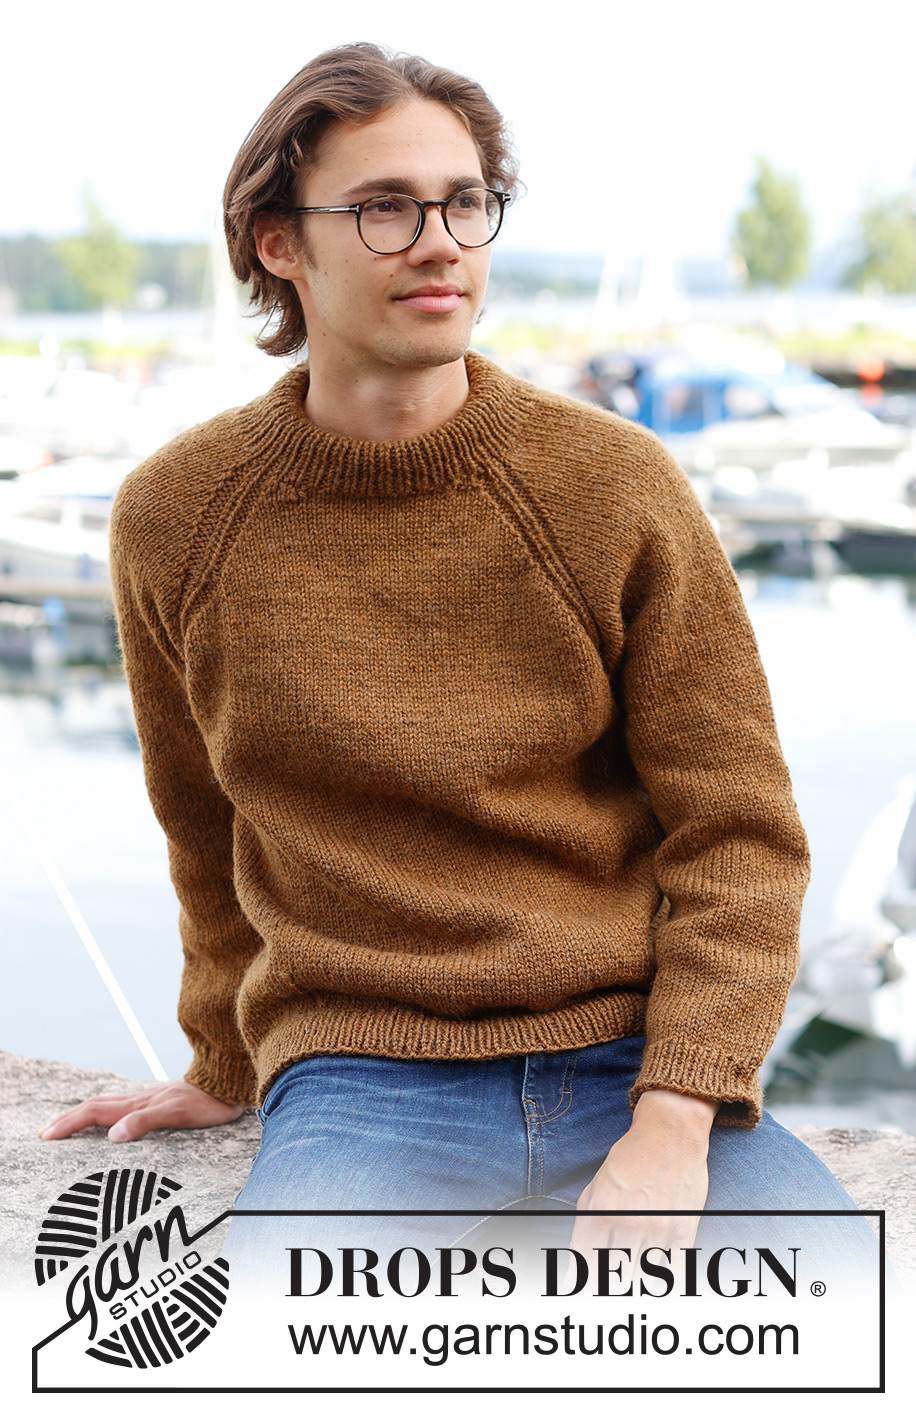
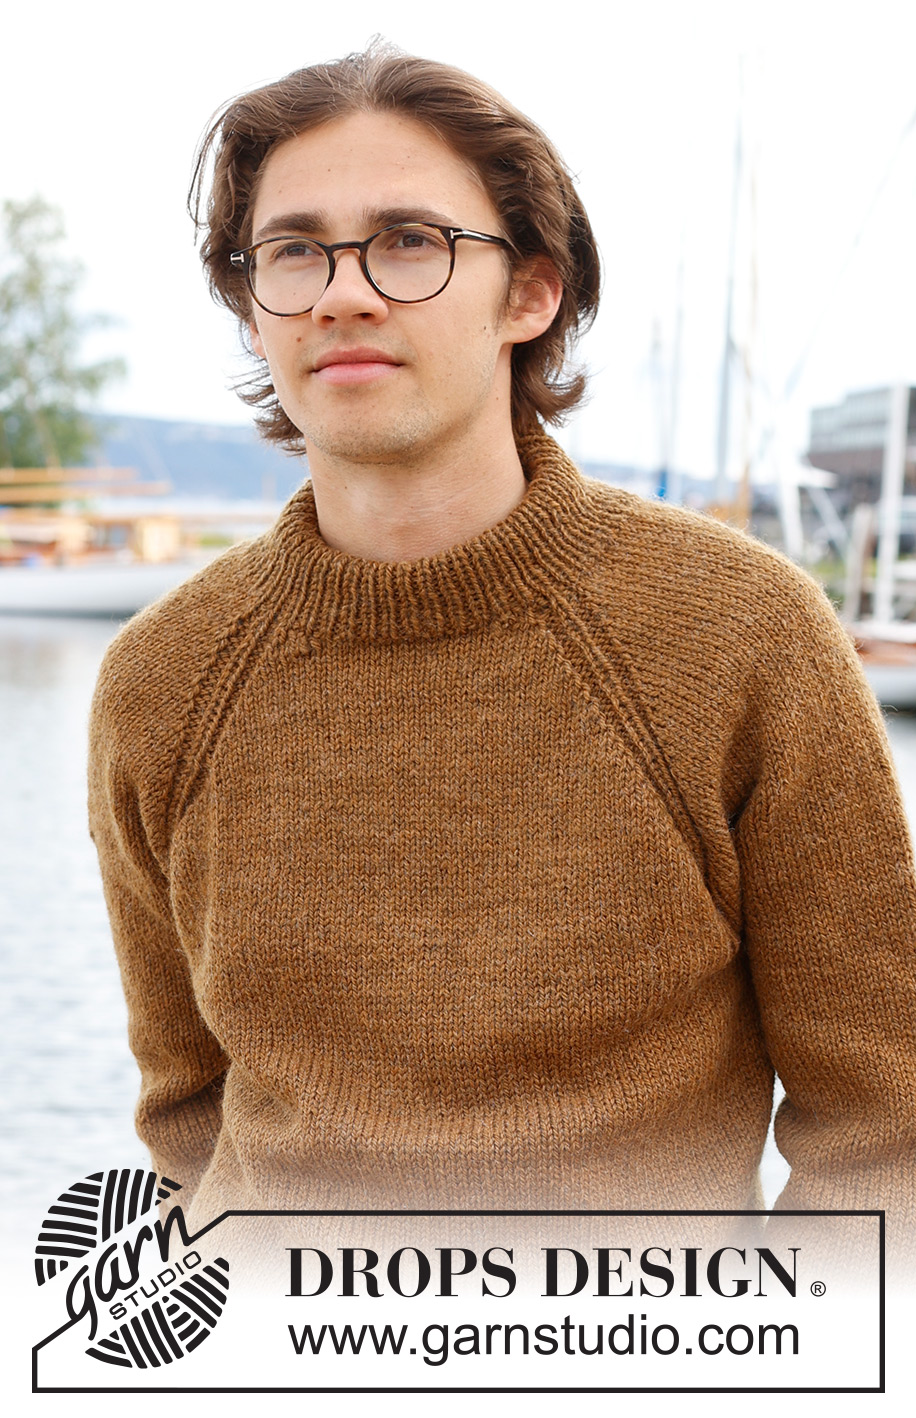
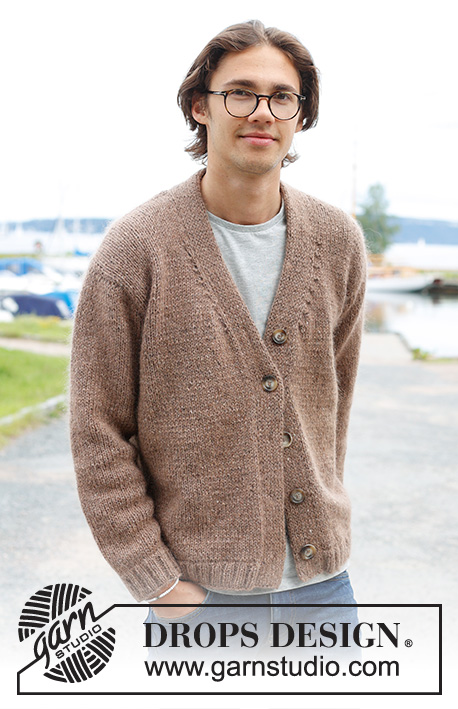
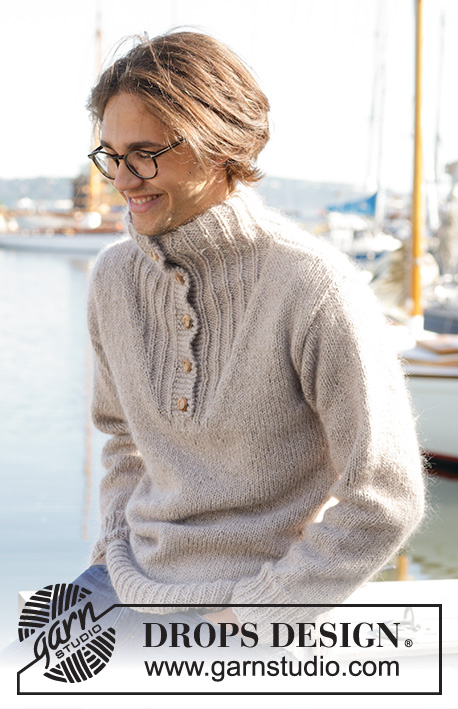
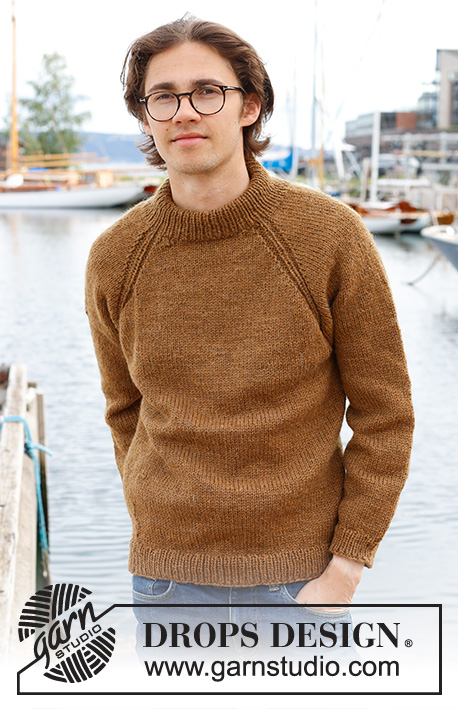
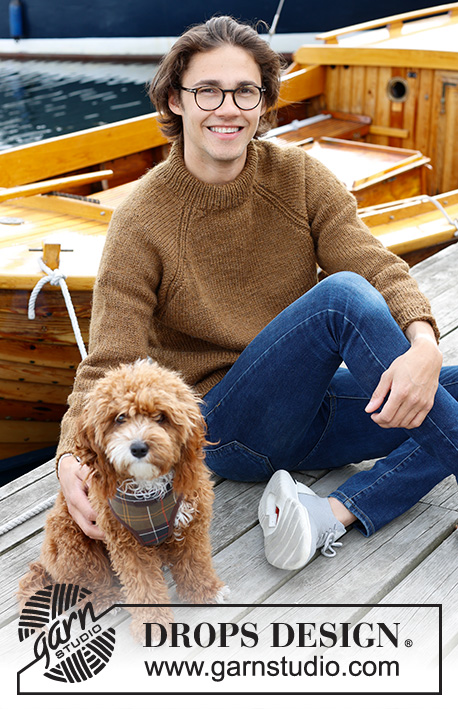
Knitted jumper for men in DROPS Alaska. The piece is worked top down with stocking stitch, double neck and raglan. Sizes S - XXXL.
DROPS 233-10 |
||||||||||
|
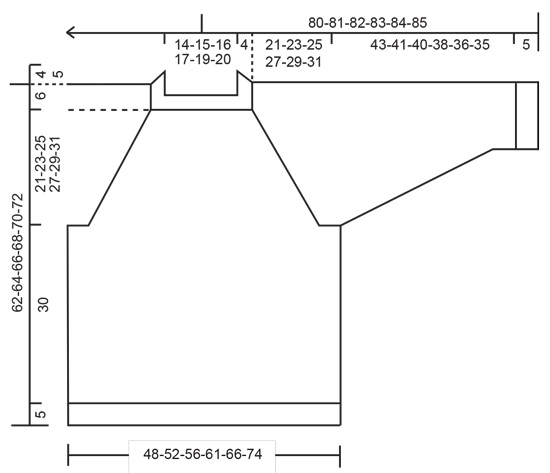
------------------------------------------------------- EXPLANATIONS FOR THE PATTERN: ------------------------------------------------------- PATTERN: See diagrams A.1 and A.2. The diagrams show all rows in the pattern from the right side. RAGLAN: Increases vary on the body and sleeves and in the different sizes. Increase before/after A.1/A.2 (the marker-stitch is the middle stitch in A.1/A.2). Increase for the body before markers 1 and 3 and after markers 2 and 4 when working from the right side, after markers 1 and 3 and before markers 2 and 4 when working from the wrong side. Increase for the sleeves after markers 1 and 3 and before markers 2 and 4. Always increase from the right side on the sleeves. Increase by making 1 yarn over. When working back and forth work the yarn overs from the wrong side as follows: BEFORE A.1/A.2: Purl the back loop. No hole. AFTER A.1/A.2: Slip the yarn over off the needle and replace it twisted (insert the left needle from the back when replacing it). Purl the front loop. No hole. When working back and forth work the yarn overs from the right side as follows (also applies when working in the round): BEFORE A.1/A.2: Slip the yarn over off the needle and replace it twisted (insert the left needle from the back when replacing it). Knit the front loop (the stitch twists to the right. No hole. AFTER A.1/A.2 Knit the back loop (the stitch twists to the left). No hole. DECREASE TIP (for sleeves): Start 3 stitches before the marker, knit 2 together, knit 2 (marker sits between these 2 stitches), slip 1 stitch as if to knit, knit 1 and pass the slipped stitch over the knitted stitch. ------------------------------------------------------- START THE PIECE HERE: ------------------------------------------------------- JUMPER – SHORT OVERVIEW OF THE PIECE: The neck and yoke are worked in the round with circular needle, from mid back and top down. The yoke is divided for body and sleeves and the body is continued in the round with circular needle. The sleeves are worked with short circular needle/double pointed needles. DOUBLE NECK: Cast on 88-92-96-100-104-108 stitches with short circular needle size 5 mm and DROPS Alaska. Change to circular needle size 4 mm and work rib in the round (knit 1, purl 1) for 9-9-9-11-11-11 cm. On the next round insert 4 markers and increase 4 stitches as described below. The markers are used when increasing for raglan (each marker is inserted in a knitted stitch from the rib): Knit 10-12-12-14-14-16 and increase 1 stitch (half back piece), insert marker-1 in the next stitch, knit 21 (sleeve), insert marker-2 in the next stitch, knit 21-23-25-27-29-31 and increase 2 stitches evenly spaced (front piece), insert marker-3 in the next stitch, knit 21 (sleeve), insert marker-4 in the next stitch, knit the last 11-11-13-13-15-15 stitches and increase 1 stitch (half back piece) = 92-96-100-104-108-112 stitches. Cut the strand. NECKLINE: Change to circular needle size 5 mm and work a neckline with short rows, AT THE SAME TIME increase for raglan as described below. In addition work A.1 at each marker (the marker-stitches are the middle stitches in each A.1). Start from the right side 2 stitches before marker-stitch-3 (front left neck when the garment is worn). Work stocking stitch, A.1 and increase for RAGLAN – read description above, until you have worked 2 stitches past marker-stitch-2 (front right of neck and 8 stitches increased for raglan). Turn, tighten the strand and work from the wrong side (increasing for raglan on the body only) to 2 stitches past where the short rows began by marker-3 (4 increased stitches). Turn and work from the right side, increasing for raglan and working A.2 over A.1, to 2 stitches past where you turned last time by marker-2. Turn, tighten the strand and work from the wrong side (increasing for raglan on the body only) to 2 stitches past marker-3. Cut the strand. YOKE: = 124-128-132-136-140-144 stitches. Work in the round over all stitches as follows: SIZES S, M, L and XL: Start mid-back, work stocking stitch and A.2 and increase for raglan on the body and sleeves every 2nd round 2-8-10-11 times = 140-192-212-224 stitches. Continue working and increasing, but every 2nd increase is only on the body (4 stitches increased); i.e. increase on the body every 2nd round and on the sleeves every 4th round. Increase like this 18-15-14-16 times on the body (9-7-7-8 times on the sleeves). A total of 24-27-28-31 times on the body and 13-17-19-21 times on the sleeves. After the last increase there are 248-280-296-320 stitches. Go to ALL SIZES. SIZES XXL and XXXL: Start mid-back, work stocking stitch and A.2, continuing to increase for raglan on the body on every round 2-6 more times and every other round on the sleeves1-3 more time = 152-180 stitches. Then increase on the body and sleeves every 2nd round 10-7 times = 232-236 stitches. Continue working and increasing, but every 2nd increase is only on the body (4 stitches increased); i.e. increase on the body every 2nd round and on the sleeves every 4th round. Increase like this 18-22 times on the body (9-11 times on the sleeves). A total of 34-39 times on the body and 22-23 times on the sleeves. After the last increase there are 340-368 stitches. Go to ALL SIZES. ALL SIZES. = 248-280-296-320-340-368 stitches. Continue with stocking stitch and A.2 without further increases until the piece measures 21-23-25-27-29-31 cm mid-front – measured from the neck. Now divide for the body and sleeves as follows: Work 37-42-43-48-51-58 stitches (half back piece), place the next 49-57-61-65-67-69 stitches on a thread for the sleeve, cast on 6-6-8-8-10-10 stitches (in side under sleeve), work 75-83-87-95-103-115 stitches (front piece), place the next 49-57-61-65-67-69 stitches on a thread for the sleeve, cast on 6-6-8-8-10-10 stitches (in side under sleeve), work the last 38-41-44-47-52-57 stitches (half back piece). Finish the body and sleeves separately. The piece is now measured from here! BODY: = 162-178-190-206-226-250 stitches. Work stocking stitch in the round until the body measures 30 cm from the division. Knit 1 round and increase 20-20-22-26-26-32 stitches evenly spaced = 182-198-212-232-252-282 stitches. Change to circular needle size 4 mm and work rib (knit 1, purl 1) for 5 cm. Cast off a little loosely with knit over knit and purl over purl. The jumper measures approx. 62-64-66-68-70-72 cm from the shoulder down. SLEEVES: Place the 49-57-61-65-67-69 stitches from the thread on the one side of the piece on short circular needle/double pointed needles size 5 mm and knit up 1 stitch in each of the 6-6-8-8-10-10 stitches cast on under the sleeve = 55-63-69-73-77-79 stitches. Insert a marker in the middle of the new stitches under the sleeve. Allow the marker to follow your work onwards; it is used when decreasing under the sleeve. Work stocking stitch in the round. When the sleeve measures 4 cm decrease 2 stitches on each side of the marker – read DECREASE TIP. Decrease like this every 6-3½-3-2½-2-2 cm a total of 7-10-12-13-15-15 times = 41-43-45-47-47-49 stitches. Continue working until the sleeve measures 43-41-40-38-36-35 cm from the division (or to desired length; there is approx. 5 cm left). Knit 1 round and increase 5-5-5-5-7-7 stitches evenly spaced = 46-48-50-52-54-56 stitches. Change to double pointed needles size 4 mm and work rib (knit 1, purl 1) for 5 cm. Cast off a little loosely with knit over knit and purl over purl. The sleeve measures approx. 48-46-45-43-41-40 cm from the division. Work the other sleeve in the same way. ASSEMBLY: Fold the neck double to the inside and fasten with a stitch in each raglan-line. |
||||||||||
Diagram explanations |
||||||||||
|
||||||||||
 |
||||||||||
 |
||||||||||
Have you finished this pattern?Tag your pictures with #dropspattern #spicemarketsweater or submit them to the #dropsfan gallery. Do you need help with this pattern?You'll find 31 tutorial videos, a Comments/Questions area and more by visiting the pattern on garnstudio.com. © 1982-2026 DROPS Design A/S. We reserve all rights. This document, including all its sub-sections, has copyrights. Read more about what you can do with our patterns at the bottom of each pattern on our site. |
||||||||||


With over 40 years in knitting and crochet design, DROPS Design offers one of the most extensive collections of free patterns on the internet - translated to 17 languages. As of today we count 324 catalogues and 12245 patterns translated into English (UK/cm). 12245
We work hard to bring you the best knitting and crochet have to offer, inspiration and advice as well as great quality yarns at incredible prices! Would you like to use our patterns for other than personal use? You can read what you are allowed to do in the Copyright text at the bottom of all our patterns. Happy crafting!
Post a comment to pattern DROPS 233-10
We would love to hear what you have to say about this pattern!
If you want to leave a question, please make sure you select the correct category in the form below, to speed up the answering process. Required fields are marked *.