
Popular categories
Looking for a yarn?


Comments / Questions (29)
![]() Aster wrote:
Aster wrote:
Hallo, ja, Frau Yoruba hat ganz recht, das ist mir ebenfalls schon aufgefallen. Könnten Sie bitte Ihre Anleitung dahingehend korrigieren, denn es hat ja auch Auswirkungen auf die Abnahmen.
06.03.2020 - 09:57
![]() Yoruba wrote:
Yoruba wrote:
Sehr geehrte Damen und Herren, ich glaube, Sie haben ein grundlegendes Missverhältnis zur Mathematik. In den 300 Maschen sind bereits die Maschen für die Blende enthalten (Anleitung). Dagegen wird in der Skizze aber eine Länge in cm von max. 138 cm angeben. Mit der Maschenprobe sind es dann aufgerundet genau 290 Maschen, die angeschlagen werden müßten.
06.03.2020 - 09:42
![]() Yoruba wrote:
Yoruba wrote:
Die Erklärung unter dem unten genannten Link ist nicht korrekt, denn: “Mit hellgrau auf Rundstricknadel N. 4, 264 (280-300) M. anschlagen und 2 Krausrippen (siehe oben) stricken. Danach Muster M1 stricken, dabei für die Blenden die äußersten je 6 M kraus re stricken und mit den Knopflöchern (siehe oben) an der rechten Blenden beginnen.“ Das heißt also, dass die Maschen für die Blenden bereits mit eingerechnet wurden.
05.03.2020 - 18:03DROPS Design answered:
Liebe Yoruba, ja ganz genau, deshalb stimmen die Maschenanzahl. Viel Spaß beims tricken!
06.03.2020 - 08:55
![]() Yoruba wrote:
Yoruba wrote:
In der Anleitung DROPS 53-9 wird eine Maschenprobe von 21 M. x 28 R. auf Ndl. Nr. 4 und im Muster gestrickt = 10 x 10 cm angegeben. In der Skizze wird eine Gesamtbreite von 138 cm angegeben. In der Anleitung wird nun gesagt, für das Rumpfteil solle man 300 M. anschlagen. Nimmt man jetzt aber Ihre Maschenprobe zur Hilfe, dann ergibt die Berechnung für das Anschlagen der Maschen eine Maschenzahl von 290 (aufgerundet). Welche Maschenanzahl ist denn nun korrekt?
05.03.2020 - 16:14DROPS Design answered:
Liebe Yoruba, Sie brauchen 300 Maschen in die größte Größe, es sind noch 6 Maschen beidseitig für die Blenden. Viel Spaß beim stricken!
05.03.2020 - 17:00
![]() Marion Böhm wrote:
Marion Böhm wrote:
Hallo, ich habe mir gerade die anleitung ausgedruckt. Das Diagramm M1 für das Muster fehlt.
11.01.2020 - 16:56DROPS Design answered:
Liebe Marion, Sie finden M.1 unter dem Ärmel des Jackendiagramms. Viel Spaß beim stricken!
12.01.2020 - 23:55
![]() Judy Canning wrote:
Judy Canning wrote:
Hi, I am confused by the decrease directions after the sleeves are put on the needle. In one reading, it sounds like I only decrease every other row, and it also says every row. I got all the way to the collar, and the raglan angle was too short, and the overall a few inches shorter than needed. It seems like I need to do something different for the sleeve decreases, than the back and front decreases. Is there another set of directions for this pattern which would be more understandable?
27.12.2019 - 20:19DROPS Design answered:
Dear Mrs Canning, the decreases for raglan will be worked as follows: *Row 1: decrease, row 2: no decrease, row 3: decrease* and repeat these 3 rows (there will be then 2 decrease row next to each other when working row 1 after row 3). So that decreases will be made either from RS or from WS. Make also sure your tension in height is matching, otherwise your raglan will not be right. Happy knitting!
02.01.2020 - 11:54
![]() Nele wrote:
Nele wrote:
Hallo kann ich die raglanabnahme auch in einer Reihe komplett abnehmen oder warum getrennte Abnahme hin und rückreihe?
13.12.2019 - 10:52DROPS Design answered:
Liebe Nele, die Raglanabnhamen werden abwechselnd in jeder und in jeder 2. R. gearbeitet, deshalb werden die beiden Abnahmen (= bei den Hin- sowie bei den Rückreihen) erklärt. Viel Spaß beim stricken!
13.12.2019 - 11:33
![]() Judy Pietila Canning wrote:
Judy Pietila Canning wrote:
I have the same question as Janet Foster above. I love both sides. Is it possible to continue the pattern using either side as the “ front?”
15.11.2019 - 19:59DROPS Design answered:
Dear Mrs Canning, you might have to choose a right side and a wrong side when coming to yoke (raglan) and close the opening under sleeves. Happy knitting!
18.11.2019 - 08:26
![]() Henriette wrote:
Henriette wrote:
Het lukt mij niet om met een rondbreinaald te breien. Ik wil mijn truien gewoon met voor en achterpanden breien. Zijn de patronen ook te krijgen met 2 naalden breien? Hoe zet ik de patronen om?
09.11.2018 - 09:23DROPS Design answered:
Dag Mieke,
Omdat in dit patroon de pas in een keer gebreid wordt op de rondbreinaald is het niet geschikt om deze trui met rechte naalden te breien.
Algemene informatie over het aanpassen van patronen om met rechte naalden te breien vind je hier.
11.11.2018 - 13:34
![]() Lone wrote:
Lone wrote:
Er de eneste vrangmasker dem på mønsterpinden?
10.04.2015 - 19:57
|
|||||||
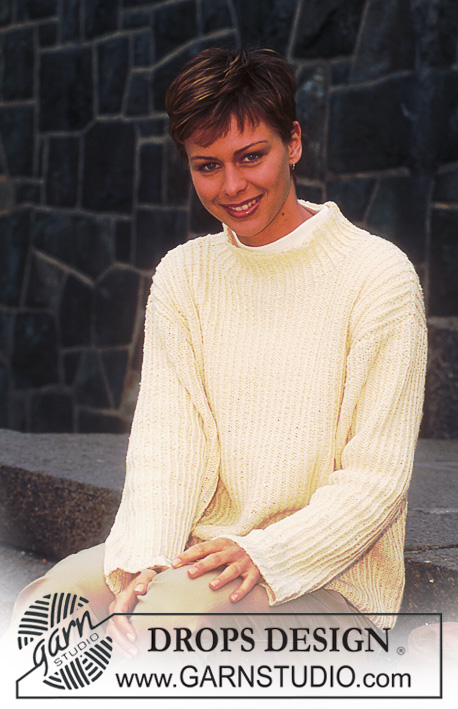
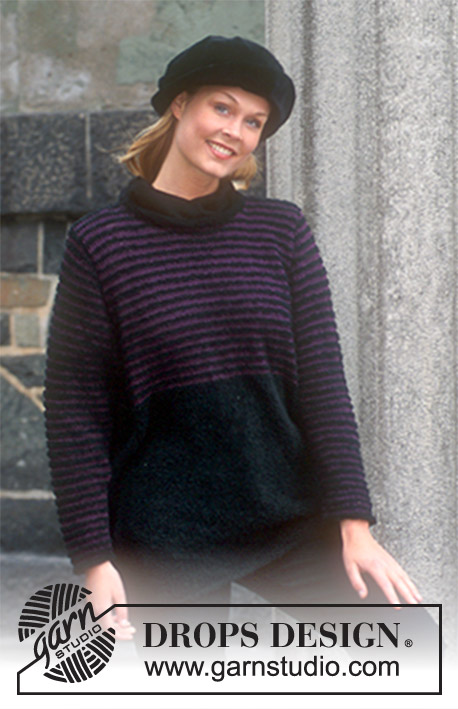
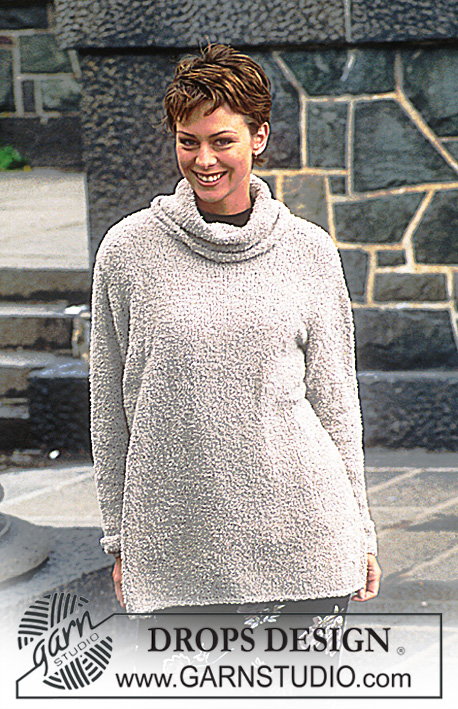
DROPS 53-9 |
|||||||
|
|
|||||||
DROPS Cardigan in Karisma Angora-Tweed.
DROPS 53-9 |
|||||||
|
Gauge: 21 sts and 28 rows in Pattern stitch = 10 x 10 cm Note: maintaining the gauge is especially important when shaping the raglan. Garter Stitch, when knitting flat: Knit all sts, all rows. Garter Stitch, when knitting in the round: *Rnd 1, knit. Rnd 2, purl *. Repeat from * - *. Rib: *knit 1, purl 1*. Repeat from * - *. Pattern: See chart. The pattern is seen from the right side. The chart is placed vertically on the page. NOTE: this is the pattern stitch written out: Row 1 (and all uneven rows): *K 1, P 1* Row 2 (and all even rows): knit all sts Buttonholes: when the work measures: 22 (27-30) cm 29 (34.5-38) cm 36 (42-46) cm 43 (49.5-54) cm 50 (57-62) cm 57 (65-70) cm bind off the 3rd and 4th sts and cast on 2 new sts over the bound-off sts on the next row. Body: Cast on 264 (280-300) sts and knit 4 rows garter st, then work in Pattern but keep the 6 sts at each side (the center front) in garter st for the buttonband for the entire body (remember buttonholes on the right buttonband - see instructions above). When the work measures 53 (59-63) cm knit the next row as follows: 6 sts garter st for the buttonband, 61 (65-70) sts for the front, bind off 4 sts for armhole, 122 (130-140) sts for the back, bind off 4 sts for armhole, 61 (65-70) sts for the front, 6 sts garter st for the button band. Put the work aside. Sleeves: Cast on 46 (46-48) sts on double pointed needles; join and place a marker at the join. Knit 4 rows garter stitch garter st, then work in Pattern. When the work measures 6 cm inc 1 st at each side of marker 25 (30-33) times Size S/M: every 4th row Size M/L: alternately every 3rd and 4th row Size XL: every 3rd row = 96 (106-114) sts. When the work measures 45 (44-43) cm, bind off 2 sts each side of marker = 92 (102-110) sts. Put the work aside. Body: Put the sleeves in on the same circular needles as the body where 4 sts are bound off for armholes = 440 (476-512) sts on needle. Place a marker at each join between the sleeves and body = 4 markers. Continue in Pattern stitch, but knit the first stitch on each side of the marker in stockinette stitch (2 sts stockinette stitch in each raglan between body and sleeves). Raglan shaping: Read the entire next section before knitting! There are 8 decreases per row (1 decrease inside each side of 2 sts of stockinette stitch). Dec 1 stitch 43 (47-52) times on either side of the markers alternately every and every other row: *Row 1: decrease; Row 2: work even; Row 3: decrease*. Repeat these three rows until all decreases are completed. Make the decreases as follows: Before the 2 sts stockinette stitch: Right side: K 2 tog. Wrong side: Take the next two sts off the needle, put them back on the left needle twisted (one by one), purl the 2 sts together into back of stitch. After the 2 sts stockinette stitch: Right side: Slip 1, knit 1, psso Wrong side: P 2 tog At the same time, when the work measures 58 (66-71) cm form collar: The collar is created by increasing the number of sts worked in garter st (changing from pattern stitch, without increasing the number of sts). Inc 2 garter sts each front band 2 times every other row, 1 st 10 (10-11) times every 4th row and finally 1 st 1 (1-1) time on every 6th row (= 21 (21-22) sts collar). After the last raglan decrease the work measures approximately 76 (84-90) cm and 96 (100-96) sts remain on the needle (including sts from the collar). Work even for 2 cm = 78 (86-92) cm . Bind off all sts except the 21 (21-22) sts of garter st for the collar on every front piece. Knit each collar part separately. Right collar: = 21 (21-22). Set a row marker and measure the work from here. Continue in garter st. After 2 cm put sts on a stitch holder every other row at the inside edge: 3 sts 6 times, 3 (3-4) sts 1 time. Then put all sts back on the needle and continue to knit garter st - be careful not knit too loosely on the first row. When the collar measures 10 (10-11) cm put all sts on a stitch holder. Left collar: Knit as for the right collar, reversing shaping. Assembly: Sew the 4 sts together directly under the sleeve. Weave the collar together at the center back with sts, then sew the collar to the body. Sew a loop of chain sts on either side of the cardigan to hold the belt. Sew on the buttons. Belt: Cast on 11 sts and knit first row as follows: 1 stitch garter st, 9 sts rib, 1 stitch garter st. Continue in this pattern until the work measures 150 cm or desired length; bind off all sts. |
|||||||
Diagram explanations |
|||||||
|
|||||||
 |
|||||||
Have you finished this pattern?Tag your pictures with #dropspattern or submit them to the #dropsfan gallery. Do you need help with this pattern?You'll find 26 tutorial videos, a Comments/Questions area and more by visiting the pattern on garnstudio.com. © 1982-2026 DROPS Design A/S. We reserve all rights. This document, including all its sub-sections, has copyrights. Read more about what you can do with our patterns at the bottom of each pattern on our site. |
|||||||


With over 40 years in knitting and crochet design, DROPS Design offers one of the most extensive collections of free patterns on the internet - translated to 17 languages. As of today we count 324 catalogues and 12290 patterns translated into English (UK/cm). 12290
We work hard to bring you the best knitting and crochet have to offer, inspiration and advice as well as great quality yarns at incredible prices! Would you like to use our patterns for other than personal use? You can read what you are allowed to do in the Copyright text at the bottom of all our patterns. Happy crafting!
Post a comment to pattern DROPS 53-9
We would love to hear what you have to say about this pattern!
If you want to leave a question, please make sure you select the correct category in the form below, to speed up the answering process. Required fields are marked *.