
Popular categories
Looking for a yarn?


Comments / Questions (6)
![]() Laila Vergara wrote:
Laila Vergara wrote:
Hej Nu skal jeg til kraven og forstår slet ikke hvordan jeg skal lave den. Kan dog hitte ud af at læse diagrammet, men forstår ikke hvordan jeg skal starte. Håber i kan forklare mig det. Vh Laila
03.04.2025 - 08:58DROPS Design answered:
Hei Laila. Kragen strikkes som et eget "plagg" før det strikkes sammen med jakken. Legg opp X antall m som vanlig og strikk diagramrekkefølgen som står skrevet i oppskriften. Når kragen måler x cm, strikkes kragen sammen med jakken fra retten. Strikk 5 stolpemasker, legg venstre strikkepinnen fra jakken sammen med venstre strikkepinnen fra kragen. Strikk første m fra kragen rett sammen med neste m fra bærestykket, = 1 m fra hver av strikkepinnene = 1 m (da på høyre pinne). Strikk slik til siste m på kragen er strikket sammen med maskene på bærestykket. Strikk de siste 5 stolpem på bærestykket. Fell av med vrang fra vrangen. mvh DROPS Design
07.04.2025 - 12:30
![]() Linda wrote:
Linda wrote:
Grazie per la risposta, ma come mai nelle maniche si passa ai ferri 5.5 dopo aver terminato il bordo (quindi il lavoro misura 8 cm) e nel corpo invece il passaggio è dopo 4 cm? E come si fanno a fare le diminuzioni e allo stesso tempo il bordo da piegare? Grazie mille!
02.01.2025 - 09:11DROPS Design answered:
Buongiorno Linda, c'è un errore nella versione inglese: si passa ai ferri 5,5 mm dopo aver lavorato 4 cm del bordo da piegare. Buon lavoro!
04.01.2025 - 11:07
![]() Linda wrote:
Linda wrote:
Buongiorno, nel lavorare il corpo quando si passa ai ferri 5.5? Quando si lavora il bordo da piegare? Grazie mille
01.01.2025 - 00:59DROPS Design answered:
Buonasera Linda, si passa ai ferri 5,5 mm a 4 cm dal bordo di avvio, come indicato nelle spiegazioni. Buon lavoro!
01.01.2025 - 21:38
![]() Lilly Marie Schölling wrote:
Lilly Marie Schölling wrote:
Behöver snabb hjälp hur man tolkar mönstret på kragen ? lite luddig beskrivning
11.06.2024 - 08:14DROPS Design answered:
Hej Lilly. Var är det du får problem? Du lägger upp 259 maskor i minsta storleken och stickar först diagrammen A.4 klart på höjden och sedan diagrammen A.5 och till sist diagrammen A.6. Mvh DROPS Design
11.06.2024 - 13:14
![]() Marie Järnroos wrote:
Marie Järnroos wrote:
Håller på med denna , efter exakt angivna mått och rekommenderade stickor, ändå räcker inte garnet…storlek M 150 gram . Skulle behövas 175 gram för att få en färdig kofta. Är en van stickare, aldrig varit med om detta tidigare .
09.11.2023 - 16:07
![]() Cinna wrote:
Cinna wrote:
Ce gilet à un côté romantique qui me plaît beaucoup !
16.01.2022 - 17:59
|
|||||||||||||||||||||||||
Big Sur Cardigan#bigsurcardigan |
|||||||||||||||||||||||||
 |
 |
||||||||||||||||||||||||
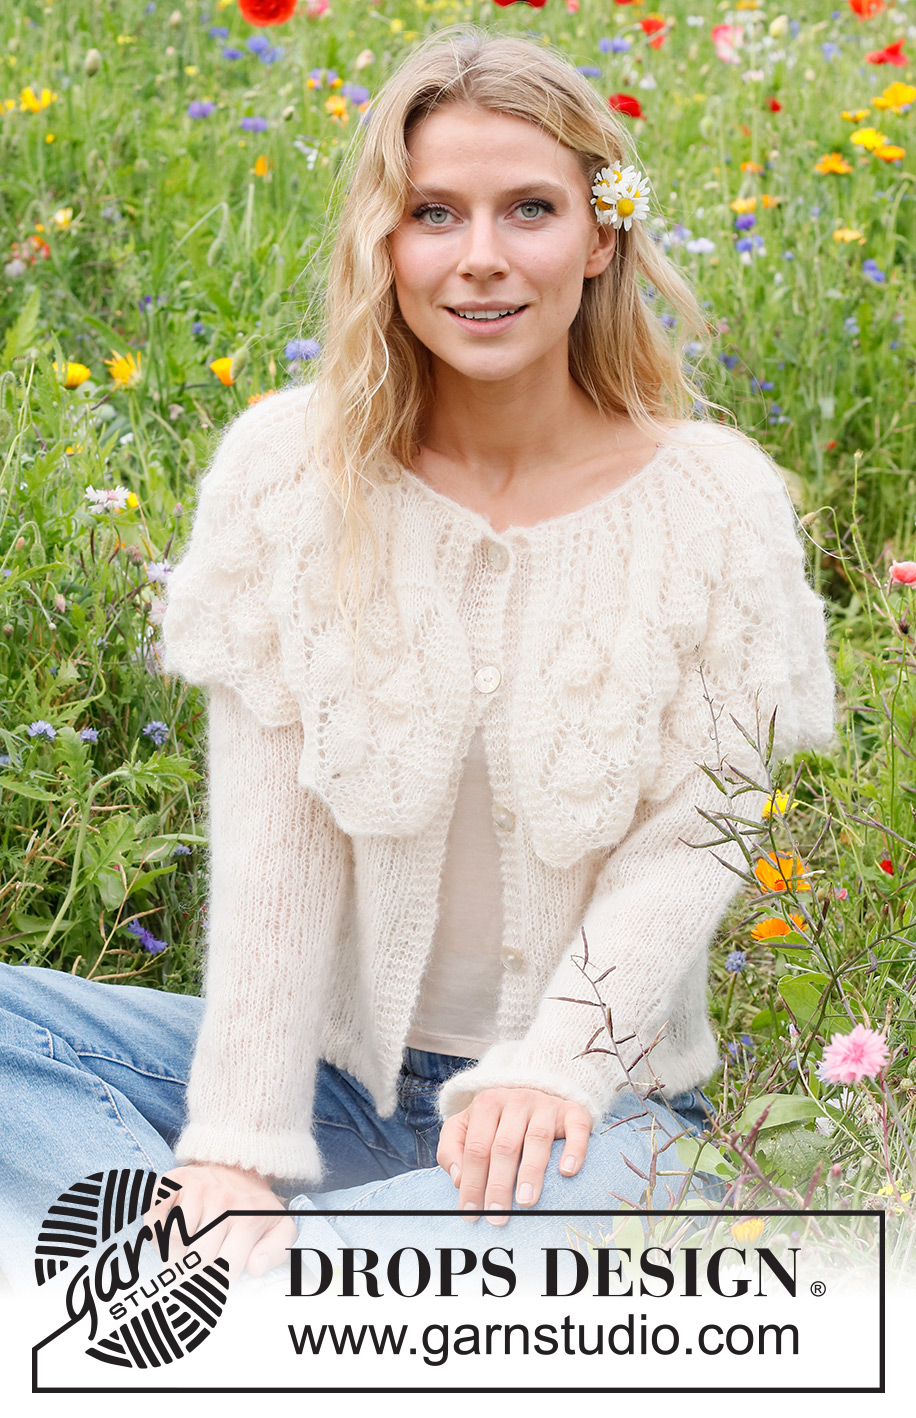
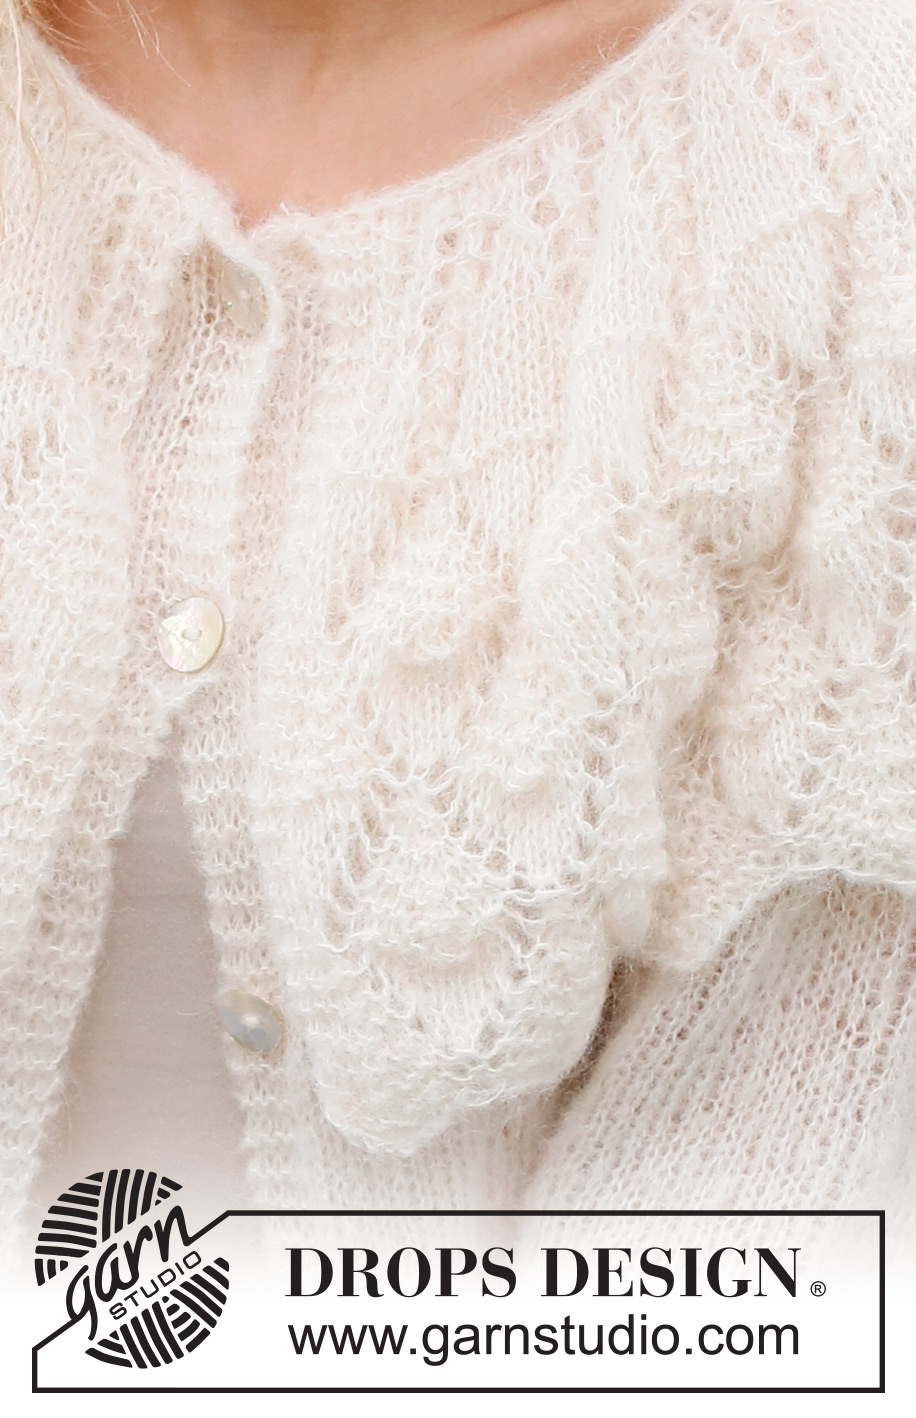
Knitted jacket in DROPS Brushed Alpaca Silk. Piece is knitted bottom up with round yoke, lace pattern and collar. Size: S - XXXL
DROPS 231-18 |
|||||||||||||||||||||||||
|
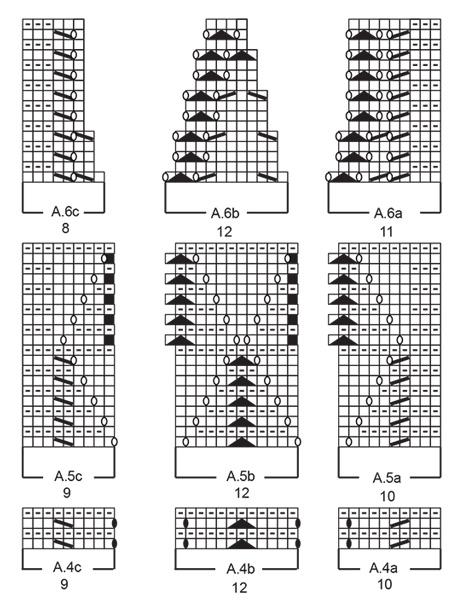
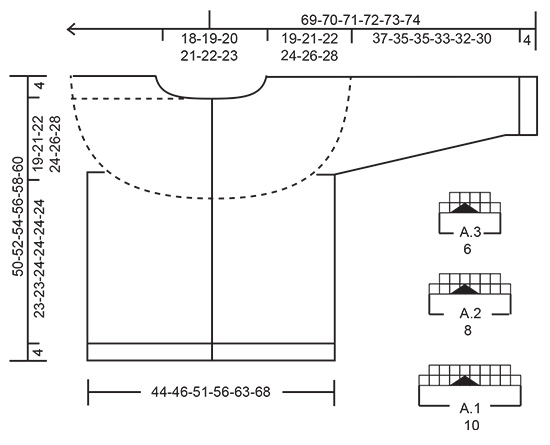
---------------------------------------------------------- EXPLANATION FOR THE PATTERN: ---------------------------------------------------------- GARTER STITCH (back and forth): Knit all rows. 1 ridge vertically = knit 2 rows. PATTERN: See diagrams A.1 to A.6. INCREASE TIP (applies to mid under sleeves): Work until 2 stitches remain before marker thread, make 1 yarn over, knit 4 (marker thread is in the middle of these 4 stitches), make 1 yarn over. On next round knit yarns over twisted to avoid holes. Then work the new stitches in stocking stitch. BUTTONHOLES: Decrease for buttonholes on right band. 1 BUTTONHOLE = knit third and fourth stitch from edge together and make 1 yarn over. On next row knit yarn over to make hole. Decrease for buttonholes when piece measures (measured from cast-on edge): S: 6, 16, 26, 35 and 44 cm M: 6, 16, 26, 36 and 46 cm L: 6, 15, 24, 32, 40 and 48 cm XL: 6, 15, 24, 33, 42 and 50 cm. XXL: 6, 16, 25, 34, 43 and 52 cm XXXL: 6, 16, 26, 36, 45 and 54 cm ---------------------------------------------------------- START THE PIECE HERE: ---------------------------------------------------------- JACKET - SHORT OVERVIEW OF THE PIECE: Work from bottom up. Work body back and forth on circular needle. Work sleeves in the round on double pointed needles. Put body and sleeves together for yoke and decrease for neck edge. Work the collar together with stitches from neck edge. BODY: Cast on 170-178-196-214-240-260 stitches on circular needle size 4 mm with DROPS Brushed Alpaca Silk. Work in stocking stitch with 1 edge stitch in GARTER STITCH - read explanation above, in each side. When piece measures 4 cm, work a folding edge as follows: Work 1 edge stitch in garter stitch, * knit 2 together, 1 yarn over *, work from *-* until 1 stitch remains, and finish with 1 edge stitch in garter stitch. Work in stocking stitch and cast on 4 stitches at the end of the next 2 rows = 178-186-204-222-248-268 stitches. Then work in stocking stitch with 5 band stitches in garter stitch in each side of piece. When piece measures 4 cm from cast-on edge, switch to circular needle size 5.5 mm. Work in stocking stitch with 5 band stitches in garter stitch in each side. On first row decrease 28-28-30-32-38-42 stitches evenly (do not decrease over band stitches) = 150-158-174-190-210-226 stitches. Decrease for BUTTONHOLES - read explanation above. REMEMBER THE KNITTING TENSION! When piece measures 27-27-28-28-28-28 cm from folding edge, cast off stitches for armholes in each side as follows: Work 5 band stitches in garter stitch, 31-33-37-41-46-50 stitches in stocking stitch, cast off the next 8 stitches, 62-66-74-82-92-100 stitches in stocking stitch, cast off the next 8 stitches, 31-33-37-41-46-50 stitches in stocking stitch and 5 band stitches in garter stitch. Put piece aside and work the sleeves as follows: SLEEVES: Cast on 48-50-52-52-56-58 stitches on double pointed needles size 4 mm with DROPS Brushed Alpaca Silk. Work in stocking stitch in the round. When piece measures 4 cm, work a folding edge as follows: * Knit 2 together, 1 yarn over *, work from *-* over all stitches. Then continue piece in stocking stitch. When piece measures 4 cm from folding edge, switch to double pointed needles size 5.5 mm. Work in stocking stitch in the round. On first round decrease 8-8-8-8-10-10 stitches evenly = 40-42-44-44-46-48 stitches. Insert 1 marker thread at the beginning of round, increase on each side of this marker thread later. When sleeve measures 12-12-10-10-8-10 cm from folding edge, increase 1 stitch on each side of marker thread - read INCREASE TIP. Increase like this every 4-3½-3-2-2-1½ cm 7-8-10-13-14-14 times in total = 54-58-64-70-74-76 stitches. When sleeve measures 41-39-39-37-36-34 cm from folding edge, cast off the first 4 stitches and the last 4 stitches = 46-50-56-62-66-68 stitches. Cut the yarn. Knit another sleeve the same way. YOKE: Slip sleeves on to same circular needle size 5.5 mm as body, where armholes were cast off = 226-242-270-298-326-346 stitches. Now measure the piece from here. Work in stocking stitch with 5 band stitches in garter stitch in each side of piece. When piece measures 3 cm from where piece were put together, work as follows: Work 5 band stitches in garter stitch, work in stocking stitch until 5 stitches remain and decrease at the same time 6-2-0-18-26-26 stitches evenly, work 5 band stitches in garter stitch = 220-240-270-280-300-320 stitches. Work 5 band stitches in garter stitch, A.1 21-23-26-27-29-31 times in total in width, finish with 5 band stitches in garter stitch. When A.1 has been worked 1 time vertically, there are 178-194-218-226-242-258 stitches on needle. Work in stocking stitch with 5 band stitches in garter stitch in each side. When piece measures 9-11-11-12-13-14 cm, work as follows: Work 5 band stitches in garter stitch, A.2 21-23-26-27-29-31 times in total in width, finish with 5 band stitches in garter stitch. When A.2 has been worked 1 time vertically, there are 136-148-166-172-184-196 stitches on needle. Work in stocking stitch with 5 band stitches in garter stitch in each side. When piece measures 16-18-19-20-22-24 cm, work as follows: Work 5 band stitches in garter stitch, A.3 21-23-26-27-29-31 times in total in width, finish with 5 band stitches in garter stitch. When A.3 has been worked 1 time vertically, there are 94-102-114-118-126-134 stitches on needle. When piece measures 18-20-21-23-25-27 cm, work next row from wrong side as follows: Work 5 band stitches in garter stitch, work stocking stitch until 5 stitches remain and decrease at the same time 0-6-14-16-20-24 stitches evenly, work 5 band stitches in garter stitch = 94-96-100-102-106-110 stitches. Work like this until piece measures approx. 19-21-22-24-26-28 cm and finish with 1 row from wrong side. Put piece aside and work the collar as follows: COLLAR: Cast on 259-271-307-331-367-391 stitches on circular needle size 5.5 mm with DROPS Brushed Alpaca Silk. Work pattern as follows: A.4a, A.4b 20-21-24-26-29-31 times in total in width and A.4c. Then work A.5a, A.5b 20-21-24-26-29-31 times in total and A.5c. Work A.5 a total of 2-2-2-2-3-3 times vertically. Then work A.6a, A.6b 20-21-24-26-29-31 times in total and A.6c. When A.6 has been worked 1 time vertically, there are 95-99-111-119-131-139 stitches on needle. Work in stocking stitch with 3 stitches in garter stitch in each side of piece. On first row decrease 11-13-21-27-35-39 stitches evenly = 84-86-90-92-96-100 stitches. When collar measures 27-27-30-30-37-37 cm, work collar together with jacket from right side as follows: Work 5 band stitches in garter stitch on jacket, knit first stitch from collar together with next stitch from yoke, * knit next stitch from collar together with next stitch from yoke *, work from *-* until last stitch on collar has been worked together with stitches on yoke, 5 band stitches now remain on yoke, work 5 band stitches in garter stitch. Cast off by purling from wrong side. ASSEMBLY: Sew the opening under the sleeves. Thread a thin elastic under the collar in last row on yoke, before collar and yoke were worked together. Begin approx. 2 cm in from band and finish approx. 2 cm before band in opposite side. This is done so that the collar keeps it shape and does not widen with use. Sew the buttons on to left band. Fold the folding edges at the bottom of the sleeves and body to the wrong side and sew them on, making sure that the seam does not tighten the edge. |
|||||||||||||||||||||||||
Diagram explanations |
|||||||||||||||||||||||||
|
|||||||||||||||||||||||||
 |
|||||||||||||||||||||||||
 |
|||||||||||||||||||||||||
Have you finished this pattern?Tag your pictures with #dropspattern #bigsurcardigan or submit them to the #dropsfan gallery. Do you need help with this pattern?You'll find 27 tutorial videos, a Comments/Questions area and more by visiting the pattern on garnstudio.com. © 1982-2026 DROPS Design A/S. We reserve all rights. This document, including all its sub-sections, has copyrights. Read more about what you can do with our patterns at the bottom of each pattern on our site. |
|||||||||||||||||||||||||


With over 40 years in knitting and crochet design, DROPS Design offers one of the most extensive collections of free patterns on the internet - translated to 17 languages. As of today we count 324 catalogues and 12290 patterns translated into English (UK/cm). 12290
We work hard to bring you the best knitting and crochet have to offer, inspiration and advice as well as great quality yarns at incredible prices! Would you like to use our patterns for other than personal use? You can read what you are allowed to do in the Copyright text at the bottom of all our patterns. Happy crafting!
Post a comment to pattern DROPS 231-18
We would love to hear what you have to say about this pattern!
If you want to leave a question, please make sure you select the correct category in the form below, to speed up the answering process. Required fields are marked *.