Comments / Questions (3)
![]() Laurence Roquet wrote:
Laurence Roquet wrote:
Bonjour, ce puul over ne possede pas de rangs raccourcis pour avoir un plus belle et agréable encolure comment en faire une avec ces emmanchures et le motif ? merci
14.02.2023 - 13:19DROPS Design answered:
Bonjour Mme Roquet, essayez de voir si vous pouvez adapter cette technique utilisée pour les raglans de haut en bas de nos dernières collections. Bon tricot!
14.02.2023 - 13:58
![]() Corinne D wrote:
Corinne D wrote:
I'd name this one "broken arrow"
13.01.2021 - 15:18
![]() Arndt wrote:
Arndt wrote:
Namensvorschlag: Kühle Brise
09.01.2021 - 10:41
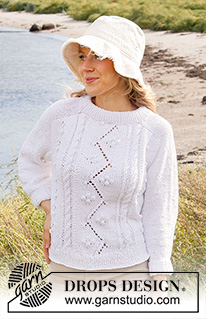
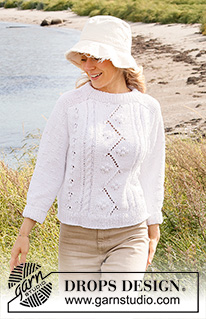
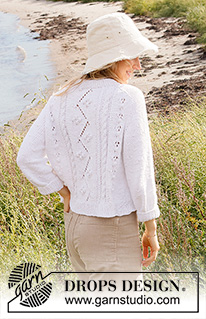
Mountain Pass#mountainpasssweater |
||||||||||||||||||||||||||||||||||||||||
 |
 |
|||||||||||||||||||||||||||||||||||||||
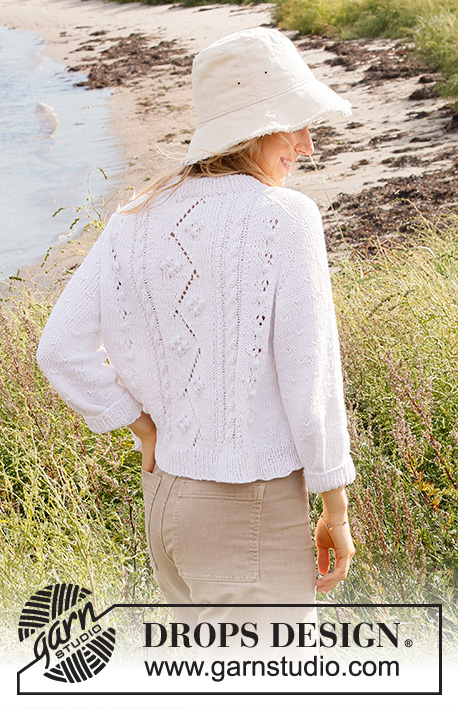
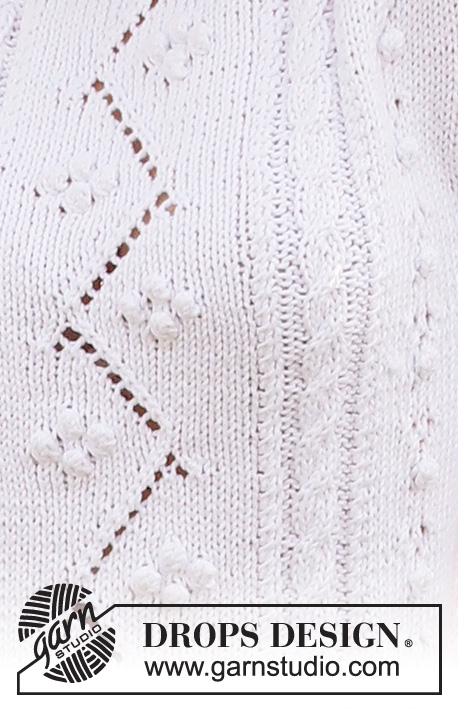
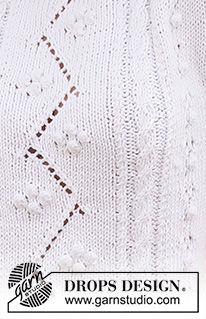
Knitted jumper in DROPS Paris or DROPS Bomull-Lin. The piece is worked top down, with double neck, saddle shoulders, cables and lace pattern. Sizes S - XXXL.
DROPS 221-40 |
||||||||||||||||||||||||||||||||||||||||
|
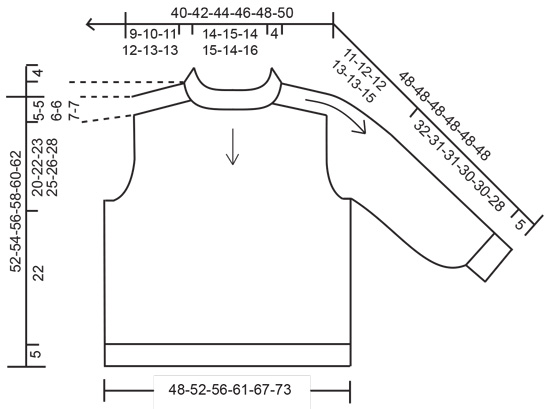
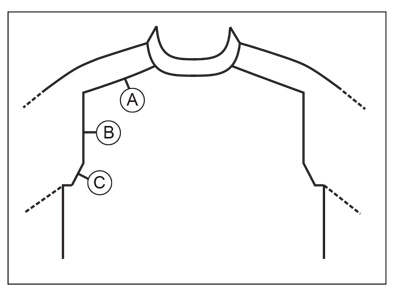
------------------------------------------------------- EXPLANATIONS FOR THE PATTERN: ------------------------------------------------------- PATTERN: See diagrams A.1 to A.6. Choose diagram for your size (applies to A.1 and A.5). INCREASE/DECREASE TIP (evenly spaced): To work out how to increase/decrease evenly, count the total number of stitches on needle (e.g. 82 stitches), and divide by the number of increases/decreases to be made (e.g. 18) = 4.6. In this example, increase by making 1 yarn over after approx. each 4th and 5th stitch. On the next round work the yarn overs twisted to avoid holes. When decreasing, knit together alternately each 3rd stitch and 4th and each 4th and 5th stitch (approx.). INCREASE TIP-1 (for shoulders, sleeves and yoke): BEFORE THE MARKER: The new stitch twists to the right. Use the left needle to pick up the strand between 2 stitches from the previous round, pick up the back strand and knit in the front loop. AFTER THE MARKER: The new stitch twists to the left. Use the left needle to pick up the strand between 2 stitches from the previous round, pick up the front strand and knit in the back loop. DECREASE TIP (for sleeves): Work until there are 3 stitches left before the marker thread, knit 2 together, knit 2 (marker thread sits between these 2 stitches), slip 1 stitch as if to knit, knit 1 and pass the slipped stitch over the knitted stitch (2 stitches decreased). CASTING-OFF TIP: To avoid the cast-off edge being tight you can cast off with a larger size needle. If the edge is still tight, make 1 yarn over after approx. each 6th stitch at the same time as casting off; the yarn overs are cast off as normal stitches. ------------------------------------------------------- START THE PIECE HERE: ------------------------------------------------------- JUMPER – SHORT OVERVIEW OF THE PIECE: The neck and yoke are worked in the round with circular needle, starting from the right shoulder and working top down. Stitches are increased for the shoulders, then for the sleeves and finally for the yoke. The yoke is divided for the body and sleeves and the body continued in the round. The sleeves are worked in the round with short circular needle/double pointed needles, top down. DOUBLE NECK: Cast on 82-84-88-92-96-100 stitches with short circular needle size 4 mm and Paris or Bomull-Lin. Work rib in the round (knit 1, purl 1) for 8 cm. When the rib is finished, knit 1 round where you increase 18-16-20-28-32-28 stitches evenly spaced – read INCREASE/DECREASE TIP = 100-100-108-120-128-128 stitches. Knit 1 round (yarn overs knitted twisted). YOKE: Change to circular needle size 5 mm. Insert 1 marker after the first 33-33-37-40-44-44 stitches on the round (= mid-front) – the yoke is measured from this marker! In addition insert 4 new markers as described below – without working the stitches and each marker is inserted between 2 stitches. These markers are used when increasing for the shoulders. Insert marker 1 before the first stitch on the round (= back of right shoulder when the garment is worn). Count 16-16-20-20-24-24 stitches from marker 1 (= shoulder), insert marker 2 before the next stitch. Count 34-34-34-40-40-40 stitches from marker 2 (= front piece), insert marker 3 before the next stitch. Count 16-16-20-20-24-24 stitches from marker 3 (= shoulder), insert marker 4 before the next stitch. There are 34-34-34-40-40-40 stitches left on the round after marker 4 (= back piece). Allow these 4 markers to follow your work onwards; you will increase at each marker. SADDLE SHOULDERS: Read the following section before continuing – on the first round you start the pattern and start to increase for the shoulders! PATTERN: Work (beginning of round = marker 1) 0-0-2-2-0-0 stitches in stocking stitch, A.2 a total of 2-2-2-2-3-3 times in width, 0-0-2-2-0-0 stitches in stocking stitch, marker 2, A.1 over the next 34-34-34-40-40-40 stitches (= front piece), marker 3, 0-0-2-2-0-0 stitches in stocking stitch, A.3 a total of 2-2-2-2-3-3 times in width, 0-0-2-2-0-0 stitches in stocking stitch, marker 4, A.1 over the last 34-34-34-40-40-40 stitches (= back piece). INCREASES FOR SADDLE SHOULDERS: AT THE SAME TIME on the first round increase 4 stitches for the shoulders as follows: Increase BEFORE markers 1 and 3 and increase AFTER markers 2 and 4 – read INCREASE TIP-1. You are only increasing on the front and back pieces and the number of stitches on the shoulders remains the same. Continue like this in the round, and increase every round a total of 20-22-24-26-28-28 times = 180-188-204-224-240-240 stitches. REMEMBER THE KNITTING TENSION! NOTE: The increased stitches are worked into A.1 on the front and back pieces as shown in the diagram, then the next increases are worked in stocking stitch. NOTE: Repeat in height as shown in A.4, A.5 and A.6. After the last increase the piece measures 9-10-11-12-13-13 cm from the marker on the neck. Continue increasing for the sleeves as described below. INCREASES ON SLEEVES: Continue the pattern in the round. AT THE SAME TIME on the next round increase 4 stitches as follows: Increase AFTER markers 1 and 3 and BEFORE markers 2 and 4 – remember INCREASE TIP-1. You are now only increasing on the sleeves and the number of stitches on the front and back pieces remains the same. The increased stitches are worked into A.2 and A.3. NOTE: The stitches on the front and back pieces are continued as shown in A.1, and you repeat in height as shown in A.4, A.5 and A.6 – the other stitches are worked in stocking stitch. Increase for the sleeves like this every 2nd round a total of 11-10-9-9-7-8 times = 224-228-240-260-268-272 stitches. The piece measures approx. 19-19-19-20-19-20 cm from the marker on the neck. Now increase for the yoke as described below. INCREASES ON YOKE: Move the 4 markers so that each marker sits in the outermost stitch on each side of the front and back piece. There are 38-36-38-38-38-40 stitches between markers on each sleeve. On the next round increase 8 stitches for the yoke, by increasing before and after each marker-stitch – remember INCREASE TIP-1. You are now increasing on both the back and front pieces and on the sleeves. The increased stitches are worked in stocking stitch on the front and back pieces and into A.2/A.3 on the sleeves. Increase like this every 2nd round a total of 1-3-4-5-7-9 times = 232-252-272-300-324-344 stitches. When all the increases are finished, the piece measures approx. 20-22-23-25-26-28 cm from the marker on the neck. If the piece is shorter than this, continue working to the correct length, without further increases. Now divide the piece for the body and sleeves as follows: Start 0-1-1-3-2-0 stitches before the first marker-stitch, place the next 42-46-50-56-58-60 stitches on a thread for the sleeve, cast on 12-12-14-16-16-18 stitches (= in side under the sleeve), work the next 74-80-86-94-104-112 stitches (= front piece), place the next 42-46-50-56-58-60 stitches on a thread for the sleeve, cast on 12-12-14-16-16-18 stitches (= in side under the sleeve), work the last 74-80-86-94-104-112 stitches (= back piece). Body and sleeves are finished separately. THE PIECE IS NOW MEASURED FROM HERE. BODY: = 172-184-200-220-240-260 stitches. Continue in the round with stocking stitch and pattern as before – make sure the repeats of A.4, A.5 and A.6 match the yoke. The 12-12-14-16-16-18 stitches cast on under each sleeve are worked in stocking stitch. Work until the piece measures 22 cm from the division in all sizes. There is approx. 5 cm left to finished length – try the jumper on and work to desired length. Now increase stitches to avoid the rib being tight. Knit 1 round where you increase 18-18-20-22-24-26 stitches evenly spaced – remember INCREASE/DECREASE TIP = 190-202-220-242-264-286 stitches. Change to circular needle size 4 mm. Work rib (knit 1, purl 1) for 5 cm. Cast off with knit over knit and purl over purl – read CASTING-OFF TIP! The jumper measures approx. 52-54-56-58-60-62 cm from the shoulder down. SLEEVES: Place the 42-46-50-56-58-60 stitches from the thread on the one side of the piece on double pointed needles/short circular needle size 5 mm and knit up 1 stitch in each of the 12-12-14-16-16-18 stitches cast on under the sleeve = 54-58-64-72-74-78 stitches. Insert a marker thread in the middle of the 12-12-14-16-16-18 stitches under the sleeve. Allow the thread to follow your work onwards; it will be used when decreasing under the sleeve. Continue A.2/A.3 in the round as before – the stitches which do not fit the pattern under the sleeve are worked in stocking stitch. When the sleeve measures 3-3-2-2-2-2 cm from the division, decrease 2 stitches under the sleeve – read DECREASE TIP. Decrease like this every 3-3-2-1½-1½-1½ cm a total of 3-4-6-10-10-11 times = 48-50-52-52-54-56 stitches. Work until the sleeve measures 34-33-33-32-32-30 cm from the division. There is approx. 5 cm left to finished length – try the jumper on and work to desired length. Now decrease stitches to give the ribbing a good fit. Knit 1 round where you decrease 14 stitches evenly spaced = 34-36-38-38-40-42 stitches. Change to double pointed needles size 4 mm and work rib (knit 1, purl 1) for 5 cm. Cast off with knit over knit and purl over purl – remember CASTING-OFF TIP! The sleeve measures approx. 39-38-38-37-37-35 cm from the division. Work the other sleeve in the same way. ASSEMBLY: Fold the neck double to the inside and sew down. To avoid the neck being tight and rolling outwards, it is important that the seam is elastic. |
||||||||||||||||||||||||||||||||||||||||
Diagram explanations |
||||||||||||||||||||||||||||||||||||||||
|
||||||||||||||||||||||||||||||||||||||||
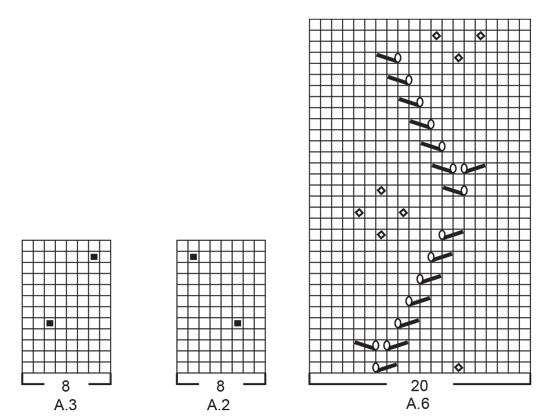 |
||||||||||||||||||||||||||||||||||||||||
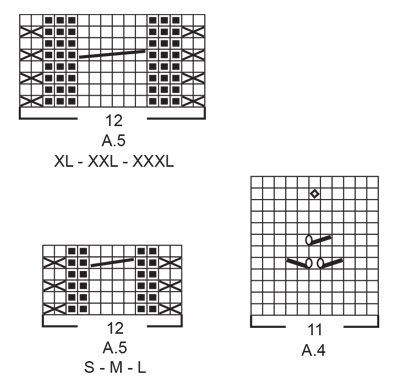 |
||||||||||||||||||||||||||||||||||||||||
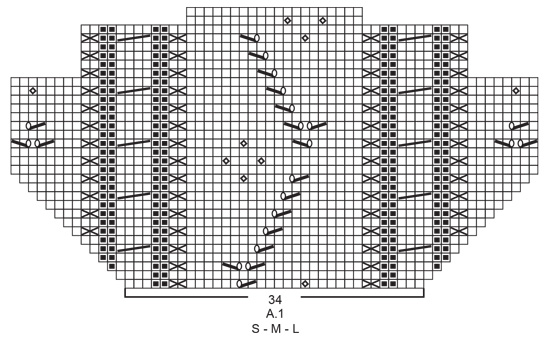 |
||||||||||||||||||||||||||||||||||||||||
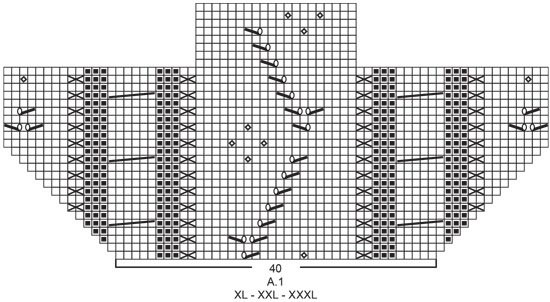 |
||||||||||||||||||||||||||||||||||||||||
 |
||||||||||||||||||||||||||||||||||||||||
 |
||||||||||||||||||||||||||||||||||||||||
Have you finished this pattern?Tag your pictures with #dropspattern #mountainpasssweater or submit them to the #dropsfan gallery. Do you need help with this pattern?You'll find 33 tutorial videos, a Comments/Questions area and more by visiting the pattern on garnstudio.com. © 1982-2026 DROPS Design A/S. We reserve all rights. This document, including all its sub-sections, has copyrights. Read more about what you can do with our patterns at the bottom of each pattern on our site. |
||||||||||||||||||||||||||||||||||||||||





Post a comment to pattern DROPS 221-40
We would love to hear what you have to say about this pattern!
If you want to leave a question, please make sure you select the correct category in the form below, to speed up the answering process. Required fields are marked *.