
Popular categories
Looking for a yarn?


Comments / Questions (13)
![]() Ida wrote:
Ida wrote:
Kan det være en feil i avsnittet Sadelskulderøkning for str L? 20+20+41+29+20=130 masker, men oppskriften sier 121 masker. De to skulderpartiene har ulikt antall masker (20 m etter 2. merke vs 29 etter 4. merke)
12.04.2021 - 17:04DROPS Design answered:
Hei Ida. Ja, her er det nok en taste feil i str. L og XL (skal være 20 masker og ikke 29 masker). Takk for at du gjorde oss oppmerksom på dette, vi vil rette dette asap. mvh DROPS design
26.04.2021 - 13:51
![]() Mieke Baras wrote:
Mieke Baras wrote:
Does this mean that there are 2 stitches (with the marker in between these 2 stitches) between each increase when you start increasing before and after each marker for the pass?
07.04.2021 - 14:26DROPS Design answered:
Dear Mrs Baras, correct. You increase now for yoke both before and after all 4 marker-stitches: increase, knit 1 with marker, increase. Happy knitting!
07.04.2021 - 16:12
![]() Elin wrote:
Elin wrote:
Jeg strikker str. M. Når der er taget 2 masker ud på hver ærme 22 gange, skal der så ikke være 64 masker, man starter jo med 20 masker.
05.04.2021 - 11:04DROPS Design answered:
Hej Elin, antallet masker bliver justeret på de forskellige stykker, når du deler arbejdet op. Det vil sige du sætter 70 masker på en tråd til ærmet. God fornøjelse!
21.04.2021 - 15:42
![]() Mieke wrote:
Mieke wrote:
Why am I not getting an answer to,my question? Maybe you are too busy?
31.03.2021 - 15:19DROPS Design answered:
Dear Mieke, when all increases for sleeves are done, there are 60 sts; move the markers in the first + in the last of these 60 sts: there are now 58 sts between each of the stitches with a marker. Happy knitting!
06.04.2021 - 10:49
![]() Mieke Baras wrote:
Mieke Baras wrote:
Hello, I’m knitting this wonderful sweater but have some problems with the increasing of the sleeves. I am doing medium size, but after 22 increases I get 60 stitches between the sleeve markers, not 58. The increasing on sleeves as well as om body show that each sleeve, after increasing 5 times 2 stitches on each sleeve has 70 stitches in total, sonthat suggests that not 58 but 60 stitches are required between the markers of the sleeves? Correct or not?
27.03.2021 - 18:45
![]() Sandra wrote:
Sandra wrote:
Hallo, in der Webversion sind die Diagramme noch falsch (fehlende Umschläge). In der mobilen Version sind die Diagramme richtig.
14.03.2021 - 07:22DROPS Design answered:
Liebe Sandra, aktualisieren Sie die Seite in Ihrem Browser und leeren Sie den Cache, so sollten Sie auch in der Webversion die richtige Version finden. Viel Spaß beim stricken!
15.03.2021 - 09:36
![]() Anna wrote:
Anna wrote:
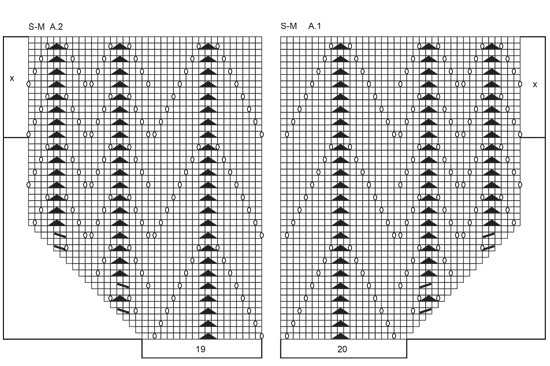
I had the same issue with the pattern as Eva. In my opinion there are missing yarn overs at the beginning of row 1, 19 and 35 A.2 (size S/M), but I see it is the same with other sizes. Mam ten sam problem co Eva. Moim zdaniem brakuje narzutów na początku rzędów 1, 19 i 35 w schemacie A.2 rozmiar S/M, i widzę te same braki w innych rozmiarach
01.03.2021 - 11:27DROPS Design answered:
Dear Anna, thanks for your feedback, our design team will check diagrams again.
01.03.2021 - 13:26
![]() Eva Ruisanchez wrote:
Eva Ruisanchez wrote:
Hi! I just casted this wonderful new pattern on and have problems with the number of stiches in the front pattern. Aren’t some yarnovers missing from A2 pattern on the beginning of rows 1, 17, etc? Thanks! Ekezdtem kötni ezt a friss mintát, és érdeklődni szeretnék, hogy az A2 minta első sorában (és az összes ismétlésnél) nem hiányzik véletlenül egy ráhajtás a sor elején? A minta is csak így jön ki, a fotón is így látszik. Köszönöm a választ!
26.02.2021 - 17:13DROPS Design answered:
Dear Mrs Ruisanchez, thanks for your feedback, our designer team will check diagrams again.
01.03.2021 - 13:25
![]() Tatjana wrote:
Tatjana wrote:
Sehr schön, wird von mir nachgeschickt. Danke DropsTeam.
22.02.2021 - 08:45
![]() Else Jensen wrote:
Else Jensen wrote:
Den vil jeg lave når den kommer
04.02.2021 - 22:09
|
||||||||||||||||||||||||||||
Pink Sandstone#pinksandstonesweater |
||||||||||||||||||||||||||||
 |
 |
|||||||||||||||||||||||||||
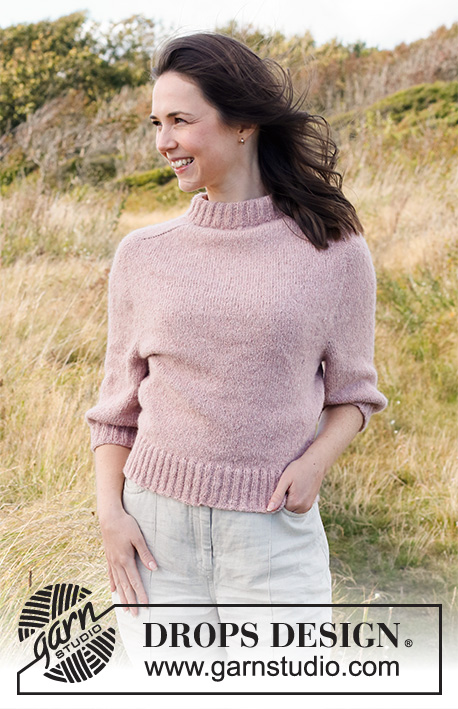
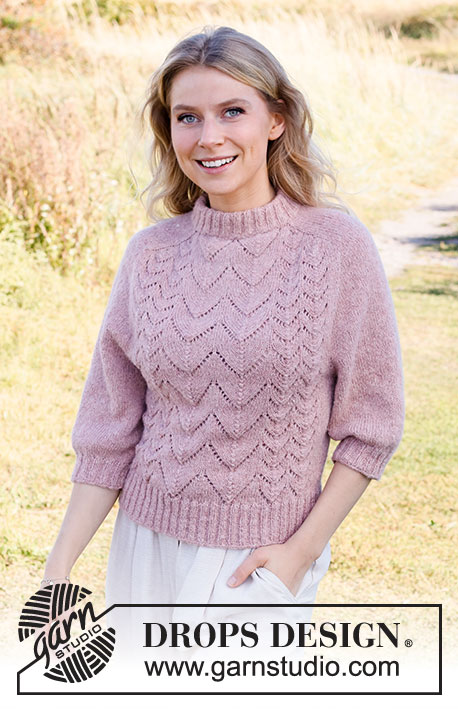
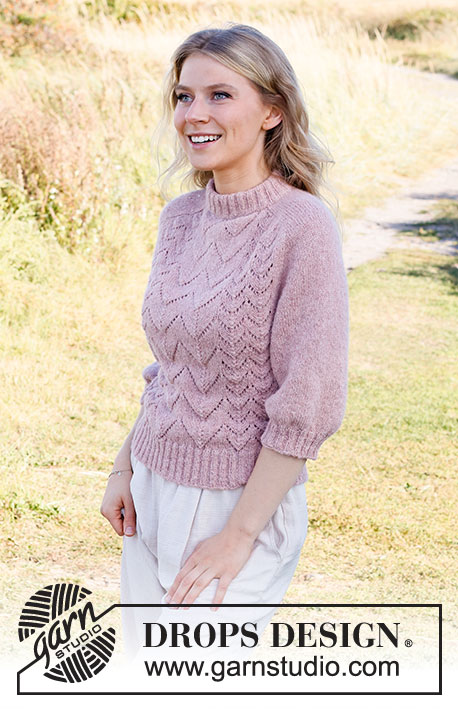
Knitted jumper in DROPS Sky. The piece is worked top down with lace pattern and saddle-shoulders. Sizes S - XXXL.
DROPS 222-37 |
||||||||||||||||||||||||||||
|
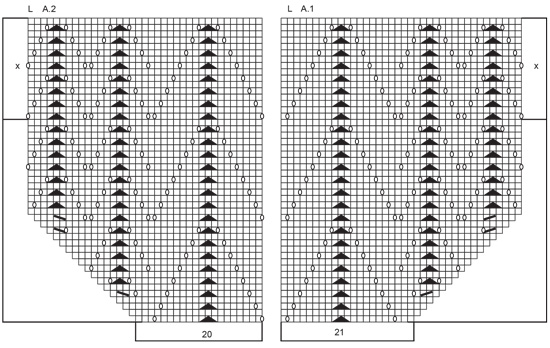
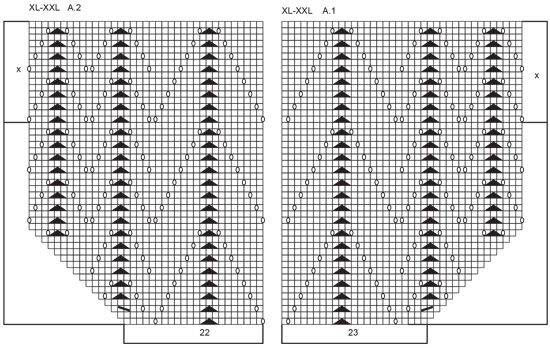
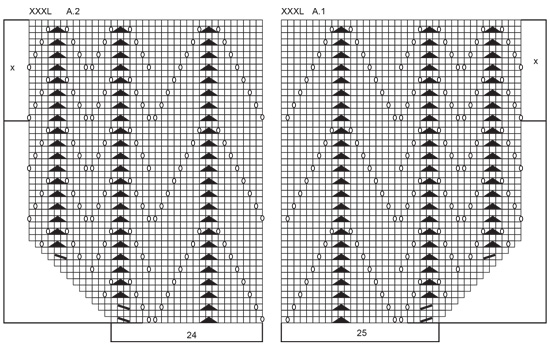
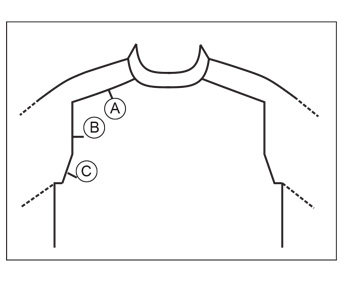
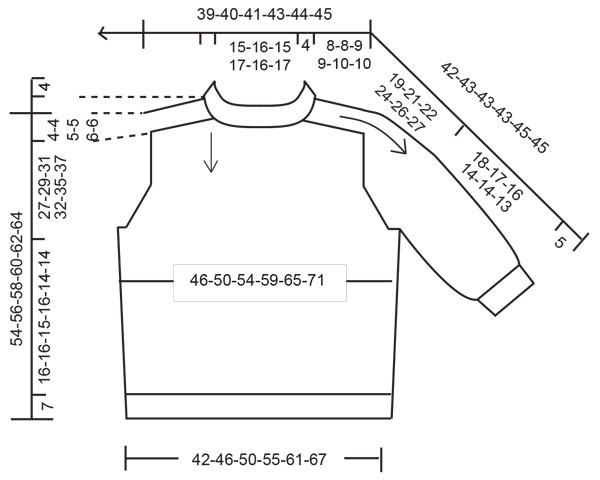
------------------------------------------------------- EXPLANATIONS FOR THE PATTERN: ------------------------------------------------------- PATTERN: See diagrams A.1 and A.2. Choose diagram for your size. INCREASE/DECREASE TIP (evenly spaced): To work out how to increase/decrease evenly, count the total number of stitches on the needle (e.g. 96 stitches) and divide by the number of increases/decreases to be made (e.g. 13) = 7.4. In this example, increase by making 1 yarn over after approx. each 7th stitch. On the next round knit the yarn overs twisted to avoid holes. When decreasing, knit together each 6th and 7th stitch. INCREASE TIP-2 (for increases to saddle-shoulders, sleeves and yoke): BEFORE MARKER: The new stitch twists to the right. Use the left needle to pick up the back strand between 2 stitches from the previous round and knit in the front loop. AFTER MARKER: The new stitch twists to the left. Use the left needle to pick up the front strand between 2 stitches from the previous round and knit in the back loop. DECREASE TIP-2 (for sides of body): Decrease 1 stitch on each side of the marker as follows: Work until there are 3 stitches left before the marker, knit 2 together, knit 2, slip 1 stitch as if to knit, knit 1 and pass the slipped stitch over the knitted stitch. CASTING-OFF TIP: To avoid the cast-off edge being tight you can cast off with a larger needle size. If the edge is still tight, make 1 yarn over after approx. each 4th stitch while casting off; the yarn overs are cast off as normal stitches. ------------------------------------------------------- START THE PIECE HERE: ------------------------------------------------------- JUMPER – SHORT OVERVIEW OF THE PIECE: The neck and yoke are worked in the round with circular needle, top down and from mid-back. Stitches are increased for the shoulders, then for the sleeves and finally for the yoke. The yoke is divided for the body and sleeves and the body is continued in the round with circular needle. The sleeves are worked in the round with short circular needle, top down. NECK: Cast on 92-96-100-108-112-116 stitches with circular needle size 3.5 mm and Sky. Knit 1 round. Then work rib (knit 2, purl 2) in the round for 8½ cm. When the rib is finished, knit 1 round where you increase 17-13-21-21-25-29 stitches evenly spaced – read INCREASE/DECREASE TIP = 109-109-121-129-137-145 stitches. Knit 1 round (yarn overs knitted twisted). YOKE: Change to circular needle size 4.5 mm. Insert a marker at the beginning of the round – THE PIECE IS NOW MEASURED FROM HERE! In addition, insert 4 more markers as described below, without working the stitches and inserting each marker between 2 stitches; these markers are used when increasing for the shoulders and should be of a different colour to the marker on the neck. Count 19-19-20-22-22-24 stitches (= half the back piece), insert marker 1 before the next stitch. Count 16-16-20-20-24-24 stitches from marker 1 (= shoulder), insert marker 2 before the next stitch. Count 39-39-41-45-45-49 stitches from marker 2 (= front piece), insert marker 3 before the next stitch. Count 16-16-20-20-24-24 stitches from marker 3 (= shoulder), insert marker 4 before the next stitch. There are 19-19-20-22-22-24 stitches left on the back piece after marker 4. Allow these markers to follow you work onwards; you will increase at each marker. SADDLE-SHOULDER INCREASES: Read the whole section before continuing! The piece is continued with stocking stitch on the shoulders/sleeves and on the back piece. The front piece is worked as follows: A.1 (= 20-20-21-23-23-25 stitches), A.2 (= 19-19-20-22-22-24 stitches). When you have increased enough stitches so the whole of A.1 and A.2 fit onto the front piece, continue any subsequent new stitches in stocking stitch. A.1x and A.2 x are repeated in height. AT THE SAME TIME, on the first round, increase 4 stitches for the shoulders as follows: Increase BEFORE markers 1 and 3 and AFTER markers 2 and 4– read INCREASE TIP-2. You are only increasing on the front and back pieces; the number of sleeve stitches remains the same. Continue these increases every round a total of 20-21-24-24-26-26 times = 189-193-217-225-241-249 stitches (the increased stitches are worked into A.1 and A.2). REMEMBER THE KNITTING TENSION! After the final increase, the piece measures approx. 8-8-9-9-10-10 cm from the marker on the neck. Now increase for the sleeves as described below. SLEEVE INCREASES: Continue with stocking stitch and A.1/A.2 as before. AT THE SAME TIME, on the next round, increase 4 stitches as follows: Increase AFTER markers 1 and 3 and BEFORE markers 2 and 4 – remember INCREASE TIP-2 You are now only increasing on the sleeves; the number of stitches on the front and back pieces remains the same. The increased stitches are worked in stocking stitch. Increase like this every 2nd round a total of 21-22-22-21-21-21 times = 273-281-305-309-325-333 stitches. The piece measures approx. 24-25-26-25-26-26 cm from the marker on the neck. Now increase for the yoke as described below. YOKE INCREASES. Move the 4 markers so that each one sits in the outermost stitch on each side of both sleeves. There are 56-58-62-60-64-64 stitches between the markers on each sleeve. On the next round, increase 8 stitches by increasing both before and after all 4 marker-stitches – remember INCREASE TIP. You are now increasing on the front and back pieces and on both sleeves; the increased stitches are worked in stocking stitch. Continue with stocking stitch and A.1 and A.2 as before and increase like this every 2nd round a total of 4-5-6-10-11-14 times = 305-321-353-389-413-445 stitches. When all the increases are finished, the piece measures approx. 27-29-31-33-35-37 cm from the marker on the neck. If the piece is shorter than this, continue working without further increases, to the correct length. Now divide the yoke for the body and sleeves as follows: Work the first 42-45-49-54-59-65 stitches (= half back piece), place the next 68-70-78-86-88-92 stitches on a thread for the sleeve, cast on 8-10-10-10-12-12 stitches under the sleeve, work 85-91-99-109-119-131 stitches (= front piece), place the next 68-70-78-86-88-92 stitches on a thread for the sleeve, cast on 8-10-10-10-12-12 stitches under the sleeve, work the last 42-45-49-54-59-65 stitches (= half back piece). The body and sleeves are finished separately. THE PIECE IS NOW MEASURED FROM HERE. BODY: = 185-201-217-237-261-285 stitches. Insert 1 marker in the middle of the 8-10-10-10-12-12 new stitches under each sleeve; these markers are used when decreasing in the sides. Continue with stocking stitch, A.1 and A.2 in the round as before. When the piece measures 4 cm from the division, decrease 1 stitch on each side of both markers – read DECREASE TIP-2 (= 4 stitches decreased). Decrease like this every 3 cm, a total of 4 times in all sizes = 169-185-201-221-245-269 stitches. Work until the piece measures 16-16-15-16-14-14 cm from the division. There is approx. 7 cm left to finished length; try the jumper on and work to desired length. Knit 1 round where you increase 39-39-39-39-39-39 stitches evenly spaced = 208-224-240-260-284-308 stitches. Knit 1 round (the yarn overs are knitted twisted). Change to circular needle size 3.5 mm and work rib (knit 2, purl 2) for 7 cm. Cast off with knit over knit and purl over purl – read CASTING-OFF TIP! The jumper measures approx. 54-56-58-60-62-64 cm from the shoulder down. SLEEVES: Place the 68-70-78-86-88-92 stitches from the thread on the one side of the piece with short circular needle size 4.5 mm and knit up 1 stitch in each of the 8-10-10-10-12-12 stitches cast on under the sleeve = 76-80-88-96-100-104 stitches. Continue with stocking stitch in the round until the sleeve measures 18-17-16-14-14-13 cm from the division. Knit 1 round where you decrease 12-12-20-24-24-28 stitches evenly spaced = 64-68-68-72-76-76 stitches. Change to circular needle size 3.5 mm. Work rib (knit 2, purl 2) for 5 cm. Cast off with knit over knit and purl over purl – remember CASTING-OFF TIP. Work the other sleeve in the same way. ASSEMBLY: Fold the neck double to the inside of the piece and sew down. To avoid the neck being tight and rolling outwards, it is important the seam is elastic. |
||||||||||||||||||||||||||||
Diagram explanations |
||||||||||||||||||||||||||||
|
||||||||||||||||||||||||||||
 |
||||||||||||||||||||||||||||
 |
||||||||||||||||||||||||||||
 |
||||||||||||||||||||||||||||
 |
||||||||||||||||||||||||||||
 |
||||||||||||||||||||||||||||
 |
||||||||||||||||||||||||||||
Have you finished this pattern?Tag your pictures with #dropspattern #pinksandstonesweater or submit them to the #dropsfan gallery. Do you need help with this pattern?You'll find 31 tutorial videos, a Comments/Questions area and more by visiting the pattern on garnstudio.com. © 1982-2026 DROPS Design A/S. We reserve all rights. This document, including all its sub-sections, has copyrights. Read more about what you can do with our patterns at the bottom of each pattern on our site. |
||||||||||||||||||||||||||||


With over 40 years in knitting and crochet design, DROPS Design offers one of the most extensive collections of free patterns on the internet - translated to 17 languages. As of today we count 324 catalogues and 12290 patterns translated into English (UK/cm). 12290
We work hard to bring you the best knitting and crochet have to offer, inspiration and advice as well as great quality yarns at incredible prices! Would you like to use our patterns for other than personal use? You can read what you are allowed to do in the Copyright text at the bottom of all our patterns. Happy crafting!
Post a comment to pattern DROPS 222-37
We would love to hear what you have to say about this pattern!
If you want to leave a question, please make sure you select the correct category in the form below, to speed up the answering process. Required fields are marked *.