
Categorías populares
¿Buscas un hilo?


Comentarios / Preguntas (59)
![]() Barbara escribió:
Barbara escribió:
Wie viele Andere bin ich verzweifelt, zu versuchen das Lätzchen zu stricken.Ich bin geübte Strickerin und habe schon viele Strickschriften gelesen. Aber sowas ist mir noch nie in die Finger gekommen. Sie müssen doch aus den vielen Kommentaren gemerkt haben, dass kaum jemand damit zurecht kommt. Dann geben sie unzureichende Antworten und schreiben noch darunter : Viel Spass beim Stricken. Als ob so was noch Spaß machen würde ! Fertigen sie doch einfach eine verständliche Anleitung an
23.02.2025 - 18:58
![]() Helga escribió:
Helga escribió:
Ich bin eine wie ich dachte geübte Strickerin aber bei dieser Anleitung blickt man wirklich nicht durch. Das Diagramm beinhaltet nicht die ganze Strickschrift, Randmaschen sind auch nicht erwähnt.Schade um die Zeit
23.02.2025 - 16:32
![]() Matilda escribió:
Matilda escribió:
På förklaring till beskrivningen står det: Rätstickning (stickas runt): Sticka *1varv rätt och 1 varv avigt*, upprepa *_* Rätstickning (stickas fram och tillbaka): Alla varv stickas räta. Båda står det rätstickning på. Vad/När är skillnaden?
16.11.2024 - 18:12DROPS Design respondió:
Hej Matilda. Du stickar rätstickning olika beroende på om du stickar arbetet runt eller fram och tillbaka. RÄTSTICKNING (stickas runt): Sticka *1 varv rätt och 1 varv avigt*, upprepa *-*. RÄTSTICKNING (stickas fram och tillbaka): Alla varv stickas räta. Mvh DROPS Design
20.11.2024 - 14:26
![]() Hecquet Claire escribió:
Hecquet Claire escribió:
Bonjour comment faire quand on ne sait pas se servir d aiguille circulaire presque tous les modéles sont ainsi Je voulais vous dire que je suis trés contente de l ouverture d un magasin Drops à dunkerque pour acheter la laine merçi
17.09.2024 - 09:56DROPS Design respondió:
Bonjour Mme Hecquet, retrouvez en vidéo comment tricoter en rond ou en allers et retours sur aiguille circulaire (voir aussi onglet "vidéos"); et dans cette leçon comment adapter un modèle sur aiguilles droites. Bon tricot!
17.09.2024 - 16:08
![]() Kathrin escribió:
Kathrin escribió:
Ich fange mit dem Lätzchen an und soll 7 Maschen aufnehmen, 1 Reihe kraus rechts, ist klar, dann A1= 1 Masche, ich habe aber 3, dann die Mittelmasche und für A2= 1 Masche habe ich eigentlich auch schon 3 Maschen? wie ist das gemeint? Vielen Dank
30.08.2024 - 22:45DROPS Design respondió:
Liebe Kathrin, so stricken Sie die 7 Maschen: 1 Masche Krausrechts, 1 Masche rechts, A.1 (= 1 Masche), 1 Masche rechts (= Mittelmasche), A.2 (= 1 Masche), 1 Masche rechts, 1 Masche kraus rechts = so haben Sie 1+1+1+1+1+1+1=7 Maschen gestrickt, und gleichzeitig in A.1 und A.2 je 2 Maschen zugenommen (= 1 Umschlag, 1 Masche rechts, 1 Umschlag) so sind es jetzt 11 Maschen. Viel Spaß beim Stricken!
02.09.2024 - 07:52
![]() Ana Ramirez escribió:
Ana Ramirez escribió:
Thank you for your answer. The stitch in the middel is not Even. Any suggestiom on What to do? About how many stitches at the end?
15.07.2024 - 22:22DROPS Design respondió:
Dear Ana, you start with an uneven number (7) and increase simmetrically on bot sides of this stitch, so you should have an uneven number. Happy Knitting!
18.07.2024 - 04:21
![]() Ana Cecilia Ramirez escribió:
Ana Cecilia Ramirez escribió:
Jeg strikker smekken og vet ikke hvordan jeg skal fortsette etter jeg har strikket diagrammene. Setter pris på hjelp
12.07.2024 - 09:09DROPS Design respondió:
Hei Ana. Da fortsetter du på samme måte. A.1 - fra retten: 1 maske i rille - 1 kast - rettmasker frem til midtmasken, 1 kast, 1 rett, så strikkes det etter det etter A.2: 1 kast - rettmasker til det gjenstår 1 maske - 1 kast - 1 maske i rille. Fra vrangen, pass på at maske stemmer over hverandre, som du ser i diagrammene. Bare tenkt deg at du fortsetter med flere masker mellom start og midtmasken og midtmasken og slutten. LIker du å se alt på diagram, kan du evnt printe ut diagrammene og så tegne videre. mvh DROPS Design
12.07.2024 - 13:08
![]() Daisy escribió:
Daisy escribió:
Ik heb een vraag over het slabbetje , als je het patroon 1 keer in de hoogte hebt gebreid staat er ga verder in patroon en meerder aan elke kant richting het midden. moet ik nu gewoon patroon a1 en a2 (inclusies de meerderingen) blijven volgen en dan zelf ergens in de toeren nog extra meerderen ? Ik begrijp het niet helemaal Ik hoor het graag !
23.06.2024 - 14:47DROPS Design respondió:
Dag Daisy,
Je gaat gewoon verder met het patroon en het meerderen aan elke zijkant en in het midden zoals je daarvoor deed (deze meerderingen zijn de omslagen in het telpatroon), je hoeft daar bovenop geen extra steken te meerderen.
25.06.2024 - 19:06
![]() Claudia escribió:
Claudia escribió:
1. Reihe:1M re, 1M re, 1U, 1M re, 1U, 1Mre( MittelM), 1U, 1M re, 1U, 1M re, 1M re = 11M 2. Reihe: 1M re, 1M li, 1U, 1M re, 1M li, 1M re, 1M li ( MittelM), 1M re,, 1M li, 1M re, 1U, 1M li, 1M re = 13 M
03.03.2024 - 11:30
![]() Claudia escribió:
Claudia escribió:
Fortsetzung: 3.Reihe:1M re, 1M re, 1U, 4M re, 1U, 1MittelM (re), 1U, 4M re, 1U, 1M re, 1M re 4. Reihe: 1M re, 1M li, 1U, 3M re, 1M li, 2M re, 1 MittelM( li), 2M re, 1M li, 3 M re, 1U, 1M li, 1M re Im aktuellen Diagramm fehlen jeweils die Randmaschen, sowie die Mittelmasche. Ich würde auch A1 direkt neben A2 darstellen, damit man das versteht, dass es nacheinander gestrickt wird. Vielleicht können Sie das Diagramm nochmal ändern:-)
03.03.2024 - 11:17
|
||||||||||
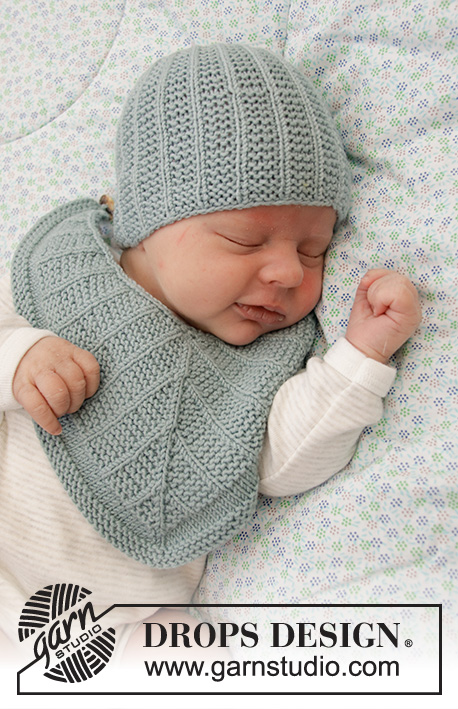
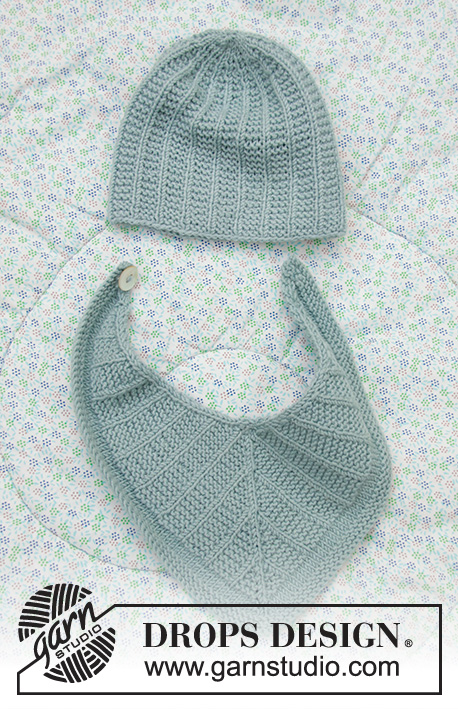
Baby Business Set#babybusinessset |
||||||||||
 |
 |
|||||||||
Gorro y babero de punto para bebés en DROPS BabyMerino con punto jersey y punto musgo. Tallas prematuro hasta 4 años.
DROPS Baby 33-20 |
||||||||||
|
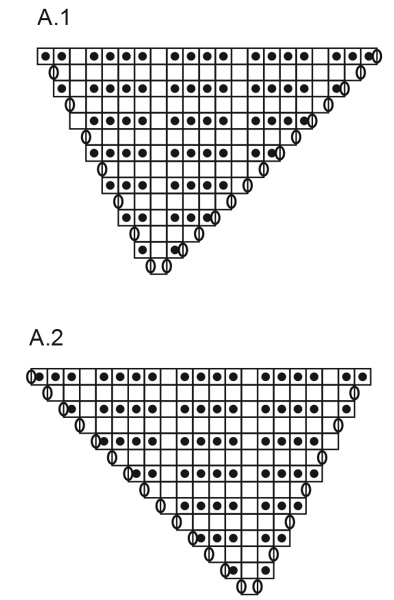
EXPLICACIONES PARA REALIZAR EL PATRÓN: ------------------------------------------------ SURCO/PUNTO MUSGO (tejido en redondo): 1 surco en altura = 2 vueltas; tejer 1 vuelta de derecho y 1 vuelta de revés. SURCO/PUNTO MUSGO (tejido de ida y vuelta): Tejer todas las hileras de derecho. 1 surco en altura = tejer 2 hileras de derecho. PATRÓN: Ver diagrama A.1 y A.2. ------------------------------------------------ COMENZAR LA PIEZA AQUÍ: ------------------------------------------------ GORRO – RESUMEN DE LA PIEZA: La pieza se teje en redondo con agujas de doble punta, de abajo para arriba. GORRO: Montar (60) 72-84-88-96 (104-108) puntos con agujas de doble punta tamaño 3 mm y Baby Merino. * Tejer 1 punto derecho, tejer 3 puntos en punto musgo *, continuar este patrón en redondo (= (15) 18-21-22-24 (26-27) repeticiones). Continuar hasta que la pieza mida aprox. (10) 11-12-13-14 (14-15) cm. Después disminuir a cada cm de la manera siguiente: DISMINUCIÓN 1: Tejer juntos de derecho los primeros 2 puntos en cada sección en punto musgo = (45) 54-63-66-72 (78-81) puntos. Continuar con 1 derecho, 2 puntos en punto musgo sobre todos los puntos. DISMINUCIÓN 2: Tejer juntos de derecho los últimos 2 puntos en cada sección en punto musgo = (30) 36-42-44-48 (52-54) puntos. Continuar con 1 derecho, 1 punto en punto musgo sobre todos los puntos. DISMINUCIÓN 3: Tejer todos los puntos juntos de derecho, de 2 en 2 = (15) 18-21-22-24 (26-27) puntos. DISMINUCIÓN 4: Tejer todos los puntos juntos de derecho, de 2 en 2 = (8) 9-11-11-12 (13-14) puntos. TODAS LAS TALLAS: Pasar un doble hilo a través de los puntos restantes, fruncir y rematar bien los hilos. El gorro mide aprox. (14) 15-16-17-18 (19-20) cm. ------------------------------------------------ BABERO – RESUMEN DE LA PIEZA: La pieza se teje de ida y vuelta con aguja circular, de arriba para abajo. BABERO: Montar 7 puntos con aguja circular tamaño 3 mm y Baby Merino. Insertar 1 marcador en el 4º punto (= punto central); dejar que el marcador siga la labor a medida que se teje. Tejer de la manera siguiente – por el lado derecho: 1 punto en PUNTO MUSGO – leer descripción arriba, 1 punto derecho, A.1 (= 1 punto), 1 punto derecho (= punto central), A.2 (= 1 punto), 1 punto derecho, 1 punto en punto musgo = 11 puntos. Continuar este patrón en adelante; son aumentados 4 puntos en cada hilera por el lado derecho y 2 puntos en cada hilera por el lado revés. Cuando A.1 y A.2 se han tejido 1 vez en altura continuar el patrón, así como aumentar a cada lado y en dirección al punto central. Cuando la pieza mida 14-17 cm (medida a lo largo del punto central), tejer punto jersey sobre todos los puntos y continuar a aumentar a cada lado y en dirección al punto central como antes. Tejer punto jersey durante 1 cm, después tejer 3 surcos sobre todos los puntos sin más aumentos. Rematar. El babero mide aprox. 16-19 cm. Sujetar un botón en un extremo del babero (abotonar el botón entre 1 punto en punto musgo y 1 punto derecho en el otro extremo). |
||||||||||
Explicaciones del diagrama |
||||||||||
|
||||||||||
 |
||||||||||
¿Terminaste este patrón?Entonces, etiqueta tus fotos con #dropspattern #babybusinessset o envíalas a la galería #dropsfan. ¿Necesitas ayuda con este patrón?Encontrarás 19 videos tutoriales, un espacio para comentarios/preguntas y más visitando la página del patrón en garnstudio.com © 1982-2026 DROPS Design A/S. Todos los derechos reservados. Este documento, incluyendo todas sus sub-secciones, está protegido por los derechos de autor (copyright). Lee más acerca de lo que puedes hacer con nuestros patrones en la parte de abajo de cada patrón de nuestro sitio. |
||||||||||


Con más de 40 años en el diseño de modelos de punto y de ganchillo, DROPS Design ofrece una de las más vastas colecciones de patrones gratuitos en el internet - traducidos en 17 idiomas. Al día de hoy, contamos con 324 catálogos y 12290 patrones - de los cuales 11675 están traducidos en español.
Nosotros trabajamos con mucho esmero para brindarte lo mejor que las labores de punto y ganchillo tienen para ofrecer,inspiración y consejos, así como hilos de magnífica calidad a precios increíbles! Te gustaría usar nuestros patrones para otro fin además del uso personal? Puedes leer acerca de lo que estás permitida a hacer en el texto de Copyright en la parte de abajo de todos nuestros patrones. Felices labores!
Escribe un comentario sobre DROPS Baby 33-20
¡Nos encantaría saber qué piensas acerca de este patrón!
Si quieres escribir una pregunta referente al patrón, por favor asegúrate de elegir la categoría correcta en el formulario debajo, para acelerar el proceso de respuesta. Los campos obligatorios están marcados con un *.